
The move to cloud computing has been a huge paradigm shift in the technology industry. We don’t need to buy servers anymore - it’s just a matter of a few clicks or API calls to send code to a cloud provider to build and run for us. A provider hosts the workloads of a huge number of organisations on mostly commodity hardware. And one company that knows how to run a lot of computers, is Google.
Google Cloud Platform (GCP) offers a range of compute, storage, monitoring, data and AI services, along with plenty of supporting tools and services. If you’re familiar with AWS, Google publish a table of comparable services in GCP.
Google is already well known for its data and AI expertise, and has developed the hugely popular container orchestration tool, Kubernetes. More recently, Cloud Run has been released as a simpler, serverless alternative to Kubernetes, for running a container with all of the underlying infrastructure abstracted away.
In my experience with GCP, I’ve found the web console very easy to use, and been impressed with the clear documentation and with some of the developer tooling, particularly the Cloud Shell, which we’ll see more of later on.
And with a generous free tier, all of the above can be used for hobby projects without spending a penny!
A small Google Cloud project
With that in mind, let’s jump into running some code in Google Cloud. I’ll assume no prior knowledge of cloud technologies, so follow along!
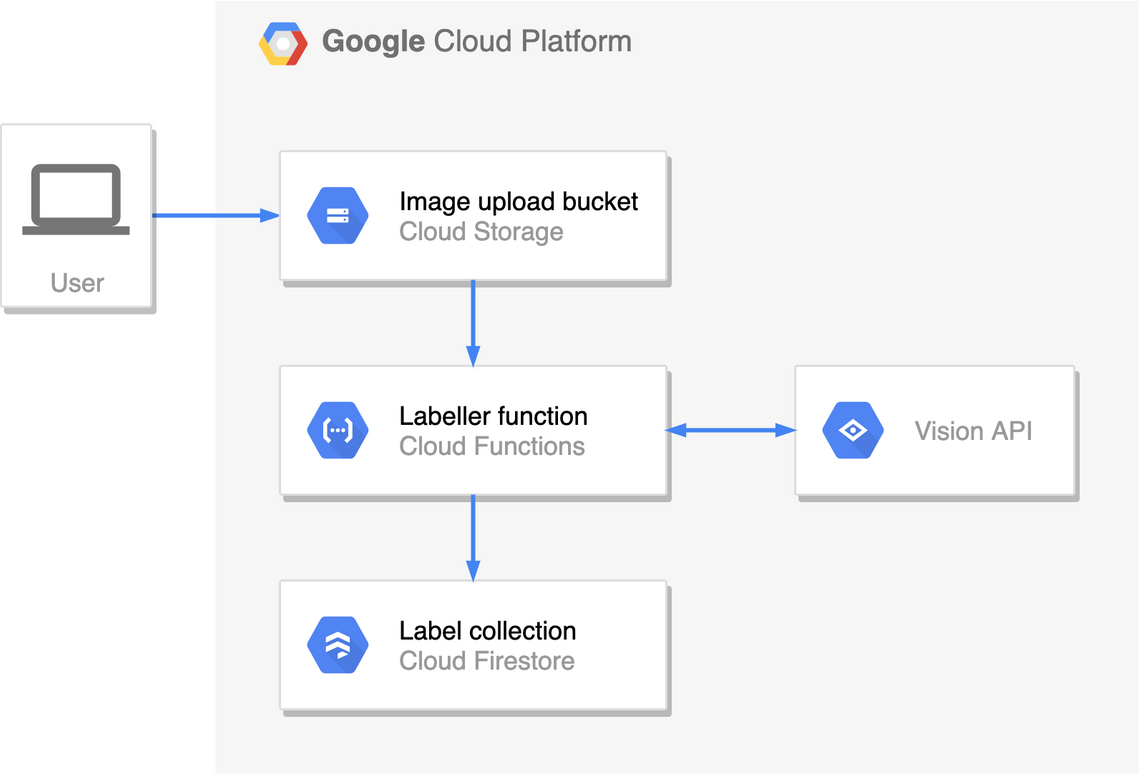
We’re going to ask Google to describe pictures we upload. Whenever the application receives an image from the user, this will trigger our code, which will use an API to detect words and phrases that describe the image, before writing these to a database.
You’ll need:
- a desktop web browser,
- a personal Google account - a work account might have organisation restrictions or incur costs
Your new project
Google Cloud organises your resources (like compute and storage) in projects. Everything in a project works together easily, so you’ll often use a project to represent a single application, or part of a bigger application. You can freely create and destroy a number of projects in your account.
Head to https://console.cloud.google.com. Use your Google account to sign up if you’ve not done so before, and make sure you’ve got a new project to work in. This will be created for you if you’ve signed up for the first time, otherwise create a new project called “Image labeller” and switch to it.
Image uploads
For our simple application, we’ll use a Cloud Storage bucket as a place to upload images for processing.
Cloud Storage is an object storage service. These objects (similar to files) are organised into buckets, and can be uploaded and downloaded from anywhere. This kind of storage differs from a database, which holds structured data, and from disks, which are only used by compute instances.
- Go to Storage in the navigation menu on the console. If this is your first project, you might be required to Enable Billing. Go ahead and do this - we’ll stay within the free quotas of the services we use.
- Create a bucket.
- Pick a unique name (try including your project ID).
- Of the regions us-east1, us-central1 and us-west1 (the only storage free tier regions at time of writing), locate your bucket in the one closest to you.
- Leave everything else default.
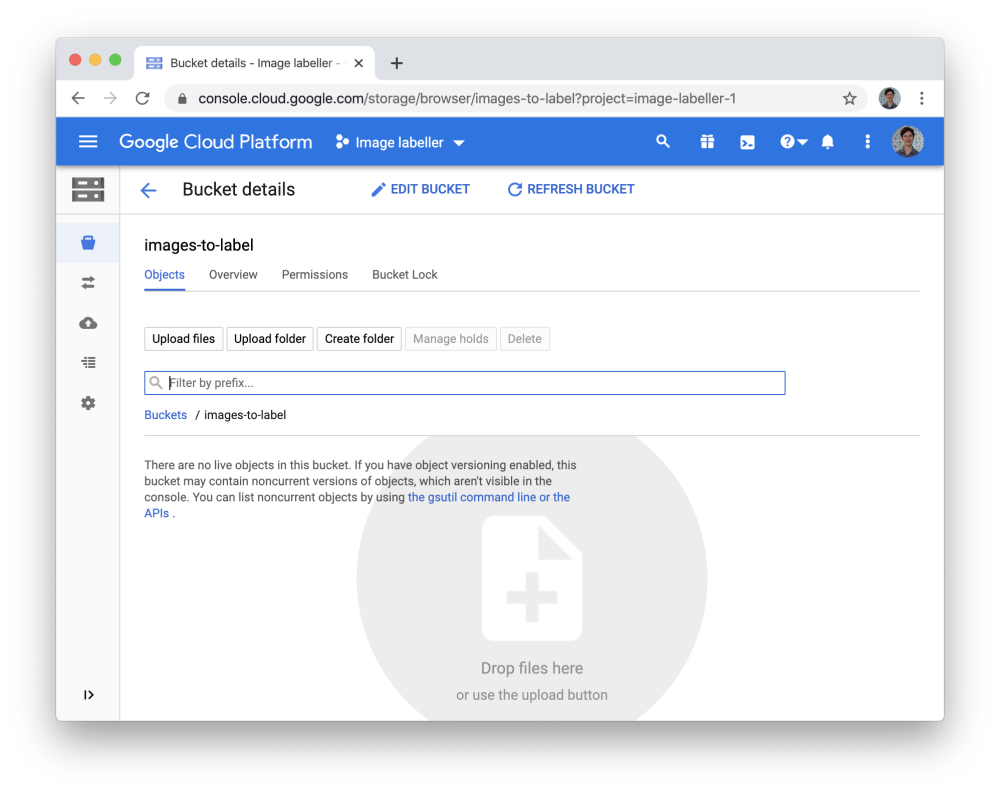
You’ll see your created bucket on the next screen, where you can upload files to it.
A skeleton label detection function
When an image is uploaded, we can use a Cloud Function to process the image to look for labels.
Cloud Functions is a platform for executing your code whenever an event of your choosing occurs. A function can respond to HTTP requests, process events from Cloud Storage or Cloud Firestore, or handle messages from Cloud Pub/Sub. The environment it runs in is fully managed by Google, meaning we don’t have to provision servers, local storage, or the runtime environment.
- Go to Cloud Functions in the navigation menu.
- Create a function named
detectLabels. - Use Cloud Storage as the trigger and pick the bucket you created earlier as the source.
- Keep the default Node.js runtime but change the source code function name to
detectLabelsand change the “Function to execute” todetectLabels. - Expand the further options at the bottom of the form and pick the region that you created your bucket in.
- Leave everything else default.
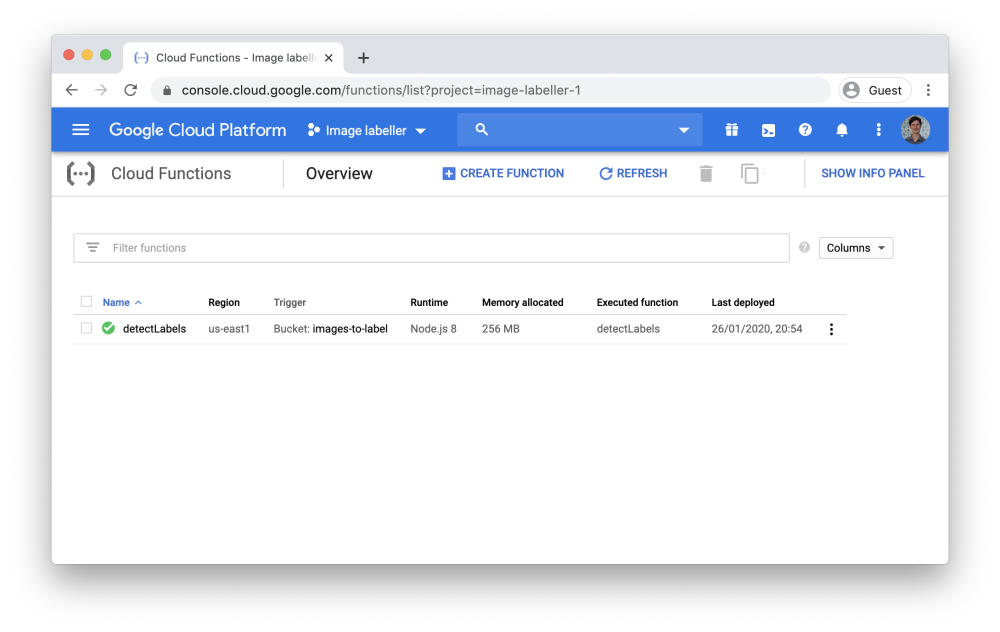
Once the function has finished deploying, let’s try it out.
- Go to the images bucket and upload any image - remember the file name because you’ll use it later.
- Go back to the function and click View logs, where you should see a log line “Processing file: your-image.jpg”. This shows the function can respond to upload events and run our own code.
Label storage
After images have been processed, we’ll use Cloud Firestore as a place to store the detected labels of an image, so that we can look them up.
Cloud Firestore is a schemaless, scalable database for storing documents by key. As with the other resources we’ve used in this application, the environment is entirely managed by Google - no servers or installation in sight. It’s branded as part of Firebase, a web and mobile app development platform which uses GCP under the hood.
- Go to Firestore in the navigation menu.
- Select native mode - Datastore is being phased out in favour of Firestore.
- Choose the location where you created your bucket and function previously.
- Click Create Database. We’ll add data to it later.
Developing the detectLabels function
We’ve provisioned the components of our architecture, but it still needs to detect labels using the Cloud Vision API and store the results in Cloud Firestore. We could add these features using the in-line code editor in the Cloud Functions console, but for a more full-featured development environment we’ll use the Cloud Shell.
Open the following link in the same browser window where you’re logged into the GCP console:

Click Confirm when it asks you about cloning a git repo into your Cloud Shell.
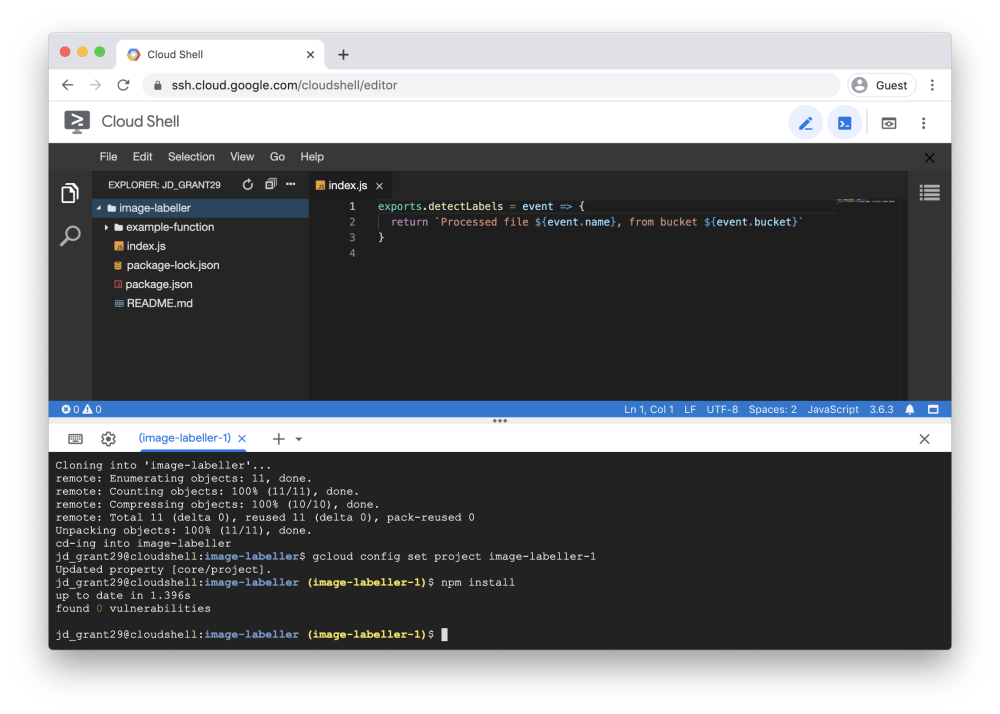
This will take you to the Cloud Shell - your own Linux instance with 5GB of persistent storage and lots of tools pre-installed, including Git, Docker, language runtimes like Java and Python, and the Google Cloud SDK. You can administer and reset this instance as you like, and it’s entirely free!
It also has a built-in text editor, which we’ll use to add features to the detectLabels function. We’ll deploy and test it inbetween, using the gcloud command line tool.
Deploying from the terminal
The button above cloned a Git repository into your workspace. There is some skeleton code in index.js which will output the file and bucket received in the triggering event.
First, you’ll need the project ID where you’ve set up your resources. In the Cloud Shell terminal, you can view your projects by running:
gcloud projects list
Then set the default project ID that will be used in gcloud commands by running:
gcloud config set project <PROJECT_ID>
Also set the region used for function commands - this needs to match the region where you originally deployed your function in the console:
gcloud config set functions/region us-east1 # change this to your region
Now deploy the function, changing <BUCKETNAME> to the bucket you created earlier:
gcloud functions deploy detectLabels
Finally, call the function, changing <FILENAME> to the image filename you’ve uploaded earlier, and <BUCKETNAME> to the bucket it’s stored in:
gcloud functions call detectLabels --data='{"name":"<FILENAME>","bucket":"<BUCKETNAME>"}'
The function should output that it processed your file. (If you don’t see this output in the console, wait 30 seconds and try again - it might have triggered the previously deployed version.)
Using the Vision API
Cloud Vision API is a computer vision service that uses Google’s pre-trained models to provide information about an image. For our purposes we’ll use the label detection service to find the five most relevant labels detected in our uploaded images.
First, enable the Vision API in your project:
gcloud services enable vision.googleapis.com
Next, add vision to your function dependencies:
npm add @google-cloud/vision@^1.8.0
In index.js, set up the ImageAnnotatorClient, at the top of the file:
const vision = require('@google-cloud/vision')
const annotator = new vision.ImageAnnotatorClient()
Now we’ll use the annotator’s labelDetection() function on the image in our storage bucket, and extract the result.
Replace the return line with the following:
return annotator
  .labelDetection(`gs://${event.bucket}/${event.name}`)
  .then(extractTop5Labels)
The labelDetection() function will detect labels in the Cloud Storage object that you specify, returning a Promise with the raw API results. The next step of our Promise will be to extract the top five labels from the API result, and then it’s important to return the Promise so that the Cloud Functions framework knows when the function has finished processing.
Add the extractTop5Labels() definition to index.js:
function extractTop5Labels(annotatorResult) {
  return annotatorResult[0]
    .labelAnnotations
    .map(label => label.description)
    .slice(0, 5)
}
Now you can deploy the function and test it again as last time. You should see five descriptive labels of the image you’ve uploaded!
Store labels in Firestore
So far we can see the labels when we run the function on demand, but for background uploads we need to be able to view the labels of all images in the bucket. For this, we’ll write the labels to a Firestore collection.
First, add firestore to the dependencies:
npm add @google-cloud/firestore@^3.4.1
In index.js, initialise the Firestore client, pointing to an image-labels collection, which we’ll use to store the detected labels of an image:
const Firestore = require('@google-cloud/firestore')
const labelStore = new Firestore().collection('image-labels')
Now add a new step to store the labels in Firestore, so that the main label-detection Promise looks like this:
return annotator
  .labelDetection(`gs://${event.bucket}/${event.name}`)
  .then(extractTop5Labels)
  .then(labels => storeImageLabels(event.name, labels))
Finally, add the storeImageLabels function:
function storeImageLabels(image, labels) {
  return labelStore
    .doc(image)
    .set({ top5Labels: labels })
    .then(() => `Stored labels (${labels.join(', ')}) for image "${image}"`)
}
Now we have a function that will detect image labels and store them in a database. Redeploy it and test it, and the output should say that it has stored the labels for the image. Back in the web console, go to Firestore to check that the labels have been stored.
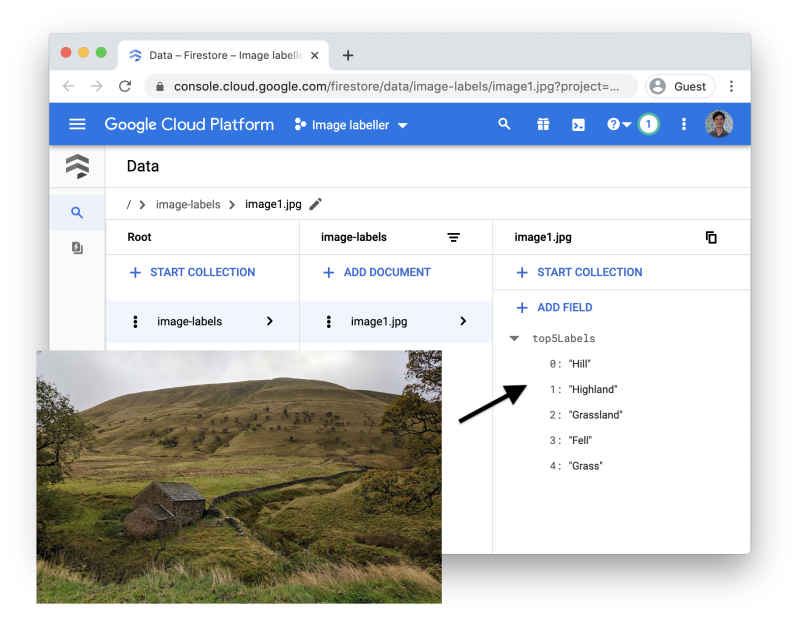
Try uploading more images to your bucket, then go to your Firestore data to see the results!
Wrapping up
In this post you have:
- set up a Google Cloud project from scratch,
- provisioned an image upload bucket in Google’s object storage solution,
- written a Cloud Function to process uploaded images,
- made use of Google’s pre-trained computer vision service to label the images,
- and stored the results in Google’s serverless database solution.

