blog
An Introduction to MySQL Deployment Using an Ansible Role

Ansible automates and simplifies repetitive, complex, and tedious operations. It is an IT automation engine that automates cloud provisioning, configuration management, application deployment, intra-service orchestration, and many other IT needs. It requires no agents, using only SSH to push changes from a single source to multiple remote resources with no additional custom security infrastructure configuration and use a simple language format (YAML) to describe the automation jobs.
Installing a standalone MySQL server is a simple straightforward task, but this can be problematic if you have multiple database servers, versions, platforms and environments to support. Thus, having a configuration management tool is the way to go to improve efficiency, remove repetitiveness and reduce human errors.
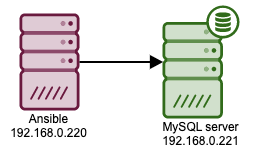
In this blog post, we are going to go walk you through the basics of Ansible’s automation for MySQL, as well as configuration management with examples and explanations. We will start with a simple standalone MySQL deployment, as illustrated in the following high-level diagram:
Installing Ansible
For this walkthrough, we need to have at least two hosts – One host is for Ansible (you could use a workstation instead of a server) and another one is the target host that we want to deploy a MySQL server.
To install Ansible on CentOS 7, simply run the following commands:
(ansible-host)$ yum install -y epel-release

(ansible-host)$ yum install -y ansible
For other OS distributions, check out the Ansible installation guide.
Setting up Passwordless SSH
Using password during SSH is supported, but passwordless SSH keys with ssh-agent are one of the best ways to use Ansible. The initial step is to configure passwordless SSH since Ansible will perform the deployment solely by this channel. Firstly, generate a SSH key on the Ansible host:
(ansible-host)$ whoami

root

(ansible-host)$ ssh-keygen -t rsa -N '' -f ~/.ssh/id_rsa
You should get at least the following files generated:
(ansible-host)$ ls -al ~/.ssh/

-rw-------. 1 root root 1679 Jan 14 03:40 id_rsa

-rw-r--r--. 1 root root  392 Jan 14 03:40 id_rsa.pub
To allow passwordless SSH, we need to copy the SSH public key (id_rsa.pub) to the remote host that we want to access. We can use a tool called ssh-copy-id to do this task for us. However, you must know the user’s password of the target host and the password authentication is allowed on the target host:
(ansible-host)$ whoami

root

(ansible-host)$ ssh-copy-id [email protected]
The above command will prompt out for root password of 192.168.0.221, simply enter the password and the SSH key for the current user of the Ansible host will be copied over to the target host, 192.168.0.221 into ~/.ssh/authorized_keys, meaning we authorize that particular key to access this server remotely. To test out, you should be able to run the following remote command without any password from Ansible host:
(ansible-host)$ ssh [email protected] "hostname -I"

192.168.0.221
In case where you are not allowed to use root user for SSH (e.g, “PermitRootLogin no” in SSH configuration), you can use a sudo user instead. In the following example, we set up passwordless SSH for a sudo user called “vagrant”:
(ansible-host)$ whoami

vagrant

(ansible-host)$ ssh-keygen -t rsa -N '' -f ~/.ssh/id_rsa

(ansible-host)$ ls -al ~/.ssh/

-rw-------. 1 vagrant vagrant 1679 Jan 14 03:45 id_rsa

-rw-r--r--. 1 vagrant vagrant  392 Jan 14 03:45 id_rsa.pub

(ansible-host)$ ssh-copy-id [email protected]
If the target server doesn’t allow password authentication via SSH, simply copy the content of SSH public key at ~/.ssh/id_rsa.pub manually into the target hosts’ ~/.ssh/authorized_keys file. For example, on the Ansible host, retrieve the public key content:
(ansible-host)$ cat ~/.ssh/id_rsa.pub

ssh-rsa AAAAB3NzaC1yc2EAAAADAQABAAABAQC5MZjufN0OiKyKa2OG0EPBEF/w23FnOG2x8qpAaYYuqHlVc+ZyRugtGm+TdTJDfLA1Sr/rtZpXmPDuLUdlAvPmmwqIhgiatKiDw5t2adNUwME0sVgAlBv/KvbusTTdtpFQ1o+Z9CltGiENDCFytr2nVeBFxImoZu2H0ilZed/1OY2SZejUviXTQ0Dh0QYdIeiQHkMf1CiV2sNYs8j8+ULV26OOKCd8c1h1O9M5Dr4P6kt8E1lVSl9hbd4EOHQmeZ3R3va5zMesLk1A+iadIGJCJNCVOA2RpxDHmmaX28zQCwrpCliH00g9iCRixlK+cB39d1coUWVGy7SeaI8bzfv3 vagrant@cc
Connect to the target host and paste the Ansible’s host public key into ~/.ssh/authorized_keys:
(target-host)$ whoami

root

(target-host)$ vi ~/.ssh/authorized_keys

ssh-rsa AAAAB3NzaC1yc2EAAAADAQABAAABAQC5MZjufN0OiKyKa2OG0EPBEF/w23FnOG2x8qpAaYYuqHlVc+ZyRugtGm+TdTJDfLA1Sr/rtZpXmPDuLUdlAvPmmwqIhgiatKiDw5t2adNUwME0sVgAlBv/KvbusTTdtpFQ1o+Z9CltGiENDCFytr2nVeBFxImoZu2H0ilZed/1OY2SZejUviXTQ0Dh0QYdIeiQHkMf1CiV2sNYs8j8+ULV26OOKCd8c1h1O9M5Dr4P6kt8E1lVSl9hbd4EOHQmeZ3R3va5zMesLk1A+iadIGJCJNCVOA2RpxDHmmaX28zQCwrpCliH00g9iCRixlK+cB39d1coUWVGy7SeaI8bzfv3 vagrant@cc
You may now try to run a remote command from Ansible host to verify and you should not be prompted with any password. At this point, our passwordless SSH is configured.
Defining the Target Host
Next we need to define the target host, the host that we want to manage using Ansible. Based on our architecture, we are going to deploy only one MySQL server which is 192.168.0.221. Add the following lines into /etc/ansible/hosts:
[db-mysql]

192.168.0.221
The above simply means we defined a group called “db-mysql”, which will be the identifier when we refer to the target host in Ansible playbook. We can also list out all IP addresses or hostnames of the target hosts under this group. At this point, we only have one MySQL server to deploy, thus only one entry is there. You can also specify a any matching rule to match the hosts under one group, for example:
[db-mysql]

192.168.0.[221:223]
The above definition means we are having 3 hosts under this very group with the following IP addresses:
- 192.168.0.221
- 192.168.0.222
- 192.168.0.223
There are a lot of ways and rules to match and group the target hosts as shown in the Ansible inventory guide.
Choosing an Ansible Role
To tell Ansible what to deploy, we need to define the deployment steps in a YML formatted file called playbook. As you might know, installing a complete MySQL server requires multiple steps to satisfy all MySQL dependencies, post-installation configuration, user and schema creation and so on. Ansible has provided a number of MySQL modules that can help us out, but still we have to write a playbook for the deployment steps.
To simplify the deployment steps, we can use existing Ansible roles. Ansible role is an independent component which allows reuse of common configuration steps. An Ansible role has to be used within the playbook. There are a number of MySQL Ansible roles available in the Ansible Galaxy, a repository for Ansible roles that are available to drop directly into your playbooks.
If you lookup “mysql”, you will get plenty of Ansible roles for MySQL:
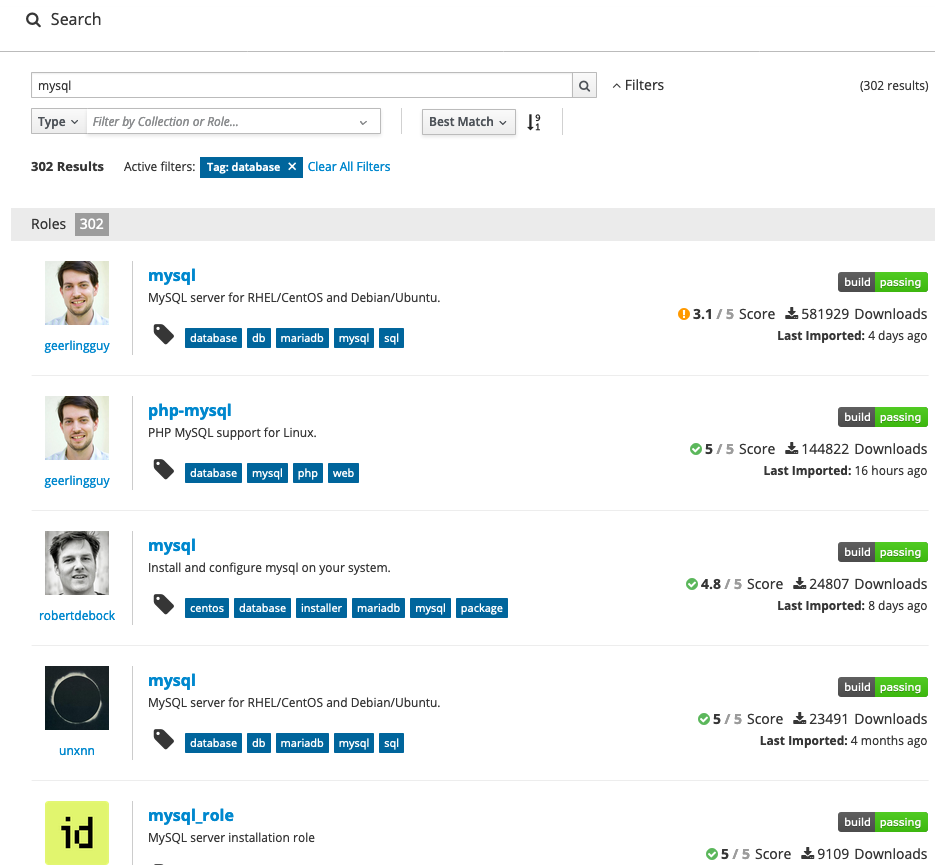
We will use the most popular one named “mysql” by geerlingguy. You can opt to use other roles but mostly the most downloaded one tends to be for general purpose which usually works fine in most cases.
On the Ansible host, run the following command to download the Ansible role:
(ansible-host)$ ansible-galaxy install geerlingguy.mysqlThe role will be downloaded into ~/.ansible/roles/geerlingguy.mysql/ of the current user.
Writing the Ansible Playbook
By looking at the Readme of the Ansible role, we can follow the example playbook that is being provided. Firstly, create a playbook file called deploy-mysql.yml and add the following lines:
(ansible-host)$ vim ~/deploy-mysql.yml

- hosts: db-mysql

  become: yes

  vars_files:

    - vars/main.yml

  roles:

    - { role: geerlingguy.mysql }
In the above lines, we define the target host which is all hosts under db-mysql entries in /etc/ansible/hosts. The next line (become) tells Ansible to execute the playbook as a root user, which is necessary for the role (it is stated there in the Readme file). Next, we define the location of variables file (var_files) located at vars/main.yml, relative to the playbook path.
Let’s create the variable directory and file and specify the following line:
(ansible-host)$ mkdir vars

(ansible-host)$ vim vars/main.yml

mysql_root_password: "theR00tP455w0rd"
For more information check out the Role Variables section in the Readme file of this role.
Start the Deployment
Now we are ready to start the MySQL deployment. Use the ansible-playbook command to execute our playbook definitions:
(ansible-host)$ ansible-playbook deploy-mysql.ymlYou should see a bunch of lines appear in the output. Focus on the last line where it summarizes the deployment:
PLAY RECAP ***************************************************************************************************************************************

192.168.0.221              : ok=36 changed=8 unreachable=0    failed=0 skipped=16 rescued=0 ignored=0
If everything turns up green and OK, you can verify on the database host that our MySQL server is already installed and running:
(mysql-host)$ rpm -qa | grep -i maria

mariadb-server-5.5.64-1.el7.x86_64

mariadb-libs-5.5.64-1.el7.x86_64

mariadb-5.5.64-1.el7.x86_64


(mysql-host)$ mysqladmin -uroot -p ping

Enter password:

mysqld is alive
As you can see from the above, for CentOS 7, the default MySQL installation is MariaDB 5.5 as part of the standard package repository. At this point, our deployment is considered complete, however, we would like to further customize our deployment as shown in the next sections.
Customizing the Deployment
The simplest definition in playbook gives us a very basic installation and uses all default configuration options. We can further customize the MySQL installation by extending/modifying/appending the playbook to do the following:
- modify MySQL configuration options
- add database user
- add database schema
- configure user privileges
- configure MySQL replication
- install MySQL from other vendors
- import a custom MySQL configuration file
Installing MySQL from Oracle repository
By default, the role will install the default MySQL package that comes with the OS distribution. As for CentOS 7, you would get MariaDB 5.5 installed by default. Suppose we want to install MySQL from another vendor, we can extend the playbook with pre_tasks, a task which Ansible executes before executing any tasks mentioned in any .yml file, as shown in the following example:
(ansible-host)$ vim deploy-mysql.yml

- hosts: db-mysql

  become: yes

  vars_files:

    - vars/main.yml

  roles:

    - { role: geerlingguy.mysql }

  pre_tasks:

    - name: Install the MySQL repo.

      yum:

        name: http://repo.mysql.com/mysql-community-release-el7-5.noarch.rpm

        state: present

      when: ansible_os_family == "RedHat"

    - name: Override variables for MySQL (RedHat).

      set_fact:

        mysql_daemon: mysqld

        mysql_packages: ['mysql-server']

        mysql_log_error: /var/lib/mysql/error.log

        mysql_syslog_tag: mysqld

        mysql_pid_file: /var/run/mysqld/mysqld.pid

        mysql_socket: /var/lib/mysql/mysql.sock

      when: ansible_os_family == "RedHat"
Execute the playbook:
(ansible-host)$ ansible-playbook deploy-mysql.ymlThe above will install MySQL from Oracle repository instead. The default version you would get is MySQL 5.6. Executing the above playbook on a target host that already has a running older version of MySQL/MariaDB would likely fail because of the incompatibility.
Creating MySQL Databases and Users
Inside vars/main.yml, we can define the MySQL database and users that we want Ansible to configure on our MySQL server by using the mysql_database and mysql_users modules, right after our previous definition on mysql_root_password:
(ansible-host)$ vim vars/main.yml

mysql_root_password: "theR00tP455w0rd"

mysql_databases:

  - name: myshop

    encoding: latin1

    collation: latin1_general_ci

  - name: sysbench

    encoding: latin1

    collation: latin1_general_ci

mysql_users:

  - name: myshop_user

    host: "%"

    password: mySh0pPassw0rd

    priv: "myshop.*:ALL"

  - name: sysbench_user

    host: "192.168.0.%"

    password: sysBenchPassw0rd

    priv: "sysbench.*:ALL"
The definition instructs Ansible to create two databases, “myshop” and “sysbench”, followed its respective MySQL user with proper privileges, allowed host and password.
Re-execute the playbook to apply the change into our MySQL server:
(ansible-host)$ ansible-playbook deploy-mysql.ymlThis time, Ansible will pick up all the changes we made in vars/main.yml to be applied to our MySQL server. We can verify in the MySQL server with the following commands:
(mysql-host)$ mysql -uroot -p -e 'SHOW DATABASES'

Enter password:

+--------------------+

| Database           |

+--------------------+

| information_schema |

| myshop             |

| mysql              |

| performance_schema |

| sysbench           |

+--------------------+

(mysql-host)$ mysql -uroot -p -e 'SHOW GRANTS FOR sysbench_user@"192.168.0.%"'

Enter password:

+------------------------------------------------------------------------------------------------------------------------+

| Grants for [email protected].%                                                                                   |

+------------------------------------------------------------------------------------------------------------------------+

| GRANT USAGE ON *.* TO 'sysbench_user'@'192.168.0.%' IDENTIFIED BY PASSWORD '*4AC2E8AD02562E8FAAF5A958DC2AEA4C47451B5C' |

| GRANT ALL PRIVILEGES ON `sysbench`.* TO 'sysbench_user'@'192.168.0.%'                                                  |

+------------------------------------------------------------------------------------------------------------------------+
Enabling Slow Query Log
This role supports enabling MySQL slow query log, we can define the location of the log file as well as the slow query time. Add the necessary variables inside vars/main.yml file:
mysql_root_password: "theR00tP455w0rd"

mysql_databases:

  - name: example_db

    encoding: latin1

    collation: latin1_general_ci

  - name: sysbench

    encoding: latin1

    collation: latin1_general_ci

mysql_users:

  - name: example_user

    host: "%"

    password: similarly-secure-password

    priv: "example_db.*:ALL"

  - name: sysbench_user

    host: "192.168.0.%"

    password: sysBenchPassw0rd

    priv: "sysbench.*:ALL"

mysql_slow_query_log_enabled: true

mysql_slow_query_log_file: 'slow_query.log'

mysql_slow_query_time: '5.000000'
Re-run the playbook to apply the changes:
(ansible-host)$ ansible-playbook deploy-mysql.ymlThe playbook will make necessary changes to MySQL slow query related options and restart the MySQL server automatically to load the new configurations. We can then verify if the new configuration options are loaded correctly on the MySQL server:
(mysql-host)$ mysql -uroot -p -e 'SELECT @@slow_query_log, @@slow_query_log_file, @@long_query_time'

+------------------+-----------------------+-------------------+

| @@slow_query_log | @@slow_query_log_file | @@long_query_time |

+------------------+-----------------------+-------------------+

|                1 | slow_query.log        | 5.000000 |

+------------------+-----------------------+-------------------+
Including Custom MySQL Configuration File
Ansible role variables and MySQL variables are two different things. The author of this role has created a number of MySQL related variables that can be represented with Ansible role variables. Taken from the Readme file, here are some of them:
mysql_port: "3306"

mysql_bind_address: '0.0.0.0'

mysql_datadir: /var/lib/mysql

mysql_socket: *default value depends on OS*

mysql_pid_file: *default value depends on OS*

mysql_log_file_group: mysql *adm on Debian*

mysql_log: ""

mysql_log_error: *default value depends on OS*

mysql_syslog_tag: *default value depends on OS*
If the generated configuration does not satisfy our MySQL requirement, we can include custom MySQL configuration files into the deployment by using mysql_config_include_files variable. It accepts an array of values separated by a comma, with a “src” as the prefix for the actual path on the Ansible host.
First of all, we have to prepare the custom configuration files on the Ansible host. Create a directory and a simple MySQL configuration file:
(ansible-host)$ mkdir /root/custom-config/

(ansible-host)$ vim /root/custom-config/my-severalnines.cnf

[mysqld]

max_connections=250

log_bin=binlog

expire_logs_days=7
Let’s say we have another configuration file specifically for mysqldump configuration:
(ansible-host)$ vim /root/custom-config/mysqldump.cnf

[mysqldump]

max_allowed_packet=128M
To import these configuration files into our deployment, define them in the mysql_config_include_files array in vars/main.yml file:
mysql_root_password: "theR00tP455w0rd"

mysql_databases:

  - name: example_db

    encoding: latin1

    collation: latin1_general_ci

  - name: sysbench

    encoding: latin1

    collation: latin1_general_ci

mysql_users:

  - name: example_user

    host: "%"

    password: similarly-secure-password

    priv: "example_db.*:ALL"

  - name: sysbench_user

    host: "192.168.0.%"

    password: sysBenchPassw0rd

    priv: "sysbench.*:ALL"

mysql_slow_query_log_enabled: true

mysql_slow_query_log_file: slow_query.log

mysql_slow_query_time: 5

mysql_config_include_files: [

  src: '/root/custom-config/my-severalnines.cnf',

  src: '/root/custom-config/mysqldump.cnf'

]
Note that /root/custom-config/mysqld-severalnines.cnf and /root/custom-config/mysqldump.cnf exist inside the Ansible host.
Re-run the playbook:
(ansible-host)$ ansible-playbook deploy-mysql.ymlThe playbook will import those configuration files and put them into the include directory (depending on the OS) which is /etc/my.cnf.d/ for CentOS 7. The playbook will auto-restart the MySQL server to load the new configuration options. We can then verify if the new configuration options are loaded correctly:
(mysql-host)$ mysql -uroot -p -e 'select @@max_connections'

250

(mysql-host)$ mysqldump --help | grep ^max-allowed-packet

max-allowed-packet                134217728
Conclusion
Ansible can be used to automate the database deployment and configuration management with a little knowledge of scripting. Meanwhile, ClusterControl uses a similar passwordless SSH approach to deploy, monitor, manage and scale your database cluster from A to Z, with a user interface and needs no additional skill to achieve the same result.