The series so far:
- Creating Your First SQL Server Docker Container in macOS
- Managing SQL Server Docker containers in macOS
- Connecting to a SQL Server Docker Container Running in macOS
In the first part of this article series, you learned the basics of SQL Server containers for macOS, starting with a brief definition of what Docker is, how it works (architecture) and how to install it on macOS. Finally, I gave you a quick example on how to pull a Docker image from Microsoft Container registry to create a SQL Server container using the Docker command line client.
In this second part, you will learn in detail about the Docker command line client. My goal is to help you understand how all these commands can help you to manage your SQL Server container through its life cycle.
Container Life Cycle
You may have heard these words before: Containers are ephemeral. Let me tell you, that phrase is absolutely true. Containers are created one day for a specific task and the next day stopped or even deleted to be rebuilt from a recent version of the image that includes minimal changes in the configuration or functionality of the containerized application. That is why you want to become very familiar with the Docker command line client. The better you learn and understand all the command line client instructions to interact with the Docker daemon, the faster you will start developing, shipping and running containerized applications. In this specific case, we are looking forward to becoming proficient managing SQL Server containers.
The life cycle of a container starts by identifying the base image version you want to use for the containerized application. In the previous article, I explained the meaning of the SQL Server image tag (SQL Server Version – build number – operating system). This is the first thing you want to look for when choosing the image from Microsoft Container Registry repository.
Then, the next step is to create the container using the docker run command (see part 1). The problem comes when you don’t want to keep this container up and running all the time. You need to learn how to stop it, modify it or even delete it.
In summary, the container life cycle is basically performing some or all of the following actions:
- Stop
- Start
- Delete
Take a look at how Docker client can help perform all of these container life cycle actions.
Docker Container Management
At this point you should understand that a Docker image is required to create a container. When working with containers, it is pretty common to end up with multiple local copies of Docker images laying around in the local image repository. Probably, these images are from previous test efforts performed using different versions of the same application. SQL Server is not an exception to this problem; you can have multiple images of SQL Server 2017 from the RTM version to the latest CU.
Listing Images
The best way to understand what images are available in the local repository, is using the docker image ls command. This command simply lists all existing images including the repository where it came from, the tag, image ID and its size.
|
1 |
$ docker Image ls |
Here is what the output looks like:

As you can see, I have a significant number of images in my local repository, probably because I have been testing several versions of SQL Server 2017 and 2019. If you look closely, you will note I have different images for different operating systems (Ubuntu & RedHat).
Deleting Images
At the time I’m writing this article, SQL Server 2019 is already in GA (General availability), so there is no point for me to keep using the “2019-RC1” (Release candidate) in my local repository. Therefore, for this example I will proceed to remove that image from my local repository.
I need to use the docker image rmi command to help me with this container management action. A requirement for this container management action is to know the docker image ID beforehand, and I already have this information from the previous example:
|
1 |
$ docker image ls |

Using the highlighted image ID above, I will proceed to remove the image as follows:
|
1 |
$ docker image rmi e3be04ae2efd |

As you can see from the output, the image ID e3be04ae2efd (2019-RC1) was deleted and untagged from my local image repository.
Checking the Container Status
The Docker client provides many ways to check the status of a container. You can easily find the current state of a container and understand what is going on from within the container by checking the logs or simply learn about its CPU and memory utilization.
Now it’s time to put all these theories in practice using the Docker client commands.
docker ps
The docker ps command is a great way to find the current state of all your containers; however, you need to understand how to make the most of it. For example, if this command is executed without any options, it only shows running containers by default.
|
1 |
$ docker ps |

The output provides the following information:
- Container ID
- Image
- Command (Last command executed when this container started)
- Creation date
- Status
- Ports
- Container name
This is a good starting point; however, what happens if you want to learn more about all the other containers that are not actually running? Or filter by name or status? Don’t worry, the docker ps command provides that information and many options more.
Speaking about options, I will focus just in two:
|
Option name |
Command |
|
All |
docker ps -a |
|
Filter |
docker ps -f |
There are many more options of course; however, the two options listed above are the most useful for finding the status of the container quickly and easy.
All (docker ps -a)
This command requires to combine the docker ps command with the -a option. It will list all containers regardless of their states (running | paused | stopped). This is better than just running the docker ps command without any options, so take a look at the output:
|
1 |
$ docker ps -a |
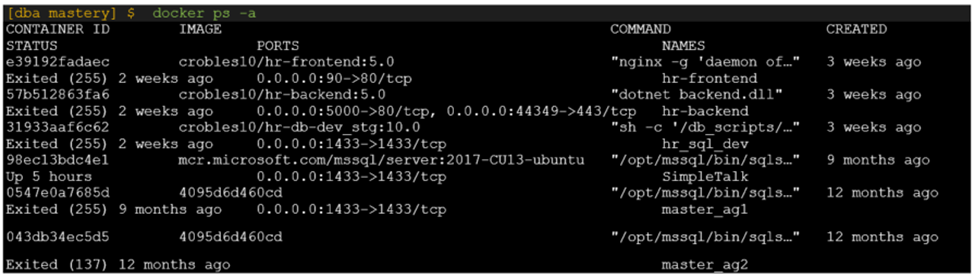 As you can see, the command returns too much information. You may be asking yourself if there is a way to see this output cleaner or make it readable for everybody.
Many Docker client commands have an additional argument called --format just for this purpose. The format must be specified using the “Go” language which is translated to a JSON object to produce the desired output.
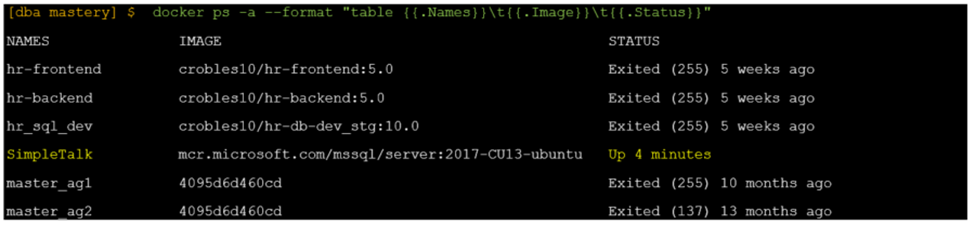
Imagine you want to know more about all your containers, but you are interested to see a customized output including just the container name, the image and the last known status. Here is an example based on this need, where the output will be displayed as a tabbed table displaying just the columns included in JSON format:
|
1 |
docker ps -a <a id="post-86135-_Hlk29456354"></a>--format "table {{.Names}}\t{{.Image}}\t{{.Status}}" |

095d6d460cd Exited (255) 9 months ago
master_ag2 4095d6d460cd (137) 12 months ago
This customized output looks way better than the default one, the three columns {{.Names}}, {{.Image}} and {{.Status}} are tab (\t) separated making the text clean and easy to read.
Of course, this is just an example. You are free to customize this output the way you like as this is at least a good starting point.
Filter (docker ps -f)
The filter option is just like a WHERE clause for a query; it will look up a key value to be paired with one of the supported filters:
|
Filter |
Description |
|
id |
Container’s ID |
|
name |
Container’s name |
|
label |
An arbitrary string representing either a key or a key-value pair |
|
status |
One of created, restarting, running, removing, paused, exited, or dead |
In simple terms, it allows you to search for all those containers with certain ID, name, label or even status.
Here are a few examples of the use of the filter option for different scenarios.
Filtering by Name
Imagine you want to list all those containers that start with the word “Simple.” We add the filter key name to the docker ps -f command assigning the lookup value. Let’s see how it works:
|
1 |
$ docker ps -f "name=Simple" |

The output returned is just what I expected. I can see a container with name “SimpleTalk” is listed, which by the way is in “running” status. Note that I didn’t have to specify the exact name; it just found a name that matches with the specified pattern.
Filtering by Name Regardless of the Status
The previous example works well; however, there is a problem with this filter. The results are being limited by the docker ps command because it will list only active (running) containers. In case you want to make sure all containers are listed regardless of the status, you must add the “-a” option to the previous example. This is how it works:
|
1 |
$ docker ps -a -f "name=master" |

Note that all the containers with the name “master” are listed. This is good but not quite perfect yet. What about combining everything learned so far? I mean, listing all containers regardless of the state filtered by name and limiting the output to show just the container name, image, port number and status in a tabbed table form.
Here is the command:
|
1 |
$ docker ps -a -f “name=master” --format "table {{.Names}}\t{{.Image}}\t{{.Status}}" |

The output looks good now, clean and easy to read. Importantly, it lists all containers with the word “master” in the name, regardless of its status.
Stopping the Container
The docker stop command is what you want to use to stop one or more containers; you just need to specify the container name. This is very similar to the previous example; however, there is something else that you need to understand, especially when stopping a SQL Server container.
There are multiple termination signals in Linux, used for slightly different purposes. Docker containers uses the SIGTERM and SIGKILL termination signals, but what they are?
SIGTERM
This is a generic signal to terminate a program, it is the traditional way to ask a program to terminate its process.
SIGKILL
This signal causes the immediate termination of a program. This signal cannot be blocked or ignored; it simply kills the program.
Putting all this together means: When the docker stop command is issued, the main process of the container in question–in this case SQL Server–will receive a SIGTERM, giving the program enough time to gracefully shutdown. After this grace period finishes (10 seconds by default), the container will receive a SIGKILL to immediately terminate SQL Server.
Run this command to stop the container:
|
1 |
$ docker stop SimpleTalk |
![]()
How cool is that! Using just a single line of code you can stop a SQL Server instance. You don’t need to worry about stopping the services anymore when using containers because everything is handled by Docker using the SIGTERM and SIGKILL signals as explained before.
Starting the Container
Booting up a VM or waiting for all the SQL Server services to be started is something from the past. Trust me, containers really change the way to ship and develop applications because of its simplicity. If you are one of those people that likes to get things done quickly and efficiently, you are going to love the container technology.
Starting up a container, requires running the docker start command followed by the name of the container. That’s so simple, right? Take a look at how it works in practice:
|
1 |
$ docker start SimpleTalk |
![]()
The command returns the name of the container as an indicator that the container called “SimpleTalk” was successfully started.
Deleting the Container
This is the last step in container management, and the obvious step when you are done with the life cycle of your container. The docker rm command has a few options It can remove a container regardless of its status (stopped | running), and it can also remove all containers including its volume.
I will focus on the traditional way, removing a container regardless of its status. Combining the docker rm with the --force option will send a SIGKILL then the container will be immediately removed.
First, check the status of the “SimpleTalk” container:
|
1 |
$ docker ps -a --format "table {{.Names}}\t{{.Image}}\t{{.Status}}" |
As you can from the output above, this container has been up and running for the last 4 minutes. Now delete it using the docker rm --force command:
|
1 |
$ docker rm --force SimpleTalk |
![]()
The command returned just the name of the removed container. To make sure it happened correctly, check the status of all the containers again:
The “SimpleTalk” container is gone from the list, which means this container was successfully removed.
Conclusion
Understanding the container life cycle is important, it really helps you to understand better what exactly you are doing when interacting with the Docker daemon through the Docker client commands.
At this point, you should be able to perform all the following actions using Docker for macOS:
- Pull an image
- Create a container
- Check the status of a container
- Stop, start and delete a container
Please join me in the next article series, where I will focus on examining the Docker container to learn more about its metadata and to connect using a database productivity tool like SQLCMD or Azure Data Studio for macOS.

Load comments