
Feel free to skip the detailed steps and jump directly to the stackblitz demo at the end of the post
@HostBinding lets you set properties on the host element or component.
Steps to be followed
-
As a good practice, create a separate directory to place all your custom directives in your angular project. I have a created a new folder name
directivesunder thesrc/appdirectory
-
Create a new file
border.directive.tsinside thedirectivesdirectory
-
In the
border.directive.tsfile, create a usual typescript class just as below.
export class BorderDirective { } -
To make this class as a attribute directive, we need to decorate it with
@Directiveannotation
@Directive() export class BorderDirective { } -
We must give this directive a name using the
selectorproperty just as we do for a @Component. The name we give here will be used in the html files.
@Directive({
    selector: '[border]'
})
export class BorderDirective {

}
In the above step, if you notice, we have surronded the name with
[]because this directive will be an attribute directive. But in case of@Componentwe don't surround the selector with brackets because they will be used as tags< >in the html templates.-
By this point, you might notice an error for
@Directive. To fix that, add the import statement as the first line in the file.
import { Directive } from '@angular/core'; -
To use this new custom directive we have to declare it in our module
app.module.ts.
import { NgModule } from '@angular/core'; import { BrowserModule } from '@angular/platform-browser'; import { FormsModule } from '@angular/forms'; import { AppComponent } from './app.component'; import { BorderDirective } from './directives/border.directive.ts'; @NgModule({ imports: [ BrowserModule, FormsModule ], declarations: [ AppComponent, BorderDirective ], bootstrap: [ AppComponent ] }) export class AppModule { } -
That's it! Our new custom directive is ready to be added to any DOM element or component. Let's add this to a
<div>tag in ourapp.component.html
<div border>
    This is a simple div with 'border' attribute
</div>
If you run the application, you won't see any border around the
div. Because we didn't specify anything in ourborder.directive.tswhenborderattribute is found on a DOM element.-
To do that, lets add the below snippet to our
BorderDirectiveclass in theborder.directive.tsfile
@HostBinding('style.borderStyle') get style() { return 'solid'; } @HostBindingdecorator binds the property specified in the argument to the host DOM element. In the above snippet, we binded the border-style property to the host element.-
You might notice an error for
@HostBinding, to fix that add the required import.
import { Directive, HostBinding } from '@angular/core'; -
Now if you run the application, you will find a solid border around the div. Yay!!

But if you notice, we are not done yet. Because, the style is border is same and not configurable. So we must provide a way to the consumer(i.e., div or any DOM element) to provide the styles they want.
-
So let's add an input property in the
BorderDirectiveclass and update the style() method as below. If the consumer doesn't provide the bStyle attribute, then it will be defaulted to 'solid'.
@Directive({ selector: '[border]' }) export class BorderDirective { @Input() bStyle: string = 'solid'; @HostBinding('style.borderStyle') get style() { return this.bStyle; } } -
Don't forget to add the import for
@Input.
import { Directive, HostBinding, Input } from '@angular/core'; -
Now add another div to our html file as below and verify the output
<div border>
    This is just a div with border directive
</div>

<div border bStyle='dotted'>
    This is just a div with border directive and specifies the style using the bStyle property
</div>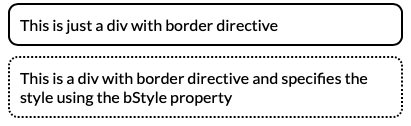
-
Similarly we can add and customize various properties for the border.
import { Directive, HostBinding, Input } from '@angular/core';

@Directive({
selector: '[border]'
})
export class BorderDirective {
    @Input() bStyle: string = 'solid';
    @Input() bRadius: number = 10;
    @Input() bPadding: number = 10;
    @Input() bMargin: number = 10;
    @Input() bColor: string = 'lightgrey';
    @Input() bWidth: number = 2;

    @HostBinding('style.borderStyle')
    get style() {
        return this.bStyle;
    }

    @HostBinding('style.borderRadius')
    get radius() {
        return `${this.bRadius}px`;
    }

    @HostBinding('style.padding')
    get padding() {
        return `${this.bPadding}px`;
    }

    @HostBinding('style.margin')
    get margin() {
        return `${this.bMargin}px`;
    }

    @HostBinding('style.borderColor')
    get color() {
        return this.bColor;
    }

    @HostBinding('style.borderWidth')
    get thickness() {
        return `${this.bWidth}px`;
    }
}
Stackblitz Demo


Top comments (0)