
If you've been working in web development these past few years than you've no doubt heard about serverless FaaS solutions like AWS Lambda or Knative. The idea boils down to writing code as a set of discrete functions that can be triggered by events. All worries about provisioning server nodes, scaling them, managing your back-end stack, and many other operational tasks are abstracted away. Moreover, it often results in massive cost savings as compute resources are provisioned on-demand. As this paradigm is growing in maturity and popularity, many tools have been created to make the process even easier and there has never been a better time to try it out for yourself.
To demonstrate how easy it is to get started with FaaS in GitLab, we've now added a project template to get you up and running even faster. If you're interested in wading into the serverless waters without running a single command in your terminal, follow along and try it yourself! All that is needed for this example is a free GitLab account and an AWS account.
1. Creating a project
To start off, let's create a project with our new serverless template. Open up the new project page and select the "Create from template" tab. Then scroll down and select the "Serverless Framework/JS" template.

Give your project a name and select "Create project"
2. Configuring your AWS credentials
Now that we have our GitLab project complete with a boilerplate serverless application, it's time to give it access credentials to AWS so we can deploy it.
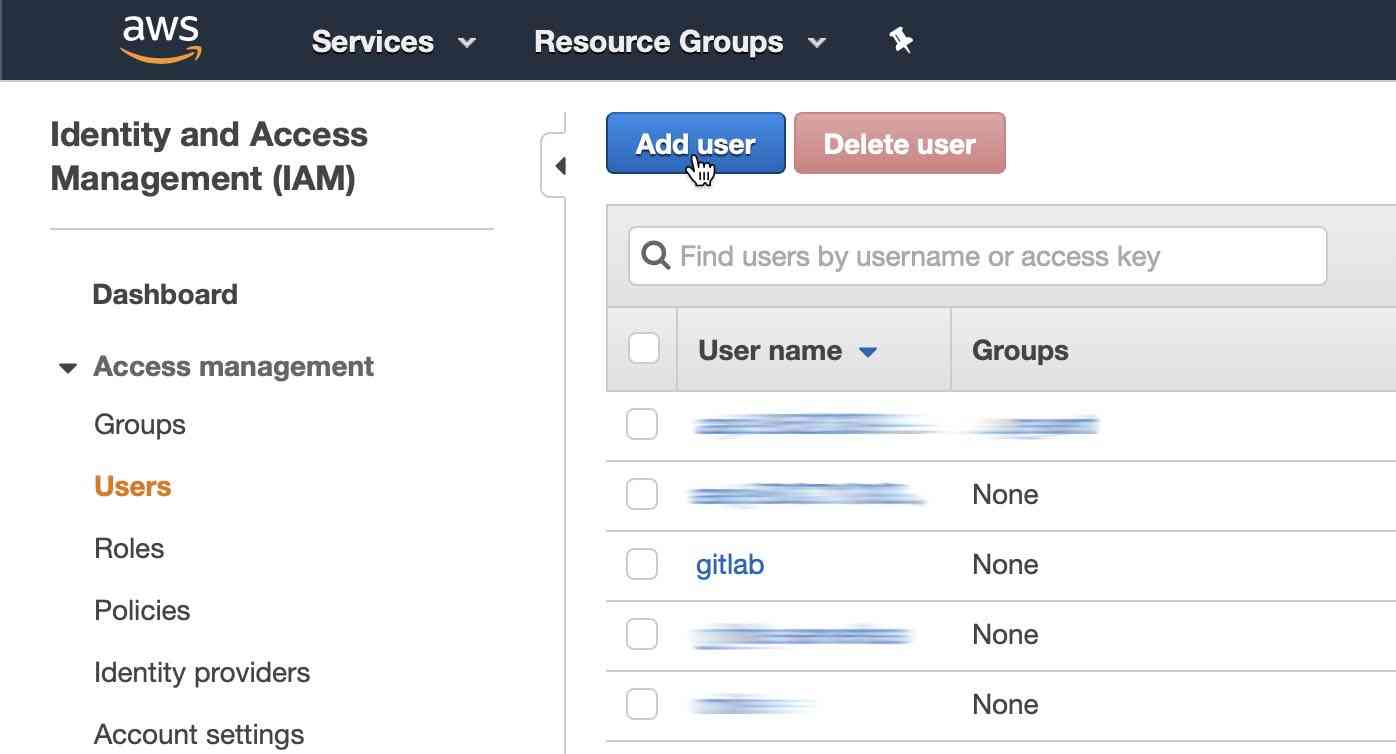
Open up the AWS console, sign in, and navigate to the IAM section. Here you can select "Users" in the left-hand column, and create a new user using the "Add user" button at the top of the list.
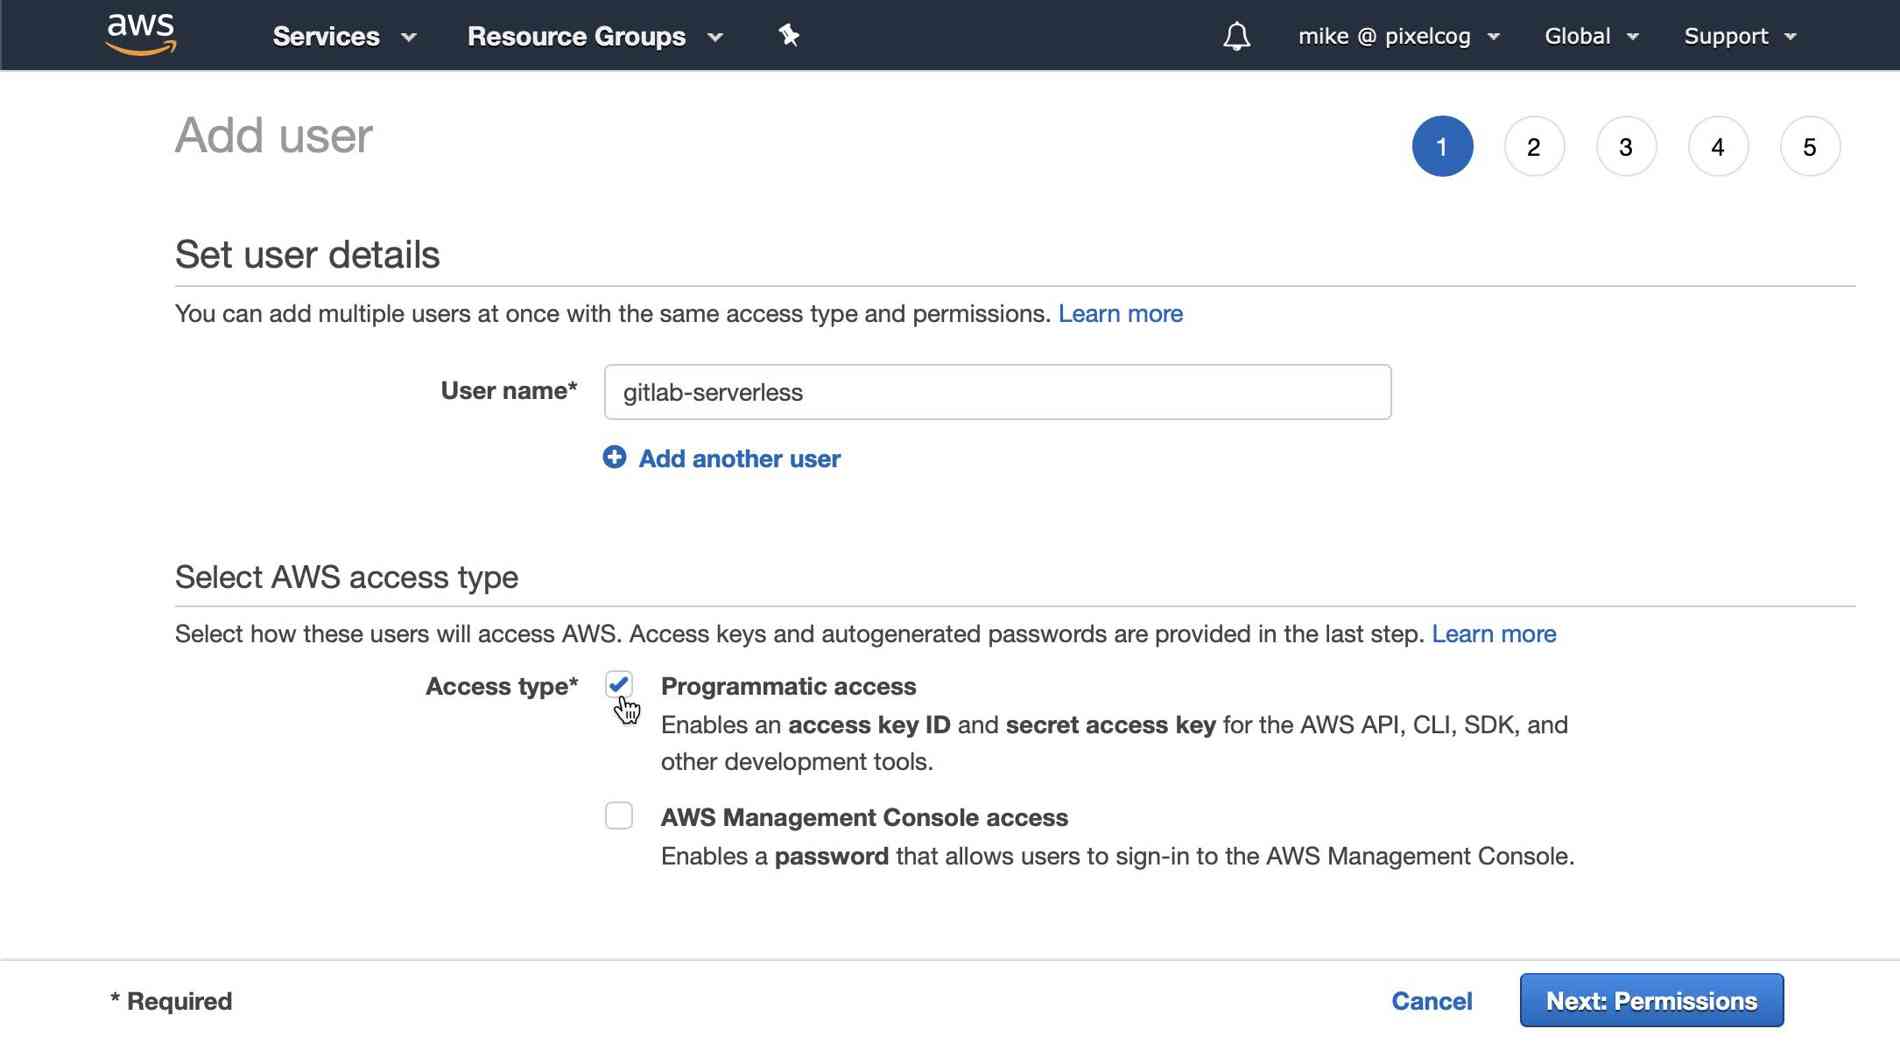
Give your user a name like "gitlab-serverless" and make sure to select the "Programatic access" checkbox before clicking on "Next".
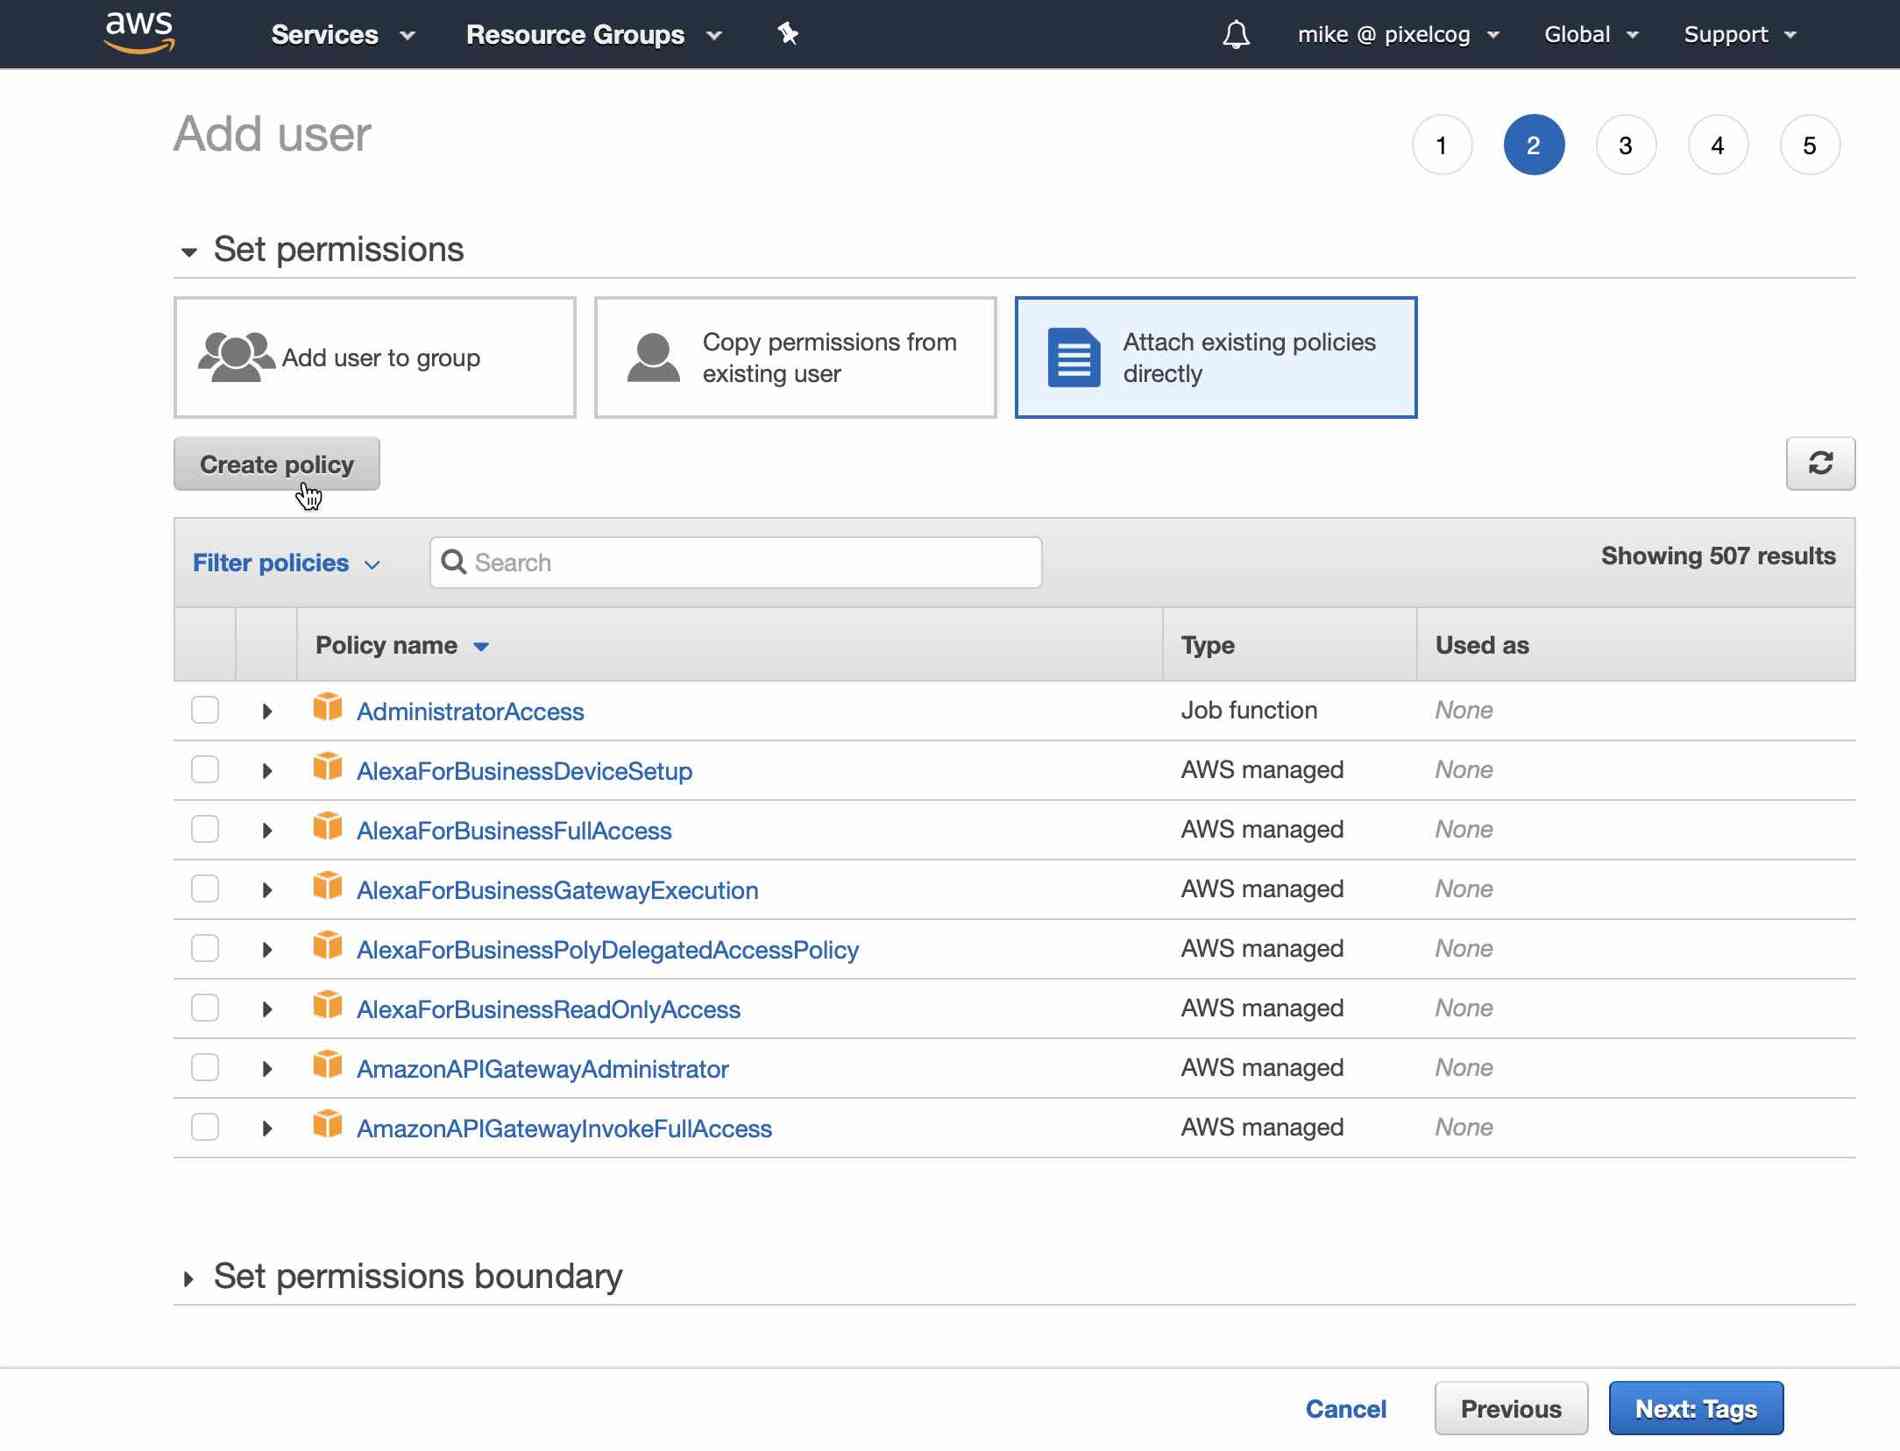
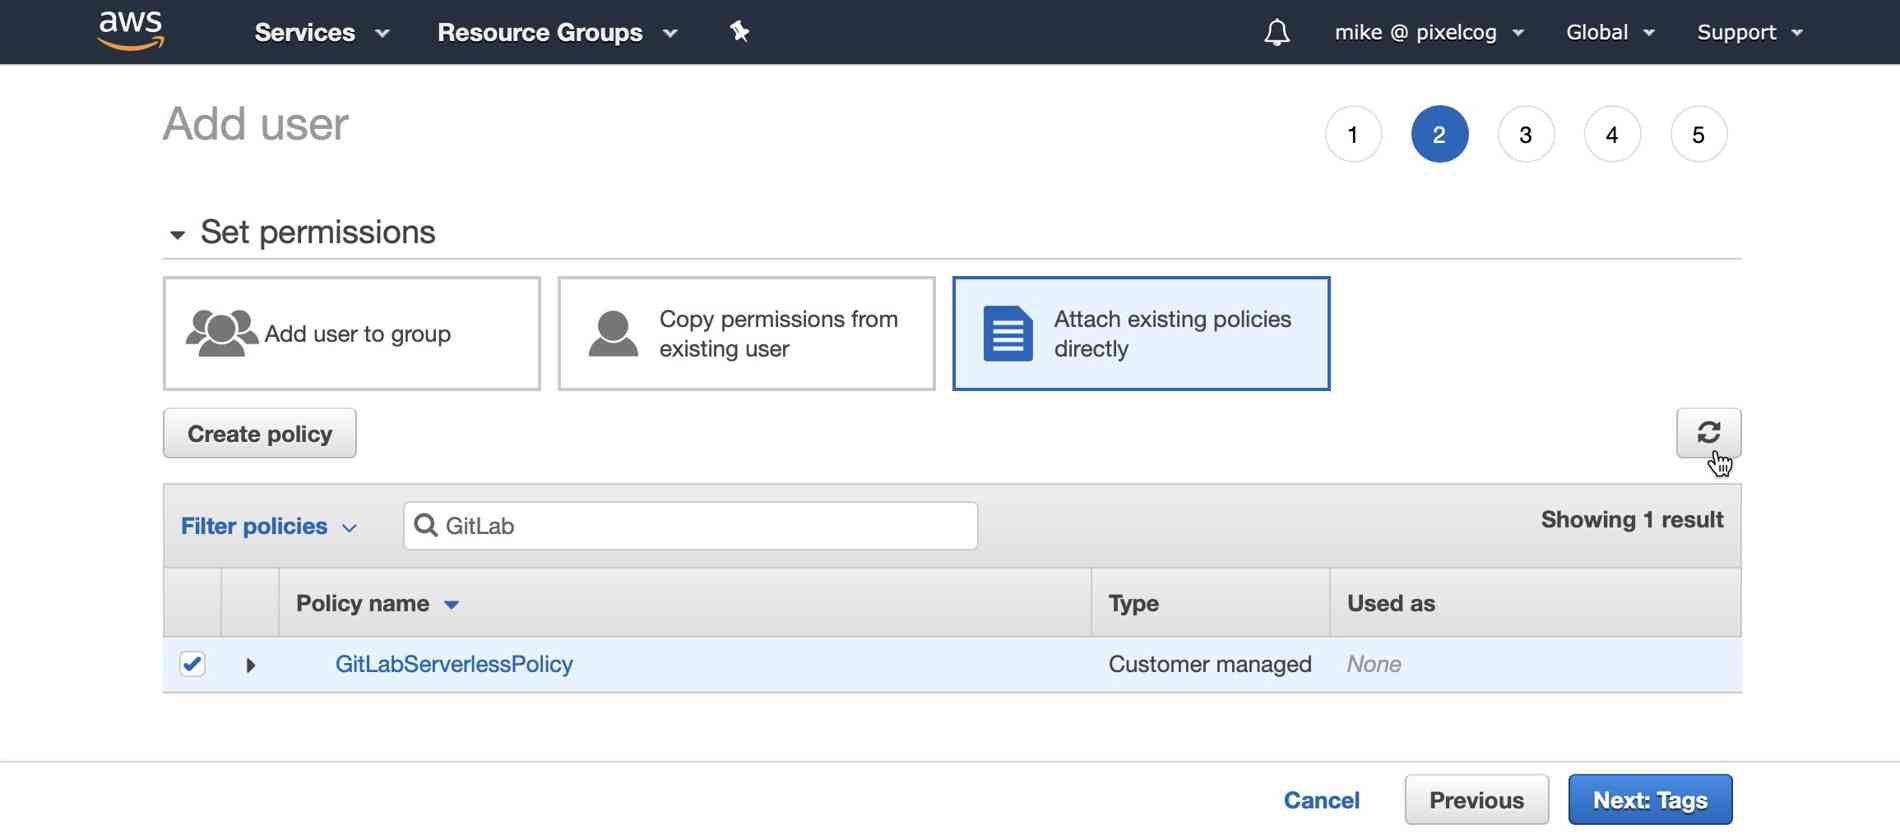
Now we need to give this user the appropriate permissions to deploy serverless functions. On the "Permissions" page select "Attach existing policies directly" and then click the "Create policy" button. This will open a new window.
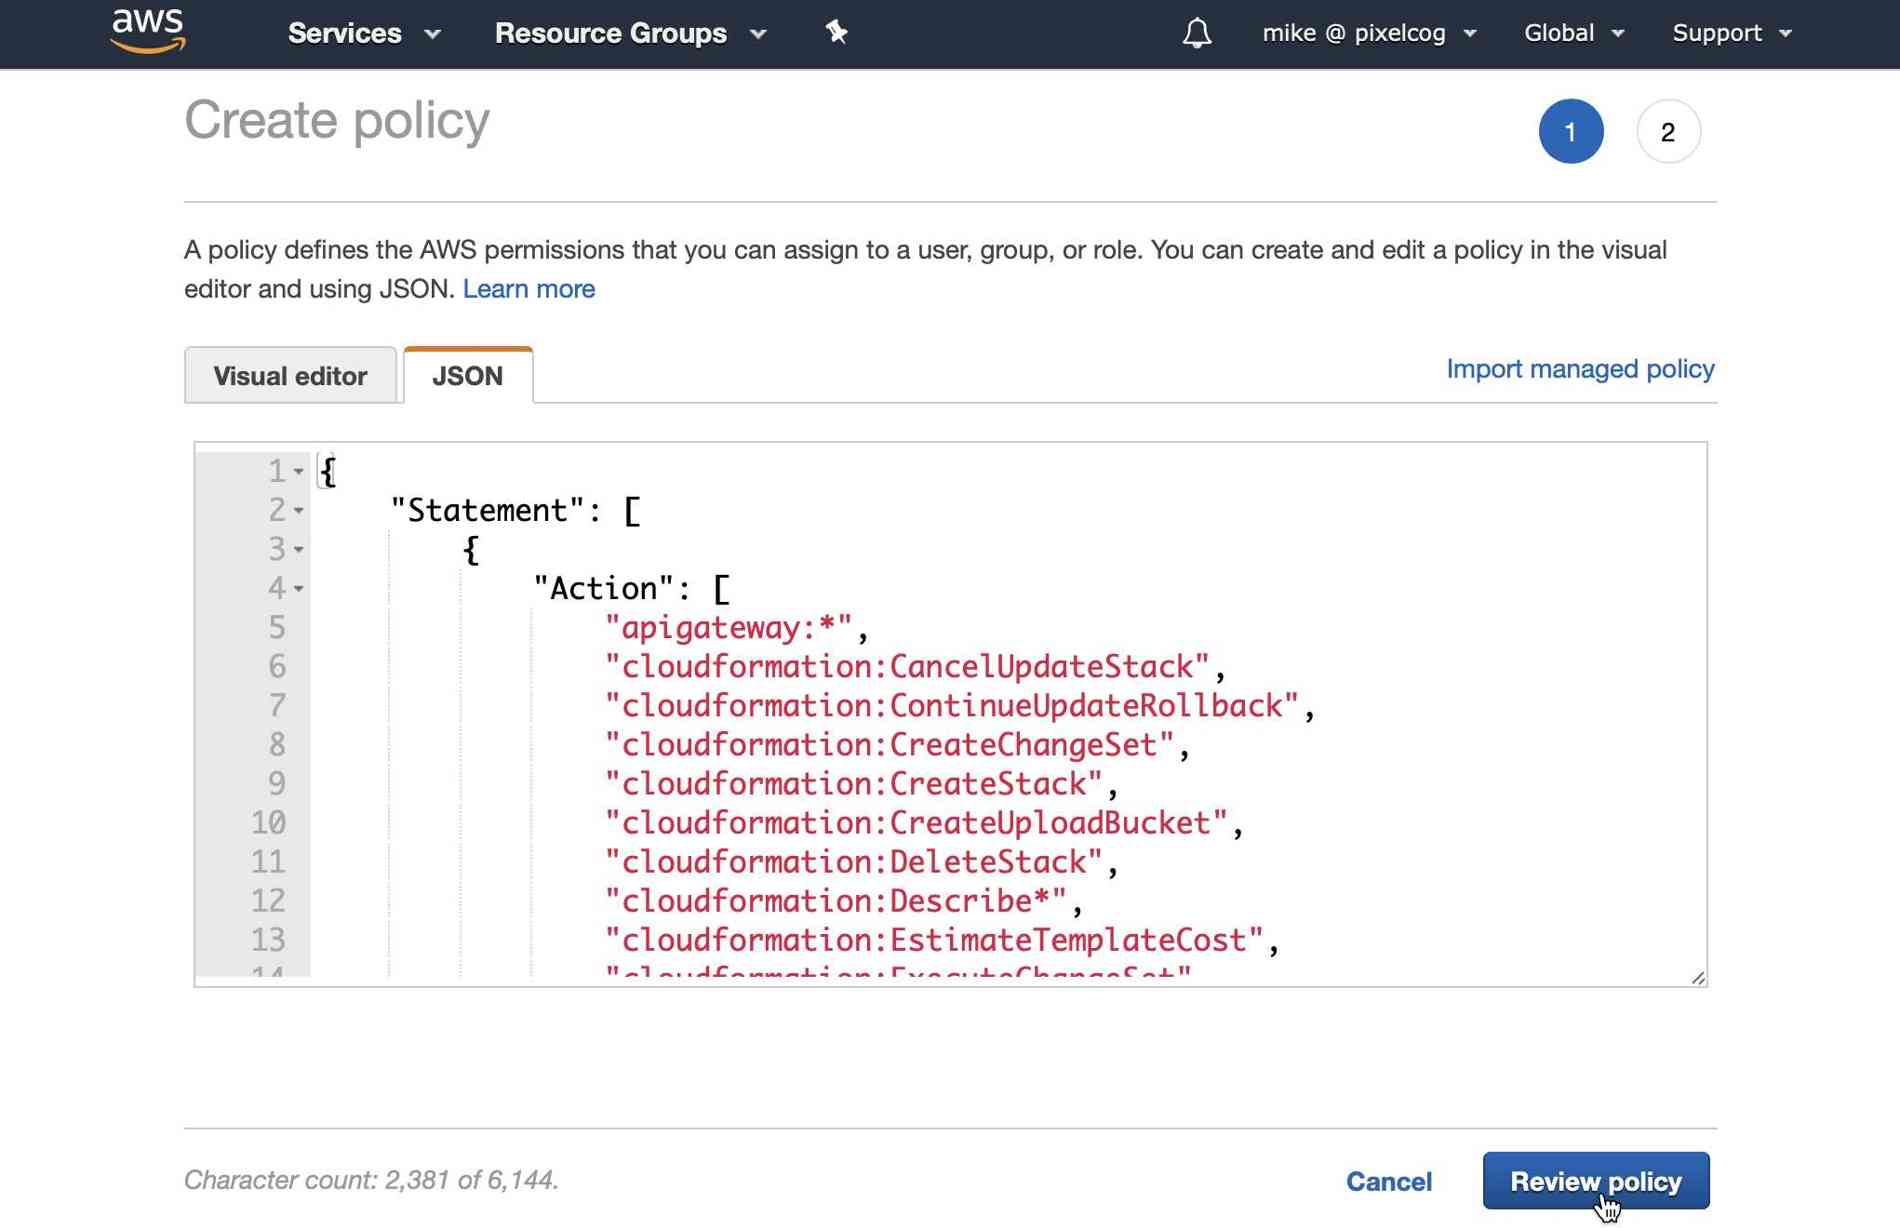
Here you'll need to select the "JSON" tab and paste the following policy statement:
{
  "Statement": [
    {
      "Action": [
        "apigateway:*",
        "cloudformation:CancelUpdateStack",
        "cloudformation:ContinueUpdateRollback",
        "cloudformation:CreateChangeSet",
        "cloudformation:CreateStack",
        "cloudformation:CreateUploadBucket",
        "cloudformation:DeleteStack",
        "cloudformation:Describe*",
        "cloudformation:EstimateTemplateCost",
        "cloudformation:ExecuteChangeSet",
        "cloudformation:Get*",
        "cloudformation:List*",
        "cloudformation:PreviewStackUpdate",
        "cloudformation:UpdateStack",
        "cloudformation:UpdateTerminationProtection",
        "cloudformation:ValidateTemplate",
        "dynamodb:CreateTable",
        "dynamodb:DeleteTable",
        "dynamodb:DescribeTable",
        "ec2:AttachInternetGateway",
        "ec2:AuthorizeSecurityGroupIngress",
        "ec2:CreateInternetGateway",
        "ec2:CreateNetworkAcl",
        "ec2:CreateNetworkAclEntry",
        "ec2:CreateRouteTable",
        "ec2:CreateSecurityGroup",
        "ec2:CreateSubnet",
        "ec2:CreateTags",
        "ec2:CreateVpc",
        "ec2:DeleteInternetGateway",
        "ec2:DeleteNetworkAcl",
        "ec2:DeleteNetworkAclEntry",
        "ec2:DeleteRouteTable",
        "ec2:DeleteSecurityGroup",
        "ec2:DeleteSubnet",
        "ec2:DeleteVpc",
        "ec2:Describe*",
        "ec2:DetachInternetGateway",
        "ec2:ModifyVpcAttribute",
        "events:DeleteRule",
        "events:DescribeRule",
        "events:ListRuleNamesByTarget",
        "events:ListRules",
        "events:ListTargetsByRule",
        "events:PutRule",
        "events:PutTargets",
        "events:RemoveTargets",
        "iam:CreateRole",
        "iam:DeleteRole",
        "iam:DeleteRolePolicy",
        "iam:GetRole",
        "iam:PassRole",
        "iam:PutRolePolicy",
        "iot:CreateTopicRule",
        "iot:DeleteTopicRule",
        "iot:DisableTopicRule",
        "iot:EnableTopicRule",
        "iot:ReplaceTopicRule",
        "kinesis:CreateStream",
        "kinesis:DeleteStream",
        "kinesis:DescribeStream",
        "lambda:*",
        "logs:CreateLogGroup",
        "logs:DeleteLogGroup",
        "logs:DescribeLogGroups",
        "logs:DescribeLogStreams",
        "logs:FilterLogEvents",
        "logs:GetLogEvents",
        "s3:CreateBucket",
        "s3:DeleteBucket",
        "s3:DeleteBucketPolicy",
        "s3:DeleteObject",
        "s3:DeleteObjectVersion",
        "s3:GetObject",
        "s3:GetObjectVersion",
        "s3:ListAllMyBuckets",
        "s3:ListBucket",
        "s3:PutBucketNotification",
        "s3:PutBucketPolicy",
        "s3:PutBucketTagging",
        "s3:PutBucketWebsite",
        "s3:PutEncryptionConfiguration",
        "s3:PutObject",
        "sns:CreateTopic",
        "sns:DeleteTopic",
        "sns:GetSubscriptionAttributes",
        "sns:GetTopicAttributes",
        "sns:ListSubscriptions",
        "sns:ListSubscriptionsByTopic",
        "sns:ListTopics",
        "sns:SetSubscriptionAttributes",
        "sns:SetTopicAttributes",
        "sns:Subscribe",
        "sns:Unsubscribe",
        "states:CreateStateMachine",
        "states:DeleteStateMachine"
      ],
      "Effect": "Allow",
      "Resource": "*"
    }
  ],
  "Version": "2012-10-17"
}
Note: This policy is an example that encompasses pretty much everything the Serverless framework might need on AWS, but much of it not likely to be used. You may wish to restrict this policy to fit your needs and security requirements. At minimum, the serverless credentials will need access to the
cloudformation,iam,lambda,logs, ands3functions specified above.
Click "Review Policy" and you'll need to give this policy a name. I've used "GitLabServerlessPolicy". Then click "Create policy".
After this is done, return to your "Add user" tab and search for the policy you just created (you may need to hit the "refresh" icon on the right). Check the box next to this policy and select the "Next" button.
Proceed to add tags or skip straight to the review. The final page should resemble the following:
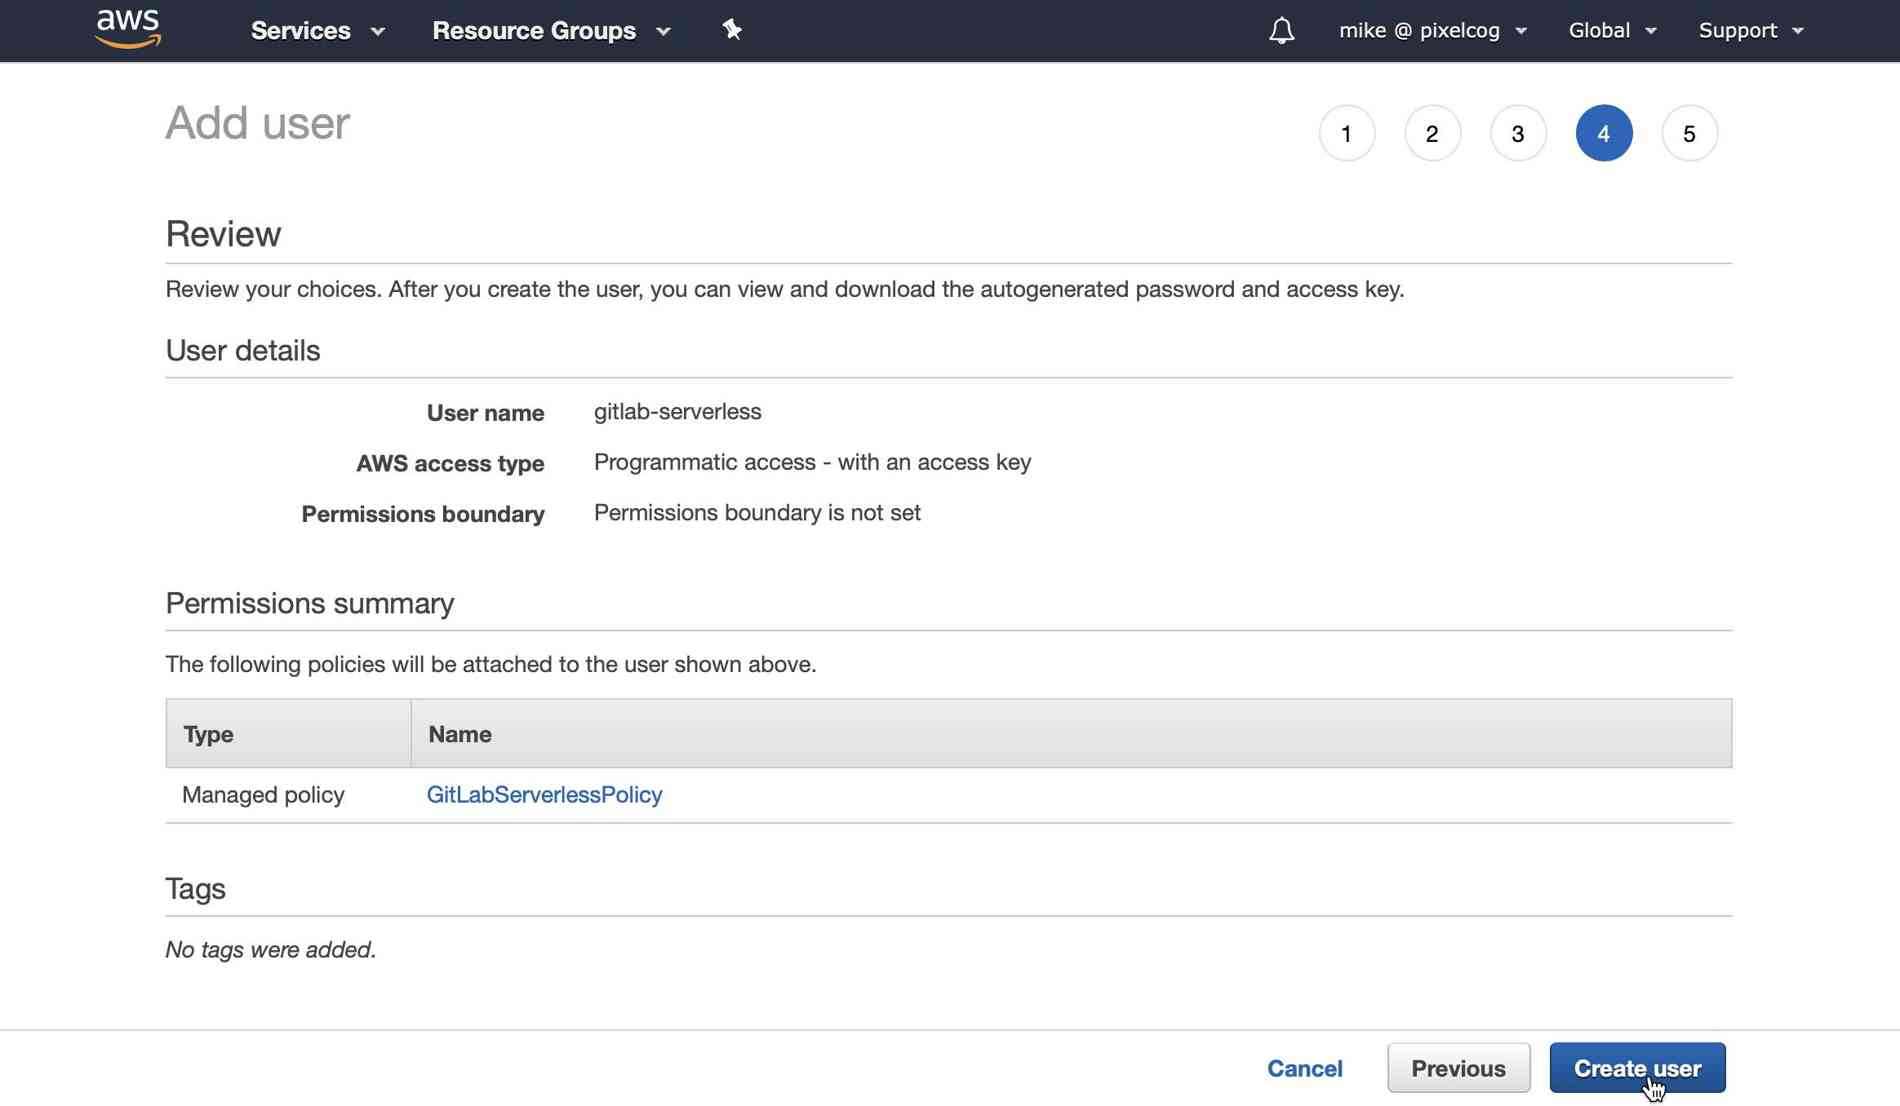
After clicking "Create user" you should finally be presented with a page that shows you your access credentials for this new AWS user account. Select "show" next to the "secret access key" and copy both this and the access key ID someplace for safe keeping.
3. Entering your AWS credentials
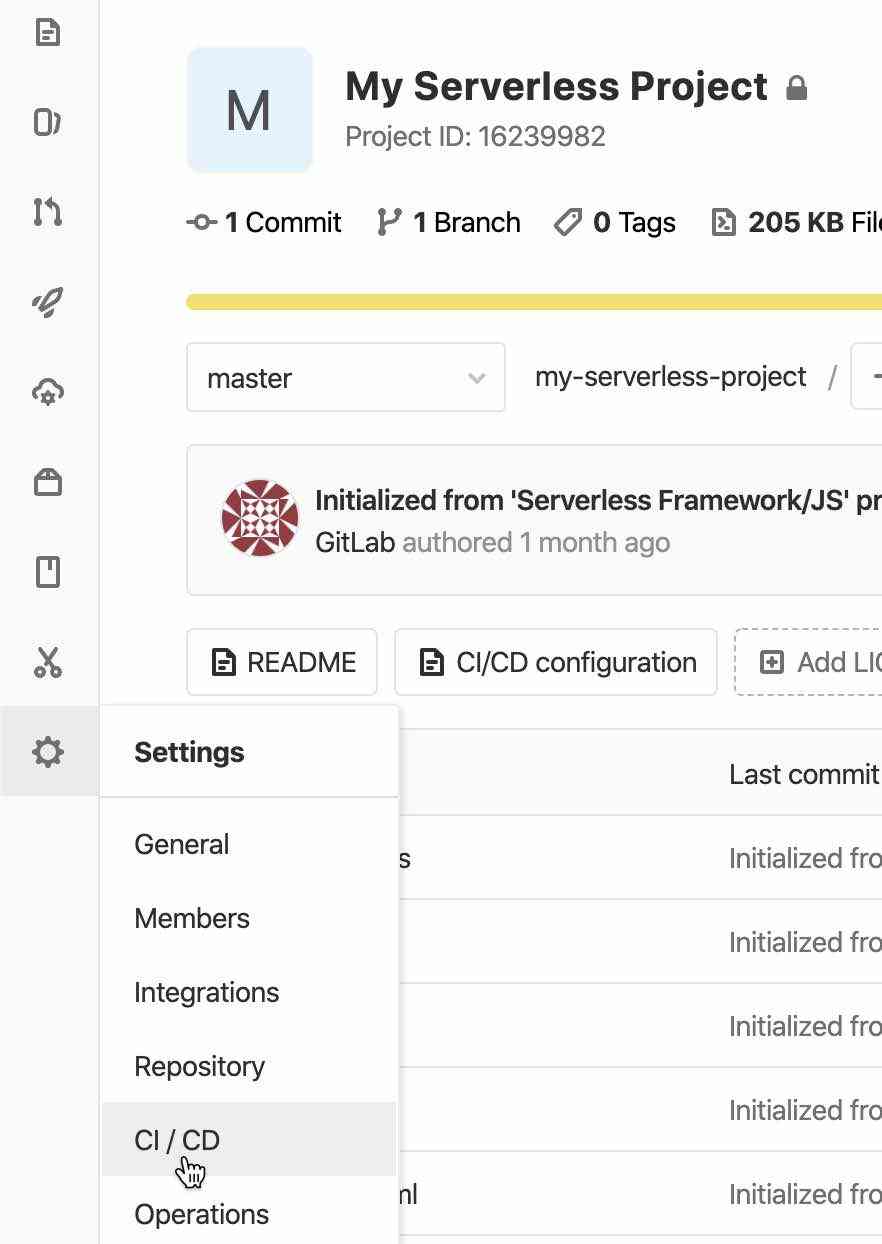
Returning back to GitLab, we'll need to enter these two credentials into our project's CI/CD settings. Select "Settings -> CI/CD" in the left-hand menu.
On this page, we need to expand the Variables section and enter our AWS credentials:
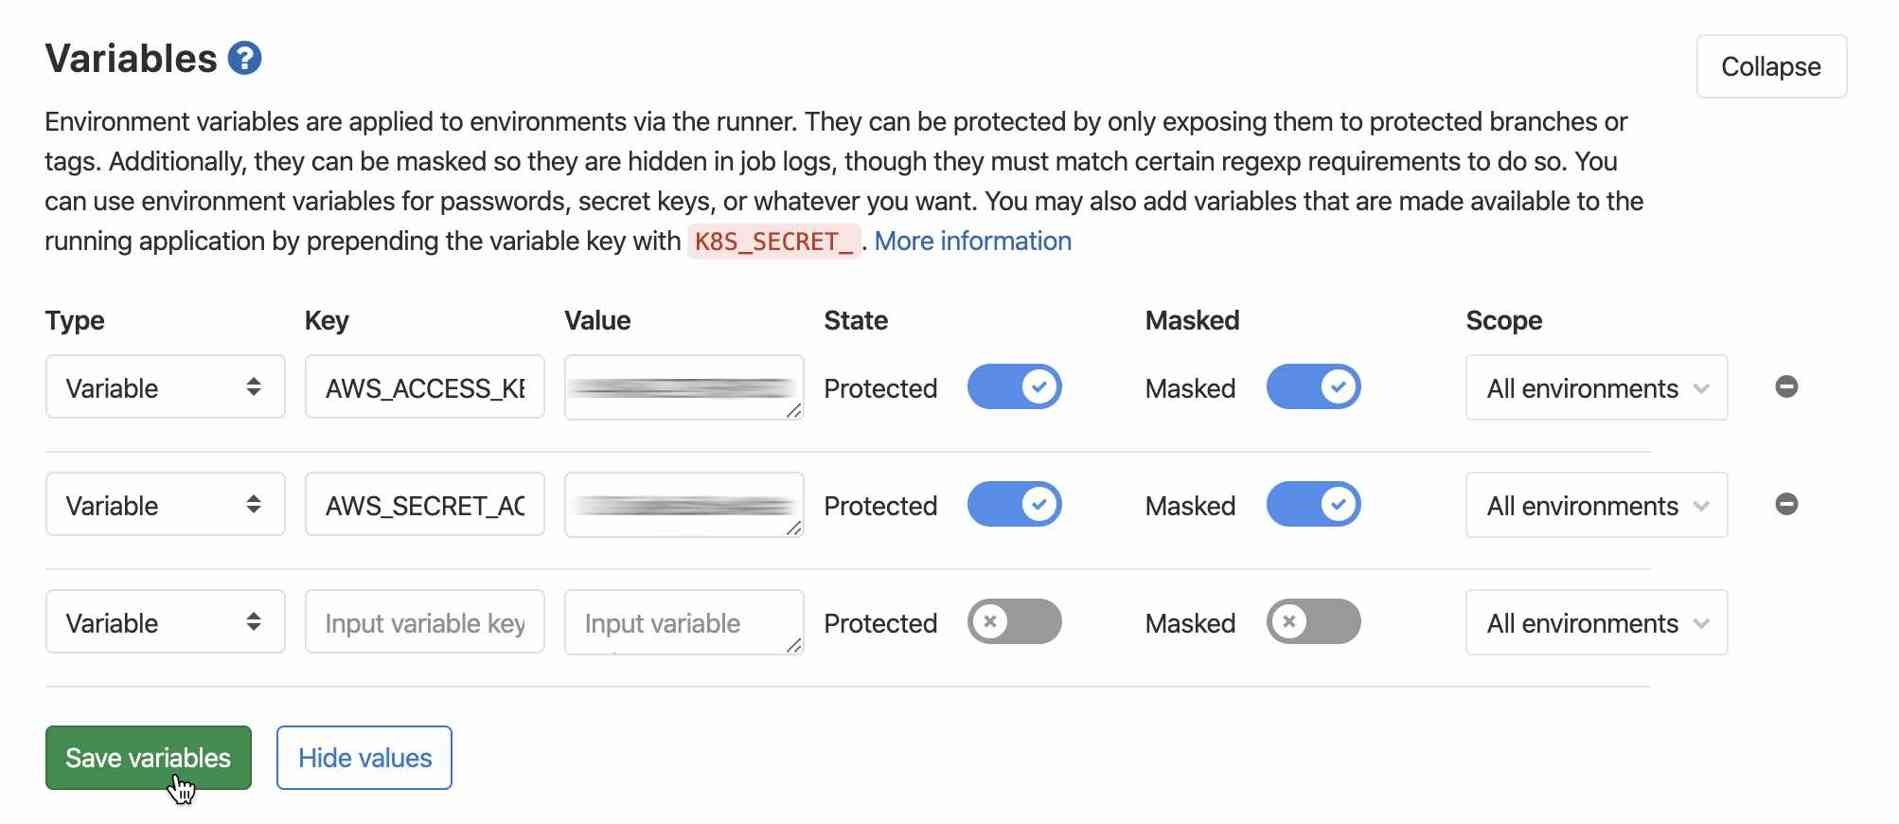
Use AWS_ACCESS_KEY_ID and AWS_SECRET_ACCESS_KEY as the keys for the two values you copied from AWS in the previous step. Don't forget to click "Save variables".
4. Deploying your first AWS Lambda function.
Now it's time to deploy your serverless project. If you're doing this on gitlab.com you've already got access to a GitLab runner with 2,000 free CI pipeline minutes, if not you'll need to configure a runner yourself.
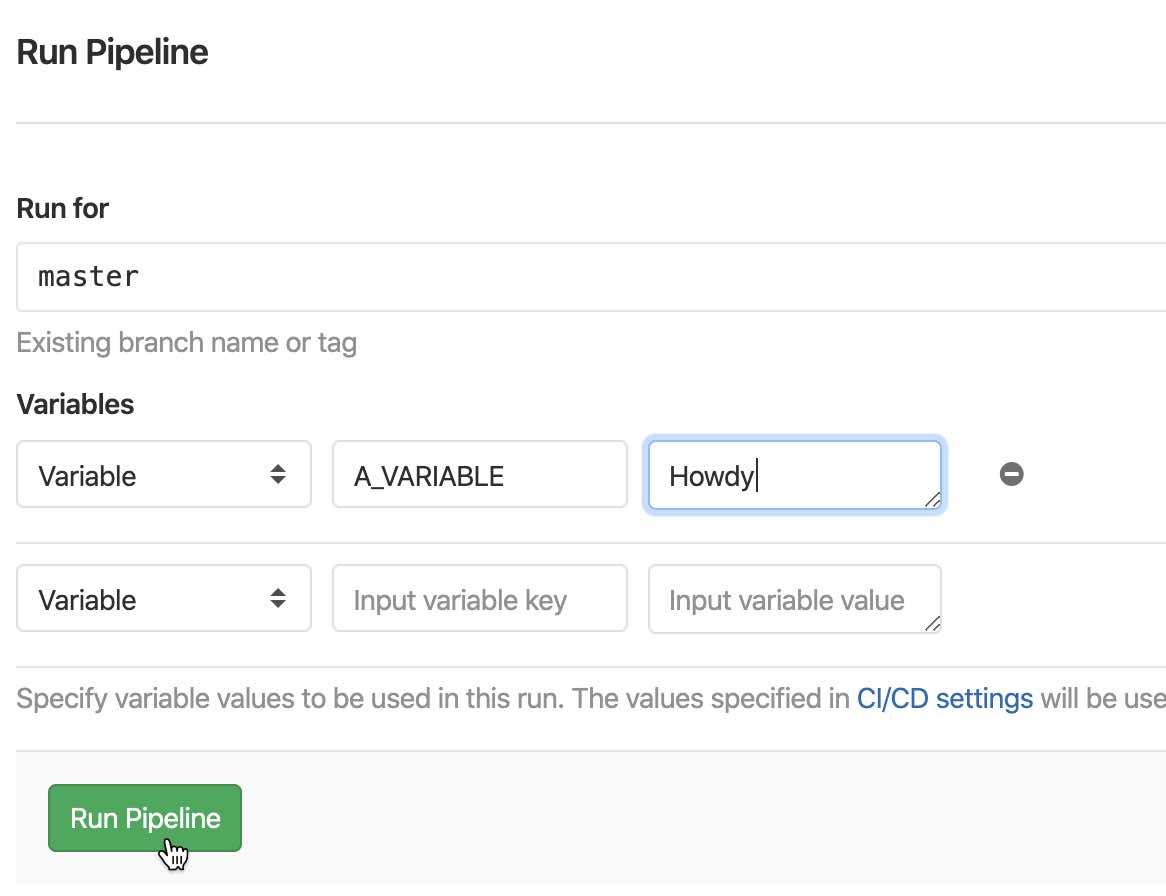
Go to "CI/CD -> Pipelines" in the left-hand menu and click the "Run Pipeline" button. For fun, let's enter an environment variable with the key A_VARIABLE and give it whatever value you want. This will be usable by our deployed function.
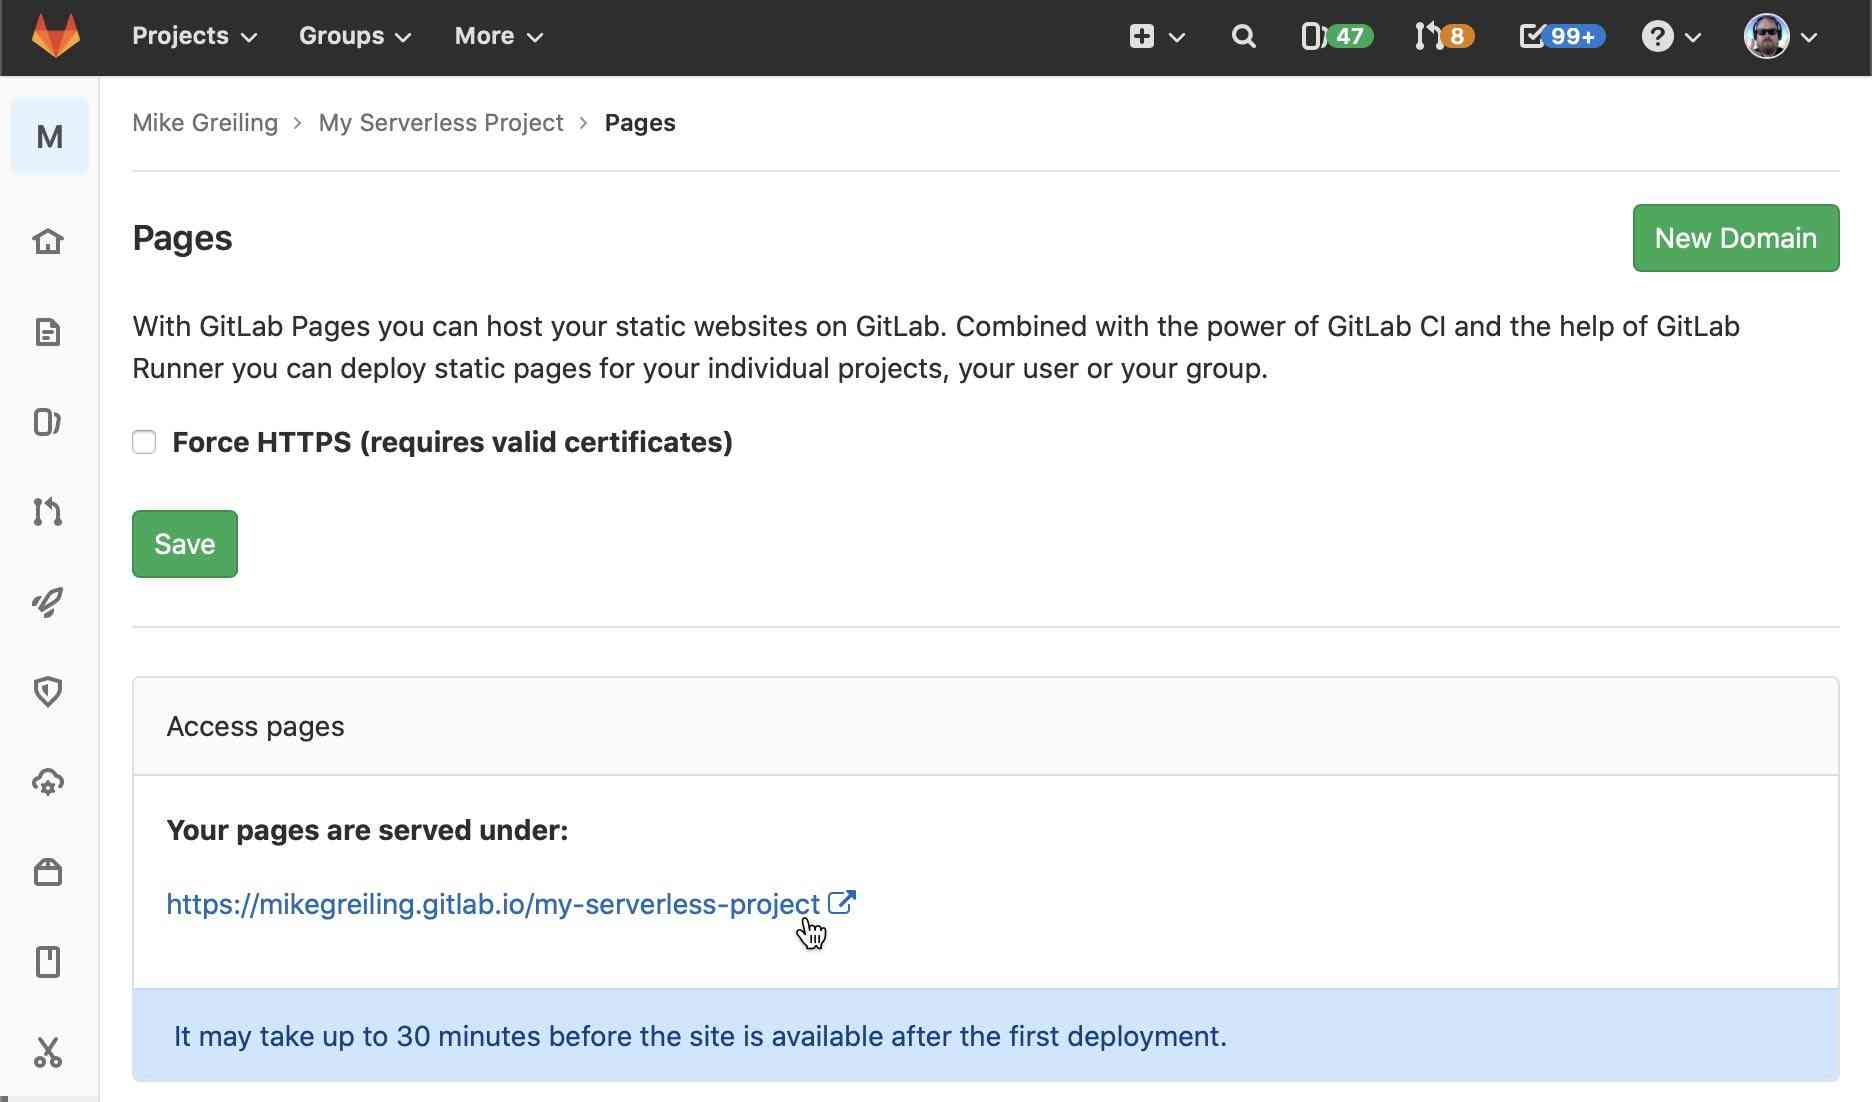
Select "Run Pipeline" and you should see your jobs start running. This project template has tests which will automatically run every time you run a pipeline. Once those are complete, the "production" job will deploy your code to AWS Lambda and finally it will produce a landing page on GitLab Pages. After just a few minutes this process should complete and you can visit "Settings -> Pages" to see a link to the URL where your GitLab project has been deployed. (It may take a few minutes before this URL is accessible the first time you make a deployment).
When you visit this page, here's what you'll see:
You can enter an input value and click "run function". This input is sent to your serverless function which then responds and the response is printed under "Function Output:". Note that the environment value we provided using the A_VARIABLE key is present as well.
5. Making Changes
Now that we have a working AWS serverless project, let's try to make our own function. How about a simple calculator?
Open up the Web IDE and let's make the following changes:
Within src/handler.js add the following function:
module.exports.add = async function(event) {
  const A = Number(event.queryStringParameters.A);
  const B = Number(event.queryStringParameters.B);
  const result = A + B;

  return {
    statusCode: 200,
    headers: {
      "Access-Control-Allow-Origin": "*"
    },
    body: result
  };
};
Then open public/index.html and replace it with:
<!DOCTYPE html>
<html>
  <head>
    <title>GitLab Serverless Framework example</title>
  </head>
  <body>
    <h3>Add two values:</h3>
    <label>A: <input type="text" id="inputA" placeholder="0" name="A"/></label>
    <label>B: <input type="text" id="inputB" placeholder="0" name="B"/></label>
    <strong>=</strong>
    <span id="functionOutput">?</span>
    <br />
    <button>Calculate!</button>

    <script>
      fetch("./stack.json").then(response => {
        response.json().then(myJson => {
          const functionUrl = myJson.ServiceEndpoint + "/add";
          const inputA = document.querySelector("#inputA");
          const inputB = document.querySelector("#inputB");
          const output = document.querySelector("#functionOutput");

          document.querySelector("button").addEventListener("click", () => {
            const A = Number(inputA.value);
            const B = Number(inputB.value);

            fetch(functionUrl + "?A=" + A + "&B=" + B)
              .then(response => response.text())
              .then(result => (output.textContent = result));
          });
        });
      });
    </script>
  </body>
</html>
Lastly, open serverless.yml and add an "add" function entry below our "hello" function like so:
functions:
  hello:
    handler: src/handler.hello
    events:
      - http:
          path: hello
          method: get
          cors: true
  add:
    handler: src/handler.add
    events:
      - http:
          path: add
          method: get
          cors: true
Stage and commit these changes directly to the master branch. This will have triggered a new pipeline automatically. You can visit "CI/CD -> Pipelines" and watch it run.
Once the deployment is complete, our project page should look like this:
Voilà, we've just created our own serverless function and deployed it without a single terminal command. There's a lot more you can do from here, but this should be a good place to get started. Happy coding!
Cover image by Kaushik Panchal on Unsplash