Spring Boot has become incredibly popular since it was first released in 2013. Starting from scratch; a developer can have an application communicating with a database through RESTful endpoints that have security configured for them all within the span of an hour. This was a huge improvement over the often days it would take to accomplish similar tasks using just the core Spring Framework.
Spring Boot itself has some core functionality, but much of what Spring Boot application will be doing; communicating with a database, providing REST endpoints, and processing security on incoming requests, are supplied through starters. The Spring team, and third party vendors that integrate with Spring, have created many publicly available starters which can be seen on start.spring.io.
These starters are great, but organizations have domain specific concerns. Organizations typically only use certain database vendors, have specific requirements when implementing security, among many other needs. Here it can be beneficial to create custom Spring Boot Starters that incorporate these constraints and requirements. In this article we will walk through the process of creating a custom Spring Boot starter.
Not Just Another Shared Library
Organizations creating shared libraries to handle cross-cutting concern like data access or security isn’t new. What is new is the Spring team has provided several extension points within Spring Boot that can be used to improve the developer experience, these shared libraries are called “starters”. Improving developer experience can increase the active use of a library which can help in making sure standards are followed across an organization.
Starter Components
There are several extensions points the Spring team has provided for building starters they are:
- Auto-Configuration
- Conditionals
- Metadata for Configuration
We will step through how to use each of these features when building a starter so that it; requires minimal configuration to be used, is flexible for a variety of scenarios, and provides developers with information they need to configure it.
We will use security, my-org-starter-security, as an example for building the custom starter. Security is a common concern for organizations, it is also something that require some amount of configuration, and also might need to behave differently depending on context. This will give us a good opportunity to flex out all the above features in a semi-realistic scenario.
You can find the code example used in this article on my GitHub.
Auto-Configuration

Spring Boot is often described as being “opinionated”, one of the ways this is done is through auto-configuration. Spring components can be automatically (automagically?) loaded into context without requiring developer intervention. This is great for making your starter easier to consume and also used correctly (i.e. ensure required classes/beans are loaded). To have a component be auto-loaded requires following a few steps:
1. Add spring-boot-autoconfigure as a dependency
For auto-configuration to work, and to have the appropriate classes available, the spring-boot-autoconfigure dependency must be on classpath. The dependency can be added directly, or indirectly by including another starter as a dependency. In my example I am using spring-boot-starter as a dependency.
This file contains bidirectional Unicode text that may be interpreted or compiled differently than what appears below. To review, open the file in an editor that reveals hidden Unicode characters.
Learn more about bidirectional Unicode characters
| <dependency> | |
| <groupId>org.springframework.boot</groupId> | |
| <artifactId>spring-boot-autoconfigure</artifactId> | |
| <version>2.2.2.RELEASE</version> | |
| <scope>compile</scope> | |
| </dependency> |
2. Create a Configuration class
Create a normal configuration class like you would within a Spring Boot application and have it perform whatever required behavior you need. In this example we will have the @Configuration class load a UserDetailsService and PasswordEncoder into the application context.
This file contains bidirectional Unicode text that may be interpreted or compiled differently than what appears below. To review, open the file in an editor that reveals hidden Unicode characters.
Learn more about bidirectional Unicode characters
| @Configuration | |
| public class SecurityConfig { | |
| @Bean | |
| public PasswordEncoder passwordEncoder() { | |
| return PasswordEncoderFactories.createDelegatingPasswordEncoder(); | |
| } | |
| @Bean | |
| public UserDetailsService users(PasswordEncoder encoder) { | |
| UserBuilder users = User.builder().passwordEncoder(encoder::encode); | |
| UserDetails admin = users.username("user").password("password").roles("USER").build(); | |
| UserDetails user = users.username("admin").password("password").roles("USER", "ADMIN").build(); | |
| return new InMemoryUserDetailsManager(user, admin); | |
| } | |
| } |
3. Add spring.factories
Next we need to tell Spring Boot that the class SecurityConfig is a candidate for auto-configuration. To do this we need to create a file named spring.factories which needs to be located under the META-INF (typically this is located src/main/resources, like this). Within spring.factories we will add the following:
This file contains bidirectional Unicode text that may be interpreted or compiled differently than what appears below. To review, open the file in an editor that reveals hidden Unicode characters.
Learn more about bidirectional Unicode characters
| org.springframework.boot.autoconfigure.EnableAutoConfiguration=\ | |
| org.my.developer.security.SecurityConfig |
Now when a developer brings in the my-org-starter-security, the class SecurityConfig will be automatically loaded into the application context.
Conditionals
Auto-configuration is great, but there might be components you want to load only in a certain scenarios. In our hypothetical organization we will have both web based and console based applications. How security works in these scenarios would differ dramatically, however using conditionals we can have only the appropriate classes loaded into the application context depending on the scenario, this saves developers who are using our starter from a lot of headaches.
Spring Boot provides a lot of flexibility when it comes to defining conditionals, however in this example we will use a couple of pre-defined ones @ConditionalOnWebApplication and @ConditionalOnNotWebApplication. Let’s create a couple classes that will only be auto-configured conditionally.
1. Create configuration classes
Like above we will create a couple of standard @Configuration classes, however we will also need to annotate those classes with the appropriate annotations, @ConditionalOnNotWebApplication for NonWebSecurityConfig and @ConditionalOnWebApplication for WebSecurityConfig. The classes look like this:
This file contains bidirectional Unicode text that may be interpreted or compiled differently than what appears below. To review, open the file in an editor that reveals hidden Unicode characters.
Learn more about bidirectional Unicode characters
| @Configuration | |
| @EnableConfigurationProperties({ CommandLineSecurityConfigurer.class }) | |
| @ConditionalOnNotWebApplication | |
| public class NonWebSecurityConfig { | |
| @Bean | |
| public GrantedAuthority createGrantedAuthority(CommandLineSecurityConfigurer cliSecurityConfigurer) { | |
| return new SimpleGrantedAuthority("ROLE_" + cliSecurityConfigurer.getRequiredRole()); | |
| } | |
| } |
This file contains bidirectional Unicode text that may be interpreted or compiled differently than what appears below. To review, open the file in an editor that reveals hidden Unicode characters.
Learn more about bidirectional Unicode characters
| @Configuration | |
| @ConditionalOnWebApplication | |
| @EnableConfigurationProperties({WebSecurityConfigurer.class}) | |
| @EnableWebSecurity | |
| public class WebSecurityConfig extends WebSecurityConfigurerAdapter { | |
| @Autowired | |
| private WebSecurityConfigurer webSecurityConfigurer; | |
| @Override | |
| protected void configure(final HttpSecurity http) throws Exception { | |
| http | |
| .csrf().disable() | |
| .authorizeRequests() | |
| .antMatchers(webSecurityConfigurer.getAdminEndpoints()).hasRole("ADMIN") | |
| .antMatchers(webSecurityConfigurer.getUserEndpoints()).hasRole("USER") | |
| .antMatchers(webSecurityConfigurer.getUnsecuredEndpoints()).permitAll() | |
| .antMatchers("/login*").permitAll() | |
| .anyRequest().authenticated() | |
| .and() | |
| .formLogin(); | |
| } | |
| } |
Note: Conditional annotations can also be placed at the method level if needed.
2. Update spring.factories
The spring.factories file will need to be updated with these new classes to mark them as auto-configuration candidates.
This file contains bidirectional Unicode text that may be interpreted or compiled differently than what appears below. To review, open the file in an editor that reveals hidden Unicode characters.
Learn more about bidirectional Unicode characters
| org.springframework.boot.autoconfigure.EnableAutoConfiguration=\ | |
| com.ibm.developer.security.SecurityConfig,\ | |
| com.ibm.developer.security.WebSecurityConfig,\ | |
| com.ibm.developer.security.NonWebSecurityConfig |
3. Curate Your POM
I will cover this in-depth in a separate article, but a key element in building a good starter, particularly when using @Conditional, is setting up the POM for your starter correctly. Commonly Conditionals will be looking for the presence (or non-presence) of classes on classpath. In my starter POM I made use of optionals, which made consuming my starter easier for console applications:
This file contains bidirectional Unicode text that may be interpreted or compiled differently than what appears below. To review, open the file in an editor that reveals hidden Unicode characters.
Learn more about bidirectional Unicode characters
| <project xmlns="http://maven.apache.org/POM/4.0.0" | |
| xmlns:xsi="http://www.w3.org/2001/XMLSchema-instance" | |
| xsi:schemaLocation="http://maven.apache.org/POM/4.0.0 http://maven.apache.org/xsd/maven-4.0.0.xsd"> | |
| <modelVersion>4.0.0</modelVersion> | |
| <groupId>org.my.developer</groupId> | |
| <artifactId>my-org-starter-security</artifactId> | |
| <version>0.0.1-SNAPSHOT</version> | |
| <packaging>jar</packaging> | |
| <name>my-org-starter-security</name> | |
| <url>http://maven.apache.org</url> | |
| <properties> | |
| <java.version>1.8</java.version> | |
| <maven.compiler.source>1.8</maven.compiler.source> | |
| <project.build.sourceEncoding>UTF-8</project.build.sourceEncoding> | |
| <maven.compiler.target>1.8</maven.compiler.target> | |
| <spring.boot.version>2.2.2.RELEASE</spring.boot.version> | |
| <spring.framework.version>5.2.1.RELEASE</spring.framework.version> | |
| </properties> | |
| <dependencies> | |
| <dependency> | |
| <groupId>org.springframework.boot</groupId> | |
| <artifactId>spring-boot-starter</artifactId> | |
| <version>${spring.boot.version}</version> | |
| <scope>compile</scope> | |
| </dependency> | |
| <dependency> | |
| <groupId>org.springframework.boot</groupId> | |
| <artifactId>spring-boot-configuration-processor</artifactId> | |
| <version>${spring.boot.version}</version> | |
| </dependency> | |
| <dependency> | |
| <groupId>org.springframework</groupId> | |
| <artifactId>spring-aop</artifactId> | |
| <version>${spring.framework.version}</version> | |
| <scope>compile</scope> | |
| </dependency> | |
| <dependency> | |
| <groupId>org.springframework.security</groupId> | |
| <artifactId>spring-security-config</artifactId> | |
| <version>${spring.framework.version}</version> | |
| <scope>compile</scope> | |
| </dependency> | |
| <!– Optional Dependencies –> | |
| <dependency> | |
| <groupId>org.springframework.boot</groupId> | |
| <artifactId>spring-boot-starter-web</artifactId> | |
| <version>${spring.boot.version}</version> | |
| <optional>true</optional> | |
| </dependency> | |
| <dependency> | |
| <groupId>org.springframework.security</groupId> | |
| <artifactId>spring-security-web</artifactId> | |
| <version>${spring.framework.version}</version> | |
| <scope>compile</scope> | |
| <optional>true</optional> | |
| </dependency> | |
| </dependencies> | |
| <build> | |
| <plugins> | |
| <plugin> | |
| <groupId>org.apache.maven.plugins</groupId> | |
| <artifactId>maven-jar-plugin</artifactId> | |
| <version>3.1.2</version> | |
| <configuration> | |
| <archive> | |
| <addMavenDescriptor>false</addMavenDescriptor> | |
| <manifest> | |
| <addDefaultImplementationEntries>false</addDefaultImplementationEntries> | |
| <addDefaultSpecificationEntries>false</addDefaultSpecificationEntries> | |
| </manifest> | |
| </archive> | |
| </configuration> | |
| </plugin> | |
| </plugins> | |
| </build> | |
| </project> |
Metadata for Configuration
Inevitably some amount of configuration is needed. Remembering the exact name for a property or the correct values to supply it with can be difficult. To address this the Spring team provides a mechanism for defining metadata about configuration properties which can provide developers with which properties are available, information about those properties, and hints on valid values.
There are several options for supplying configuration metadata.
1. Add the spring-boot-configuration-processor:
Before you can do anything with metadata you will need to add the spring-boot-configuration-processor to your pom file for the metadata to be generated:
This file contains bidirectional Unicode text that may be interpreted or compiled differently than what appears below. To review, open the file in an editor that reveals hidden Unicode characters.
Learn more about bidirectional Unicode characters
| <dependency> | |
| <groupId>org.springframework.boot</groupId> | |
| <artifactId>spring-boot-configuration-processor</artifactId> | |
| <version>2.2.2.RELEASE</version> | |
| <optional>true</optional> | |
| </dependency> |
2. Add META-INF/spring-configuration-metadata.json
Under the META-INF folder where we earlier added spring.factories you will need to create another file called spring-configuration-metadata.json which, as its name suggests, Spring will read to generate configuration meta data.
With the initial setup work done, there are several ways to provide configuration metadata. Below at two popular ways of doing this.
Defining metadata in spring-configuration-metadata
Metadata can be defined directly within the spring-configuration-metadata file. Here I am providing metadata on how to configure console security:
This file contains bidirectional Unicode text that may be interpreted or compiled differently than what appears below. To review, open the file in an editor that reveals hidden Unicode characters.
Learn more about bidirectional Unicode characters
| { | |
| "groups": [ | |
| { | |
| "name": "my-org.cli.security", | |
| "type": "org.my.developer.security.CommandLineSecurityConfigurer" | |
| }, | |
| { | |
| "name": "my-org.web.security", | |
| "type": "org.my.developer.security.WebSecurityConfigurer" | |
| } | |
| ], | |
| "properties": [ | |
| { | |
| "name": "my-org.cli.security.required-role", | |
| "type": "java.lang.String", | |
| "description": "The role a user must have to run the application." | |
| } | |
| ], | |
| "hints": [ | |
| { | |
| "name": "my-org.cli.security.required-role", | |
| "values": [ | |
| { | |
| "value": "USER", | |
| "description": "Standard user role, should only have access to READ functions." | |
| }, | |
| { | |
| "value": "ADMIN", | |
| "description": "Administrative user role, should only have access to READ and WRITE functions." | |
| } | |
| ] | |
| } | |
| ] | |
| } |
With this added, going into application.properties hints are provided saying that my-org.cli.security.required-role is a property, providing information on that property, and then with the hints field, valid values and their meaning can also be provided. This metadata makes configuring security for console applications much easier for developers.
Binding Properties to a Class
Within a @Configuration class I could just use a @Value to retrieve the value of my-org.cli.security.required-role. However I can also bind that property to a class as well, this is particularly helpful when dealing with several properties. To do this simply create a POJO and add a @ConfigurationProperties annotation to it. You will also need to give it a prefix that is the same as the groups value you defined in spring-configuration-metadata, so in this case my-org.cli.security.
This file contains bidirectional Unicode text that may be interpreted or compiled differently than what appears below. To review, open the file in an editor that reveals hidden Unicode characters.
Learn more about bidirectional Unicode characters
| @ConfigurationProperties(prefix="my-org.cli.security") | |
| public class CommandLineSecurityConfigurer { | |
| /** | |
| * The role a user must have to run the application. | |
| */ | |
| private String requiredRole; | |
| public String getRequiredRole() { | |
| return requiredRole; | |
| } | |
| public void setRequiredRole(String requiredRole) { | |
| this.requiredRole = requiredRole; | |
| } | |
| } |
Supply Properties to a Configuration Class
If we want to retrieve the values out of CommandLineSecurityConfigurer we will need to annotate a @Configuration class with @EnableConfigurationProperties({ CommandLineSecurityConfigurer.class }), like I did in NonWebSecurityConfig.
Fields and Javadoc as Metadata
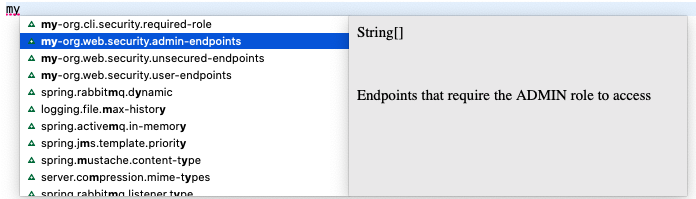
Class fields and Javadoc can also be used to provide metadata for properties. I created a second properties class, WebSecurityConfigurer. In this class I have three properties, userEndpoints, adminEndpoints, unsecuredEndpoints, each with Javadoc attached. Because I use the same group name for the prefix in @ConfigurationProperties as I supplied above in spring-configuration-metadata, Spring will process the fields and Javadoc and generate property metadata from it. As can be seen in the screen shot below the code. Like above, the values supplied in applications.properties will be bound to the fields.
This file contains bidirectional Unicode text that may be interpreted or compiled differently than what appears below. To review, open the file in an editor that reveals hidden Unicode characters.
Learn more about bidirectional Unicode characters
| @ConfigurationProperties(prefix = "my-org.web.security") | |
| public class WebSecurityConfigurer { | |
| /** | |
| * Endpoints that require the USER role to access | |
| */ | |
| private String[] userEndpoints = new String[] {}; | |
| /** | |
| * Endpoints that require the ADMIN role to access | |
| */ | |
| private String[] adminEndpoints = new String[] {}; | |
| /** | |
| * Endpoints that have no security requirements. | |
| * | |
| * Default value: /public** | |
| */ | |
| private String[] unsecuredEndpoints = new String[] {"/public**"}; | |
| public String[] getUserEndpoints() { | |
| return userEndpoints; | |
| } | |
| public void setUserEndpoints(String[] userEndpoints) { | |
| this.userEndpoints = userEndpoints; | |
| } | |
| public String[] getAdminEndpoints() { | |
| return adminEndpoints; | |
| } | |
| public void setAdminEndpoints(String[] adminEndpoints) { | |
| this.adminEndpoints = adminEndpoints; | |
| } | |
| public String[] getUnsecuredEndpoints() { | |
| return unsecuredEndpoints; | |
| } | |
| public void setUnsecuredEndpoints(String[] unsecuredEndpoints) { | |
| this.unsecuredEndpoints = unsecuredEndpoints; | |
| } | |
| } |
Providing Sensible Configuration Defaults
Another way Spring Boot is described as being “opinionated” is through providing “sensible defaults”. A common way this is experienced is through the default port number Spring Boot uses of 8080. Providing default property values is super easy, as I have done above by initializing unsecuredEndpoints with "/public**".
Conclusion
Starters offer a lot of opportunities for organizations to improve the experience of their developers. This article only scrapes the surface of what is possible. Be sure to check out the provided links for more details on how to create starters as well as the official documentation:
Auto-configuration: https://docs.spring.io/spring-boot/docs/current/reference/html/spring-boot-features.html#boot-features-developing-auto-configuration
Providing metadata: https://docs.spring.io/spring-boot/docs/current/reference/html/appendix-configuration-metadata.html
You can find the code example used in this article on my GitHub.

Thanks for the great tutorial!
LikeLike
How does one package the custom starter and deploy it on an Artifactory Server for other developers to use as a dependency?
LikeLike