
Written by Diogo Souza✏️
Django is one of the most complete web development frameworks available.
With the power of Python, we can get an application up and running in just about no time.
It manages everything from the database to the final HTML sent to the client.
However, with the advent of Single-page applications (SPAs), it’s become increasingly common to create applications that use Django only to provide an API that responds to JSON data consumed by applications developed in the most varied JavaScript frameworks.
It’s actually a trend that the majority of languages are following.
This architecture (that separates the front from the back-end) allows a better decoupling of them both, with teams that can develop in their domains completely independently.
It also enables multiple client apps to interact with the same API, while ensuring data integrity and business rules, and a variety of user interfaces.
On the other hand, two different projects generate even more work: two separate deployments, two different environments to configure, etc.
One way to simplify this is to use Django’s own capabilities to serve static files. After all, the front end application is nothing more than a set of files of this type.
In this article, we’ll outline how to create a simple CRUD API with Django and its famous Django REST Framework free from CORS common issues, and integrate it with a React app. We’ll cover everything from setup and configuration to the customization of our front-end components and back-end API.
You can expose your API in different ways with Django. While GraphQL is a safe bet, we’re going to use traditional REST endpoints.
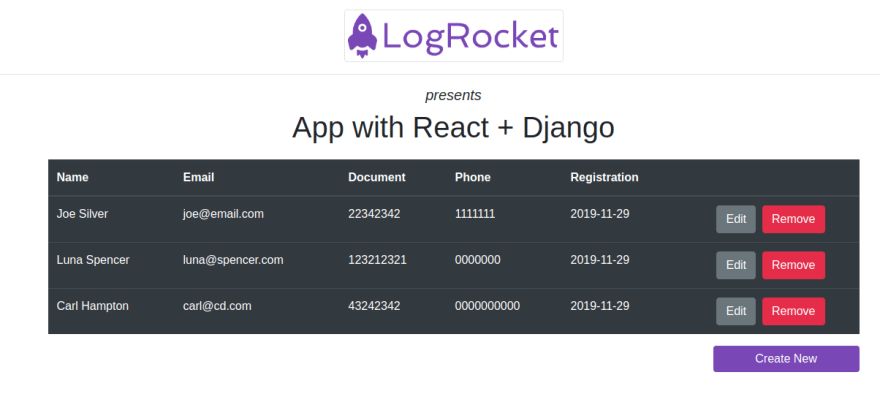
By the end of this tutorial, this will be our final output:

First stop: setup
For this article, we’re not going to cover the installation of basic tools like Python, for example.
Here’s the list of things you need to have set up in your machine before you can follow this article:
- Python 3 (if you’re using Linux, chances are that it’s already installed. Run python3 -V command to check)
- Pip (the default Python package installer)
- NodeJS(in a version 6 or plus) and npm (5.2+)
In the article, we’ll also make use of the handy Python feature: venv.
It stands for Python Virtual Environment, and basically allows developers to create a folder that’ll act exactly like a specific Python environment.
In other words, every time you add specific packages and modules or a version of a personal library of your own and you don’t want to mix them among your different Python projects locally, you can use venv to create and manage this for each virtual environment you have.
Let’s start then by installing it on your machine. Run the following command (for Linux):
sudo apt install -y python3-venv
Then, go to a folder of your choice and create the following folder:
mkdir environments
Let’s run the command inside this folder to create our venv (remember to always give it a good name):
python3 -m venv logrocket_env
After you enter the created folder, you’ll see some others (bin, lib, share, etc.) to guarantee you are in an isolated context of Python configuration.
But before you can make use of it, you have to make sure it’s activated:
source logrocket_env/bin/activate
Then your command line will look like this: (the name in parentheses is your confirmation that you’re in the venv):
(logrocket_env) diogo@localhost: _
Note: Once inside a venv, you can use the commands pip or python normally. If you’d be out of it, you must go for pip3 and python3.
That’s it. You’re good to go with your venv.
Let’s jump to Django’s installation by running the following command inside of your venv:
pip install django djangorestframework django-cors-headers
Note that we’re installing two more dependencies for our API:
– Django REST Framework: a powerful and flexible toolkit for building Web APIs
– django-cors-headers: app for handling the server headers required for Cross-Origin Resource Sharing (CORS).
This is going to be useful when we try to access the API from a different application (React)
We’ll also make use of two Django’s features designed to help us with boilerplate configs:
- django-admin: Django’s automatic admin interface. It’s basically a command-line utility to perform handy operations with Django
- manage.py: is a script that will help us to manage our database, creating tables from our models, migration and versioning, as well as the proper creation of our projects
Now, we’ll run the following command to create our API project (remember that you must be inside of your venv):
django-admin startproject django_react_proj
After the project is created, check the root folder for the manage.py file we mentioned earlier. The rest of the files we’ll explore further.
Let’s start the configuration by the settings.py inside the django_react_proj/ folder.
When you open it, you’ll see a lot of configs, but the INSTALLED_APPS is the one that matters to us.
Add the following three lines to the array:
INSTALLED_APPS = [
   ...
    'rest_framework',
    'corsheaders',
    'students'
]
Those are the dependencies we’ve previously installed, along with the name of our API folder (to be created).
Now, add the following into the MIDDLEWARE array:
MIDDLEWARE = [
    ....
    'corsheaders.middleware.CorsMiddleware',
    'django.middleware.common.CommonMiddleware',
]
They correspond to a filter that’ll intercept all of our application’s requests and apply CORS logic to them.
However, since we’re working full localhost, we’ll disable the CORS feature by adding the following to the same file:
CORS_ORIGIN_ALLOW_ALL = True
Great! Now, let’s move on to the models and views of our application.
In order to create some preset files, we’ll make use of manage.py script once again. This time, run the following:
python manage.py startapp students
After that, a folder students/ will be created, along with models.py and views.py, both with little to no content inside.
Let’s start, then, by adding our models to the models.py file.
So, remove everything from the file and replace it with the following:
from django.db import models

class Student(models.Model):
    name = models.CharField("Name", max_length=240)
    email = models.EmailField()
    document = models.CharField("Document", max_length=20)
    phone = models.CharField(max_length=20)
    registrationDate = models.DateField("Registration Date", auto_now_add=True)

    def __str__(self):
        return self.name
Notice that our class extends from Django’s Model class.
This will make our lives easier once it connects directly to the Django model framework, which we’ll use to create our database tables.
It’s also important to set all the fields with the proper types, as well as configurations (max length, if it’s required or not, description, autocreation, etc.)
Now, let’s export our models to the database through the migrations Django feature.
Migrations are Django’s way of propagating changes you make to your models (adding a field, deleting a model, etc.) into your database schema.
They’re designed to be mostly automatic, but you’ll need to know when to make migrations, when to run them, and what common problems you may run into.
Go to the root of the application and run the following:
python manage.py makemigrations
You’ll see the name of the file created for the versioning of these changes, and where it’s placed.
Then, we need to apply the changes to the database itself:
python manage.py migrate
The next step consists of creating what we call a data migration file.
It represents the direct manipulation of data into the database.
Run the following command:
python manage.py makemigrations --empty --name students students
Then, we’ll see a second file (note that the versioning is made upon numbers by the end of the file, to maintain the order).
After that, go to the django_react_proj/students/migrations/ folder and change the content to the following:
from django.db import migrations

def create_data(apps, schema_editor):
    Student = apps.get_model('students', 'Student')
    Student(name="Joe Silver", email="joe@email.com", document="22342342", phone="00000000").save()

class Migration(migrations.Migration):

    dependencies = [
        ('students', '0001_initial'),
    ]

    operations = [
        migrations.RunPython(create_data),
    ]
In short, the create_data method recovers the Student model object and creates initial data, just so that our database isn’t empty when the API starts.
The dependencies property relates the other files to be considered into the migration process.
The operations are basically the actions Django has to perform once the migration is triggered.
Now, we’re ready to run the migrate command again.
So, in the django_react_proj/ folder, run:
python manage.py migrate
The REST API
Now it’s time to dive into the REST API, the one we’re going to build on top of Django REST Framework, as we’ve mentioned.
Here, you’ll get in touch with two main worlds: the views and urls. A view is the initial entrypoint of a request made upon a specific endpoint served by a url.
This is all mapped by the Django REST Framework once we connect the function itself to the endpoint. We’ll also make use of the serializers.
They allow complex data such as querysets and model instances to be converted to native Python datatypes that can then be easily rendered into JSON. Let’s start there.
Create a new file serializers.py into the students/ folder and add the following content:
from django.db import migrations

def create_data(apps, schema_editor):
    Student = apps.get_model('students', 'Student')
    Student(name="Joe Silver", email="joe@email.com", document="22342342", phone="00000000").save()

class Migration(migrations.Migration):

    dependencies = [
        ('students', '0001_initial'),
    ]

    operations = [
        migrations.RunPython(create_data),
    ]
The Meta class is important here because it defines the metadata information that our model has (database) and that must be converted to the Student class.
Next, let’s open the urls.py file located in the django_react_proj/ folder and change its content to the following:
from django.contrib import admin
from django.urls import path
from students import views
from django.conf.urls import url

urlpatterns = [
    path('admin/', admin.site.urls),
    url(r'^api/students/$', views.students_list),
    url(r'^api/students/(?P[0-9]+)$', views.students_detail),
]
The admin path was already there.
The only things we’ve added are the students endpoints.
Note that each of them is connected to a view function (to be created), so this is the place where we route our requests.
The first endpoint will handle both creations (POST) and listing (GET).
The second one will remove (DELETE) or update (PUT) the data of a single student. Simple, right?
Now, let’s go to the views. Open up the students/views.py file and copy in the following code:
from rest_framework.decorators import api_view
from rest_framework import status

from .models import Student
from .serializers import *

@api_view(['GET', 'POST'])
def students_list(request):
    if request.method == 'GET':
        data = Student.objects.all()

        serializer = StudentSerializer(data, context={'request': request}, many=True)

        return Response(serializer.data)

    elif request.method == 'POST':
        serializer = StudentSerializer(data=request.data)
        if serializer.is_valid():
            serializer.save()
            return Response(status=status.HTTP_201_CREATED)

        return Response(serializer.errors, status=status.HTTP_400_BAD_REQUEST)

@api_view(['PUT', 'DELETE'])
def students_detail(request, pk):
    try:
        student = Student.objects.get(pk=pk)
    except Student.DoesNotExist:
        return Response(status=status.HTTP_404_NOT_FOUND)

    if request.method == 'PUT':
        serializer = StudentSerializer(student, data=request.data,context={'request': request})
        if serializer.is_valid():
            serializer.save()
            return Response(status=status.HTTP_204_NO_CONTENT)
        return Response(serializer.errors, status=status.HTTP_400_BAD_REQUEST)

    elif request.method == 'DELETE':
        student.delete()
        return Response(status=status.HTTP_204_NO_CONTENT)
The first method, students_list, is handling both GET and POST operations over the root endpoint of our API.
This means every time we make a request over http://localhost:8000/api/students with GET and POST HTTP verbs, we’ll execute this method.
The first thing is to get all the students from our model through the Student object.
It provides an implicit object called object with a method to access the entire database: all().
Then, we pass the result to our serializer, which will take care of the converting process before we return it as a response.
For the POST method, note that we’re first calling the is_valid() method on the serializer to ensure that the data received is conformed with our model.
Otherwise the serializer will throw an exception here. If all is fine, we save it to the datastore.
The next PUT and DELETE operations are pretty much the same, changing only the HTTP verbs and the responses.
That’s it!
Now, let’s run our Django application in order to test these endpoints. Run the following command into the root folder:
python manage.py runserver
After you see the log showing our server is up and running, go to the browser and access http://localhost:8000/api/students/. You’ll see something like this:

What you see here is the Django’s Browsable API: a human-friendly HTML output that allow for easy browsing of resources, as well as forms for submitting data to the resources.
It’s very handy for testing your endpoints easily without having to make use of cURL or other UI tools.
You can also use the other HTTP methods through the form in the bottom of the image. Go ahead and play around with it.
Building the React app
Now it’s front-end time.
It’s important to note that we’re not going to dive into React details here (there’s a bunch of articles about it in LogRocket’s blog if you’re a beginner).
The focus of this article is to show you how to consume a Django API quickly from a React app.
In this article, we’ll use the latest version of React.
However, feel free to use whichever version you prefer. We also won’t discuss the use of Hooks or other side features of React since the purpose is the API consumption itself.
Once you have Node and npm installed, let’s run the following command in the root folder of our Django project to create our React app:
npx create-react-app students-fe
If you don’t know create-react-app, I’d suggest to go here.
We’ll divide our front end in some smaller components, as seen in the following figure:

The Header will store the header information, logo, etc.
The Home will be our main container, storing the rest of the other components, like the Listing of the students in a table.
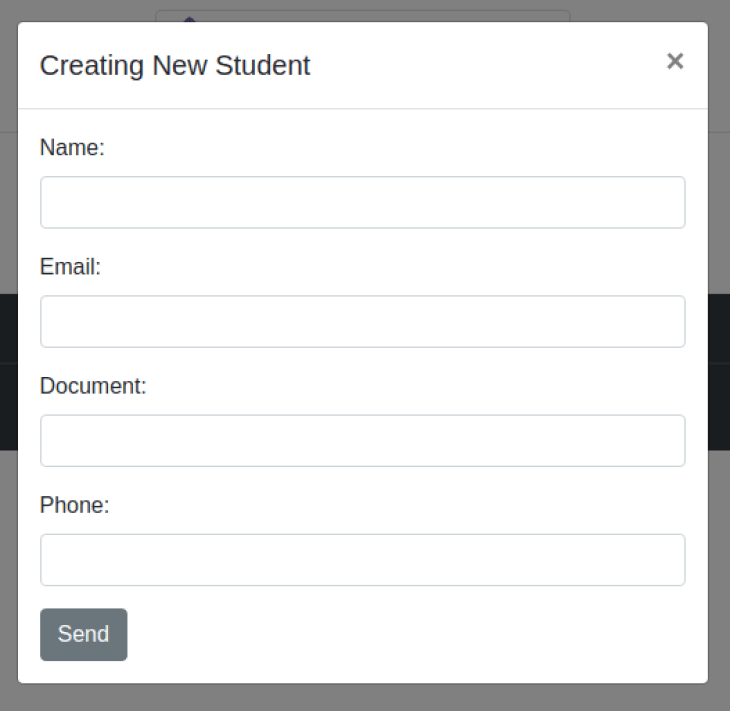
We’ll also have two more components for the forms: the update/add form will be pretty much the same components — having both functions depends on which one is active now (they’re going to be placed in modals):
Let’s go right to it.
First, let’s add some important dependencies to our students-fe project, so cd into the project and run:
npm install bootstrap reactstrap axios --save
This is because we’ll make use of Bootstrap for the styling, and reactstrap is a very powerful way to do this since it’s easier to use ready Bootstrap built-in components.
Axios is the promise-based HTTP client that we’ll use to make HTTP request calls to our Django API.
First of all, In you src/ folder create another folder called constants, and then a file index.js.
It’ll store the utility constants of our React project. Add a single constant, just to keep the url of our API:
export const API_URL = "http://localhost:8000/api/students/";
Then, let’s go to the components creation, starting by the header.
Create another folder called components and, then, a JavaScript file called Header.js. Add the following content:
import React, { Component } from "react";

class Header extends Component {
  render() {
    return (
      <div className="text-center">
        <img
          src="https://logrocket-assets.io/img/logo.png"
          width="300"
          className="img-thumbnail"
          style={{ marginTop: "20px" }}
        />
        <hr />
        <h5>
          <i>presents</i>
        </h5>
        <h1>App with React + Django</h1>
      </div>
    );
  }
}

export default Header;
This is pretty much static HTML represented under JSX. Nothing much of note here.
Next, let’s change the strategy and build the next components from the most inner to the outer ones.
In the same folder, create a new file NewStudentForm.js and add the following:
import React from "react";
import { Button, Form, FormGroup, Input, Label } from "reactstrap";

import axios from "axios";

import { API_URL } from "../constants";

class NewStudentForm extends React.Component {
  state = {
    pk: 0,
    name: "",
    email: "",
    document: "",
    phone: ""
  };

  componentDidMount() {
    if (this.props.student) {
      const { pk, name, document, email, phone } = this.props.student;
      this.setState({ pk, name, document, email, phone });
    }
  }

  onChange = e => {
    this.setState({ [e.target.name]: e.target.value });
  };

  createStudent = e => {
    e.preventDefault();
    axios.post(API_URL, this.state).then(() => {
      this.props.resetState();
      this.props.toggle();
    });
  };

  editStudent = e => {
    e.preventDefault();
    axios.put(API_URL + this.state.pk, this.state).then(() => {
      this.props.resetState();
      this.props.toggle();
    });
  };

  defaultIfEmpty = value => {
    return value === "" ? "" : value;
  };

  render() {
    return (
      <Form onSubmit={this.props.student ? this.editStudent : this.createStudent}>
        <FormGroup>
          <Label for="name">Name:</Label>
          <Input
            type="text"
            name="name"
            onChange={this.onChange}
            value={this.defaultIfEmpty(this.state.name)}
          />
        </FormGroup>
        <FormGroup>
          <Label for="email">Email:</Label>
          <Input
            type="email"
            name="email"
            onChange={this.onChange}
            value={this.defaultIfEmpty(this.state.email)}
          />
        </FormGroup>
        <FormGroup>
          <Label for="document">Document:</Label>
          <Input
            type="text"
            name="document"
            onChange={this.onChange}
            value={this.defaultIfEmpty(this.state.document)}
          />
        </FormGroup>
        <FormGroup>
          <Label for="phone">Phone:</Label>
          <Input
            type="text"
            name="phone"
            onChange={this.onChange}
            value={this.defaultIfEmpty(this.state.phone)}
          />
        </FormGroup>
        <Button>Send</Button>
      </Form>
    );
  }
}

export default NewStudentForm;
Here, we have some important things going on:
- In the first lines, we’re importing the reactstrap components for the first time including Form, Button, etc, which will comprise our form.
- Then, we created our
stateobject with the corresponding properties of our Student’s model. This is going to be useful to manipulate each prop individually. - The
componentDidMountfunction will run after the component finishes its startup, so we can recover the student’s props from the parent component (this.props) here, and set the state with them (if they exist, for the editing scenario.) - The
onChangefunction will handle the update of each state’s prop with the current value typed in each respective field - The
createStudentfunction will deal with the HTTP POST requests of our form. Every time we press the submit button, this function will be called, triggering the axios’post()function and passing the current state in the request’sbody.Once it’s completed, we’ll call thepropsfunctionsresetState(to refresh the table) andtoggle(to close the modal), they’ll be created further -
editStudentfunction works almost like the previous one, but calling our PUT operation - The
defaultIfEmptyfunction was created as an auxiliary function that’ll check the current value of each field in order to determine if they’re going to be filled with the value of the state (in case any exists, for editing) or not (when creating a new student) - The
renderfunction will just compose our form with the help of reactstrap components. Nothing special here, except for the onSubmit property, which checks for a props’ property called students: if it does exist, the submit function will be for editing (the value was passed by the parent component); otherwise, it’s for creation.
Next, we’ll turn our attention to the modal component that’ll contain the form we’ve just created.
For this, create a new component file called NewStudentModal.js and add the code below:
import React, { Component, Fragment } from "react";
import { Button, Modal, ModalHeader, ModalBody } from "reactstrap";
import NewStudentForm from "./NewStudentForm";

class NewStudentModal extends Component {
  state = {
    modal: false
  };

  toggle = () => {
    this.setState(previous => ({
      modal: !previous.modal
    }));
  };

  render() {
    const create = this.props.create;

    var title = "Editing Student";
    var button = <Button onClick={this.toggle}>Edit</Button>;
    if (create) {
      title = "Creating New Student";

      button = (
        <Button
          color="primary"
          className="float-right"
          onClick={this.toggle}
          style={{ minWidth: "200px" }}
        >
          Create New
        </Button>
      );
    }

    return (
      <Fragment>
        {button}
        <Modal isOpen={this.state.modal} toggle={this.toggle}>
          <ModalHeader toggle={this.toggle}>{title}</ModalHeader>

          <ModalBody>
            <NewStudentForm
              resetState={this.props.resetState}
              toggle={this.toggle}
              student={this.props.student}
            />
          </ModalBody>
        </Modal>
      </Fragment>
    );
  }
}

export default NewStudentModal;
This time, the only state prop we’re creating is the modal’s state in order to check whether it must be open or closed.
The toggle function (the one our form receives as param) will switch the current modal’s value to the opposite every time it’s called.
In the render function, we’re first checking if a create boolean was passed as param from the parent caller to decide if the button is for editing or creating action.
The buttons are created dynamically depending on what the parent said to us.
Then, the Modal component can be mounted upon these conditions further down. Pay attention to where we’re placing the <NewStudentForm /> component we’ve just created.
The NewStudentModal component will be placed into the StudentList.js we’re going to create now:
import React, { Component } from "react";
import { Table } from "reactstrap";
import NewStudentModal from "./NewStudentModal";
import ConfirmRemovalModal from "./ConfirmRemovalModal";
class StudentList extends Component {
render() {
const students = this.props.students;
return (
<Table dark>
<thead>
<tr>
<th>Name</th>
<th>Email</th>
<th>Document</th>
<th>Phone</th>
<th>Registration</th>
<th></th>
</tr>
</thead>
<tbody>
{!students || students.length <= 0 ? (
<tr>
<td colSpan="6" align="center">
<b>Ops, no one here yet</b>
</td>
</tr>
) : (
students.map(student => (
<tr key={student.pk}>
<td>{student.name}</td>
<td>{student.email}</td>
<td>{student.document}</td>
<td>{student.phone}</td>
<td>{student.registrationDate}</td>
<td align="center">
<NewStudentModal
create={false}
student={student}
resetState={this.props.resetState}
/>
<ConfirmRemovalModal
pk={student.pk}
resetState={this.props.resetState}
/>
</td>
</tr>
))
)}
</tbody>
</Table>
);
}
}
export default StudentList;
Here, the focus is explicitly the listing of the students and nothing else.
Be careful not to mix different logic and rules that don’t belong here.
The heart of this component is the iteration over the students prop we’ll receive from the parent component (Home).
The map function will take care of the iteration by providing a variable (student) for us to access each value.
Again, take a look at the NewStudentModal and ConfirmRemovalModal components, which are just placed under the last <td>.
The following is the content of the ConfirmRemovalModal component:
import React, { Component, Fragment } from "react";
import { Modal, ModalHeader, Button, ModalFooter } from "reactstrap";

import axios from "axios";

import { API_URL } from "../constants";

class ConfirmRemovalModal extends Component {
  state = {
    modal: false
  };

  toggle = () => {
    this.setState(previous => ({
      modal: !previous.modal
    }));
  };

  deleteStudent = pk => {
    axios.delete(API_URL + pk).then(() => {
      this.props.resetState();
      this.toggle();
    });
  };

  render() {
    return (
      <Fragment>
        <Button color="danger" onClick={() => this.toggle()}>
          Remove
        </Button>
        <Modal isOpen={this.state.modal} toggle={this.toggle}>
          <ModalHeader toggle={this.toggle}>
            Do you really wanna delete the student?
          </ModalHeader>

          <ModalFooter>
            <Button type="button" onClick={() => this.toggle()}>
              Cancel
            </Button>
            <Button
              type="button"
              color="primary"
              onClick={() => this.deleteStudent(this.props.pk)}
            >
              Yes
            </Button>
          </ModalFooter>
        </Modal>
      </Fragment>
    );
  }
}

export default ConfirmRemovalModal;
This one is also very simple, it hosts the removal operation.
We’ll call this one our DELETE endpoint.
Since it’s also a modal, we must have the state’s modal prop too, as well as the toggle function.
The deleteStudent function will handle the HTTP call to delete the given student. The rest of the code is very similar to what we’ve seen already.
Let’s build our Home.js component now. Create the file and add the following to it:
import React, { Component } from "react";
import { Col, Container, Row } from "reactstrap";
import StudentList from "./StudentList";
import NewStudentModal from "./NewStudentModal";

import axios from "axios";

import { API_URL } from "../constants";

class Home extends Component {
  state = {
    students: []
  };

  componentDidMount() {
    this.resetState();
  }

  getStudents = () => {
    axios.get(API_URL).then(res => this.setState({ students: res.data }));
  };

  resetState = () => {
    this.getStudents();
  };

  render() {
    return (
      <Container style={{ marginTop: "20px" }}>
        <Row>
          <Col>
            <StudentList
              students={this.state.students}
              resetState={this.resetState}
            />
          </Col>
        </Row>
        <Row>
          <Col>
            <NewStudentModal create={true} resetState={this.resetState} />
          </Col>
        </Row>
      </Container>
    );
  }
}

export default Home;
Here, our state will host the array of students we’ll recover from the server.
The resetState function (we’ve called earlier) will just call the getStudents that, in turn, calls the GET endpoint in our API with the full list of students.
The rest of the listing refers to the use of StudentList and NewStudentModal components.
Feel free to organize the exhibition of your components on your own.
This is it—the last thing before we can test our app.
Import the Header and Home components to our App.js file.
import React, { Component, Fragment } from "react";
import Header from "./components/Header";
import Home from "./components/Home";

class App extends Component {
  render() {
    return (
      <Fragment>
        <Header />
        <Home />
      </Fragment>
    );
  }
}

export default App;
Now, run the command npm start and your React app will open the browser in the http://localhost:3000/ url. Make sure to have your Django API up and running as well.
Conclusion
You can access the full source code of this project here.
Of course, this is only one way of doing this.
The good thing about using React is that you can organize your components (or even create more components out of the ones you have) in many ways to achieve the same goal.
In the world of SPAs, your back-end APIs are practically fully independent from the front-end clients.
This gives you the flexibility to change the whole architecture of your API (like switching from Django to Flask, for example) without any side effects to your React apps.
As a challenge, try to add a pagination system to your API/React app.
Django REST Framework provides support for customizable pagination styles and so does React diverse libs.
Full visibility into production React apps
Debugging React applications can be difficult, especially when users experience issues that are difficult to reproduce. If you’re interested in monitoring and tracking Redux state, automatically surfacing JavaScript errors, tracking slow network requests and component load time, try LogRocket.

LogRocket is like a DVR for web apps, recording literally everything that happens on your React app. Instead of guessing why problems happen, you can aggregate and report on what state your application was in when an issue occurred. LogRocket also monitors performance of your app with metrics like client CPU load, client memory usage, and more.
The LogRocket Redux middleware package adds an extra layer of visibility into your user sessions. LogRocket logs all actions and state from your Redux stores.
Modernize how you debug your React apps - Start monitoring for free.
The post Creating an app with React and Django appeared first on LogRocket Blog.


Top comments (0)