When one thinks of PowerShell, one thinks of it as a scripting language. Generally, this is true. While you can write a script that prompts for input and provides output, usually there are no real GUI elements involved, and a cursory glance at the list of PowerShell cmdlets reinforces this idea.
However, it is possible to create a GUI with PowerShell; it just takes a bit more work. Furthermore, once one understands how to do this, it can lead to far more powerful scripts in the future.
A Simple Timer
As with some of my projects, this one started as sort of a challenge to myself. I wanted to create a script that created a form on the screen, and I wanted it to do something. I decided to start with something simple, a form that counted down the time and then closed. (NOTE: The examples in this article work in classic PowerShell but not PowerShell Core since Core is multiplatform.)
Save the following script as Countdown Timer_1.ps1.
|
1 2 3 4 5 6 7 8 9 10 11 12 13 14 15 16 |
$delay = 10 $Counter_Form = New-Object System.Windows.Forms.Form $Counter_Form.Text = "Countdown Timer!" $Counter_Form.Width = 450 $Counter_Form.Height = 200 $Counter_Label = New-Object System.Windows.Forms.Label $Counter_Label.AutoSize = $true $Counter_Form.Controls.Add($Counter_Label) while ($delay -ge 0) { $Counter_Form.Show() $Counter_Label.Text = "Seconds Remaining: $($delay)" start-sleep 1 $delay -= 1 } $Counter_Form.Close() |
The loop should be self-evident. It starts with the selected $delay value and counts down, sleeping for 1 second at a time until it hits 0. Note that due to how PowerShell works, the one-second delay in start-sleep has some slop to it. You should not use this script to launch a space shuttle, but for everyday use it’s fine.
The interesting part of this script is not the loop; it’s the New-Object System.Windows.Forms.Form line. To anyone who has worked with C# or VB.Net or any other .Net managed code, this should look familiar. You are simply calling into the .Net Framework to create a form. This innocuous statement will mean huge ramifications later.
Once you have your form object, you can start to assign some properties, in this case, the title (in the .text) property and height and width.
Finally, you need to put a new object on this form, a label. Once you’ve done that, you simply loop through for the length of your $delay and the form will count down. You should see a screen that looks like this. (Note that the scripts in this article were tested on Dell and Lenovo laptops, an old HP desktop, and an Azure VM but no guarantee that the forms will look the same on all machines. You may have to tweak some of the numbers in the scripts to see the same results.)
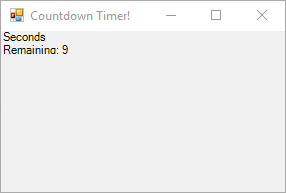
It’s not pretty, but it gets the job done. To fix some of the more obvious problems and create something a bit nicer looking, save the following script as Coutndown Timer_2.ps1.
|
1 2 3 4 5 6 7 8 9 10 11 12 13 14 15 16 17 18 19 20 21 22 23 24 25 26 27 28 |
$delay = 10 $Counter_Form = New-Object System.Windows.Forms.Form $Counter_Form.Text = "Countdown Timer!" $Counter_Form.Width = 450 $Counter_Form.Height = 200 $Counter_Label = New-Object System.Windows.Forms.Label $Counter_Label.AutoSize = $true $Counter_Label.ForeColor = "Green" $normalfont = New-Object System.Drawing.Font("Times New Roman",14) $Counter_Label.Font = $normalfont $Counter_Label.Left = 20 $Counter_Label.Top = 20 $Counter_Form.Controls.Add($Counter_Label) while ($delay -ge 0) { $Counter_Form.Show() $Counter_Label.Text = "Seconds Remaining: $($delay)" if ($delay -lt 5) { $Counter_Label.ForeColor = "Red" $fontsize = 20-$delay $warningfont = New-Object System.Drawing.Font("Times New Roman",$fontsize,[System.Drawing.FontStyle]([System.Drawing.FontStyle]::Bold -bor [System.Drawing.FontStyle]::Underline)) $Counter_Label.Font = $warningfont } start-sleep 1 $delay -= 1 } $Counter_Form.Close() |
You should get something like this when you run the script:
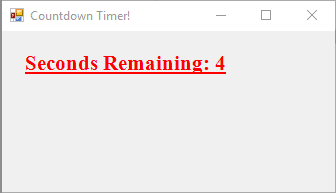
You now have a countdown timer that you can control the label position, font size, style and color which is all very useful. In this case, I took advantage of the ability to move the label down a bit, make the font larger and to change color and size as the countdown approached 0.
Adding Functionality
The previous example is a simple timer, but to make it useful, you will need to add some controls. Again, you can take advantage of the fact that classic PowerShell can make calls into the Windows forms dll.
In addition, you will take advantage of the ability to pass parameters as you start to make this a fully functional application. This time, you will add a new label, a text edit box and OK and Cancel buttons. Combined, all these should give you a fully functional countdown timer.
The following script combines all of the above:
|
1 2 3 4 5 6 7 8 9 10 11 12 13 14 15 16 17 18 19 20 21 22 23 24 25 26 27 28 29 30 31 32 33 34 35 36 37 38 39 40 41 42 43 44 45 46 47 48 49 50 51 52 53 54 55 56 57 58 59 60 61 62 63 64 65 66 67 68 69 70 71 72 73 74 75 76 77 78 |
param([int]$delay=3, [string]$EventLabel = "This is a test") #Setup initial form $Counter_Form = New-Object System.Windows.Forms.Form $Counter_Form.Text = "Countdown Timer!" $Counter_Form.Width = 450 $Counter_Form.Height = 200 $Counter_Form.WindowState = "Normal" #Setup our Normal font $normalfont = New-Object System.Drawing.Font("Times New Roman",14) #Setup initial label $Counter_Label = New-Object System.Windows.Forms.Label $Counter_Label.AutoSize = $true $Counter_Label.ForeColor = "Green" $Counter_Label.Font = $normalfont $Counter_Label.Left = 20 $Counter_Label.Top = 50 #setup input areas $Counter_GetDelay_Label = New-Object System.Windows.Forms.Label $Counter_GetDelay_Label.AutoSize = $true $Counter_GetDelay_Label.Text = "Enter Delay:" $Counter_GetDelay_Label.Left = 10 $Counter_GetDelay_Label.Top = 8 $Counter_Form.Controls.Add($Counter_GetDelay_Label) $Counter_GetDelay_TextBox = New-Object System.Windows.Forms.TextBox $Counter_GetDelay_TextBox.AutoSize = $true $Counter_GetDelay_TextBox.Text = $delay $Counter_GetDelay_TextBox.Left = $Counter_GetDelay_Label.Left + $Counter_GetDelay_Label.Width + 10 $Counter_GetDelay_TextBox.Top = 5 $Counter_Form.Controls.Add($Counter_GetDelay_TextBox) $Counter_Event_Label = New-Object System.Windows.Forms.Label $Counter_Event_Label.AutoSize = $true $Counter_Event_Label.Text = $EventLabel $Counter_Event_Label.Location = '20,100' # note we're using a different method to position the text here. $Counter_Event_Label.Font = $normalfont #Setup and handle the OK button $Counter_OKButton = New-Object System.Windows.Forms.Button $Counter_OKButton.AutoSize = $true $Counter_OKButton.Text = "Ok" $Counter_OKButton.Left = 80 $Counter_OKButton.Top = 40 $Counter_OKButton.Add_Click({ $delay=$Counter_GetDelay_TextBox.Text $Counter_Form.Controls.Remove($Counter_GetDelay_Label) $Counter_Form.Controls.Remove($Counter_GetDelay_TextBox) $Counter_Form.Controls.Remove($Counter_OKButton) $Counter_Form.Controls.Remove($Counter_CancelButton) $Counter_Form.Controls.Add($Counter_Label) $Counter_Form.Controls.Add($Counter_Event_Label) while ($delay -gt 0) { $Counter_Label.Text = "Seconds Remaining: $($delay)" if ($delay -lt 5) { $Counter_Label.ForeColor = "Red" $fontsize = 20-$delay $warningfont = New-Object System.Drawing.Font("Times New Roman",$fontsize,[System.Drawing.FontStyle]([System.Drawing.FontStyle]::Bold -bor [System.Drawing.FontStyle]::Underline)) $Counter_Label.Font = $warningfont } start-sleep 1 $delay -= 1 } $Counter_Form.Close() } ) $Counter_Form.Controls.Add($Counter_OKButton) #Setup and handle the cancel button $Counter_CancelButton = New-Object System.Windows.Forms.Button $Counter_CancelButton.AutoSize = $true $Counter_CancelButton.Text = "Cancel" $Counter_CancelButton.Left = $Counter_OKButton.Left + $Counter_OKButton.Width + 10 $Counter_CancelButton.Top = 40 $Counter_CancelButton.Add_Click({$counter_form.Close() }) $Counter_Form.Controls.Add($Counter_CancelButton) #Setup and handle keyboard Enter/Escape $Counter_Form.AcceptButton=$Counter_OKButton $Counter_Form.CancelButton=$Counter_CancelButton #Finally, we show the dialog $Counter_Form.ShowDialog() | Out-Null #absorbs cancel message at end. This occurs for reasons outside scope of this article |
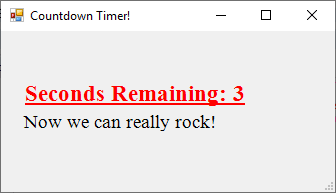
You can call it from the command line and pass the parameter –EventLabel “Now we can really rock!”
|
1 |
& '.\Countdown Timer_3.ps1' -EventLabel "Now we can really rock!" |
When you run it, you will get something like this:
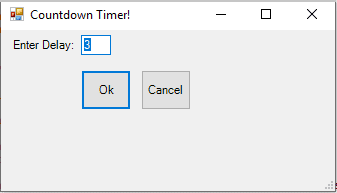
Clicking the Ok button will result in the following:
I will leave it to you as the reader to figure out how to add the possibility of editing the passed in EventLabel parameter within the dialog box.
Controlling the Form Position
When you run this multiple times, you will notice that the position of the dialog box itself changes each time. The next version will fix this. In fact, in the next step, you will make this a fairly functional countdown timer that fills up most of the screen and looks professional.
|
1 2 3 4 5 6 7 8 9 10 11 12 13 14 15 16 17 18 19 20 21 22 23 24 25 26 27 28 29 30 31 32 33 34 35 36 37 38 39 40 41 42 43 44 45 46 47 48 49 50 51 52 53 54 55 56 57 58 59 60 61 62 63 64 65 66 67 68 69 70 71 72 73 74 75 76 77 78 79 80 81 82 83 84 85 86 87 88 89 90 91 92 93 94 95 96 |
param([int]$delay=3, [string]$EventLabel = "This is a test") #Get monitor resolution of primary monitor $monitordetails = [System.Windows.Forms.SystemInformation]::PrimaryMonitorSize $monitorheight = $monitordetails.Height $monitorwidth = $monitordetails.Width #Setup initial form $Counter_Form = New-Object System.Windows.Forms.Form $Counter_Form.Text = "Countdown Timer!" $Counter_Form.Height = $monitorheight * .80 $Counter_Form.Width = $monitorwidth * .80 $Counter_Form.WindowState = "Normal" $Counter_Form.Top = $monitorheight *.10 $Counter_Form.Left = $monitorwidth *.10 $Counter_Form.StartPosition = "manual" # this ensures we can control where on the screen the form appears #Setup our Normal font $normalfont = New-Object System.Drawing.Font("Times New Roman",28) # We will use this size and type of font throughout #Setup initial label $Counter_Label = New-Object System.Windows.Forms.Label $Counter_Label.ForeColor = "Green" $Counter_Label.Font = $normalfont #setup input areas # This will let prompt for the delay if it wasn't passed in on the command line. $Counter_GetDelay_Label = New-Object System.Windows.Forms.Label $Counter_GetDelay_Label.AutoSize = $true $Counter_GetDelay_Label.Text = "Enter Delay:" $Counter_GetDelay_Label.Left = 10 $Counter_GetDelay_Label.Top = 8 $Counter_Form.Controls.Add($Counter_GetDelay_Label) $Counter_GetDelay_TextBox = New-Object System.Windows.Forms.TextBox $Counter_GetDelay_TextBox.AutoSize = $true $Counter_GetDelay_TextBox.Text = $delay $Counter_GetDelay_TextBox.Left = $Counter_GetDelay_Label.Left + $Counter_GetDelay_Label.Width + 10 $Counter_GetDelay_TextBox.Top = 5 $Counter_Form.Controls.Add($Counter_GetDelay_TextBox) $EventLabel_Size= [System.Windows.Forms.TextRenderer]::MeasureText($EventLabel, $normalfont) $Counter_Event_Label = New-Object System.Windows.Forms.Label $Counter_Event_Label.Width = $EventLabel_Size.Width+6 # Apparently despite giving it the string, we need a little extra room. $Counter_Event_Label.Height= $EventLabel_Size.Height $Counter_Event_Label.Text = $EventLabel $Counter_Event_Label.Left = ($Counter_Form.Width/2)-($EventLabel_Size.Width/2) $Counter_Event_Label.Top = ($Counter_Form.Height/2)-($EventLabel_Size.Height/2) $Counter_Event_Label.Font = $normalfont #Setup and handle the OK button $Counter_OKButton = New-Object System.Windows.Forms.Button $Counter_OKButton.AutoSize = $true $Counter_OKButton.Text = "Ok" $Counter_OKButton.Left = 80 $Counter_OKButton.Top = 40 $Counter_OKButton.Add_Click({ # Get our delay the user entered. $delay=$Counter_GetDelay_TextBox.Text # Get rid of the controls we don't need any more. $Counter_Form.Controls.Remove($Counter_GetDelay_Label) $Counter_Form.Controls.Remove($Counter_GetDelay_TextBox) $Counter_Form.Controls.Remove($Counter_OKButton) $Counter_Form.Controls.Remove($Counter_CancelButton) # Now add the labels we want. $Counter_Form.Controls.Add($Counter_Label) $Counter_Form.Controls.Add($Counter_Event_Label) while ($delay -gt 0) { $Counter_Label.Text = "Seconds Remaining: $($delay)" $Counter_LabelSize= [System.Windows.Forms.TextRenderer]::MeasureText($Counter_Label.Text , $normalfont) # we need this so we can figure where to put the countdown labeled, centered. $Counter_Label.Font = $normalfont $Counter_Label.AutoSize = $true $Counter_Label.Left = ($Counter_Form.Width/2)-($Counter_LabelSize.Width/2) # We want it centered. $Counter_Label.Top = $Counter_Form.Height * .3 # We want it near the bottom of the screen. if ($delay -le 5) # Now things are getting close, let's change the color and make it bolder and underline it { $Counter_Label.ForeColor = "Red" $warningfont = New-Object System.Drawing.Font("Times New Roman",28,[System.Drawing.FontStyle]([System.Drawing.FontStyle]::Bold -bor [System.Drawing.FontStyle]::Underline)) $Counter_Label.Font = $warningfont $Counter_LabelSize= [System.Windows.Forms.TextRenderer]::MeasureText($Counter_Label.Text , $warningfont) $Counter_Label.Width = $Counter_LabelSize.Width + 10 $Counter_Label.Left = ($Counter_Form.Width/2)-($Counter_LabelSize.Width/2) } start-sleep 1 $delay -= 1 } $Counter_Form.Close() }) $Counter_Form.Controls.Add($Counter_OKButton) #Setup and handle the cancel button $Counter_CancelButton = New-Object System.Windows.Forms.Button $Counter_CancelButton.AutoSize = $true $Counter_CancelButton.Text = "Cancel" $Counter_CancelButton.Left = $Counter_OKButton.Left + $Counter_OKButton.Width + 10 $Counter_CancelButton.Top = 40 $Counter_CancelButton.Add_Click({$counter_form.Close() }) $Counter_Form.Controls.Add($Counter_CancelButton) #Setup and handle keyboard Enter/Escape $Counter_Form.AcceptButton=$Counter_OKButton $Counter_Form.CancelButton=$Counter_CancelButton #Finally, we show the dialog $Counter_Form.ShowDialog() | Out-Null #absorbs cancel message at end. This occurs for reasons outside scope of this article |
You’ve now created a fully functional countdown timer that will automatically scale to the size of the screen and allow you to configure how long it runs for and what primary message it displays. Future improvements might be to allow the option of having a background graphic and being able to more easily abort the timer in the middle of it running.
Conclusion
Hopefully, now you can see that through the power of PowerShell, in combination with the built-in .Net capabilities, you can create full-fledged applications that can interact with the user, prompting them for input and also providing them with output. In fact, pretty much anything you can do in C# or VB.Net can be done in a very similar fashion in PowerShell without needing to write a full-blown application. That said, writing an application like this using PowerShell ISE can be tedious. For example, it took me a while to get the positioning correct, mostly due to a few typos here and there (for example, using width when I meant height and vice versa). There are plug-ins for Visual Studio and other stand-alone IDEs that can make this task easier. But I wanted to demonstrate the power of PowerShell out of the box without any further add-ons or tools.
All scripts in this article are also available at: https://github.com/stridergdm/SimpleTalk_PowerShell-Scripts

Load comments