How do you perform AWS Fargate monitoring? Today, we’ll discuss the background of AWS Fargate and using Retrace to monitor your code.
As companies evolve from a monolithic architecture to microservice architectures, some common challenges often surface that companies must address during the journey.
In this post, we’ll discuss one of these challenges: observability and how to do it in AWS Fargate.
Twenty plus years ago, applications were different from what they are today. They were fragile, slow and lacked automation. Developers would package software manually. With the aid of file transfer programs, application code landed on servers. Each of these servers had a name and tags. Then, when a server went down, everybody scrambled to resolve the problem and bring business back online. New releases took days to roll out, and businesses could afford minutes or even an hour of downtime.
As the demands for faster, highly available applications increased, things changed. Businesses had one choice: more rapid innovation with frequent software releases.
Today, businesses serve a growing mix of on-premises and remote employees across multiple geographical areas, not to mention customer-facing applications with global availability. A minute of downtime could mean losing millions of dollars.
Container technologies like Docker, which enable you to package your app once and run it everywhere, have become commonplace. Modern applications with microservice architectures. help you to create hundreds of services in one entire system. While modern applications have taken a better turn, they are not without challenges.
From development to production, modern applications come with challenges, including server provisioning, scaling, observability, security and maintenance. For small businesses, finding the right talent to meet and hopefully exceed these challenges can be daunting.
In a world that’s changing fast and with technology disruption happening in every sector, a leading business today may be overtaken tomorrow. To be successful, businesses must leverage technologies that deliver real business value while optimizing costs.
One such technology is AWS Fargate. In 2017, AWS introduced Fargate as a new way of running containers in the cloud to further abstract complexities.
AWS Fargate allows you to deploy container workloads without thinking about EC2 server instances or container orchestration. The grunt work of managing EC2 instances or scaling is taken care of by AWS.
With Fargate, your only focus is building your Docker images and defining some basic requirements for your application. Do that, and you can go to bed with no worries.
As exciting as AWS Fargate sounds, having 360-degree visibility into your apps could still be a problem without the right monitoring tools. For the rest of this post, we’ll look at AWS Fargate monitoring using Retrace.
Retrace is a SaaS APM that gives you granular visibility into your applications. Just as its name indicates, it allows you to monitor and troubleshoot applications faster. Let’s look at how Retrace can help you gain deep visibility into an AWS Fargate application.
First things first. To use Retrace, you need an activation key. The Retrace container agent uses this key to authenticate to the Retrace server. You can get an activation key by signing up for a free Retrace trial account, if you don’t already use the solution. After registration, you’ll receive your activation key by email. Please note that you’ll need the key later on, so don’t lose it.
For the demo app, we’ll create a simple Docker container from a Node.js app, deploy to Fargate, and monitor the app using Retrace.
Now, let’s proceed to create a simple Node.js container application for this demo.
First, install express-generator by executing this:
$ npm install -g express-generator
Next, generate the application boilerplate with this:
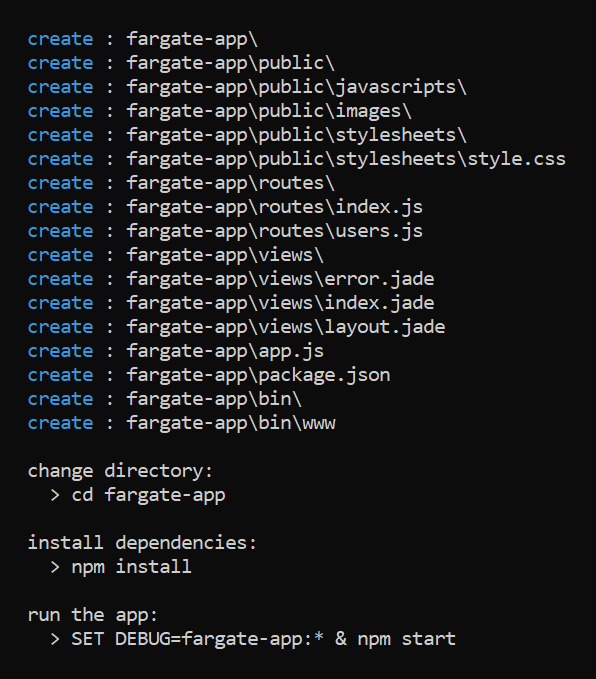
$ express fargate-app
If you ran the command above, then your directory structure should look like this:
Now, execute the command below to install the app dependencies:
$ npm install
For error logging in the application, we need to install a Retrace APM package. You can install it with this command:
$ npm install stackify-node-apm
After installation, it’s important to copy node_modules/stackify-node-apm/stackify.js to the root folder of the application. This is where you define your application environment and Retrace’s activation key.
So, execute the command below to copy:
$ cp node_modules/stackify-node-apm/stackify.js ./
And when you’ve done that, update the content of the file to this:
//stackify.js
exports.config = {
/**
* Your application name.
*/
application_name: process.env.APPLICATION_NAME,
/**
* Your environment name.
*/
environment_name: process.env.STACKIFY_ENV
}
Finally, open app.js and add this line at the top in order to initialize the Retrace profiler:
//app.js
require('stackify-node-apm')
Okay, onto the next step. We’ll now build a Docker container image that AWS Fargate can run.
In order to build the Docker image for the app, we need to create a Dockerfile. A Dockerfile is a text file that contains instructions on how to assemble a Docker image. Ideally, you should have Docker installed for this step.
To keep things simple, we won’t go into details how the Docker build works. You can learn more about it here.
At the root directory of the app, create a Dockerfile with this content:
# filename : Dockerfile
FROM node:12.2.0-alpine
WORKDIR /usr/app
COPY package*.json ./
RUN npm install
COPY . .
CMD [ "npm", "start" ]
Then build a Docker image by running this:
$ docker build .
Usually, the command above will take a couple of minutes to complete the building process.
On successful completion, run the command below to see the Docker image you just built:
$ docker image ls
The output will be similar to the image below. Note the IMAGE ID.
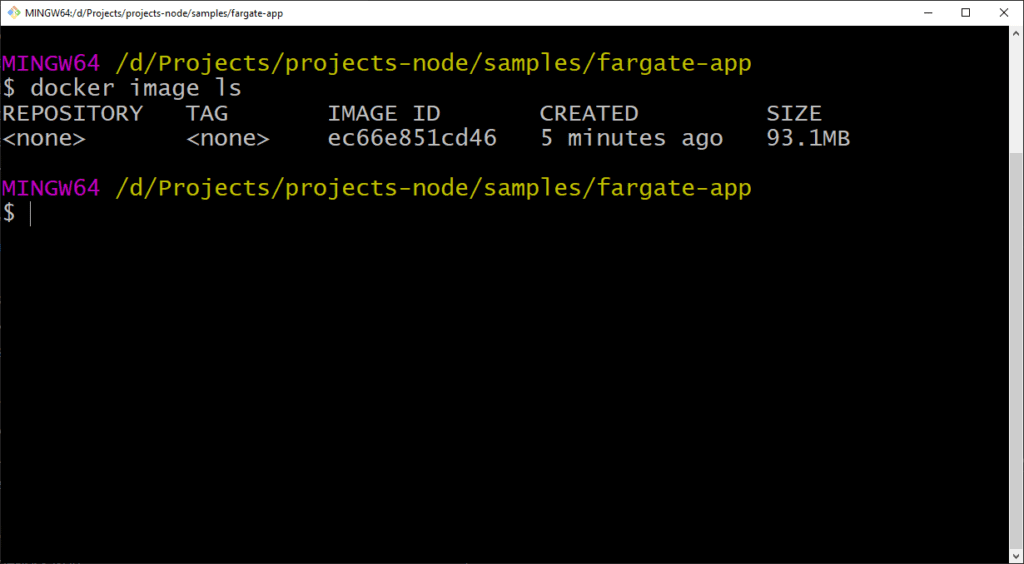
At this point, the image still resides in your local environment. You’ll need to push it to a Docker registry.
A Docker registry is a repository where you can store one or more versions of your Docker image. For this demo, we’ll use DockerHub as our Docker registry.
Before you can push a Docker image to DockerHub, you need to tag it.
You can do so with this command:
$ docker tag <image-id> <docker-registry-username/image-tag>
Ensure you replace the image-id with your Docker IMAGE ID mentioned previously. You’ll also want to replace the docker-registry-username with your registry username and the image-tag with the tag.
$ docker tag 0b2b699a0c8e abiodunjames/stackify-node
Now, we’ll push the image to DockerHub with this command:
docker push abiodunjames/stackify-node
With the Docker image in a Docker registry, the next step is creating a task definition on AWS ECS.
A task definition is the first step to running a container workload with AWS Fargate and is somewhat like a design plan for an application. It’s where we define the images to use, the number of containers for the task, the memory allocation, etc.
But Retrace will not automatically monitor your app. Monitoring AWS Fargate with Retrace requires you to define the Retrace container agent in the same task definition as your application.
A task definition for our demo app and Retrace container agent would look like this:
{
    "containerDefinitions": [
      {
        "cpu": 1,
        "environment": [
          {
            "name": "STACKIFY_DEVICE_ALIAS",
            "value": "Aws Fargate"
          },
          {
            "name": "STACKIFY_ENV",
            "value": "Production"
          },
          {
            "name": "STACKIFY_KEY",
            "value": "YOU-STACKIFY-KET"
          }
        ],
        "mountPoints": [
          {
            "containerPath": "/var/stackify",
            "sourceVolume": "stackify"
          }
        ],
        "image": "stackify/retrace:latest",
        "readonlyRootFilesystem": false,
        "name": "stackify-retrace"
      },
      {
        "portMappings": [
          {
            "hostPort": 80,
            "protocol": "tcp",
            "containerPort": 80
          }
        ],
        "environment": [
          {
            "name": "PORT",
            "value": "80"
          },
          {
            "name": "APPLICATION_NAME",
            "value": "fargate-app"
          },
          {
            "name": "STACKIFY_KEY",
            "value": "YOUR-STACKIFY-KEY"
          }
        ],
        "mountPoints": [
          {
            "containerPath": "/usr/local/stackify",
            "sourceVolume": "stackify"
          }
        ],
        "memory": 128,
        "image": "abiodunjames/stackify-node:latest",
        "name": "fargate-app"
      }
    ],
    "memory": "512",
    "family": "my-fargate-app",
    "requiresCompatibilities": [
      "FARGATE"
    ],
    "networkMode": "awsvpc",
    "cpu": "256",
    "volumes": [
      {
        "name": "stackify"
      }
    ]
  }
Let’s put the code snippet above in a file and name it task-definition.json. Make sure to replace the placeholder YOUR-STACKIFY-KEY with your activation key.
In the task definition, we defined two container images: stackify/retrace and abiodunjames/stackify-node (the Docker image we built). We also defined some environment variables like APPLICATION_NAME, STACKIFY_ENV and STACKIFY_KEY. These variables are passed into the containers.
To create this task on AWS, you’ll have to execute the following command using AWS CLI:
$ aws ecs register-task-definition --cli-input-json file://path/to/task-definition.json
If successful, the description of the task definition will be output in your console. If you list your task definition using the command
$ aws ecs list-task-definitions
… then you should get an output similar to this:
{
"taskDefinitionArns": [
        "arn:aws:ecs:eu-west-1:xxxxxxx:task-definition/my-fargate-app:1"
    ]
}
Before we create the service, let’s create a cluster to run the service in. You can see a cluster as a logical group of resources (tasks and services).
To create a cluster, run this command:
$ aws ecs create-cluster --cluster-name my-fargate-cluster
Now, let’s run the task with this command:
$ aws ecs create-service --cluster my-fargate-cluster --service-name my-service --task-definition my-fargate-app --desired-count 1 --launch-type "FARGATE" --network-configuration "awsvpcConfiguration={subnets=[your-subnet-id],securityGroups=your-security-group-id,assignPublicIp=ENABLED}"
The command above uses a few arguments. Let’s take a moment to look at them.
Also, we enabled automatic public IP assigning.
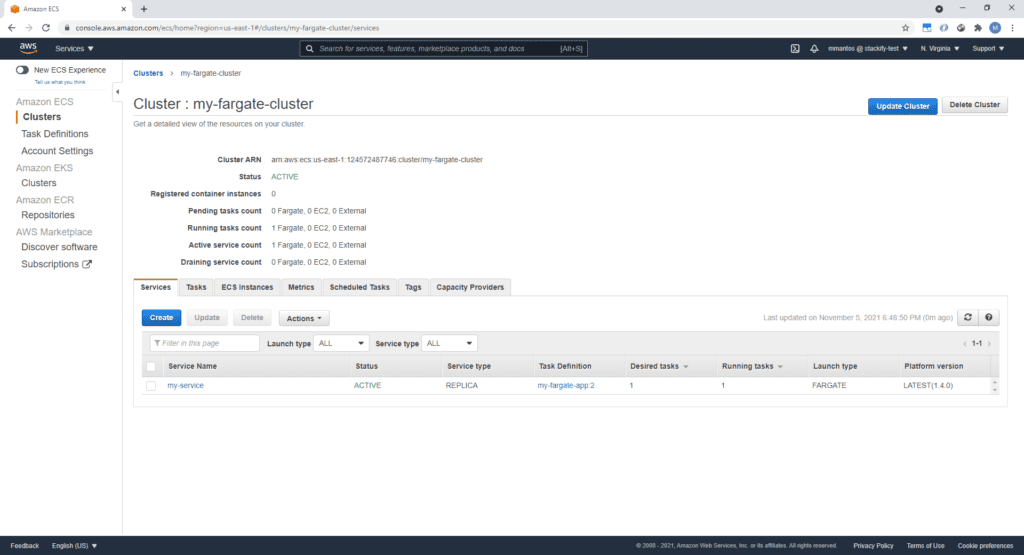
If you log in to the AWS console, you should see the service you just created running in the cluster, as shown in this image:
And if you log in to your Retrace dashboard, you should see metrics from your application in real time. Retrace provides a rich dashboard where you can access your application logs.
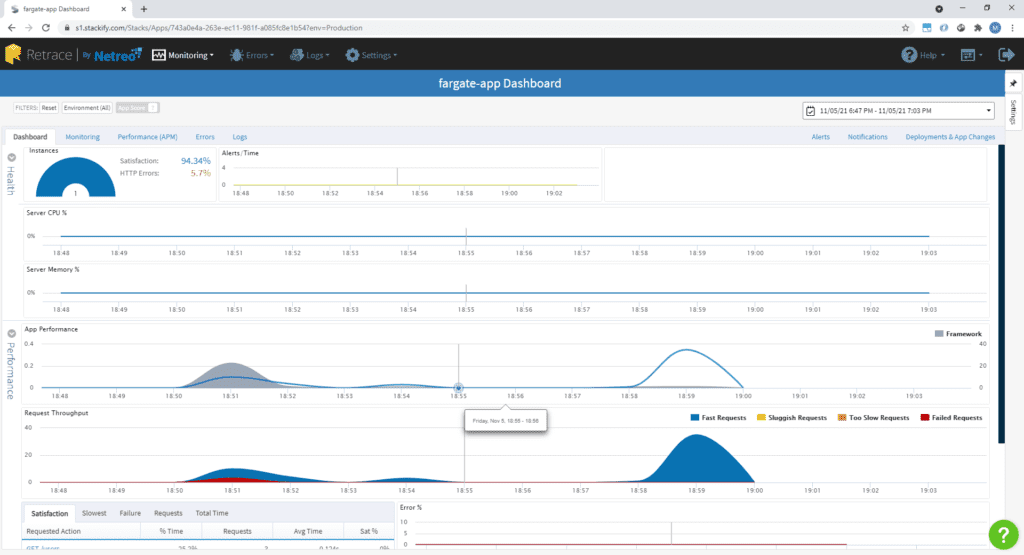
You can drill down to see details of each log.
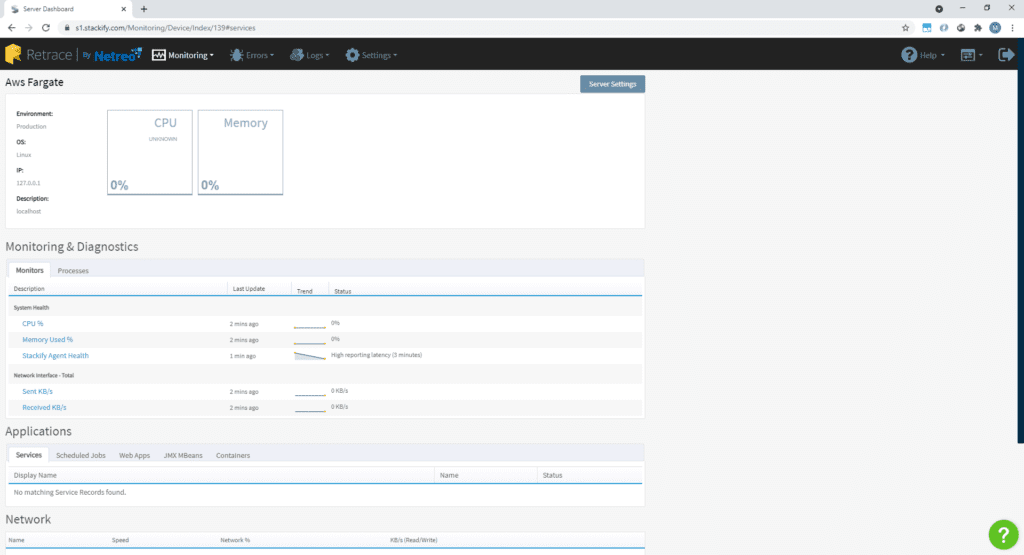
In addition to application logs, Retrace also monitors your system health, availability and resource utilization like CPU, memory and network usage. You can see the information in your Retrace dashboard.
To summarize, we’ve learned all about AWS Fargate monitoring: how you can use the Retrace container agent to monitor your Node.js application running in AWS Fargate in real time.
Retrace also supports other programming languages, like .NET, Java, PHP, Ruby, Python, and EC2 launch types. To build on this knowledge, we recommend you head on to Retrace official documentation.
Stackify's APM tools are used by thousands of .NET, Java, PHP, Node.js, Python, & Ruby developers all over the world.
Explore Retrace's product features to learn more.
If you would like to be a guest contributor to the Stackify blog please reach out to [email protected]