blog
PostgreSQL Deployment & Configuration with Puppet

Puppet is open source software for configuration management and deployment. Founded in 2005, it’s multi-platform and even has its own declarative language for configuration.
The tasks related to administration and maintenance of PostgreSQL (or other software really) consists of daily, repetitive processes that require monitoring. This applies even to those tasks operated by scripts or commands through a scheduling tool. The complexity of these tasks increases exponentially when executed on a massive infrastructure, however, using Puppet for these kind of tasks can often solve these types of large scale problems as Puppet centralizes and automates the performance of these operations in a very agile way.
Puppet works within the architecture at the client/server level where the configuration is being performed; these ops are then diffused and executed on all the clients (also known as nodes).
Typically running every 30 minutes, the agents’ node will collect a set of information (type of processor, architecture, IP address, etc..), also called as facts, then sends the information to the master which is waiting for an answer to see if there are any new configurations to apply.
These facts will allow the master to customize the same configuration for each node.

In a very simplistic way, Puppet is one of the most important DevOps tools available today. In this blog we will take a look at the following…
- The Use Case for Puppet & PostgreSQL
- Installing Puppet
- Configuring & Programming Puppet
- Configuring Puppet for PostgreSQL
The installation and setup of Puppet (version 5.3.10) described below were performed in a set of hosts using CentOS 7.0 as operating system.
The Use Case for Puppet & PostgreSQL
Suppose that there is an issue in your firewall on the machines that host all your PostgreSQL servers, it would then be necessary to deny all outbound connections to PostgreSQL, and do it as soon as possible.

Puppet is the perfect tool for this situation, especially because speed and efficiency are essential. We’ll’ talk about this example presented in the section “Configuring Puppet for PostgreSQL” by managing the parameter listen_addresses.
Installing Puppet
There are a set of common steps to perform either on master or agent hosts:
Step One
Updating of /etc/hosts file with host names and their IP address
192.168.1.85 agent agent.severalnines.com

192.168.1.87 master master.severalnines.com puppet
Step Two
Adding the Puppet repositories on the system
$ sudo rpm –Uvh https://yum.puppetlabs.com/puppet5/el/7/x86_64/puppet5-release-5.0.0-1-el7.noarch.rpmFor other operating systems or CentOS versions, the most appropriate repository can be found in Puppet, Inc. Yum Repositories.
Step Three
Configuration of NTP (Network Time Protocol) server
$ sudo yum -y install chronyStep Four
The chrony is used to synchronize the system clock from different NTP servers and thus keeps the time synchronized between master and agent server.
Once installed chrony it must be enabled and restarted:
$ sudo systemctl enable chronyd.service

$ sudo systemctl restart chronyd.service
Step Five
Disable the SELinux parameter
On the file /etc/sysconfig/selinux the parameter SELINUX (Security-Enhanced Linux) must be disabled in order do not restricts access on both hosts.
SELINUX=disabledStep Six
Before the Puppet installation (either master or agent) the firewall in these hosts must be defined accordingly:
$ sudo firewall-cmd -–add-service=ntp -–permanent

$ sudo firewall-cmd –-reload
Installing the Puppet Master
Once the package repository puppet5-release-5.0.0-1-el7.noarch.rpm added to the system the puppetserver installation can be done:
$ sudo yum install -y puppetserverThe max memory allocation parameter is an important setting to update on /etc/sysconfig/puppetserver file to 2GB (or to 1GB if the service doesn’t start):
JAVA_ARGS="-Xms2g –Xmx2g "In the configuration file /etc/puppetlabs/puppet/puppet.conf it’s necessary to add the following parameterization:
[master]

dns_alt_names=master.severalnines.com,puppet


[main]

certname = master.severalnines.com

server = master.severalnines.com

environment = production

runinterval = 1h
The puppetserver service uses the port 8140 to listen to the node requests, thus it’s necessary to ensure that this port will be enabled:
$ sudo firewall-cmd --add-port=8140/tcp --permanent

$ sudo firewall-cmd --reload
Once all settings made in puppet master, it’s time to start this service up:
$ sudo systemctl start puppetserver

$ sudo systemctl enable puppetserver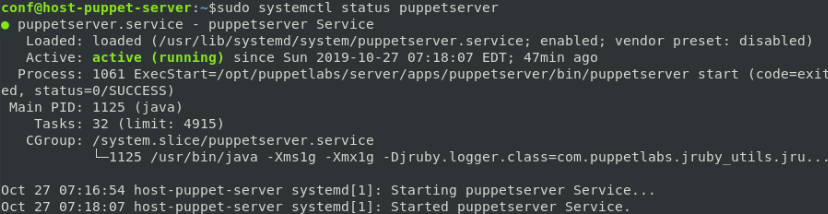
Installing the Puppet Agent
The Puppet agent in the package repository puppet5-release-5.0.0-1-el7.noarch.rpm is also added to the system, the puppet-agent installation can be performed right away:
$ sudo yum install -y puppet-agentThe puppet-agent configuration file /etc/puppetlabs/puppet/puppet.conf needs also to be updated by adding the following parameter:
[main]

certname = agent.severalnines.com

server = master.severalnines.com

environment = production

runinterval = 1h
The next step consists of registering the agent node on the master host by executing the following command:
$ sudo /opt/puppetlabs/bin/puppet resource service puppet ensure=running enable=true

service { ‘puppet’:

ensure => ‘running’,

enable => ‘true’

  }
At this moment, on the master host, there is a pending request from the puppet agent to sign a certificate:

That must be signed by executing one of the following commands:
$ sudo /opt/puppetlabs/bin/puppet cert sign agent.severalnines.comor
$ sudo /opt/puppetlabs/bin/puppet cert sign --allFinally (and once the puppet master has signed the certificate) it’s time to apply the configurations to the agent by retrieving the catalog from puppet master:
$ sudo /opt/puppetlabs/bin/puppet agent --testIn this command, the parameter –test doesn’t mean a test, the settings retrieved from the master will be applied to the local agent. In order to test/check the configurations from master the following command must be executed:
$ sudo /opt/puppetlabs/bin/puppet agent --noopConfiguring & Programming Puppet
Puppet uses a declarative programming approach on which the purpose is to specify what to do and doesn’t matter the way to achieve it!
The most elementary piece of code on Puppet is the resource that specifies a system property such as command, service, file, directory, user or package.
Below it’s presented the syntax of a resource to create an user:
user { 'admin_postgresql':

  ensure     => present,

  uid        => '1000',

  gid        => '1000',

  home       => '/home/admin/postresql'

}
Different resources could be joined to the former class (also known as a manifest) of file with “pp” extension (it stands for Puppet Program), nevertheless, several manifests and data (such as facts, files, and templates) will compose a module. All there logical hierarchies and rules are represented in the diagram below:
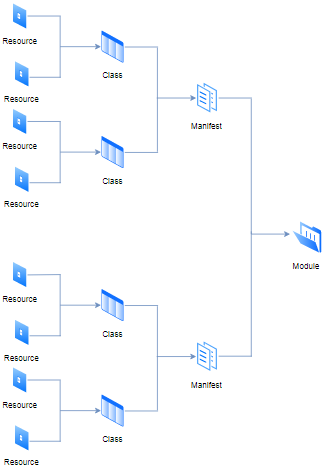
The purpose of each module is to contain all the needed manifests to execute single tasks in a modular way. On the other hand, the concept of class isn’t the same one from object-oriented programming languages, in Puppet, it works as an aggregator of resources.
These files organization has a specific directory structure to follow:
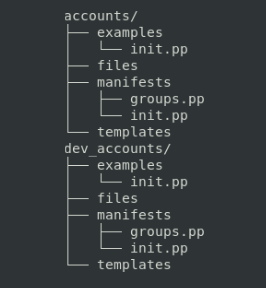
On which the purpose of each folder is the following:
|
Folder |
Description |
|
manifests |
Puppet code |
|
files |
Static files to be copied to nodes |
|
templates |
Template files to be copied to managed nodes(it can be customized with variables) |
|
examples |
Manifest to show how to use the module |
class dev_accounts {

  $rootgroup = $osfamily ? {

    'Debian'  => 'sudo',

    'RedHat'  => 'wheel',

    default   => warning('This distribution is not supported by the Accounts module'),

  }


  include accounts::groups


  user { 'username':

    ensure      => present,

    home        => '/home/admin/postresql',

    shell       => '/bin/bash',

    managehome  => true,

    gid         => 'admin_db',

    groups      => "$rootgroup",

    password    => '$1$7URTNNqb$65ca6wPFDvixURc/MMg7O1'

  }

}
In the next section, we’ll show you how to generate the contents of the examples folder as well the commands to test and publish each module.
Configuring Puppet for PostgreSQL
Before to present the several configuration examples to deploy and maintain a PostgreSQL database it’s necessary to install the PostgreSQL puppet module (on the server host) to use all of their functionalities:
$ sudo /opt/puppetlabs/bin/puppet module install puppetlabs-postgresqlCurrently, thousands of modules ready to use on Puppet are available on the public module repository Puppet Forge.
Step One
Configure and deploy a new PostgreSQL instance. Here is all the necessary programming and configuration to install a new PostgreSQL instance in all nodes.
The first step is to create a new module structure directory as shared previously:
$ cd /etc/puppetlabs/code/environments/production/modules

$ mkdir db_postgresql_admin

$ cd db_postgresql_admin; mkdir{examples,files,manifests,templates}
Then, in the manifest file manifests/init.pp, you need to include the class postgresql::server provided by the installed module :
class db_postgresql_admin{

  include postgresql::server

}
To check the syntax of the manifest, it’s a good practice to execute the following command:
$ sudo /opt/puppetlabs/bin/puppet parser validate init.ppIf nothing is returned, it means that the syntax is correct
To show you how to use this module in the example folder, it’s necessary to create a new manifest file init.pp with the following content:
include db_postgresql_adminThe example location in the module must be tested and applied to the master catalog:
$ sudo /opt/puppetlabs/bin/puppet apply --modulepath=/etc/puppetlabs/code/environments/production/modules --noop init.ppFinally, it’s necessary to define which module each node has access in the file “/etc/puppetlabs/code/environments/production/manifests/site.pp” :
node ’agent.severalnines.com’,’agent2.severalnines.com’{

 include db_postgresql_admin

}
Or a default configuration for all nodes:
node default {

 include db_postgresql_admin

}
Usually each 30min the nodes check the master catalog, nevertheless this query can be forced on node side by the following command:
$ /opt/puppetlabs/bin/puppet agent -tOr if the purpose is to simulate the differences between the master configuration and the current node settings, it could be used the nopp parameter (no operation):
$ /opt/puppetlabs/bin/puppet agent -t --noopStep Two
Update the PostgreSQL instance to listen all interfaces. The previous installation defines an instance setting in a very restrictive mode: only allows connections on localhost as can be confirmed by the hosts associated for the port 5432 (defined for PostgreSQL):
$ sudo netstat -ntlp|grep 5432

tcp        0 0 127.0.0.1:5432          0.0.0.0:* LISTEN   3237/postgres

tcp6       0 0 ::1:5432                :::* LISTEN   3237/postgres
In order to allow listening all interface, it’s necessary to have the following content in the file /etc/puppetlabs/code/environments/production/modules/db_postgresql_admin/manifests/init.pp
class db_postgresql_admin{

  class{‘postgresql:server’:

        listen_addresses=>’*’ #listening all interfaces

       }

}
In the example above there is declared the class postgresql::server and setting the parameter listen_addresses to “*” that means all interfaces.
Now the port 5432 is associated with all interfaces, it can be confirmed with the following IP address/port: “0.0.0.0:5432”
$ sudo netstat -ntlp|grep 5432

tcp        0 0 0.0.0.0:5432            0.0.0.0:* LISTEN   1232/postgres

tcp6       0 0 :::5432                 :::* LISTEN   1232/postgres
To put back the initial setting: only allow database connections from localhost the listen_addresses parameter must be set to “localhost” or specifying a list of hosts, if desired:
listen_addresses = 'agent2.severalnines.com,agent3.severalnines.com,localhost'To retrieve the new configuration from the master host, only it’s needed to request it on the node:
$ /opt/puppetlabs/bin/puppet agent -tStep Three
Create a PostgreSQL Database. The PostgreSQL instance can be created with a new database as well as a new user (with password) to use this database and a rule on pg_hab.conf file to allow the database connection for this new user:
class db_postgresql_admin{

  class{‘postgresql:server’:

        listen_addresses=>’*’ #listening all interfaces

  }


   postgresql::server::db{‘nines_blog_db’:

     user => ‘severalnines’,          password=> postgresql_password(‘severalnines’,’passwd12’)

   }


   postgresql::server::pg_hba_rule{‘Authentication for severalnines’:

     Description =>’Open access to severalnines’,

     type => ‘local’,

database => ‘nines_blog_db’,

     user => ‘severalnines’,

address => ‘127.0.0.1/32’

         auth_method => ‘md5’

   }

}
This last resource has the name of “Authentication for severalnines” and the pg_hba.conf file will have one more additional rule:
# Rule Name: Authentication for severalnines

# Description: Open access for severalnines

# Order: 150

local   nines_blog_db   severalnines 127.0.0.1/32    md5
To retrieve the new configuration from the master host, all that is needed is to request it on the node:
$ /opt/puppetlabs/bin/puppet agent -tStep Four
Create a Read-Only User. To create a new user, with read only privileges, the following resources need to be added to the previous manifest:
postgresql::server::role{‘Creation of a new role nines_reader’:

createdb   => false,

createrole => false,

superuser => false,     password_hash=> postgresql_password(‘nines_reader’,’passwd13’)

}

postgresql::server::pg_hba_rule{‘Authentication for nines_reader’:

     description =>’Open access to nines_reader’,

     type => ‘host’,

database => ‘nines_blog_db’,

     user => ‘nines_reader’,

address => ‘192.168.1.10/32’,

         auth_method => ‘md5’

   }
To retrieve the new configuration from the master host, all that is needed is to request it on the node:
$ /opt/puppetlabs/bin/puppet agent -tConclusion
In this blog post, we showed you the basic steps to deploy and start configuring your PostgreSQL database through an automatic and customized way on several nodes (which could even be virtual machines).
These types of automation can help you to become more effective then doing it manually and PostgreSQL configuration can easily be performed by using several of the classes available in the puppetforge repository