Before anything
There are many guides about Android Development on the internet, but there are always new things to learn, or at least different methods to learn something.
That's the reason I'm starting this series, to improve myself on many things like writing, English and on Android development itself, as you learn when you teach too.
This series will cover from the basics to some more complex stuff and using refactoring as we progress throughout the series, from somewhat "go horsy" like to evolving into somewhat an architectural pattern, this way showing how hard it can be to refactor some things, but trying to explain the line of thought that went through the changes.
Let's get started
Hello World is the most basic thing you can do in any language, it's your entry point for any language, so let's start thinking about that.
For that, we will need our good fellow Android Studio, and use it to create our project.
For the sake of learning and understanding, the start point will be an empty project.
It may be annoying at the start, but I promise it will get more interesting.


As minimum API Level (That is something that you should think when creating an App), go with what you have to test, if anything is needed, there will be some work to make it flow, but it will be treated here.

This is our initial project structure, it is empty, and it's what is needed right now, now a fast explanation about the icons:
Blue folders - contains code
Any folders with a fanlike icon embedded - contains generated files
folder with yellow thingy: contains resources files
gray folders with dot - simple folder
Activities
First thing after creating the project, will be creating the first screen, in Android, the "Screens" are usually called Activities, so the first file that should be created is: MainActivity (I'll code in Kotlin)
First, the class should extend from Activity, and the IDE will show one thing that should be paid attention to.

The class name is highlighted on yellow, that's because Android will not recognize our Activity unless it's on the AndroidManifest.xml, but as AndroidStudio helps a lot on some things, pressing alt+enter(or cmd+enter on mac) while the text cursor is at the class name it will show a context menu with the following options:
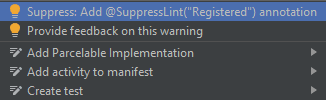
Selecting the "Add activity to manifest" it will solve almost all problems about the activity, yet there is another modification to the manifest that should be made, the Activity registered, but the OS doesn't know that it should launch that activity when the user touch the app icon.

Manifest
Opening the manifest it can be noticed that the file has a huge yellow highlight, by the moment it isn't that important, because what it's trying to say is that there is no indexing for the PlayStore, so by now, it can be ignored.
Now to identify what the OS will open, it's needed to add an Intent-Filter on the activity, changing the following line:
<activity android:name=".MainActivity" />
to
<activity android:name=".MainActivity">
    <intent-filter>
        <action android:name="android.intent.action.MAIN"/>
        <category android:name="android.intent.category.LAUNCHER"/>
    </intent-filter>
</activity>
What does this intent-filter means?
Most interactions made between Android Components that pass by the OS are made by Intents, how does this works are like this:
-the user presses the app shortcut;
-It's generated an Intent to open that App because you expressed the intent of opening it(pressing the shortcut);
-The Android OS, searches for anything that has that accepts that intent;
-The OS opens the app that accepts it.
It'll be used for starting new activities for example, as the OS is the one responsible when changing the screens, but also it's used for starting services sending broadcasts and such.
So, with this "basic" knowledge let's explain the code:
The OS creates an intent for the package of the app (in this case:br.com.shogogan.androidappquest)
Saying that it wants the activity that is of the LAUNCHER category, and is the MAIN launcher.
That is what is expressing on the intent-filter, it's creating an Implicit Intent because the OS won't know exactly what class to launch, so it will get it by those "tags".
Okay, so going on, we have our Activity and it's set up on the manifest...
What is missing?
Oh, right, there is nothing to show, because it's empty.
Resources
So, for the layouts, first it's needed to create our activity layout file, that's why the android project has the resources folder, to contain anything that is "non-programming" related.
The resources folder can have some specific sub-folders, and the layout is not created by default (if the project was created as an empty project)
There are 2 ways to create resources sub-folders:
Creating the folder manually, or using the AndroidStudio helper.
-Creating manually is self-explanatory, you right-click, select new->Directory and set the name layout.
-Using the "Helper" you right-click, select New->Android Resource Directory, and it will open a screen with some info, which just change the dropdown to Layout and press okay.
Why would you want the helper if you can create manually?
Well, you can learn more about where to put the resources on the Resources folder, as it isn't possible to use any folder name, it uses explicit folders, and it can get a little bit confusing.
Well, okay, now right-clicking in the layout folder it will has the option to create a new Layout Resource File under the New Menu.
Resource files must be on snake_case because it will not be recognized if you use uppercase or hyphen, so just stick to snake_case on resources files.
The naming convention that I'm used to layout is (TYPE)_(CLASS).xml, in our case: activity_main.xml
Our root element will be LinearLayout for now.
In the end, our New Resource Dialog will be like this.

Layout
Opening the new file, it can show the following screen, but for editing, it is normally better to open the Text tab in the bottom left of the editor.

It should open a text editor with a preview on the right, if it doesn't show the preview, you can open it on the right Tool Window Bar.
now there should be this code this:
<?xml version="1.0" encoding="utf-8"?>
<LinearLayout xmlns:android="http://schemas.android.com/apk/res/android"
    android:orientation="vertical" android:layout_width="match_parent"
    android:layout_height="match_parent">

</LinearLayout>
this is an empty screen with a linear layout, which means it will put it's children linearly following its direction.
In this case, the orientation is vertical (android:orientation="vertical")
if 3 buttons are added, they will all be added one below the other.
so, this is the code for displaying some text using TextView.
<TextView
    android:text="Hello World"
    android:layout_width="wrap_content"
    android:layout_height="wrap_content"/>
Explaining:
android: is the main namespace used on android (it's used on the manifest too)
and using this namespace, it's informed 3 values: text, layout_width, layout_height.
-text: Self-explanatory, it's the text on the component. it can be a Resource (there will be more explanation about this later) or a hardcoded text (Android studio will show a warning if you use hardcoded text)
-layout_width/layout_height: Width/Height of the component, it's mandatory.
Now all that is needed, is to link the layout to the class created!
On the MainActivity class, if ctrl+o in the class body to list all the possible override methods, and search for the onCreate method.
It will be the one with only one argument, press enter and voila, now the class has the onCreate method. (knowing your IDE, and its shortcuts can give a huge boost on productivity)
inside this method adding the following line will link the class to the layout:
setContentView(R.layout.activity_main)
leaving our class like this:
class MainActivity: Activity() {
    override fun onCreate(savedInstanceState: Bundle?) {
        super.onCreate(savedInstanceState)

        setContentView(R.layout.activity_main)
    }
}
Now, what the heck is the R.layout.activity_main?
R is the static class that the android generates and uses, so anything on the Resources folder and the layout is the sub-folder, activity_main is the file.
Now if everything is okay, pressing run(shift+f10) it is possible to verify the results on the emulator or smartphone, and it will have an output like this on your Android Device:

And that's it! you made the hello world for android, but well, this is the start.
In my point of view, the next step will be working with the screen. Adding some components, some basic styling and make our app from a static text to somewhat usable!
The code will be always committed to the following GitHub if anyone want to check :)
Thank you for reading, and any suggestion or question is always welcome!


Top comments (1)
Very good text for those starting out on Android programming, and it is already using kotlin, which is currently paramount for Android.