In this article, we will learn how Kubernetes Liveness Probes and Kubernetes Readiness Probes help us improve the continuity and availability of Kubernetes Services. For that, we will learn how Kubernetes uses probes to decide, whether an application is up and running and act accordingly:
- liveness probes – checks, whether a long-running application is still responsive
- readiness probes – checks, whether a starting application is responsive already
References
0. Preparation
Step 0.1: Access the Kubernetes Playground
As always, we start by accessing the Katacoda Kubernetes Playground.
Step 0.2 (optional): Configure auto-completion
The Katacoda Kubernetes Playground has defined the alias and auto-completion already. Only in case you are running your tests in another environment, we recommend to issue the following two commands:
alias k=kubectl
source <(kubectl completion bash)
However, even in the case of the Katacoda Kubernetes Playground, auto-completion does not work for the alias k for yet. Therefore, we need to type the following command:
source <(kubectl completion bash | sed 's/kubectl/k/g')
Once this is done, k g<tab> will be auto-completed to k get and k get pod <tab> will reveal the name(s) of the available POD(s).
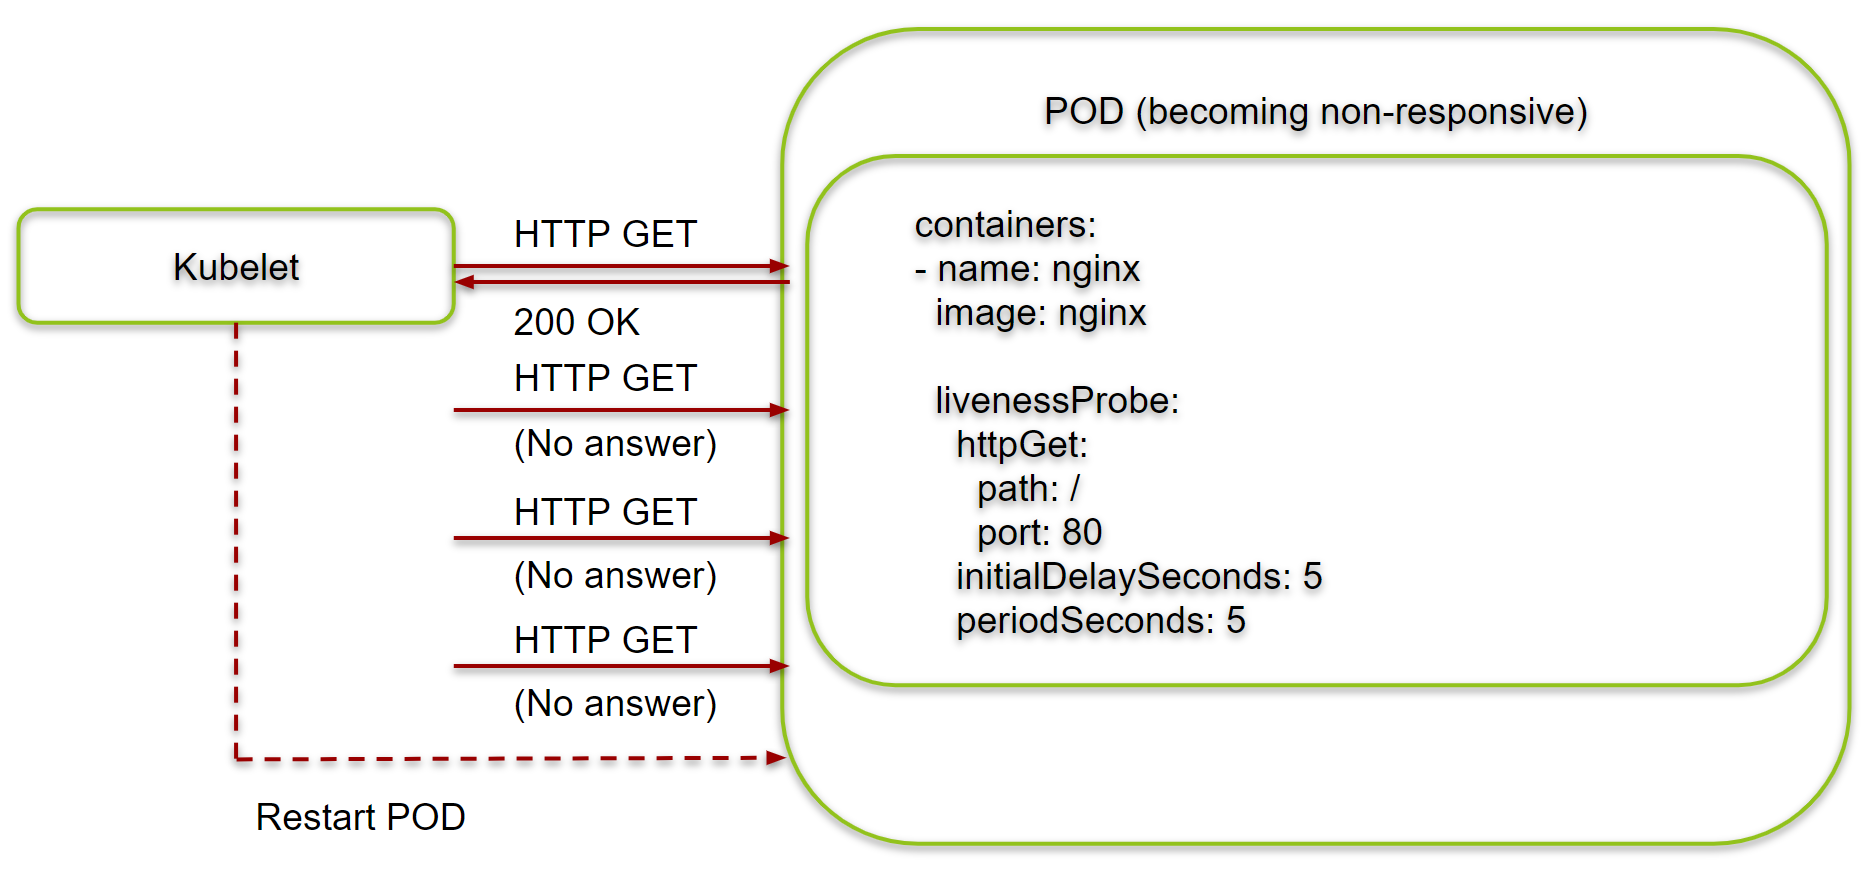
1. Liveness Probes
Liveness probes can help to detect POD/containers that are not fully functional. Once, the application is not responsive anymore, Kubernetes can restart the corresponding POD, and with that Kubernetes can potentially auto-heal the problem.
We now will test, what happens, if a POD of a Kubernetes Deployment becomes unresponsive after some time. For that, we will start a deployment with two parallel processes, one of which is an NginX server and the other is a while loop that keeps the container up and running, even if we manually kill the NginX process, thus making the container unresponsive.
Step 1.1: Create Deployment with two Processes and a Service
Let us create a Deployment with a shell script that starts an NginX server in the background and a while loop that keeps the container up and running, even if the NginX service fails. We also create a service, so we can verify, whether the NginX server is responsive or not. The liveness Probe is commented out for now:
cat <<EOF | kubectl apply -f -
---
apiVersion: v1
kind: Service
metadata:
  name: nginx
spec:
  type: LoadBalancer
  ports:
  - port: 80
    targetPort: 80
  selector:
    app: nginx
---
apiVersion: apps/v1
kind: Deployment
metadata:
  name: nginx
  labels:
    app: nginx
spec:
  # modify replicas according to your case
  replicas: 1
  selector:
    matchLabels:
      app: nginx
  template:
    metadata:
      labels:
        app: nginx
    spec:
      containers:
      - name: nginx
        image: nginx
        command: ["/bin/sh"]
        args:
        - -c
        - >
          nginx -g 'daemon off;' & while true; do sleep 10; done
#        livenessProbe:
#          httpGet:
#            path: /
#            port: 80
#          initialDelaySeconds: 5
#          periodSeconds: 5
EOF

# output:
# service/nginx created
# deployment.apps/nginx created
After 60 sec, you should be able to access the NginX Server on the service endpoint:
kubectl get svc
NAME         TYPE           CLUSTER-IP       EXTERNAL-IP   PORT(S)        AGE
kubernetes   ClusterIP      10.96.0.1                443/TCP        64m
nginx        LoadBalancer   10.111.191.121   172.17.0.75   80:32244/TCP   10m

CLUSTER_IP=$(kubectl get svc | grep nginx | awk '{print $3}')
curl -v -s $CLUSTER_IP 2>&1 | head -n 10
* Rebuilt URL to: 10.111.191.121/
*   Trying 10.111.191.121...
* Connected to 10.111.191.121 (10.111.191.121) port 80 (#0)
> GET / HTTP/1.1
> Host: 10.111.191.121
> User-Agent: curl/7.47.0
> Accept: */*
>
< HTTP/1.1 200 OK
< Server: nginx/1.17.5
If you got the following message, wait up to 60 sec and try again:
connect to 10.96.228.235 port 80 failed: Connection refusedIf it does not work after 2 or 3 minutes, then search for the POD name and look at the logs with
kubectl logs <POD>.
Above, we have received a „200 OK“ from the NginX server. You also can view the HTML message only by omitting the pipe to the head command, if you wish.
Step 1.2: Kill the NginX Server Process
Now let us kill the NginX process to simulate a broken POD, that still lives in the sense that the container is up and running. For that, let us find the process ID. The ps command is not available, so we need to install it, or we can look at the /proc folder (we have chosen the latter):
POD=$(k get pod | grep nginx | awk '{print $1}')
kubectl exec $POD -- bash -c 'find /proc -mindepth 2 -maxdepth 2 -name exe -exec ls -lh {} \; 2>/dev/null'

# output:
...
lrwxrwxrwx 1 root root 0 Nov  6 06:26 /proc/6/exe -> /bin/nginx
...
Here, we can see that the process ID of the nginx process is 6. Let us kill the process now:
kubectl exec $POD -- bash -c 'kill 6'
Now the service is unresponsive:
curl -s -v 10.96.228.235 2>&1 | head -n 10
* Rebuilt URL to: 10.96.228.235/
*   Trying 10.96.228.235...
* connect to 10.96.228.235 port 80 failed: Connection refused
* Failed to connect to 10.96.228.235 port 80: Connection refused
* Closing connection 0
However, the POD is not restarted. It is still the old POD:
kubectl get pod
NAME                    READY   STATUS    RESTARTS   AGE
nginx-7b7698b7b-q4ctz   1/1     Running   0          30m
Thus, the NginX server has stopped working properly, but there is no self-healing process either. Let us fix that now.
Step 1.3: Add a Liveness Probe
We re-deploy the Kubernetes deployment with the Livenness Probe configured:
cat <<EOF | kubectl apply -f -
---
apiVersion: apps/v1
kind: Deployment
metadata:
  name: nginx
  labels:
    app: nginx
spec:
  # modify replicas according to your case
  replicas: 1
  selector:
    matchLabels:
      app: nginx
  template:
    metadata:
      labels:
        app: nginx
    spec:
      containers:
      - name: nginx
        image: nginx
        command: ["/bin/sh"]
        args:
        - -c
        - >
          nginx -g 'daemon off;' & while true; do sleep 10; done
        livenessProbe:
          httpGet:
            path: /
            port: 80
          initialDelaySeconds: 5
          periodSeconds: 5
EOF

# output:
# deployment.apps/nginx configured
The POD has been replaced and the NginX server is responsive again (after a minute or so):
kubectl get pod
NAME                     READY   STATUS    RESTARTS   AGE
nginx-5b4955cf69-dkc6f   1/1     Running   0          38s

curl -v -s $CLUSTER_IP 2>&1 | head -n 10
* Rebuilt URL to: 10.96.228.235/
*   Trying 10.96.228.235...
* Connected to 10.96.228.235 (10.96.228.235) port 80 (#0)
> GET / HTTP/1.1
> Host: 10.96.228.235
> User-Agent: curl/7.47.0
> Accept: */*
>
< HTTP/1.1 200 OK
< Server: nginx/1.17.5
Step 1.4: Kill the NginX Process
We kill the nginx process again:
kubectl exec $POD -- bash -c 'find /proc -mindepth 2 -maxdepth 2 -name exe -exec ls -lh {} \; 2>/dev/null' | grep nginx
lrwxrwxrwx 1 root root 0 Nov  6 06:53 /proc/6/exe -> /usr/sbin/nginx
lrwxrwxrwx 1 nginx nginx 0 Nov  6 06:53 /proc/8/exe

kubectl exec $POD -- bash -c 'kill 6'
Now the NginX server is unresponsive again:
curl -s -v 10.96.228.235 2>&1 | head -n 10
* Rebuilt URL to: 10.96.228.235/
*   Trying 10.96.228.235...
* connect to 10.96.228.235 port 80 failed: Connection refused
* Failed to connect to 10.96.228.235 port 80: Connection refused
* Closing connection 0
Step 1.5: Wait for the Service to heal itself
However, after a minute or so, you will see that the POD is restarted. The Liveness probe has failed and thus, the Kubernetes has decided that the POD has failed and will restart it:
kubectl get pod
NAME                     READY   STATUS    RESTARTS   AGE
nginx-5b4955cf69-dkc6f   1/1     Running   0          5m15s

kubectl get pod
NAME                     READY   STATUS    RESTARTS   AGE
nginx-5b4955cf69-dkc6f   1/1     Running   1          6m
After this, the NginX server is responsive again:
curl -s -v $CLUSTER_IP 2>&1 | head -n 10
* Rebuilt URL to: 10.96.228.235/
*   Trying 10.96.228.235...
* Connected to 10.96.228.235 (10.96.228.235) port 80 (#0)
> GET / HTTP/1.1
> Host: 10.96.228.235
> User-Agent: curl/7.47.0
> Accept: */*
>
< HTTP/1.1 200 OK
< Server: nginx/1.17.5
With the help of the Liveness Probe, the problem has healed itself. Any POD that does not respond properly is restarted automatically.
2. Readiness Probes

Step 2.1: Explore Problems with Containers that have a long Boot-Time
In this sub-chapter, we want to see, what happens to an exposed service, if a POD/container starts with a long boot time. For this, we create a service with two PODs, one of which has a boot time of 120 sec. We simulate this situation by running a 120 seconds sleep command before we run the actual application, i.e. an NginX server.
cat <<EOF | kubectl apply -f -
---
apiVersion: v1
kind: Service
metadata:
  name: nginx
spec:
  type: LoadBalancer
  ports:
  - port: 80
    targetPort: 80
  selector:
    app: nginx
---
apiVersion: v1
kind: Pod
metadata:
  name: nginx-slowboot
  labels:
    app: nginx
spec:
  containers:
  - name: nginx
    image: nginx
    command: ["/bin/sh"]
    args: ["-c", "sleep 60; nginx -g 'daemon off;'"]
#    readinessProbe:
#      httpGet:
#        path: /
#        port: 80
#      initialDelaySeconds: 5
#      periodSeconds: 5
---
apiVersion: v1
kind: Pod
metadata:
  name: nginx-quickboot
  labels:
    app: nginx
spec:
  containers:
  - name: nginx-quickboot
    image: nginx
#    readinessProbe:
#      httpGet:
#        path: /
#        port: 80
#      initialDelaySeconds: 5
#      periodSeconds: 5
EOF
For now, we have commented out the readiness probe.
Right after the start of the service and the PODs, we copy and paste the following code to the master:
CLUSTER_IP=$(kubectl get svc | grep nginx | awk '{print $3}')
sleep 15
kubectl get ep
while true; do curl -s $CLUSTER_IP -o /dev/null && echo success || echo failure; sleep 2; done
The output will look similar to follows.
# output:
master $ kubectl get ep
NAME         ENDPOINTS                   AGE
kubernetes   172.17.0.25:6443            117m
nginx        10.32.0.2:80,10.32.0.3:80   15s
master $ while true; do curl -s $CLUSTER_IP -o /dev/null && echo success || echo failure; sleep 2; done
failure
success
failure
failure
failure
failure
success
success
Therefore, statistically, every second curl request will fail. This is because the HTTP requests are load-balanced between the POD that is working already and the one, which is still in the boot process, leading to a „failed“ status. The problem is caused by both endpoints being added the service right away, even though one of the PODs is not responsive yet:
kubectl get ep
NAME         ENDPOINTS                   AGE
nginx        10.40.0.2:80,10.40.0.3:80   35s
If you wait long enough (> 2 minutes), then all curl commands will be successful again, indicating that the slower nginx POD is ready as well.
In the next step, we will improve the initialization procedure by adding a readiness probe.
Step 2.2: Add a Readiness Probe
We now will remove the slow POD:
kubectl delete pod nginx-slowboot
.We re-create the POD with a readiness probe now:
cat <<EOF | kubectl apply -f -
---
apiVersion: v1
kind: Pod
metadata:
  name: nginx-slowboot
  labels:
    app: nginx
spec:
  containers:
  - name: nginx
    image: nginx
    command: ["/bin/sh"]
    args: ["-c", "sleep 60; nginx -g 'daemon off;'"]
    readinessProbe:
      httpGet:
        path: /
        port: 80
      initialDelaySeconds: 5
      periodSeconds: 5
EOF
Again, we copy & paste the following code to the master’s console:
sleep 15
kubectl get ep
while true; do curl -s $CLUSTER_IP -o /dev/null && echo success || echo failure; sleep 2; done
Thus time, the output will look much better than before:
master $ sleep 15
master $ kubectl get ep
NAME         ENDPOINTS          AGE
kubernetes   172.17.0.25:6443   120m
nginx        10.32.0.3:80       3m8s
master $ while true; do curl -s $CLUSTER_IP -o /dev/null && echo success || echo failure; sleep 2; done
success
success
success
success
success
success
All curl requests will be successful. The reason is, that the endpoint of the slowly booting POD is not added to the list of the endpoints of the service before it successfully replies to the readiness probe. This way, you never will create a black hole for the HTTP requests.
If you wait for more than 60 seconds, stop the while loop with <ctrl>-C and look for the list of endpoints, the second endpoint will be available, though:
kubectl get ep
NAME         ENDPOINTS                   AGE
kubernetes   172.17.0.25:6443            122m
nginx        10.32.0.2:80,10.32.0.3:80   5m16s
3. ReplicaSets and Readiness Probes
We now will show, whether a readiness probe can help in the case of a rollout with misconfigured Deployments.
Step 3.1: Create a working ReplicaSet with Readiness Probe
cat <<EOF | kubectl apply -f -
---
apiVersion: apps/v1
kind: ReplicaSet
metadata:
  name: nginx
  labels:
    app: nginx
spec:
  # modify replicas according to your case
  replicas: 3
  selector:
    matchLabels:
      app: nginx
  template:
    metadata:
      labels:
        app: nginx
    spec:
      containers:
      - name: nginx
        image: nginx
        command: ["/bin/sh"]
        args: ["-c", "nginx -g 'daemon off;'"]
        readinessProbe:
          httpGet:
            path: /
            port: 80
          initialDelaySeconds: 5
          periodSeconds: 5
EOF
After 60 sec or so, the PODs are considered to be up and running:
kubeclt get pods
NAME          READY   STATUS    RESTARTS   AGE
nginx-557fr   1/1     Running   0          62s
nginx-j6zsb   1/1     Running   0          62s
nginx-q682c   1/1     Running   0          62s
Now we do the same, but be make sure the nginx never starts by just adding a long-living sleep command instead of the nginx command:
cat <<EOF | kubectl apply -f -
---
apiVersion: apps/v1
kind: ReplicaSet
metadata:
  name: nginx-not-starting
  labels:
    app: nginx-not-starting
spec:
  # modify replicas according to your case
  replicas: 3
  selector:
    matchLabels:
      app: nginx-not-starting
  template:
    metadata:
      labels:
        app: nginx-not-starting
    spec:
      containers:
      - name: nginx
        image: nginx
        command: ["/bin/sh"]
        args: ["-c", "sleep 3600"]
        readinessProbe:
          httpGet:
            path: /
            port: 80
          initialDelaySeconds: 5
          periodSeconds: 5
EOF
Even after more than two minutes, the PODs are still not considered to be READY, even though the STATUS is „Running“:
kubectl get pods
NAME                       READY   STATUS    RESTARTS   AGE
nginx-557fr                1/1     Running   0          6m54s
nginx-j6zsb                1/1     Running   0          6m54s
nginx-not-starting-dbnwh   0/1     Running   0          2m14s
nginx-not-starting-mkg7l   0/1     Running   0          2m14s
nginx-not-starting-wpqfw   0/1     Running   0          2m14s
nginx-q682c                1/1     Running   0          6m54s
As a summary, we can see that non-responsive ReplicaSets with readiness probes never get READY, even if the STATUS is „Running“.
How can we make use of the fact, that non-working ReplicaSets never become „READY“, when using deployments? This will be investigated in the next chapter.
4. Deployments and Readiness Probes
In this subchapter, we will show how we can make use of the fact, that non-responsive ReplicaSets never enter the „READY“ state.
Step 4.1: Create a working Deployment
We restart the Kubernetes Playground, so it will be clean again:
https://www.katacoda.com/courses/kubernetes/playground#
We start a Deployment with a working NginX application:
cat <<EOF | kubectl apply -f -
---
apiVersion: apps/v1
kind: Deployment
metadata:
  name: nginx-deploy
  labels:
    app: nginx-deploy
spec:
  # modify replicas according to your case
  replicas: 3
  selector:
    matchLabels:
      app: nginx-deploy
  template:
    metadata:
      labels:
        app: nginx-deploy
    spec:
      containers:
      - name: nginx
        image: nginx
        command: ["/bin/sh"]
        args: ["-c", "nginx -g 'daemon off;'"]
        readinessProbe:
          httpGet:
            path: /
            port: 80
          initialDelaySeconds: 5
          periodSeconds: 5
EOF
After a minute or so, the PODs are READY:
kubectl get pod
NAME                            READY   STATUS    RESTARTS   AGE
nginx-deploy-687c989cb9-8pg6m   1/1     Running   0          23s
nginx-deploy-687c989cb9-g2d97   1/1     Running   0          23s
nginx-deploy-687c989cb9-psdst   1/1     Running   0          23s
Step 4.2: Try to break the Deployment
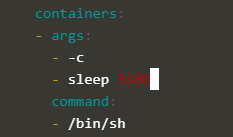
Now let us edit the deployment and replace the command:
kubectl edit deploy nginx-deploy
...
containers:
- args:
  - -c
  - nginx -g 'daemon off;'   # <----------- replace <nginx ...> by <sleep 3600>
# output after saving: deployment.extensions/nginx-deploy edited
Here in pictures. Before, we see:

Afterward, it looks as follows:
Step 4.3: Observe that the old Deployment PODs are kept up and running
Now, a new POD is started:
kubectl get pod
NAME                            READY   STATUS    RESTARTS   AGE
nginx-deploy-59d6f9bcc5-rcfz5   0/1     Running   0          47s
nginx-deploy-687c989cb9-8pg6m   1/1     Running   0          6m31s
nginx-deploy-687c989cb9-g2d97   1/1     Running   0          6m31s
nginx-deploy-687c989cb9-psdst   1/1     Running   0          6m31s
However, the new POD will never be READY, so the old, working PODs will not be removed in a rolling update. Two minutes later, nothing has changed:
kubectl get pod
NAME                            READY   STATUS    RESTARTS   AGE
nginx-deploy-59d6f9bcc5-rcfz5   0/1     Running   0          2m12s
nginx-deploy-687c989cb9-8pg6m   1/1     Running   0          7m56s
nginx-deploy-687c989cb9-g2d97   1/1     Running   0          7m56s
nginx-deploy-687c989cb9-psdst   1/1     Running   0          7m56s
Moreover, if there is a service that exposes the deployment, the traffic will only be distributed among the old, working PODs.
Thus, the existing services will not be destroyed and the administrator has time to troubleshoot and correct the problem he has introduced with the new Deployment version.
Summary
In this article, we have learned how to use Kubernetes Readiness and Liveness Probes to mitigate application problems during startup and normal operation.
Kubernetes Readiness probes make sure, that applications, that are not ready yet, do not disturb any existing services. They also help to avoid that misconfigured, non-responsive PODs replace old, still functional PODs in production.
Kubernetes Liveness probes monitor long-running application PODs and restart those if they become unresponsive.

Palo Alto Networks Certified Security Engineer (PCNSE) PAN-OS 10.2 exam requires you to make sure a clear, profound and accurate understanding of the subjects covered in the exam syllabus. The most important thing to pass this exam is to access a study material that provides you exam-oriented, simplified and authentic information that is primary requirement of Paloalto Networks Exam PCNSE.