We concluded the last post on CSS Positioning with two questions which are:
- What is the stacking context?
- What is the
z-index?
The second question is the main theme of this post, but answering the first question will be of great help. Let's begin.
From MDN:
The stacking context is a three-dimensional conceptualization of HTML elements along imaginary z-axis relative to the user, who is assumed to be facing the
viewportor the webpage. HTML elements occupy this space in priority order based on element attributes.
This is telling us that the stacking context has do with how we (the users) perceive HTML elements on a web page. The image below sum this up nicely.

From the image above, you might ask three questions:
- How do we stack page elements?
- Which page element can be stacked?
- How can we make a page element appear closer to the user?
Let's answer these questions one after the other.
First, we can stack page elements using the CSS z-index property. This property specifies the stack order of an element i.e which page element appear over another.
Mind you, only positioned element can be stacked. When we say positioned element we mean element that have one of the following position value set in their CSS rule:
relativeabsolutefixed
The z-index value can determine which positioned element appear closer to the user and the element with a larger z-index value will appear on top i.e closer to the user. The z-index can accept the following values:
- number — can be negative, or positive and it specifies the order the element appears in.
-
auto— sets thez-indexvalue to that of its parent element. -
inherit— inherits thez-indexvalue from the parent element. -
initial— sets thez-indexvalue to the default value.
Before we proceed we should know the Default Stacking order which is the default order the browser stacks elements in, when no z-index is applied:
- Root element i.e the
htmlelement - Non-positioned elements in the order they are defined
- Positioned elements in the order they are defined
Now, let's write some code.
Save the following HTML and CSS with the .html and .css extension.
<div class="parent">
  <div class="child"></div>
  <div class="child-two"></div>
  <div class="child-three"></div>
</div>
.parent {
  width: 500px;
  height: 400px;
  margin: 2em auto;
  background-color: #dddddd;
}

.child {
  width: 150px;
  height: 100px;
  background-color: #1560bd;
}

.child-two {
  width: 150px;
  height: 100px;
  background-color: red;
}

.child-three {
  width: 150px;
  height: 100px;
  background-color: magenta;
}
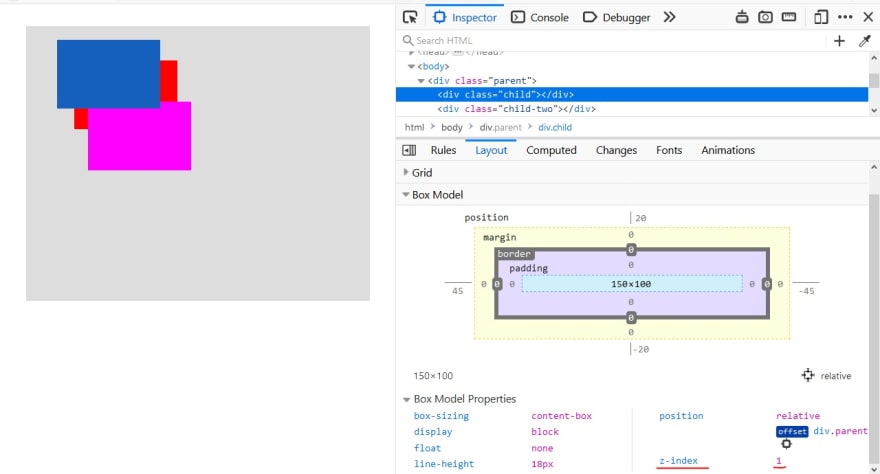
Load the HTML file in your browser. If you make use of "Inspect Element" on any of the boxes and view its Box Model in the Developer Tools you should get an output similar to the image below (take note of the highlighted part)

From the image above it's evident that the box still has the default position i.e static and the z-index value is auto. We need to move the box around so that we can see the effect of the z-index when it's applied.
Add the following code to .child:
.child {
  /* All properties remain the same */

  position: relative; /* this is necessary for the offset properties to work */
  top: 20px;          /* this will move the box down a little bit */
  left: 45px;         /* this will move the box to the right by 45px */
}
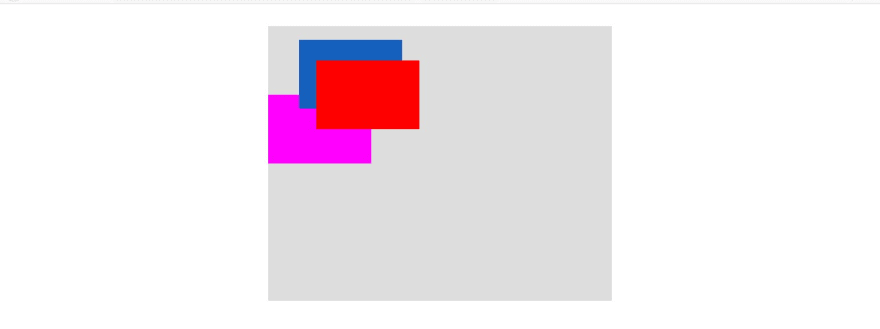
Save your file and refresh your browser, the blue box will move to a new location based on the offset properties.

Now, lets move the red box. Add the following to .child-two:
.child-two {
  /* All properties remain the same */

  position: absolute; /* we are moving the box around with absolute positioning */
  top: 50px;          /* this will the box from the top of its parent, down by 50px */
  left: 70px;         /* this will move the box to the right by 70px */
}
Save and refresh your browser. If your Developer Tools is docked to the right the red box will appear to be on the blue box. This is not the case. Close your Developer Tools and your browser window should be similar to the image below.

What just happened? See if you can fix this before you proceed.
The reason the box is out of its parent is because the parent position is static and that's why the browser positioned the element relative to the body element. The fix is to add position: relative to the .parent.
.parent {
  /* All properties  remains the same */

  position: relative;  /* creates a relative position for the element */
}
Save your file and refresh your browser. The red box should come back to its parent container by appearing on the blue box.
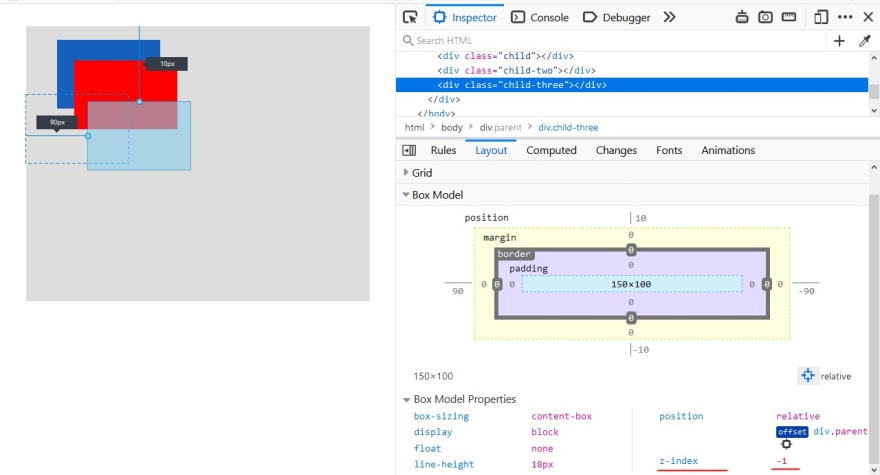
Let's move the third box, Add the following to .child-three:
.child-three {
  /* All properties  remains the same */

  position: relative;  /* creates a relative position for the element */
  top: 10px;           /* this will the box from the top of its   parent, down by 10px */
  left: 90px;          /* this will move the box to the right by 90px */
}
Save and refresh your browser.

What's next? Some z-index.
Let's bring the blue box forward. Right now, we'll give it a z-index of 1
.child {
  /* All properties  remains the same */

  z-index: 1; /* add this */
}
Save your file and refresh. Use "Inspect element" on the blue box and view the Box Model. I have highlighted the z-index value in the image.
How about we bring the red box forward? Good idea! We just have to make its z-index higher than that of the blue box. Add the following to .child-two:
.child-two {
  /* All properties  remains the same */

  z-index: 2; /* add this */
}
Save and refresh your browser.

Now what happens if we give the third box a negative z-index?. This snippet should do just that. Don't forget to save your file.
.child-three {
  /* All properties  remains the same */

  z-index: -1; /* add this */
}
The box is gone. But we can see its position by clicking on the icon beside the word 'relative' in the Box Model . The browser will show the box's position and its previous position before it was moved.
If you hover your mouse over the inner most part of the box model you'll get similar result.

You can get it back by deleting the negative z-index.
David made an important contribution in the comments that i was not aware of:

To demonstrate this, you will have to update your HTML to match the snippet below:
<div class="parent">
  <div class="child">
    <div class="child-three"></div>
  </div>
  <div class="child-two"></div>
</div>
With this .child-three is now a child of .child. Now update the CSS rule of .child-three by giving it a z-index value higher than .child-two:
.child-three {
  /* All other properties remain the same */

  z-index: 100;
}
Save your files. Refresh the browser.
You will realize that despite .child-three having a higher z-index value than .child-two it's still going to appear behind child-two because .child-three parent (.child) has a lower z-index value than .child-two.

Thank you! David.
We used three different colors to distinguish the boxes. What does it mean at this stage of the article?
It means our next topic is CSS Colors.


Top comments (4)
Thanks for this. I performed an experiment with this information and i was amused. Now, i want to ask for your permission to update the article with your comment and the result of the experiment.
Thank you.
Gracias por el aporte saludos /cdmx 🇲🇽
You are welcome.