
If you’re a regular user of Google Photos, you may have noticed how the application automatically extracts and groups faces of people from the photos that you back up to the cloud.
 Face Recognition in the Google Photos web application
A photo application such as Google’s achieves this through the detection of faces of humans (and pets too!) in your photos and by then grouping similar faces together. Detection and then classification of faces in images is a common task in deep learning with neural networks.
In the first step of this tutorial, we’ll use a pre-trained MTCNN model in Keras to detect faces in images. Once we’ve extracted the faces from an image, we’ll compute a similarity score between these faces to find if they belong to the same person.
Prerequisites
Before you start with detecting and recognizing faces, you need to set up your development environment. First, you need to “read” images through Python before doing any processing on them. We’ll use the plotting library matplotlib to read and manipulate images. Install the latest version through the installer pip:
pip3 install matplotlib
To use any implementation of a CNN algorithm, you need to install keras. Download and install the latest version using the command below:
pip3 install keras
The algorithm that we’ll use for face detection is MTCNN (Multi-Task Convoluted Neural Networks), based on the paper “Joint Face Detection and Alignment using Multi-task Cascaded Convolutional Networks” (Zhang et al., 2016). An implementation of the MTCNN algorithm for TensorFlow in Python3.4 is available as a package. Run the following command to install the package through pip:
pip3 install mtcnn
To compare faces after extracting them from images, we’ll use the VGGFace2 algorithm developed by the Visual Geometry Group at the University of Oxford. A TensorFlow-based Keras implementation of the VGG algorithm is available as a package for you to install:
pip3 install keras_vggface
While you may feel the need to build and train your own model, you’d need a huge training dataset and vast processing power. Since this tutorial focuses on the utility of these models, it uses existing, trained models by experts in the field.
Now that you’ve successfully installed the prerequisites, let’s jump right into the tutorial!
Step 1: Face Detection with the MTCNN Model
The objectives in this step are as follows:
- retrieve images hosted externally to a local server
- read images through
matplotlib’simread()function - detect and explore faces through the MTCNN algorithm
- extract faces from an image
1.1 Store External Images
You may often be doing an analysis from images hosted on external servers. For this example, we’ll use two images of Lee Iacocca, the father of the Mustang, hosted on the BBC and The Detroit News sites.
To temporarily store the images locally for our analysis, we’ll retrieve each from its URL and write it to a local file. Let’s define a function store_image for this purpose:
import urllib.request

def store_image(url, local_file_name):
  with urllib.request.urlopen(url) as resource:
    with open(local_file_name, 'wb') as f:
      f.write(resource.read())
You can now simply call the function with the URL and the local file in which you’d like to store the image:
store_image('https://ichef.bbci.co.uk/news/320/cpsprodpb/5944/production/_107725822_55fd57ad-c509-4335-a7d2-bcc86e32be72.jpg',
            'iacocca_1.jpg')
store_image('https://www.gannett-cdn.com/presto/2019/07/03/PDTN/205798e7-9555-4245-99e1-fd300c50ce85-AP_080910055617.jpg?width=540&height=&fit=bounds&auto=webp',
            'iacocca_2.jpg')
After successfully retrieving the images, let’s detect faces in them.
1.2 Detect Faces in an Image
For this purpose, we’ll make two imports — matplotlib for reading images, and mtcnn for detecting faces within the images:
from matplotlib import pyplot as plt
from mtcnn.mtcnn import MTCNN
Use the imread() function to read an image:
image = plt.imread('iacocca_1.jpg')
Next, initialize an MTCNN() object into the detector variable and use the .detect_faces() method to detect the faces in an image. Let’s see what it returns:
detector = MTCNN()

faces = detector.detect_faces(image)
for face in faces:
  print(face)
For every face, a Python dictionary is returned, which contains three keys. The box key contains the boundary of the face within the image. It has four values: x- and y-coordinates of the top left vertex, width, and height of the rectangle containing the face. The other keys are confidence and keypoints. The keypoints key contains a dictionary containing the features of a face that were detected, along with their coordinates:
{'box': [160, 40, 35, 44], 'confidence': 0.9999798536300659, 'keypoints': {'left_eye': (172, 57), 'right_eye': (188, 57), 'nose': (182, 64), 'mouth_left': (173, 73), 'mouth_right': (187, 73)}}
1.3 Highlight Faces in an Image
Now that we’ve successfully detected a face, let’s draw a rectangle over it to highlight the face within the image to verify if the detection was correct.
To draw a rectangle, import the Rectangle object from matplotlib.patches:
from matplotlib.patches import Rectangle
Let’s define a function highlight_faces to first display the image and then draw rectangles over faces that were detected. First, read the image through imread() and plot it through imshow(). For each face that was detected, draw a rectangle using the Rectangle() class.
Finally, display the image and the rectangles using the .show() method. If you’re using Jupyter notebooks, you may use the %matplotlib inline magic command to show plots inline:
def highlight_faces(image_path, faces):
  # display image
  image = plt.imread(image_path)
  plt.imshow(image)

  ax = plt.gca()

  # for each face, draw a rectangle based on coordinates
  for face in faces:
    x, y, width, height = face['box']
    face_border = Rectangle((x, y), width, height,
                          fill=False, color='red')
    ax.add_patch(face_border)
  plt.show()
Let’s now display the image and the detected face using the highlight_faces() function:
highlight_faces('iacocca_1.jpg', faces)
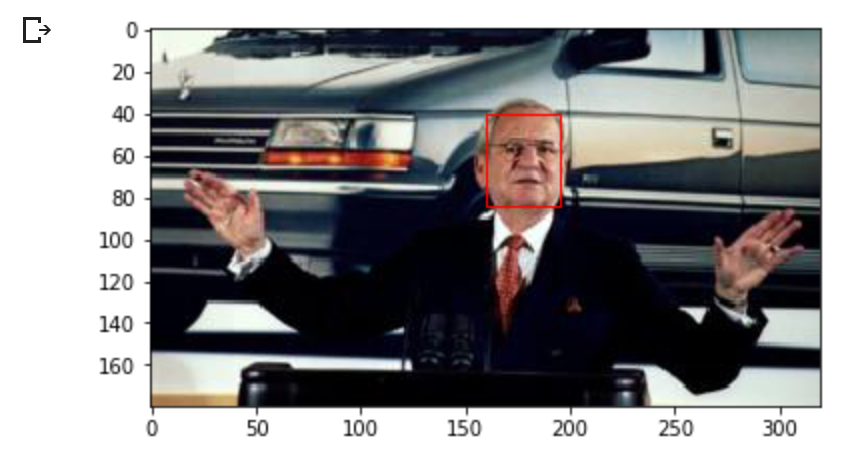 Detected face in an image of Lee Iacocca. Source: BBC
Let’s display the second image and the face(s) detected in it:
image = plt.imread('iacocca_2.jpg')
faces = detector.detect_faces(image)

highlight_faces('iacocca_2.jpg', faces)
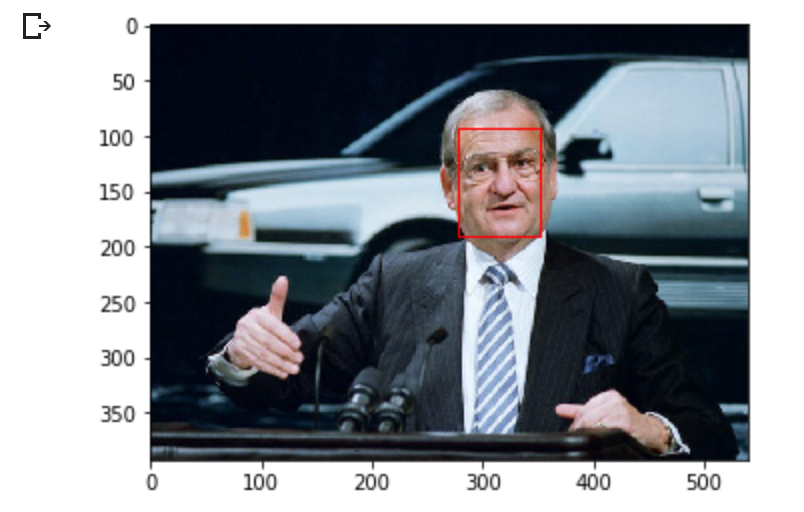
In these two images, you can see that the MTCNN algorithm correctly detects faces. Let’s now extract this face from the image to perform further analysis on it.
1.4 Extract a Face for Further Analysis
At this point, you know the coordinates of the faces from the detector. Extracting the faces is a fairly easy task using list indices. However, the VGGFace2 algorithm that we use needs the faces to be resized to 224 x 224 pixels. We’ll use the PIL library to resize the images.
The function extract_face_from_image() extracts all faces from an image:
from numpy import asarray
from PIL import Image

def extract_face_from_image(image_path, required_size=(224, 224)):
  # load image and detect faces
  image = plt.imread(image_path)
  detector = MTCNN()
  faces = detector.detect_faces(image)

  face_images = []

  for face in faces:
    # extract the bounding box from the requested face
    x1, y1, width, height = face['box']
    x2, y2 = x1 + width, y1 + height

    # extract the face
    face_boundary = image[y1:y2, x1:x2]

    # resize pixels to the model size
    face_image = Image.fromarray(face_boundary)
    face_image = face_image.resize(required_size)
    face_array = asarray(face_image)
    face_images.append(face_array)

  return face_images

extracted_face = extract_face_from_image('iacocca_1.jpg')

# Display the first face from the extracted faces
plt.imshow(extracted_face[0])
plt.show()
Here’s how the extracted face looks from the first image.
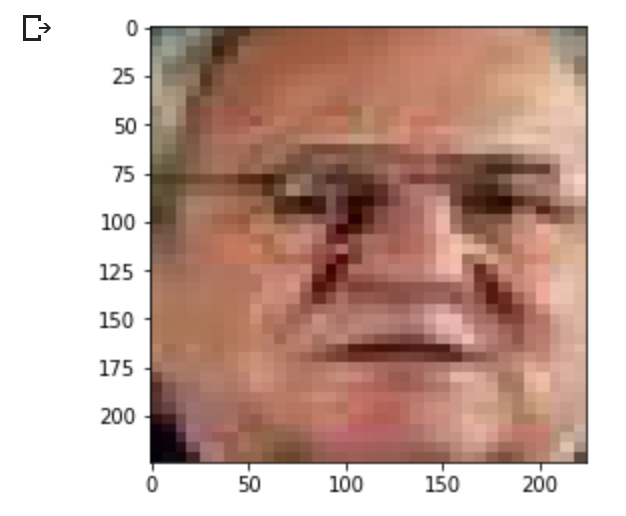 Extracted and resized face from first image
Step 2: Face Recognition with VGGFace2 Model
In this section, let’s first test the model on the two images of Lee Iacocca that we’ve retrieved. Then, we’ll move on to compare faces from images of the starting eleven of the Chelsea football team in 2018 and 2019. You’ll then be able to assess if the algorithm identifies faces of common players between the images.
2.1 Compare Two Faces
In this section, you need to import three modules: VGGFace to prepare the extracted faces to be used in the face recognition models, and the cosine function from SciPy to compute the distance between two faces:
from keras_vggface.utils import preprocess_input
from keras_vggface.vggface import VGGFace
from scipy.spatial.distance import cosine
Let’s define a function that takes the extracted faces as inputs and returns the computed model scores. The model returns a vector, which represents the features of a face:
def get_model_scores(faces):
  samples = asarray(faces, 'float32')

  # prepare the data for the model
  samples = preprocess_input(samples, version=2)

  # create a vggface model object
  model = VGGFace(model='resnet50',
      include_top=False,
      input_shape=(224, 224, 3),
      pooling='avg')

  # perform prediction
  return model.predict(samples)

faces = [extract_face_from_image(image_path)
         for image_path in ['iacocca_1.jpg', 'iacocca_2.jpg']]

model_scores = get_model_scores(faces)
Since the model scores for each face are vectors, we need to find the similarity between the scores of two faces. We can typically use a Euclidean or Cosine function to calculate the similarity.
Vector representation of faces is suited to the cosine similarity. Here’s a detailed comparison between cosine and Euclidean distances with an example.
The cosine() function computes the cosine distance between two vectors. The lower this number, the better match your faces are. In our case, we’ll put the threshold at a distance of 0.4. This threshold is debatable and will vary with your use case. You should set this threshold based on case studies on your dataset:
if cosine(model_scores[0], model_scores[1]) <= 0.4:
  print("Faces Matched")
In this case, the two faces of Lee Iacocca match:
Faces Matched
2.2 Compare Multiple Faces in Two Images
Let’s put the model to good use in this section of the tutorial. We’ll compare the faces in two images of starting elevens of the Chelsea Football Club in a Europa League match vs Slavia Prague in the 2018–19 season and the UEFA Super Cup match vs Liverpool in the 2019–20 season. While many of the players feature in both match day squads, let’s see if the algorithm is able to detect all common players.
First, let’s retrieve the resources from the URLs, detect the faces in each image and highlight them:
store_image('https://cdn.vox-cdn.com/thumbor/Ua2BXGAhneJHLQmLvj-ZzILK-Xs=/0x0:4872x3160/1820x1213/filters:focal(1877x860:2655x1638):format(webp)/cdn.vox-cdn.com/uploads/chorus_image/image/63613936/1143553317.jpg.5.jpg',
            'chelsea_1.jpg')

image = plt.imread('chelsea_1.jpg')
faces_staring_xi = detector.detect_faces(image)

highlight_faces('chelsea_1.jpg', faces_staring_xi)

store_image('https://cdn.vox-cdn.com/thumbor/mT3JHQtZIyInU8_uGxVH-TCbF50=/0x415:5000x2794/1820x1213/filters:focal(1878x1176:2678x1976):format(webp)/cdn.vox-cdn.com/uploads/chorus_image/image/65171515/1161847141.jpg.0.jpg',
            'chelsea_2.jpg')

image = plt.imread('chelsea_2.jpg')
faces = detector.detect_faces(image)

highlight_faces('chelsea_2.jpg', faces)
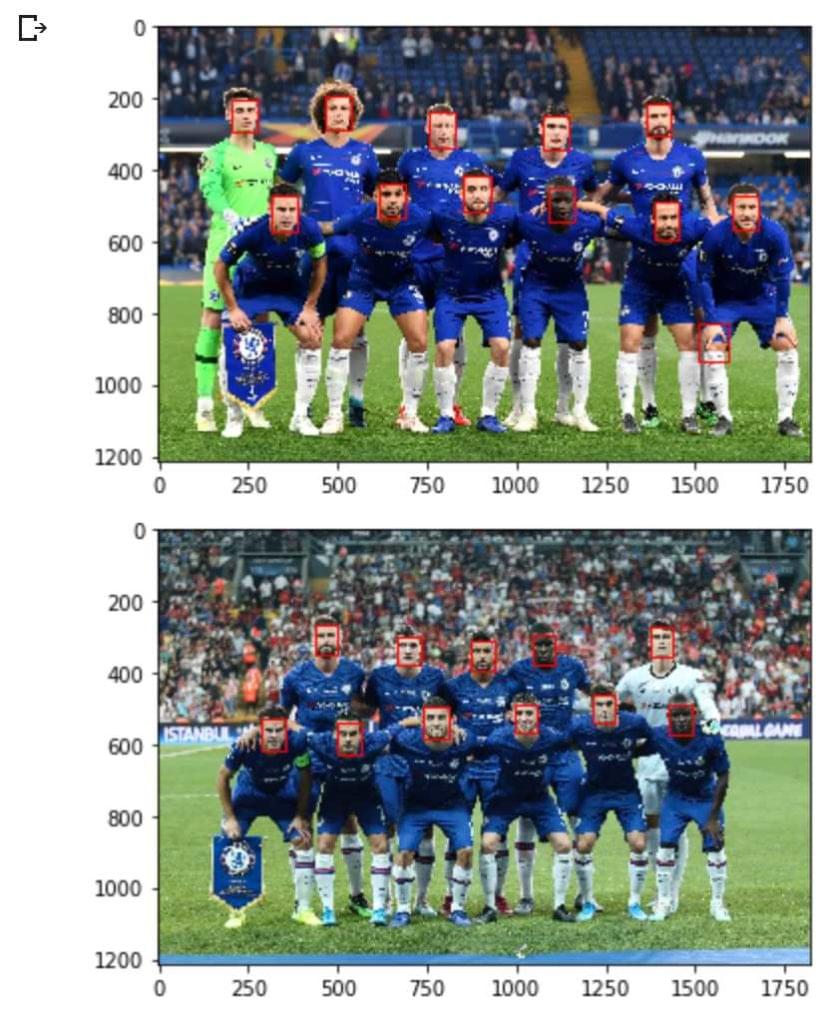
Before we proceed further, here are the starting elevens from both matches:
- Slavia Prague Match Starting XI: Kepa, Azpilicueta, Luiz, Christensen, Emerson, Kante, Barkley, Kovacic, Hazard, Pedro, Giroud
- Slavia Prague Match Starting XI: Kepa, Azpilicueta, Christensen, Zouma, Emerson, Kante, Jorginho, Kovacic, Pedro, Giroud, Pulisic
We have eight players who are common to both starting XIs and who ideally should be matched by the algorithm.
Let’s first compute scores:
slavia_faces = extract_face_from_image('chelsea_1.jpg')
liverpool_faces = extract_face_from_image('chelsea_2.jpg')

model_scores_starting_xi_slavia = get_model_scores(slavia_faces)
model_scores_starting_xi_liverpool = get_model_scores(liverpool_faces)
``
for idx, face_score_1 in enumerate(model_scores_starting_xi_slavia):
  for idy, face_score_2 in enumerate(model_scores_starting_xi_liverpool):
    score = cosine(face_score_1, face_score_2)
    if score <= 0.4:
      # Printing the IDs of faces and score
      print(idx, idy, score)
      # Displaying each matched pair of faces
      plt.imshow(slavia_faces[idx])
      plt.show()
      plt.imshow(liverpool_faces[idy])
      plt.show()
Here’s the list of pairs of faces that the algorithm matched. Notice that it has been able to match all eight pairs of faces.
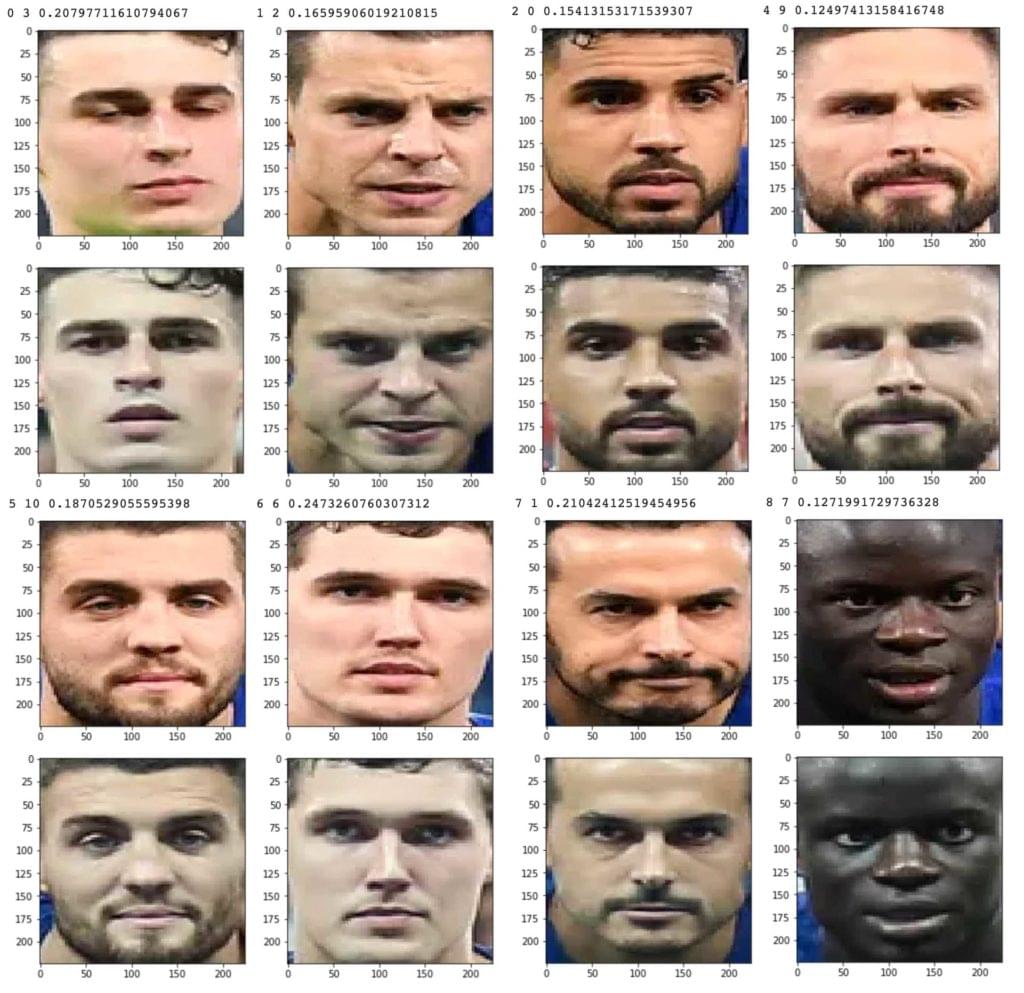 Eight Correctly Recognized Faces (Kepa, Azpilicueta, Emerson, Giroud, Kante, Pedro, Christensen, Kovacic)
While we were successfully able to match each face in our images, I’d like to take a step back to discuss ramifications of the scores. As discussed earlier, there’s no universal threshold that would match two images together. You may need to re-define these thresholds with new data coming into the analysis. For instance, even Google Photos takes your inputs when it’s unable to programmatically determine the best threshold for a pair.
 Google Photos taking user inputs for face matching
The best way forward is to carefully assess cases when matching different types of faces. Emotions of the faces and their angles play a role in determining the precision too. In our use case, notice how I’ve deliberately used photos of starting elevens, as players are staring right into the camera! You can try matching the starting eleven faces with those of a trophy celebration and I’m pretty sure the accuracy would drop.
Conclusion
In this tutorial, we first detected faces in images using the MTCNN model and highlighted them in the images to determine if the model worked correctly. Next, we used the VGGFace2 algorithm to extract features from faces in the form of a vector and matched different faces to group them together.
Do you use a different algorithm to detect and match faces? Do let me know on Twitter!
Frequently Asked Questions (FAQs) on Keras Face Detection and Recognition
What is the role of Convolutional Neural Networks (CNN) in face detection and recognition?
Convolutional Neural Networks (CNN) play a crucial role in face detection and recognition. They are a class of deep learning neural networks, primarily used in image analysis tasks. CNNs are designed to automatically and adaptively learn spatial hierarchies of features from the input images. This feature makes them highly effective for face detection and recognition tasks. They can identify faces in different poses and lighting conditions, making them a popular choice for these tasks.
How does VGGFace2 differ from other face recognition models?
VGGFace2 is a model developed by the Visual Geometry Group (VGG) at the University of Oxford. It is an improved version of the VGGFace model. The main difference lies in the training set size and diversity. VGGFace2 is trained on a larger dataset, which includes faces from a wide age range, ethnicity, lighting condition, and pose. This makes it more robust and accurate in recognizing faces compared to other models.
How can I improve the accuracy of my face detection model?
Improving the accuracy of a face detection model involves several strategies. Firstly, ensure that your model is trained on a diverse and large dataset. This helps the model to learn various features and characteristics of faces. Secondly, consider using data augmentation techniques to increase the size and diversity of your training data. Lastly, fine-tuning the model parameters and using an appropriate loss function can also help in improving the model’s accuracy.
What is the role of Keras in face detection and recognition?
Keras is a high-level neural networks API, written in Python and capable of running on top of TensorFlow, CNTK, or Theano. It provides a simpler mechanism to express neural networks. Keras also supports convolutional networks, which are essential for image processing tasks like face detection and recognition. It provides utilities for working with image data, making it easier to build and train models for these tasks.
How does ML Kit’s face detection differ from Keras face detection?
ML Kit is a mobile SDK that brings Google’s machine learning expertise to Android and iOS apps. Its face detection API can detect faces in images and video. Unlike Keras, which is a library for building and training models, ML Kit provides pre-trained models that developers can use out of the box, or customize according to their needs. While Keras offers more flexibility and control, ML Kit is easier to use and requires less machine learning expertise.
What is the significance of the FaceNet model in face recognition?
FaceNet is a face recognition system developed by Google that set new records in accuracy. It uses a deep convolutional network trained to directly optimize the embedding itself, rather than intermediate features or layers. This makes it highly accurate in recognizing faces, even in challenging conditions.
How does face detection work in real-world applications?
In real-world applications, face detection algorithms are used to identify human faces in images or videos. They can be used in various applications, including security systems, surveillance, biometric identification, and user authentication. These algorithms can detect faces in different poses, lighting conditions, and occlusions, making them suitable for real-world scenarios.
How can I use Keras for face detection in my own projects?
Keras provides utilities and layers to build and train models for image processing tasks like face detection. You can use its Conv2D layers to build a convolutional network, and train it on a dataset of face images. Keras also provides utilities for loading and preprocessing image data.
What are the challenges in face detection and recognition?
Face detection and recognition come with several challenges. These include variations in lighting conditions, face poses, occlusions, and facial expressions. Additionally, changes in age and use of accessories like glasses or hats can also pose challenges. Training a model that can handle these variations is a complex task.
How does face recognition differ from face detection?
While both are related, they serve different purposes. Face detection is the process of identifying human faces in images or videos, regardless of who the person is. On the other hand, face recognition goes a step further by identifying who the person is. It involves comparing the detected face with a database of known faces to find a match.
 Shaumik Daityari
Shaumik is a data analyst by day, and a comic book enthusiast by night (or maybe, he's Batman?) Shaumik has been writing tutorials and creating screencasts for over five years. When not working, he's busy automating mundane daily tasks through meticulously written scripts!