Out of the box, Alexa supports a number of built-in skills, such as adding items to your shopping list or requesting a song. However, developers can build new custom skills by using the Alexa Skill Kit (ASK).
The ASK, a collection of APIs and tools, handles the hard work related to voice interfaces, including speech recognition, text-to-speech encoding, and natural language processing. ASK helps developers build skills quickly and easily.
In short, the sole reason that Alexa can understand a user’s voice commands is that it has skills defined. Every Alexa skill is a piece of software designed to understand voice commands. Also, each Alexa skill has its own logic defined that creates an appropriate response for the voice command. To give you an idea of some existing Alexa skills, they include:
- ordering pizza at Domino’s Pizza
- calling for an Uber
- telling you your horoscope
So as said, we can develop our own custom skills fitted to our need with the Alexa Skill Kit, a collection of APIs and tools designed for this purpose. The ASK includes tools like speech recognition, text-to-speech encoding, and natural language processing. The kit should get any developer started quickly with developing their own custom skill.
In this article, you’ll learn how to create a basic “get a fact” Alexa skill. In short, we can ask Alexa to present us with a random cat fact. The complete code for completing our task can be found on GitHub. Before we get started, let’s make sure we understand the Alexa skill terminology.
Mastering Alexa Skill Terminology
First, let’s learn how a user can interact with a custom skill. This will be important for understanding the different concepts related to skills.
In order to activate a particular skill, the user has to call Alexa and ask to open a skill. For example: “Alexa, open cat fact”. By doing this, we’re calling the invocation name of the skill. Basically, the invocation name can be seem as the name of the application.
Now that we’ve started the right skill, we have access to the voice intents/commands the skill understands. As we want to keep things simple, we define a “Get Cat Fact” intent. However, we need to provide sample sentences to trigger the intent. An intent can be triggered by many example sentences, also called utterances. For example, a user might say “Give a fact”. Therefore, we define the following example sentences:
- “Tell a fact”
- “Give a cat fact”
- “Give a fact”
It’s even possible to combine the invocation name with an intent like this: “Alexa, ask Cat Fact to give a fact”.
Now that we know the difference between an invocation name and intent, let’s move on to creating your first Alexa skill.
Creating an Amazon Developer Account
To get started, we need an Amazon Developer Account. If you have one, you can skip this section.
Signing up for an Amazon Developer account is a three-step process. Amazon requires some personal information, accepting the terms of service, and providing a payment method. The advantage of signing up for an Amazon Developer account is that you get access to a plethora of other Amazon services. Once the signup has been successfully completed, you’ll see the Amazon Developer dashboard.
Log yourself in to the dashboard and click on the Developer Console button in the top-right corner.
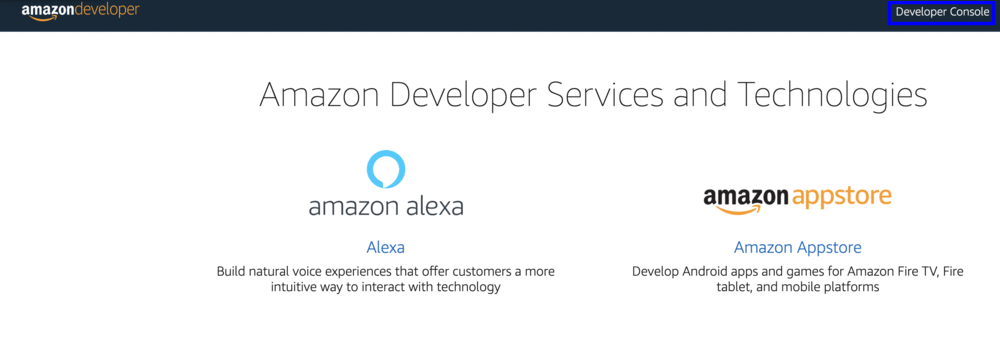
Next up, we want to open the Alexa Skills Kit.
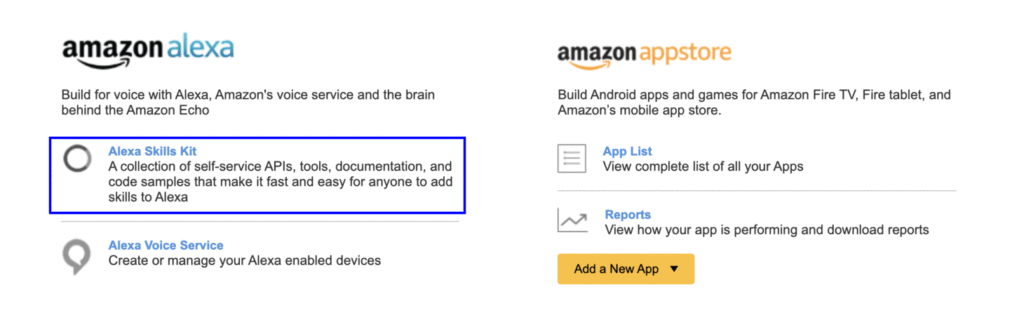
If you were unable to open the Alexa Skills Kit, use this link.
In the following section, we’ll create our actual skill.
Creating Our First Custom Alexa Skill
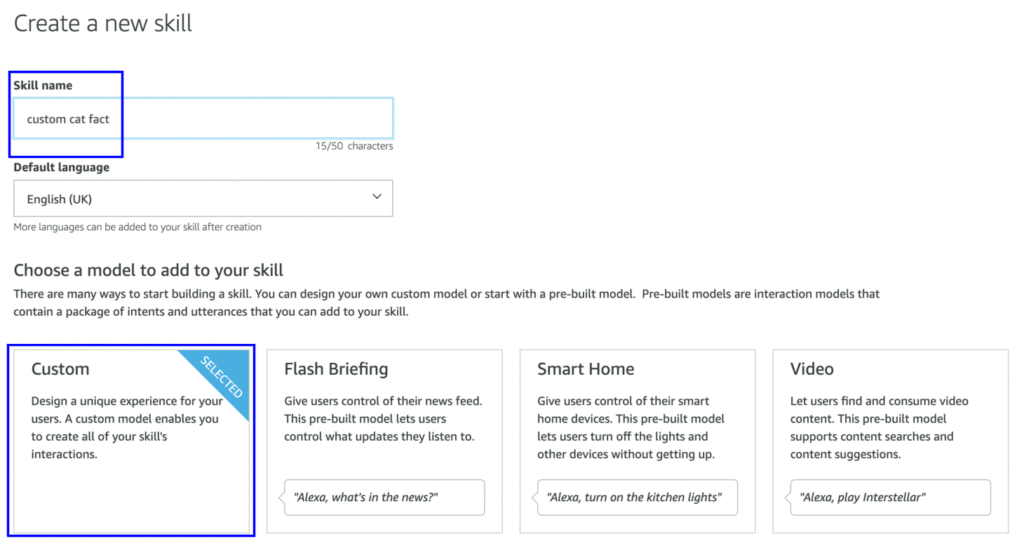
Okay, we’re set to create our first custom Alexa skill. Click the blue button Create Skill to open up the menu for creating a new skill.

Firstly, it will prompt us for the name of our skill. As you already know, we want random cat facts and therefore call the skill custom cat fact (we can’t use cat fact as that’s a built-in skill for Alexa devices). Next, it prompts us to pick a model for your skill. We can choose between some predefined models or go for a custom model that gives us full flexibility. As we don’t want to be dealing with code we don’t need, we go for the Custom option.
Note: If you choose a predefined skill, you get a list of interaction models and example sentences (utterances). However, even the custom skill is equipped with the most basic intents like Cancel, Help, NavigateHome, and Stop.
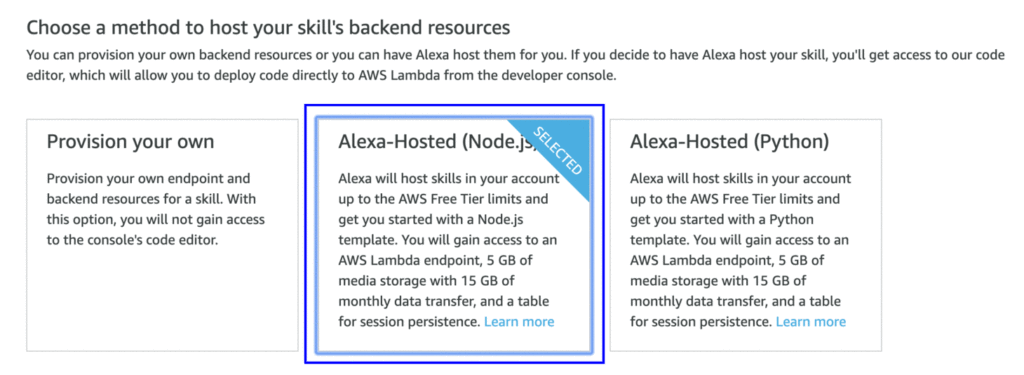
Next, we need to pick a way to host our skill. Again, we don’t want to overcomplicate things and pick the Alexa-Hosted (Node.js) option. This means we don’t have to run a back end ourselves that requires some effort to make it “Alexa compliant”. It means you have to format the response according to the Amazon Alexa standards for a device to understand this. The Alexa-hosted option will:
host skills in your account up to the AWS Free Tier limits and get you started with a Node.js template. You will gain access to an AWS Lambda endpoint, 5 GB of media storage with 15 GB of monthly data transfer, and a table for session persistence.
Okay, now that all settings are in place, you can click the Create Skill button in the top-right corner of the screen. This button will generate the actual skill in our Amazon Developer account.
Modifying Your First Alexa Skill
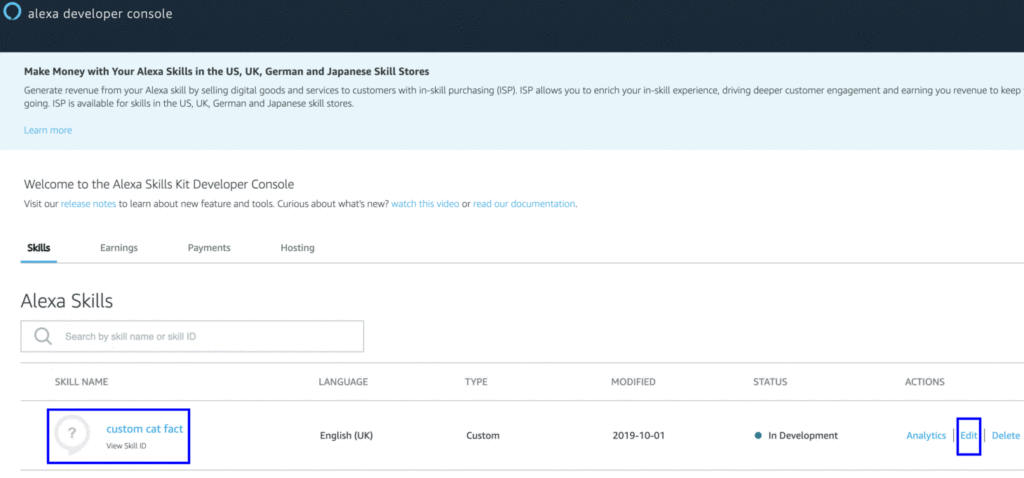
Now if you navigate to the Alexa Developer Console, you’ll find your skill listed there. Click the edit button to start modifying the skill.
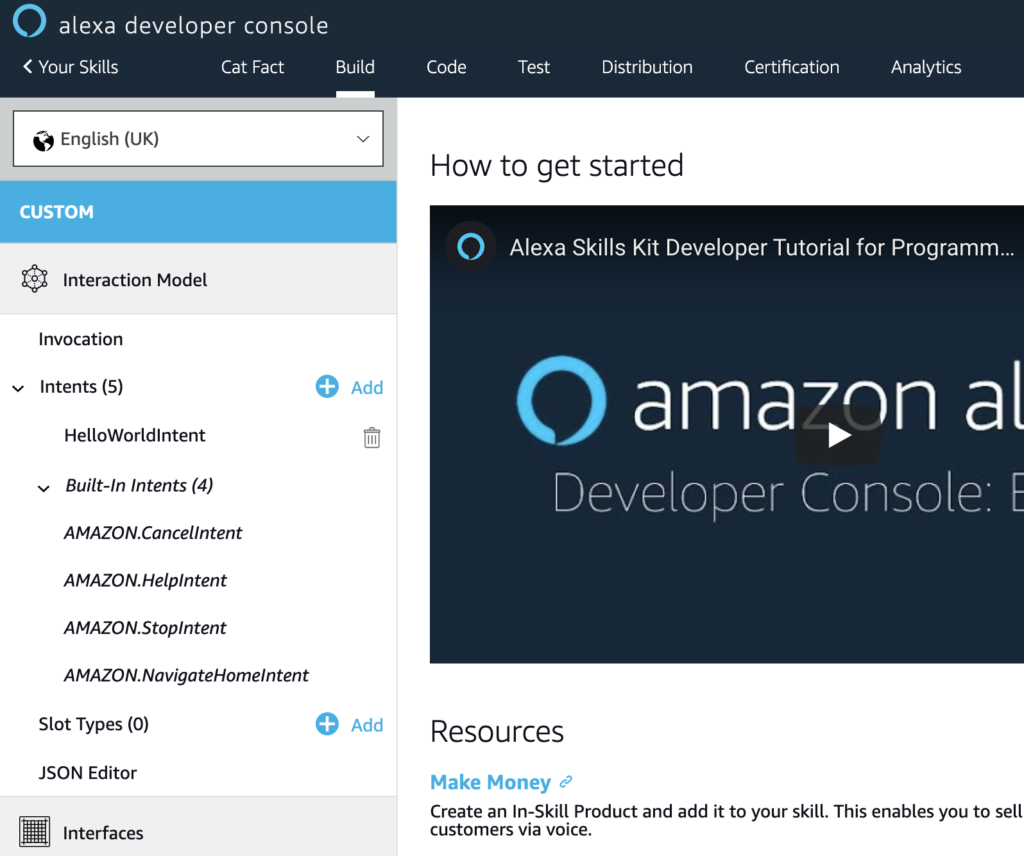
Next, Amazon will display the build tab for the Cat Fact skill. On the left-hand side, you’ll find a list of intents that are defined for the skill. As said before, by default the Alexa Skills Kit generates a Cancel, Stop, Help, and NavigateHome intent. The first three are helpful for a user that wants to quit the skill or doesn’t know how to use it. The last one, NavigateHome, is only used for complex skills that involve multiple steps.
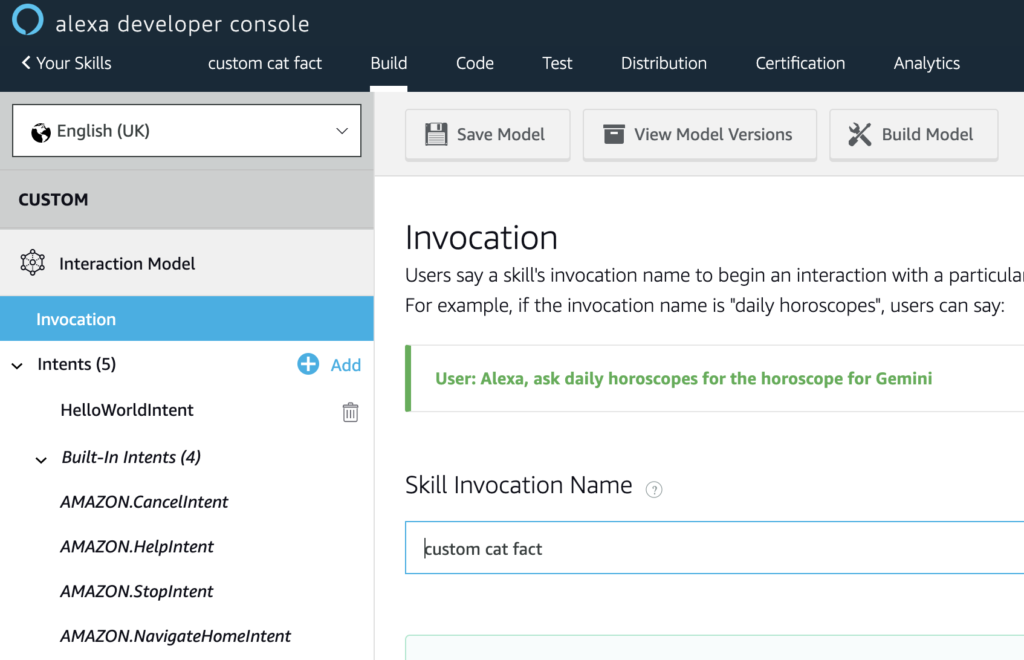
Step 1: Verify Invocation Name
First of all, let’s verify if the invocation name for the skill is correct. The name should say “custom cat fact”.
In case you change the name, make sure to hit the Save Model button on top of the page.
Step 2: Change “HelloWorldIntent”
As the second step, we want to modify the default intent HelloWorldIntent.
By clicking the intent, we get a nice graphical interface that allows us to change the intent name or add sample utterances.
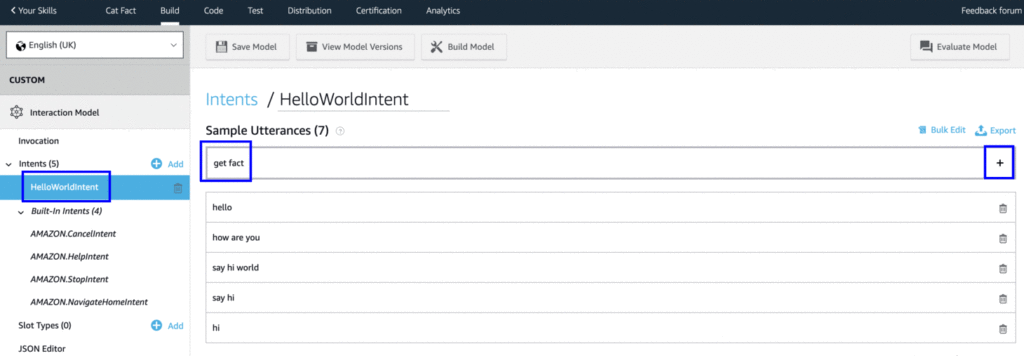
Personally, I prefer to use the JSON editor, which you find in the menu on the left. When opening the JSON editor, you’ll see the following JSON object.
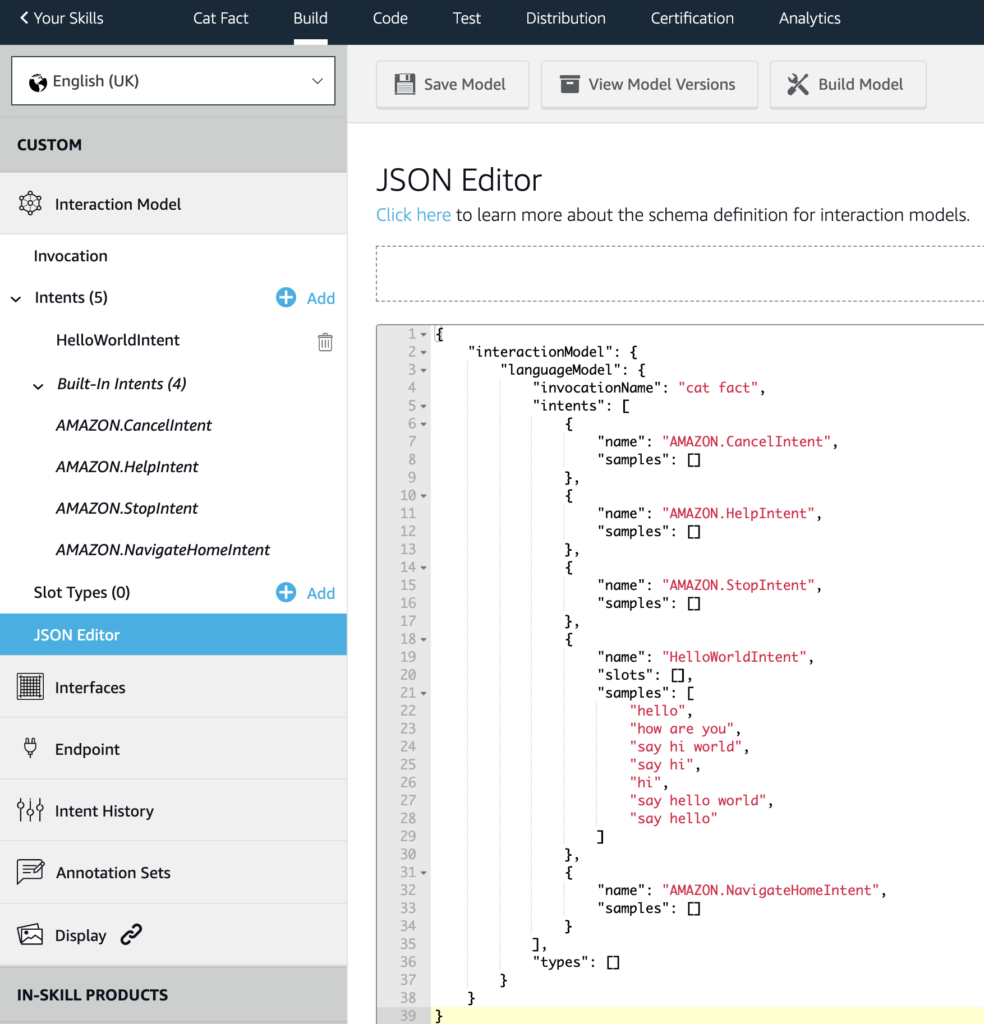
The benefit of the JSON editor is that you can modify all intents at once. Let’s first add a new intent named “GetFactIntent”.
Next, we want to add some sample utterances as in the picture below.
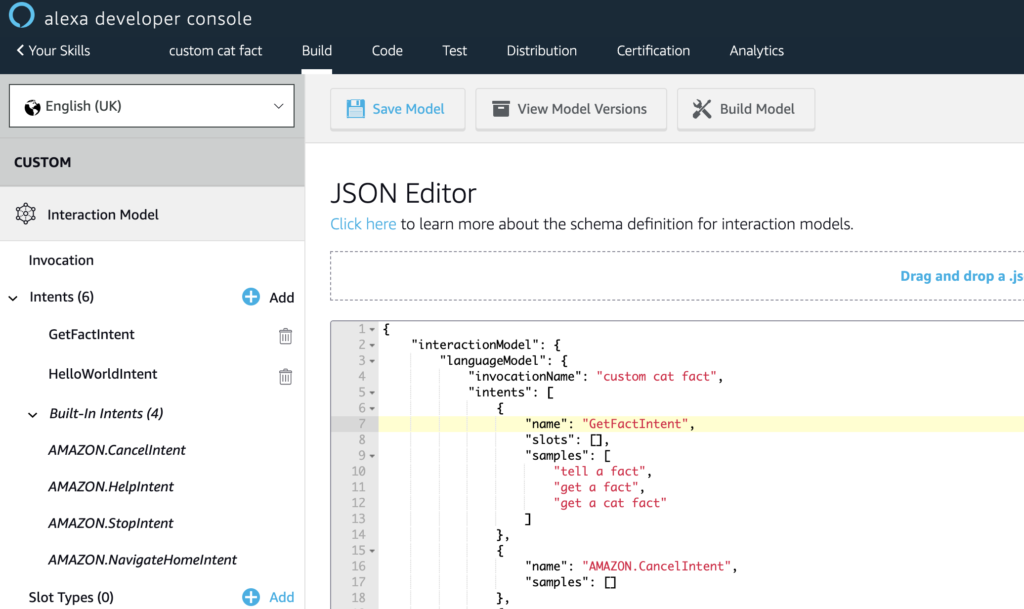
After the modifications, this is how your JSON object should look. For now, we don’t want to define sample utterances for the other intents. The Alexa Skills Kit will, by default, link a “help” sentence to the “HelpIntent”.
Note: Do not forget to click the Save Model button and afterwards hit the Build Model button. Alexa will basically build up the model and train itself according to the model you have defined using the sample utterances.
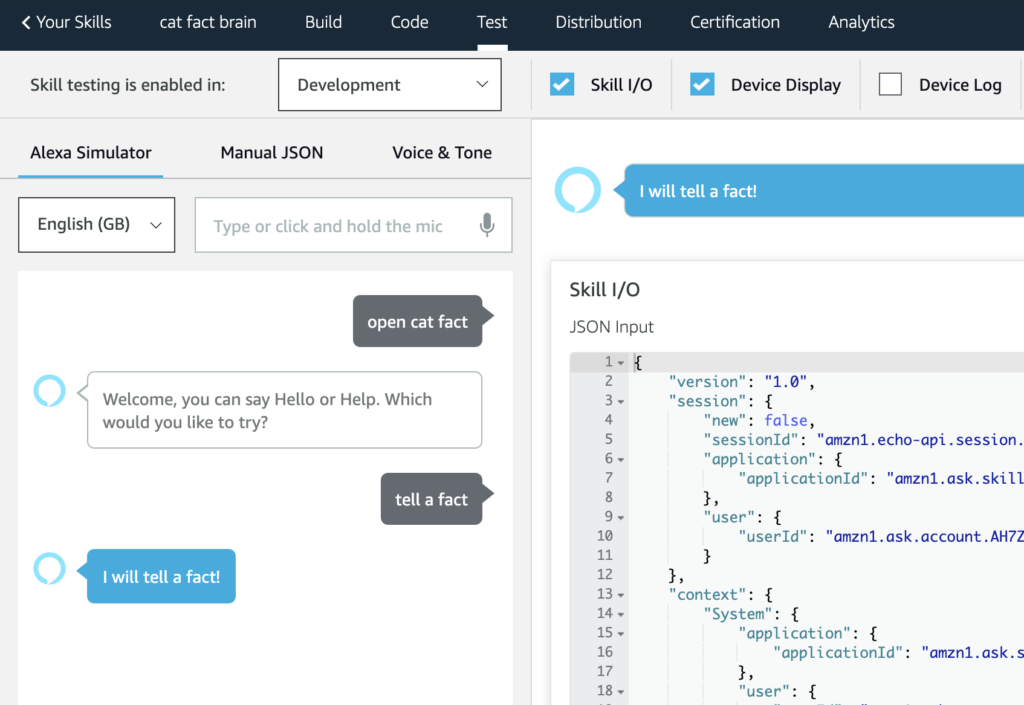
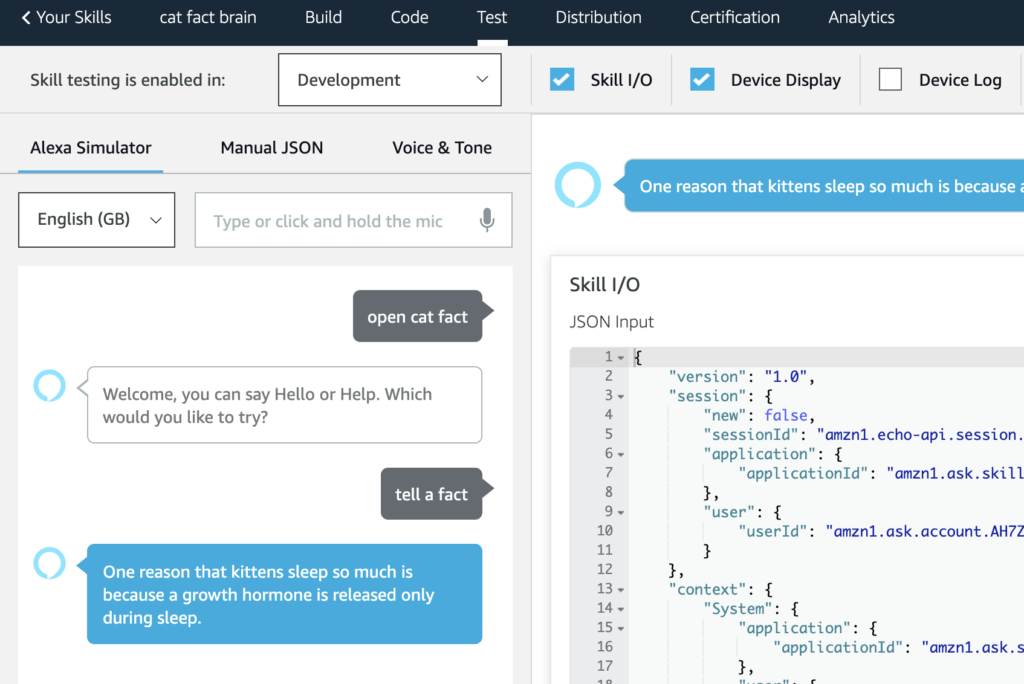
Step 3: Test the “Custom Cat Fact” Skill
Let’s move to the test tab in the horizontal menu. Now, switch the dropdown menu for “Skill testing is enabled in” to Development. This will allow us to test the skill.
For now, let’s try to activate the skill to see if things are right. We can activate the skill by calling the invocation name as shown in the image below.

Step 4: Modifying Code for GetFactIntent
Next, we’ll dive into the code tab. When you click the code tab, you’ll get an online editor with the default code.
Firstly, we want to copy the code for the HelloWorldIntentHandler and rename it to GetFactIntentHandler.
After that, we have to specify which type of intent this handler can handle. Line number 21 looks for an intent named GetFactIntent.
Now that we’ve found the intent, let’s define a static response: “I will tell a fact!” which we assign to the speakOutput variable.
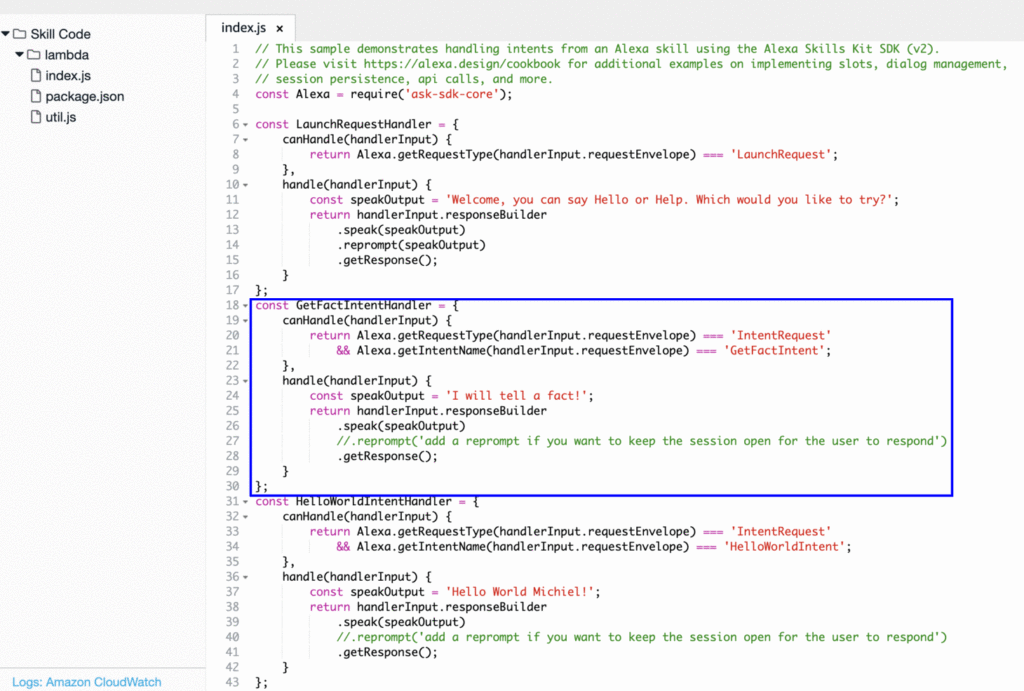
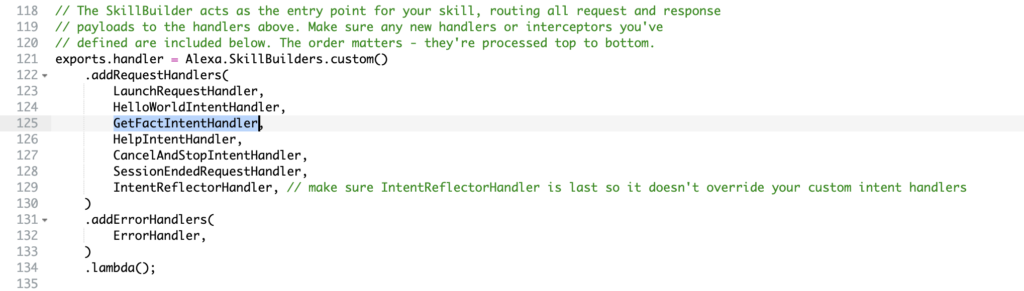
At last, we have to add the GetFactIntentHandler to the other request handlers. We can simply do this by adding it to the addRequestHandlers function. Don’t forget to save and build the intent!
Now that the skill has been saved and built, let’s briefly verify the response. If we ask the skill to tell a fact, it should reply with “I will tell a fact!”
If everything is right, you can move on to the next step.
Step 5: Query API to Retrieve Cat Facts
As the last step, we want to query a simple API that returns cat facts. For this, I’m using the following API endpoint: https://catfact.ninja/fact.
This API endpoint returns a fact and the length of the fact.
{
  "fact": "Smuggling a cat out of ancient Egypt was punishable by death. Phoenician traders eventually succeeded in smuggling felines, which they sold to rich people in Athens and other important cities.",
  "length": 192
}
As the https package is built in for Node.js, we can use it in our code to retrieve the data from the API. This is how we do it:
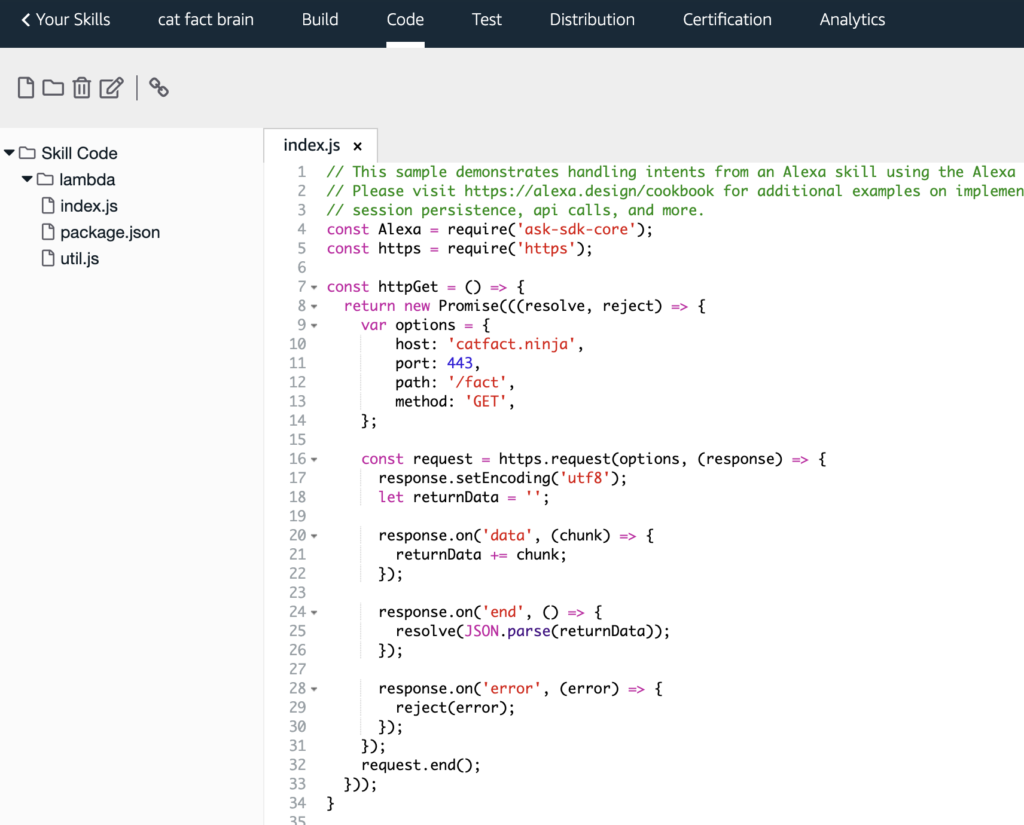
The actual code can be found here:
const https = require('https');

const httpGet = () => {
  return new Promise(((resolve, reject) => {
    var options = {
        host: 'catfact.ninja',
        port: 443,
        path: '/fact',
        method: 'GET',
    };

    const request = https.request(options, (response) => {
      response.setEncoding('utf8');
      let returnData = '';

      response.on('data', (chunk) => {
        returnData += chunk;
      });

      response.on('end', () => {
        resolve(JSON.parse(returnData));
      });

      response.on('error', (error) => {
        reject(error);
      });
    });
    request.end();
  }));
}
Now we have the helper method prepared, we can add this to the GetFactIntentHandler. Notice that, as we want to use await for the request, we’ve had to make the handle function async. Besides that, we call the httpGet function to get the cat fact response and assign response.fact to the speakOutput variable. Next, the speakOutput variable is passed to the speak command, which is used by Alexa:
const GetFactIntentHandler = {
    canHandle(handlerInput) {
        return Alexa.getRequestType(handlerInput.requestEnvelope) === 'IntentRequest'
            && Alexa.getIntentName(handlerInput.requestEnvelope) === 'GetFactIntent';
    },
    async handle(handlerInput) {
        // const speakOutput = 'I will tell a fact!';
        const response = await httpGet();
        const speakOutput = response.fact;
        return handlerInput.responseBuilder
            .speak(speakOutput)
            //.reprompt('add a reprompt if you want to keep the session open for the user to respond')
            .getResponse();
    }
};

We’re ready with the code changes. Save the code once more and click the deploy button afterwards.
Step 6: Final Skill Testing
As a very last step, let’s verify if the skill gets random cat facts from the API. Again, let’s go to the test tab.
Start the skill by calling open cat fact. Next, you can ask to tell a fact. If everything goes well, you should get a fact as a response.
Success!
Step 7 (Optional): Test on Real Alexa Device
In order to test your custom skill on an Alexa-enabled device, you need to register the Alexa device under the same email address as your Amazon developer account.
More information can be found in the Alexa documentation:
To test with an Alexa-enabled device (such as an Amazon Echo), register the device with the same same e-mail address you used to sign up for your developer account on the Amazon Developer Portal. You can then invoke your skill with the wake word and your invocation name: “Alexa, open
.” If your device is set up with an account other than your developer account, reset the device and then re-register it with your developer account.
Understanding the Basics
This is just the beginning of building skills with Alexa. Much more advanced examples are possible like passing parameters (options) with intents. Also, many other types of skills can be developed like skills that control smart home devices.
If you want to learn more about Alexa Skill development, look for those resources:
- Build a skill end to end — Amazon Alexa Docs
- Skill sample Node.js project by Alexa
- Voice design guide
Frequently Asked Questions (FAQs) about Amazon Alexa Skill
How can I create an Alexa skill for my website?
Creating an Alexa skill for your website involves several steps. First, you need to set up an Amazon Developer account. Once you have an account, navigate to the Alexa Skills Kit Developer Console and click on ‘Create Skill’. You’ll need to provide a name for your skill and choose a model to add to your skill. After that, you’ll need to build the interaction model for your skill, which includes intents, slots, and sample utterances. Once you’ve built your interaction model, you can proceed to test your skill in the developer console before publishing it.
What are the key components of an Alexa skill?
An Alexa skill consists of several key components. These include the invocation name (which is what users say to activate your skill), intents (which represent actions that fulfill a user’s request), slots (which are variables that act as placeholders for user input), and sample utterances (which are phrases users might say to interact with your skill). Each of these components plays a crucial role in how your skill functions and interacts with users.
How can I test my Alexa skill?
Testing your Alexa skill is an important part of the development process. You can test your skill in the Alexa Skills Kit Developer Console. Simply navigate to the ‘Test’ tab in the console and you can start testing your skill. You can type or speak phrases to see how your skill responds, and you can also test multi-turn conversations to see how your skill handles ongoing interactions.
How can I publish my Alexa skill?
Once you’ve built and tested your Alexa skill, you can submit it for certification in the Alexa Skills Kit Developer Console. Before you submit your skill, make sure you’ve completed all the necessary steps in the development process, including setting up your skill’s metadata and testing your skill thoroughly. After you submit your skill, it will undergo a review process before it’s published.
What is the Alexa Presentation Language (APL)?
The Alexa Presentation Language (APL) is a language that allows developers to create visual and audio experiences for Alexa skills. With APL, you can design rich, interactive displays for devices with screens, and you can also create audio responses for devices without screens. APL is a powerful tool for enhancing the user experience of your Alexa skills.
How can I use APL in my Alexa skill?
To use APL in your Alexa skill, you’ll need to include APL directives in your skill’s response. These directives define the visual and audio components of your response. You can design your APL documents using the APL authoring tool in the Alexa Skills Kit Developer Console, which provides a visual interface for creating and previewing your designs.
What is the Alexa Web API for Games?
The Alexa Web API for Games is a set of web technologies that allows developers to create visually rich and interactive game experiences for Alexa devices with screens. With the Alexa Web API for Games, you can use standard web technologies like HTML, CSS, and JavaScript to build your game experiences.
How can I use the Alexa Web API for Games in my Alexa skill?
To use the Alexa Web API for Games in your Alexa skill, you’ll need to include the Alexa Web API for Games interface in your skill’s manifest. You can then use the Alexa.Presentation.HTML.Start directive to start a web app session, and you can use the Alexa.Presentation.HTML.HandleMessage directive to handle messages from your web app.
What is the Alexa Skills Kit (ASK)?
The Alexa Skills Kit (ASK) is a collection of self-service APIs, tools, documentation, and code samples that makes it easier for you to build skills for Alexa. With ASK, you can leverage Amazon’s knowledge and pioneering work in the field of voice design.
How can I use the Alexa Skills Kit (ASK) to build my Alexa skill?
You can use the Alexa Skills Kit (ASK) to build your Alexa skill by leveraging its various features and tools. ASK provides a range of resources, including the ASK SDKs, the ASK CLI, the ASK Developer Console, and the ASK Documentation. These resources provide a comprehensive set of tools for building, testing, and publishing your Alexa skills.
 Michiel Mulders
Fullstack Blockchain Developer at TheLedger.be with a passion for the crypto atmosphere.