Introduction
This guide will walk through initial VPS server setup on CentOS 7. When you bought a new VPS hosting then you need to perform some initial configurations such as new user creation, restrict permissions, restrict login etc. for your VPS server. The hosting company send an email with password which is required to login with your root user. The hosting company may additionally send you another username which is a regular user.
It is advisable to perform activities on your server using regular user and restrict the login for your root user to avoid any accidental unrecoverable damage to the server.
We will see in this tutorial how to create a new regular user if your hosting company already sent one and restrict login to root user. We will also add the regular user into administrator group with root privileges to perform activities as an administrator.
Prerequisites
VPS server’s public IP address, Port (default is 22), PuTTY, Windows 10
Root Login
Go through the following steps to connect to server using PuTTY client.
- Open Putty by double clicking on PuTTY.EXE.
- Enter your server’s IP address and port. The default port is 22 if you have not changed it.
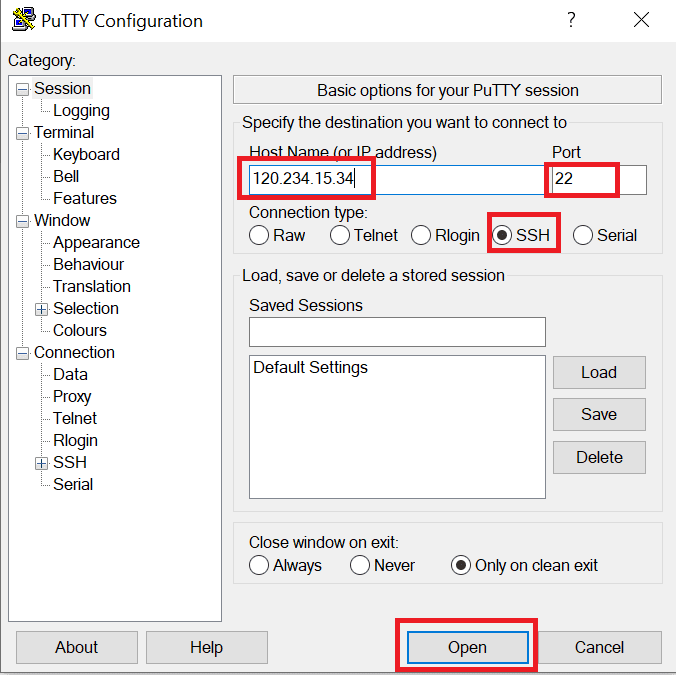
- Click Open button to connect to the server.
- Now you will see a black window where you need to enter your username. Enter root as the login as. Then enter password for your root user which hosting company sent you in email.
- Now on your first login it will ask to set the new password. Enter new password and confirm password again.
As I have already mentioned that root is the super user with very broad privileges so we should not perform any activity using root user. Therefore next step is to create a new regular user or use the regular user if your hosting company sent in email.
Create New User
So in the above step I assume that you have already logged in as root user.
Now create a new user by executing the following command. If you have already regular user then you don’t need to execute this step.
# adduser roytutsIn the above statement, you don’t need to put # before the command and roytuts is the new user for VPS server on CentOS 7.
Next step is to set a password for new user. You can execute this step even if you have the regular user with you already. Remember to replace the roytuts with your own user.
# passwd roytutsWhen prompt appears for entering password, enter strong password and repeat it to verify the same.
Root Privileges to New User
In the above step we created a new user with normal privileges but most of the times we may need to perform tasks with root privileges.
To avoid logging out of the normal user and logging in as root user every time we need to perform administrative tasks, we will setup root privileges for the new regular user.
Therefore whenever we need to perform administrative tasks using normal user, we will append sudo before the command on terminal. Using sudo in the command sometimes asks for the password. So you need to enter user’s password.
To add root privileges to new user, we need to add the new user to the wheel group. By default, on CentOS 7, users who belong to the wheel group are allowed to use the sudo command.
While you are logged in as root, run the following command to add your new user to the wheel group. Remember to replace roytuts with your own user.
# gpasswd -a roytuts wheelNow your user can run commands with super user privileges using sudo. For example, to edit the error log file your user can use the following command:
$ sudo vi error_logNote $ is seen on Unix terminal when you login with regular user, i.e., roytuts. vi editor is used to open a file for writing or editing. error_log is the name of the file.
Add Public Key Authentication
The next step is to secure your server a bit by setting up public key authentication for your new user.
Setting public key authentication up will increase the security of your server by requiring a private SSH key to login to server.
This public key authentication will not require password for login to server.
For setting up SSH key pair and securing your user’s login you can read the tutorial Login to Linux Server with SSH key from Windows.
Restrict Root User Login
As we have already setup a new user with administrative privileges, so we don’t need to allow root user to login to the server.
This will secure your server with one step ahead. We can do this by modifying its SSH daemon configuration (the program that allows us to login remote server) to disallow remote server access to the root user.
While you are logged in as root open the configuration file by executing the following command:
# vi /etc/ssh/sshd_configOr using regular user (use sudo) open the configuration file by executing the following command:
$ sudo vi /etc/ssh/sshd_configLook for the below line in the file sshd_config:
#PermitRootLogin yesAnd delete # to uncomment the line and make the changes as follows:
PermitRootLogin noTo change anything in the above file press i from your keyboard to enter INSERT mode. Update the line. Finally save and exit from the file using command :wq from your keyboard.
Reload SSH
We need to reload SSH service so that it will use the latest configuration changes.
Use below command to reload the SSH service using root user:
# systemctl reload sshdOr using regular user – roytuts, execute below command:
$ sudo systemctl reload sshdNow once you exit from the root user account you won’t be able to login again using root user and you will get error – Access denied.
Hope you got an idea how to setup new VPS server on CentOS 7 once you purchase from the hosting company.
Thanks for reading.