Enrich Your WPF Apps with the New SyntaxEditor Control

Show a block of highlighted code, display a custom language or add a complete code editor in your app – our syntax editor gives you plenty of opportunities for your applications.
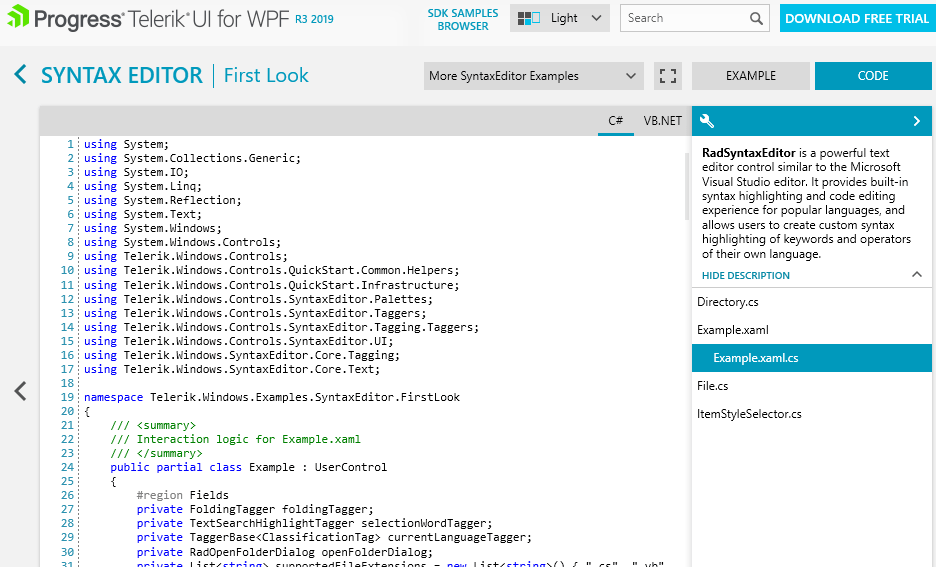
You know our shiny Telerik UI for WPF Demos Application, right? If you don’t, this is a robust WPF app, showcasing all of the over 140 UI controls of the Telerik UI for WPF component suite. Each of the components is presented by a handful of demos, all of them accompanied by their source code, so it is super easy to see how to use the different control features.
How do we visualize the source code files? It’s via the RadSyntaxEditor control. You wanted it included in our WPF suite and we delivered it. Now you can implement source code editors and viewers in your desktop applications, in any language! (👏 👏 👏)
Before going into the features let's make an important note that the RadSyntaxEditor is Beta in the R3 2019 release, and we really want to hear the scenarios you want it to cover for your applications in the future. This way we will surely deliver an outstanding official version in January 2020.
Quick Start
To get started with the syntax editor, add it in XAML and then in code set its Document property to refer a file. The last step is to register a suitable tagger class to color the code properly.
<Grid>

   <telerik:RadSyntaxEditor x:Name="syntaxEditor"  />

</Grid>

public MainWindow()

{

    StyleManager.ApplicationTheme = new FluentTheme();

    InitializeComponent();

    Uri filePathUri = new Uri("/SyntaxEditor_Design;component/Test/CSharp.cs", UriKind.RelativeOrAbsolute);

    using (Stream stream = Application.GetResourceStream(filePathUri).Stream)

    {

        StreamReader reader = new StreamReader(stream, Encoding.UTF8);

        this.syntaxEditor.Document = new TextDocument(reader);

    }

    CSharpTagger cSharpTagger = new CSharpTagger(this.syntaxEditor);

    this.syntaxEditor.TaggersRegistry.RegisterTagger(cSharpTagger);
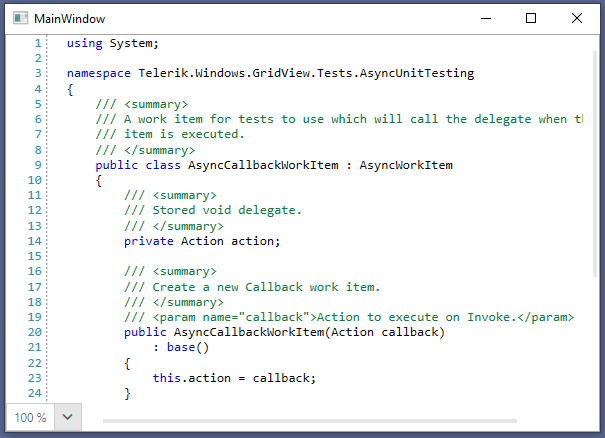
So in 10 lines of code, you get a code editor of your C# file in a modern looking Fluent theme:
Now lets look inside the fridge.
What's in the Toolbox?
Syntax Highlighting
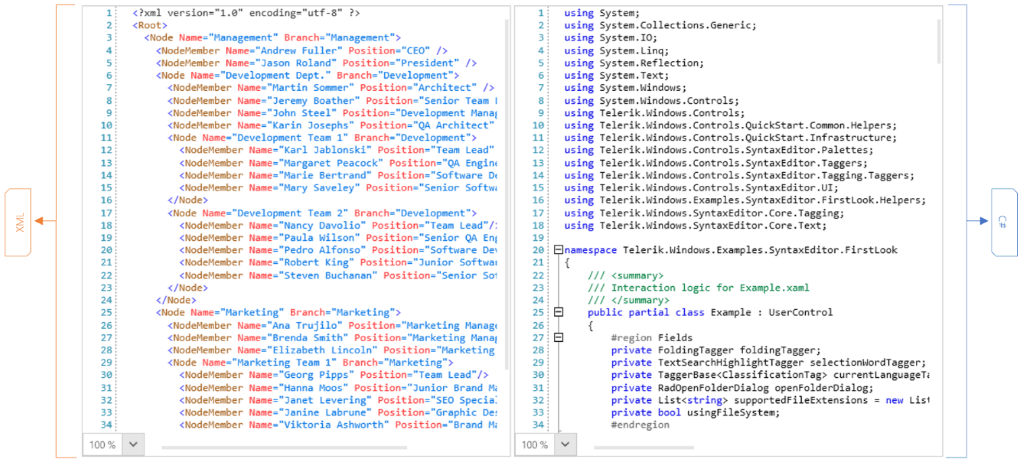
The syntax editor knows how to detect and color keywords, comments and regions in the following well-known languages in the .NET world: C#, VB, JS, SQL. Also, it recognizes the different parts in an XML-based source code text, so it is perfectly designed for highlighting XML-based language files - XML, XAML, HTML.
With these two base types of syntax recognition, you can define your own custom language and process its syntax words or structures.
Editing Experience Like in Popular IDEs
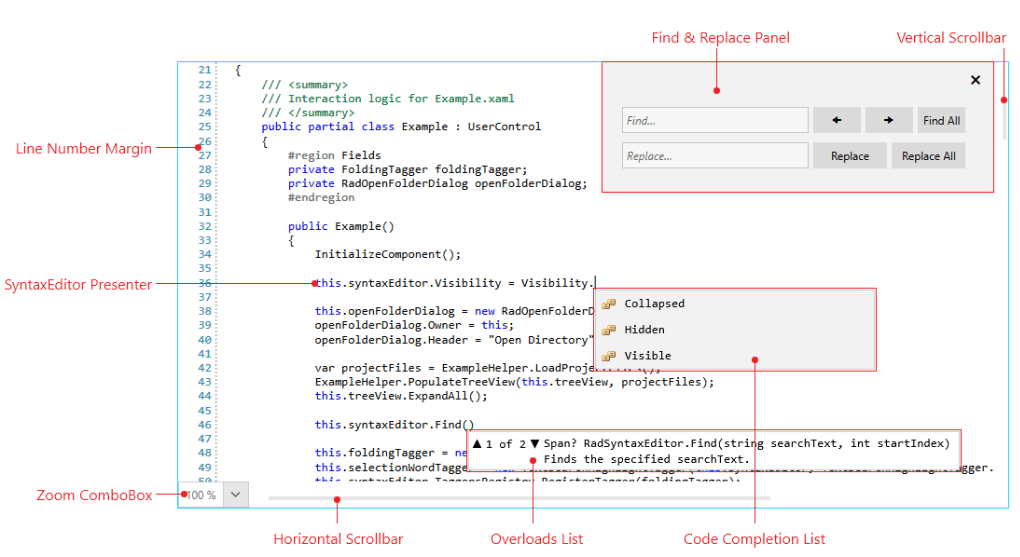
RadSyntaxEditor stores the whole text of the document in a “rope” data structure which enables insertion and deletion of text at a logarithmic speed. Some features are inspired by the popular IDEs – line numbering, folding (expand / collapse sections in code), rectangle selection, simultaneous editing on consecutive lines, Undo-Redo, zooming (plus predefined zooming levels in combo).
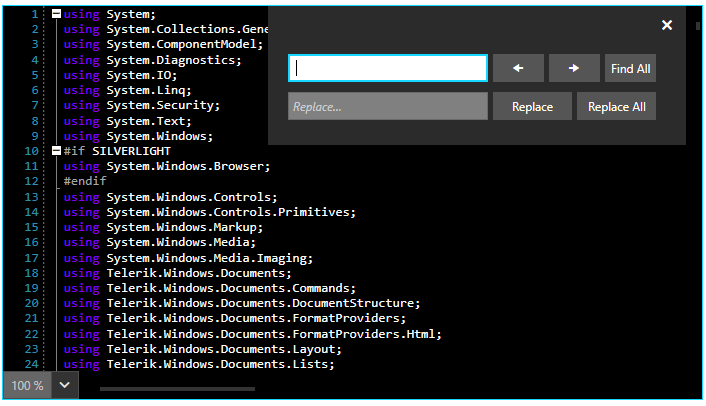
The Find-Replace dialog lets you navigate (find) a specific part of your code or replace some occurrences of matched strings. It is fully localized which means you can easily switch between our supported languages (EN, DE, FR, IT, TR, DU, ES) in your application and it will be translated. Or you can add translations for the provided localization keys.
Intelliprompt features like code completion and overload list let you add context-like menus for inserting code / text or navigating between possible method overloads.
Themes, Palettes, Custom Colors, Formatting
You have plenty of ways to color/format your code/text in RadSyntaxEditor. With palettes, you can switch Light, Dark, Neutral and Neutral Dark variations of the syntax-related words in your code document. Of course, this can be easily combined with our built-in themes which are applied to scrollbars, zoom combo, find replace dialog, intelliprompt controls, background of the editor.
Did I just forget to say that you can add a custom palette or even customize some of our built-in themes?
We have made sure most of the UI operations are executed through commands so that you can wire them easily to buttons/menus in your application. Of course, you can expect public methods for most of the features like Find-Replace / Cut-Copy-Paste / Insert-Delete / Navigation / Selection / Finding Lines / Indentation / Zooming / etc. You can track any change in the document, just subscribe to some helpful event and implement your application logic.
Taggers and Layers
Now let’s dive into the deep waters of processing text and then rendering some augmentations over it. Tagger in the syntax editor's world means a class which collects some occurrences of text portions and wraps them into tags. Tags keep reference to the found text, store information on how this text should be formatted and which layer should handle it.
For example, the CSharpTagger collects keywords, comments, regions in a C# file and prepares collection of ClassificationTags. When the syntax editor updates its UI, there is a dedicated layer which colors the text from the ClassificationTags – the TextUILayer. Another example – the TextSearchUnderlineTagger collects matches of single word and TextUnderlineUILayer renders colored rectangles below the occurrences of the given word in the document.
Using Taggers in Code Editor
Theory is hard without practice, right? So, let’s code some useful stuff with Taggers.
ToolTip Tagger
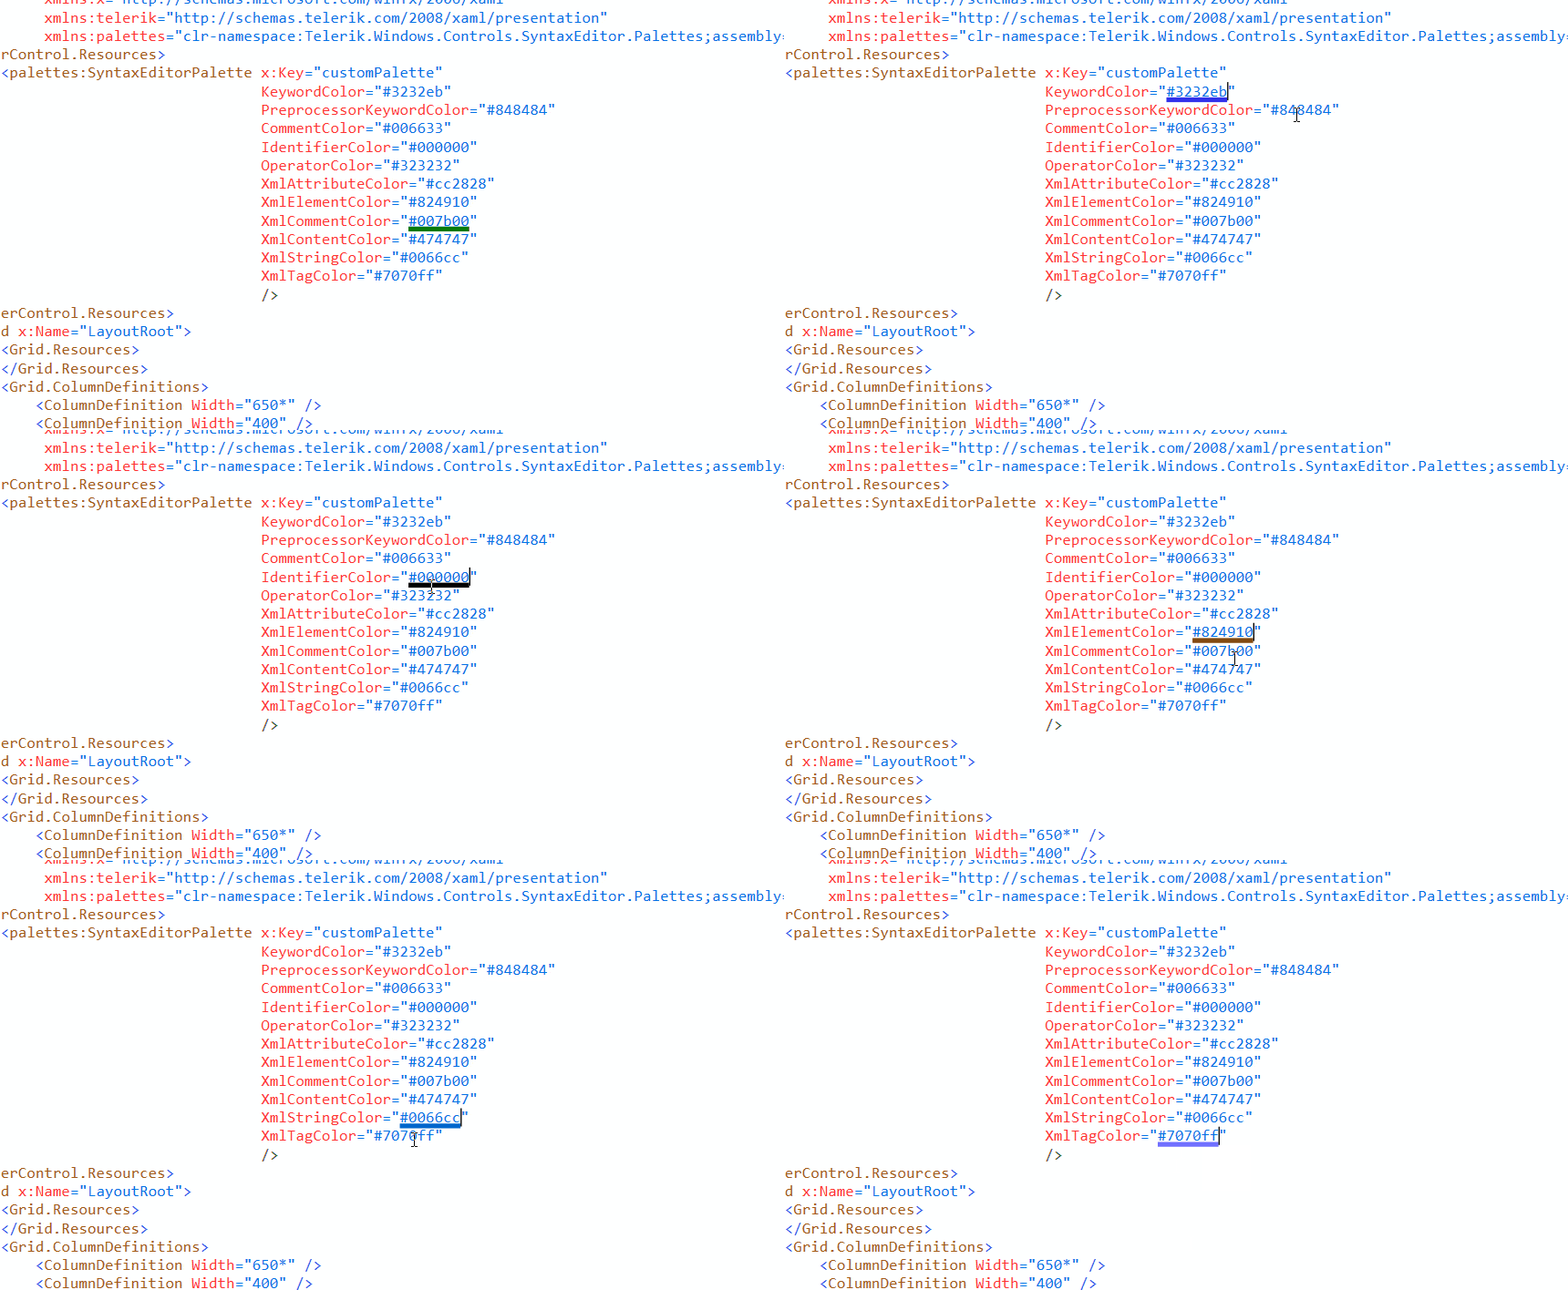
ToolTip tagger which shows the color of a “Color” property in XAML file in Tooltip:
This is done by inheriting from TaggerBase<ToolTipTag>. In the GetTags method you receive all lines in the document in the format of spans. With regex matching we collect all occurrences of words which end at *Color=”#hexcolor”, then prepare content of a tooltip and return TagSpan<ToolTipTag> - object which references the span containing the text and the tooltiptag object which will be processed by the TextToolTipLayer.
public class ColorStringTooltipTagger : TaggerBase<ToolTipTag>

{

    private const string colorRegex = @"\w*Color=""(#{0,1})([0-9A-Fa-f]{8}|[0-9A-Fa-f]{6})""$";

    /// <summary>

    /// Initializes a new instance of the <see cref="ColorStringTooltipTagger"/> class.

    /// </summary>

    /// <param name="editor">The editor.</param>

    public ColorStringTooltipTagger(ITextDocumentEditor editor)

        : base(editor)

    {

    }

    /// <summary>

    /// Gets the tags.

    /// </summary>

    public override IEnumerable<TagSpan<ToolTipTag>> GetTags(NormalizedSnapshotSpanCollection spans)

    {

        TextSnapshot snapshot = this.Document.CurrentSnapshot;

        foreach (TextSnapshotSpan snapshotSpan in spans)

        {

            string lineString = snapshotSpan.GetText();

            Regex regularExpression = new Regex(colorRegex, RegexOptions.IgnoreCase | RegexOptions.ExplicitCapture);

            MatchCollection matches = regularExpression.Matches(lineString);

            foreach (Match match in matches)

            {

                if (match.Success)

                {

                    int index = lineString.IndexOf(match.ToString());

                    TextSnapshotSpan tempSnapshotSpan = new TextSnapshotSpan(snapshot, new Span(snapshotSpan.Start + index, match.Length));

                    string colorString = match.ToString();

                    Debug.WriteLine(colorString);

                    Rectangle rect = new Rectangle()

                    {

                        Width = 30,

                        Height = 30,

                        Fill = new SolidColorBrush(this.GetColor(colorString)),

                        Margin = new System.Windows.Thickness(5),

                    };

                    yield return new TagSpan<ToolTipTag>(tempSnapshotSpan, new ToolTipTag(rect));

                }

            }

        }

        yield break;

    }

    private Color GetColor(string colortext)

    {

        string colorPart = colortext.Substring(colortext.IndexOf("#"), 7);

        Color color = (Color)ColorConverter.ConvertFromString(colorPart);

        return color;

    }

}
The rest of the work is to register this tagger:
ColorStringTooltipTagger tooltipTagger = new ColorStringTooltipTagger(this.syntaxEditor);

this.syntaxEditor.TaggersRegistry.RegisterTagger(tooltipTagger);
Underline Tagger
The UnderlineTagger is for drawing colored rectangles under hex color strings in a XAML file.
Step 1. Create a custom IUnderlineDecoration object which draws a colored underline under a given Rect which is a bounding rectangle around a text portion:
public class CustomLineDecoration : IUnderlineDecoration

{

    private double thickness;

    internal CustomLineDecoration(double thickness)

    {

        this.thickness = thickness;

    }

    /// <summary>

    /// Creates the underline.

    /// </summary>

    /// <param name="rect">The rectangle.</param>

    /// <param name="brush">The brush.</param>

    /// <returns>FrameworkElement.</returns>

    public FrameworkElement CreateUnderline(Rect rect, Brush brush)

    {

        Line line = new Line();

        line.Stroke = brush;

        line.StrokeThickness = this.thickness;

        double lineY = rect.Top + rect.Height + 2;

        line.X1 = rect.Left;

        line.Y1 = lineY;

        line.X2 = rect.Right;

        line.Y2 = lineY;

        line.IsHitTestVisible = false;

        return line;

    }

}
Step 2. Create instances of the decoration, the TextFormatDefinitionKey and the underline tagger:
public partial class MainWindow : Window

{

    private  static readonly ITextFormatDefinitionKey colorUdnerlineDefinition = new TextFormatDefinitionKey("ColorUnderlineDefinition");

    private TextSearchUnderlineTagger underlineTagger;

    private CustomLineDecoration lineDecoration = new CustomLineDecoration(4);
Step 3. Register the tagger and handle the SelectionChanged event:
public MainWindow()

{

    InitializeComponent();

    this.LoadFile("Test/UserControl.xaml");

    this.underlineTagger = new TextSearchUnderlineTagger(this.syntaxEditor, colorUdnerlineDefinition);

    this.syntaxEditor.TaggersRegistry.RegisterTagger(this.underlineTagger);

    this.syntaxEditor.Selection.SelectionChanged += Selection_SelectionChanged;
Step 4. On selection, check if the selected word is a hex color string, and if yes – set the custom formatting for this hex word and force the underline tagger to update the UI:
private void Selection_SelectionChanged(object sender, EventArgs e)

{

    string selectedWord = this.syntaxEditor.Selection.GetSelectedText();

    foreach (char ch in selectedWord)

    {

        if (!char.IsDigit(ch) && !char.IsLetter(ch))

        {

            return;

        }

    }

    if (syntaxEditor.Selection.StartPosition.Index == 0)

        return;

    Span previousCharSpan = new Span(syntaxEditor.Selection.StartPosition.Index - 1, 1);

    if (this.syntaxEditor.Document.CurrentSnapshot.GetText(previousCharSpan) == "#")

    {

        string colorSection = string.Format("#{0}", selectedWord);

        Color color = this.GetColor(colorSection);

        this.syntaxEditor.TextFormatDefinitions.AddLast(colorUdnerlineDefinition,

           new TextFormatDefinition(new UnderlineInfo(new SolidColorBrush(color), lineDecoration)));

        this.underlineTagger.UpdateSearchWord(colorSection);

        this.syntaxEditor.Selection.Clear();

    }

}
Voila! Now you have a useful feature, implemented just in minutes, which is usually an extension for Visual Studio by the way 😊.
Stay Tuned
This blog post is about to end but this is just the beginning of this powerful component’s endless lifecycle. We will appreciate any feedback you may have, and we will take into consideration every feature suggestion from you. This way we will deliver an awesome, feature-rich, official Syntax Editor in R1 2020. Please send your suggestions in our feedback portal.
To try out the new WPF SyntaxEditor control, head out to your Telerik account, or download a trial of Telerik UI for WPF.
Happy syntaxing!

Petar Mladenov
Petar Mladenov is a XAML specialist on the Telerik WPF & Silverlight team located in Sofia, Bulgaria. During weekdays he creates a cool desktop UI components like dialogs, diagrams and charts. On weekends you will find him with a fishing rod in hand, skiing or just exploring some cool places.

