
DEV is a great community for developer content. If you have articles that you don't want live all at once, how can you publish on a schedule automatically? In this article, let's use GitHub Actions to get your content online on your timeline.
GitHub Actions is a way to run code on GitHub's servers. The service is effectively a Continuous Integration (CI) service from GitHub. To use GitHub Actions, we create a workflow in a Git repository. That workflow contains all the steps to run the code we care about.
To publish to DEV, we can:
- Use a workflow...
- To read a publishing schedule we create...
- And check the current time...
- And publish an article to DEV if the publish date is in the past.
Before we get to the workflow, let's look at the code that will run.
Creating a schedule
The first step in this whole process is to create a publishing schedule that our script can read. Minimally, that requires two types of data from a list of articles:
- The ID of the article
- The datetime to publish at
So, where do we get those things?
The first datum comes from your actual unpublished articles. From my observation, the DEV website does not expose this ID in an obvious fashion from the UI, but it's not hard to find.
From your unpublished article page, view the source of the page. In both Firefox and Chrome, you can get to this by selecting "View Page Source" when you right click somewhere on the page.

On the source page, search for article-id with Ctrl+F (or Cmd+F on macOS). You should find a number value like 168727.
Now we have what we need to build a schedule. We'll use the JSON format for the schedule because Python can read that format easily. You can name the file whatever you want, but I called mine devto-schedule.json and stored it at the root of my repository.
We also need a datetime when we want to publish the article. I used the ISO-8601 standard to make dates that we can compare to the current time. To continue our example, if I want to publish the article on October 22, 2019 at 2pm Eastern Time in the US, then the schedule looks like:
[{
    "id": 168727,
    "publish_date": "2019-10-22T18:00:00+00:00",
    "title": "Ep 11"
},
{
    "id": 167526,
    "publish_date": "2019-10-15T18:00:00+00:00",
    "title": "Ep 10"
}]
We've got the ID as id and the datetime as publish_date. The publish_date uses UTC to store the time. Timezones are hard so I would always recommend storing your datetimes in UTC.
I also included a title so I know what article the object refers to in the future. title isn't necessary, but it's useful for tracking the articles.
Notice that this is a JSON list. I included an extra article so you can see what this would look like if the script checks multiple articles (which is kind of the point).
Publishing to DEV
With the schedule in hand, we're ready to look at the code that will do all the work. I'll start by showing the whole script, and we'll break it down into each section.
First, the main file, publish.py:
"""Publish scheduled articles to DEV."""
import datetime
import json
import logging
import sys

from dateutil.parser import parse

from devto import DEVGateway

logger = logging.getLogger(__name__)


def publish_scheduled_articles():
    dev_gateway = DEVGateway()
    published_articles = dev_gateway.get_published_articles()
    published_article_ids = set([article["id"]
                                for article in published_articles])

    scheduled_articles = get_scheduled_articles()
    for scheduled_article in scheduled_articles:
        if should_publish(scheduled_article, published_article_ids):
            article_id = scheduled_article["id"]
            logger.info(f"Publishing article with id: {article_id}")
            dev_gateway.publish(article_id)


def get_scheduled_articles():
    """Get the schedule."""
    logger.info("Read schedule.")
    with open("devto-schedule.json", "r") as f:
        return json.load(f)


def should_publish(article, published_article_ids):
    """Check if the article should be published.

    This depends on if the date is in the past
    and if the article is already published.
    """
    publish_date = parse(article["publish_date"])
    now = datetime.datetime.now(datetime.timezone.utc)
    return publish_date < now and article["id"] not in published_article_ids


if __name__ == "__main__":
    logging.basicConfig(
        format="%(levelname)s: %(message)s",
        level=logging.INFO, stream=sys.stdout
    )
    publish_scheduled_articles()
And then the supporting DEV file, devto.py:
import os

import requests


class DEVGateway:
    url = "https://dev.to/api"

    def __init__(self):
        self.session = requests.Session()
        self.session.headers = {"api-key": os.environ["DEV_API_KEY"]}

    def get_published_articles(self):
        """Get all the published articles."""
        response = self.session.get(
            f"{self.url}/articles/me/published", params={"per_page": 1000}
        )
        response.raise_for_status()
        return response.json()

    def publish(self, article_id):
        """Publish the article."""
        data = {"article": {"published": True}}
        response = self.session.put(f"{self.url}/articles/{article_id}",
                                    json=data)
        response.raise_for_status()
The top down view
Let's start our examination with the entry point at the bottom of the publish.py file.
if __name__ == "__main__":
    logging.basicConfig(
        format="%(levelname)s: %(message)s",
        level=logging.INFO, stream=sys.stdout
    )
    publish_scheduled_articles()
This code follows Python's popular pattern of checking the __name__ attribute to see if it is __main__. This will be true when the code runs with python3 publish.py.
Since the script is going to run in Continuous Integration, we configure the logging to output to stdout. Running on stdout is necessary because we don't have easy access to files generated from GitHub Actions, including log files.
The next call is to publish_scheduled_articles. I could have called this main, but I chose to give it a descriptive name. We'll continue working top down to see what publish_scheduled_articles does.
def publish_scheduled_articles():
    dev_gateway = DEVGateway()
    published_articles = dev_gateway.get_published_articles()
    published_article_ids = set([article["id"]
                                for article in published_articles])

    scheduled_articles = get_scheduled_articles()
    for scheduled_article in scheduled_articles:
        if should_publish(scheduled_article, published_article_ids):
            article_id = scheduled_article["id"]
            logger.info(f"Publishing article with id: {article_id}")
            dev_gateway.publish(article_id)
The overall flow of this function can be described as:
- Get what is already published to DEV.
- Get what is scheduled for publishing.
- Publish a scheduled article if it should be published.
To see what is published on DEV, we need to dig into the next layer and see how we communicate with DEV.
A gateway to DEV
DEV has a JSON API that developers can interact with. To keep a clean abstraction layer, I used the Gateway Pattern to hide the details of how that API communication happens. By doing that, the script interacts with a high level interface (like get_published_articles) rather than fiddling with the requests module directly.
class DEVGateway:
    url = "https://dev.to/api"

    def __init__(self):
        self.session = requests.Session()
        self.session.headers = {"api-key": os.environ["DEV_API_KEY"]}

    def get_published_articles(self):
        """Get all the published articles."""
        response = self.session.get(
            f"{self.url}/articles/me/published", params={"per_page": 1000}
        )
        response.raise_for_status()
        return response.json()
When we create a gateway instance, we start a requests.Session that is configured with the proper API key. We'll talk about how GitHub gets access to that API key later, but you'll need to create a key on the DEV website. You can find this under your Settings/Account section.

With the key available, we can ask DEV about our own stuff. I used the /articles/me/published API to get the list of published articles. The published articles are required to check that the script is idempotent (which means that we can safely run it repeatedly without suffering from weird side effects).
Since the gateway is small, let's look at its other method before moving on.
    def publish(self, article_id):
        """Publish the article."""
        data = {"article": {"published": True}}
        response = self.session.put(f"{self.url}/articles/{article_id}",
                                    json=data)
        response.raise_for_status()
When the script confirms that an article is ready to publish, we change the state of the article by setting the published attribute to True. We do this state modification with an HTTP PUT.
The other bit of code worth discussing is response.raise_for_status(). Truthfully, I was a bit lazy when writing this part of the script. raise_for_status will raise an exception whenever the response is not a 200 OK. I put it in as a safeguard in case something about the API changes in the future. The part that's missing (and the laziness that I mentioned) is the handling of those exceptions.
When a request failure occurs, this script is going to fail hard and dump out a traceback. From my point of view, that's fine. Since this will be part of a CI job, the only person seeing the traceback will be me, and I will want whatever data the traceback reports. This is one of those scenarios where a developer tool can have a sharper edge than production-caliber code and be perfectly reasonable.
Checking the schedule
Now we've seen how the gateway works. We can move our attention to the schedule.
def get_scheduled_articles():
    """Get the schedule."""
    logger.info("Read schedule.")
    with open("devto-schedule.json", "r") as f:
        return json.load(f)
This might be the most vanilla code in the entire script. This code reads the JSON file which has our schedule of articles. The file handle is passed to load to create the list of articles with a future publication date.
    for scheduled_article in scheduled_articles:
        if should_publish(scheduled_article, published_article_ids):
            article_id = scheduled_article["id"]
            logger.info(f"Publishing article with id: {article_id}")
            dev_gateway.publish(article_id)
Here is the heart of the script. We:
- Loop through the schedule.
- Check if we should publish an article.
- Publish the article if we should.
Why did I pull the list of published articles earlier? Now we get our answer when examining should_publish which needs the published articles.
def should_publish(article, published_article_ids):
    """Check if the article should be published.

    This depends on if the date is in the past
    and if the article is already published.
    """
    publish_date = parse(article["publish_date"])
    now = datetime.datetime.now(datetime.timezone.utc)
    return publish_date < now and article["id"] not in published_article_ids
There are actually two factors to consider when checking a scheduled article.
- Is the article's publication date in the past from now?
- Has the script already published the article?
That second question is less obvious until you see that this CI job is running regularly. Because we'll configure the script to run every hour, we want to ensure that we don't try to publish an article multiple times. should_publish guards against multiple publishing by checking if the article's id is in the list of published IDs.
Now you've seen from top to bottom how this script can publish articles to DEV. Our next step is to hook the script into GitHub Actions.
Running on GitHub Actions
GitHub Actions works by defining workflows in a .github/workflows directory in your repository. The workflow file is a YAML file with the commands to do the work.
We're calling our workflow .github/workflows/devto-publisher.yaml, but you can name it whatever you want as long as the extension ends with .yaml or .yml.
As before, let's look at the entire workflow file and break down the pieces to get an understanding of what's happening.
name: DEV Publisher
on:
  schedule:
    - cron: '0 * * * *'

jobs:
  publish:
    name: Publish to DEV
    runs-on: ubuntu-latest
    steps:
      - name: Get the code
        uses: actions/checkout@v1
        with:
          fetch-depth: 1
      - name: Set up Python
        uses: actions/setup-python@v1
        with:
          python-version: '3.x'
          architecture: 'x64'
      - name: Install packages
        run: pip install -r requirements/pub.txt
      - name: Run publisher
        run: python bin/publish.py
        env:
          DEV_API_KEY: ${{ secrets.DEV_API_KEY }}
You can optionally give your workflow a name. I like adding a name because it's friendlier for me to read in the logs over the filename. If filenames suit you better, skip it!
on:
  schedule:
    - cron: '0 * * * *'
The on section is critical and defines when your action will occur. There are tons of different events you can use. For this workflow, we need the schedule trigger. All the gory details about it are in the documentation.
If you're familiar with cron, this syntax won't shock you. Non-cron users might wonder what the heck is going on. The docs explains all the syntax, but this particular string of 0 * * * * means "run on the zeroth minute of every hour of every day." In other words, "run at the start of every hour."
jobs:
  publish:
    name: Publish to DEV
    runs-on: ubuntu-latest
All workflows need at least one job. Without a job, there is nothing for the action to do. I've named this job publish, given it a friendly name, and defined what operating system to run on (namely, Ubuntu).
    steps:
      - name: Get the code
        uses: actions/checkout@v1
        with:
          fetch-depth: 1
      - name: Set up Python
        uses: actions/setup-python@v1
        with:
          python-version: '3.x'
          architecture: 'x64'
      - name: Install packages
        run: pip install -r requirements/pub.txt
      - name: Run publisher
        run: python bin/publish.py
        env:
          DEV_API_KEY: ${{ secrets.DEV_API_KEY }}
The job runs a series of steps. Again, I tried to name each step so that we can get a readable flow of what is happening. If I extract the names, we get:
- Get the code
- Set up Python
- Install packages
- Run publisher
The first two steps in the process pull from pre-built actions developed by GitHub. GitHub gives us these actions to save time from figuring these things out ourselves. For instance, without the actions/checkout@v1 action, how would we get a local clone? It would be really challenging.
The third step starts to use configuration specific to my job. In order for the script to run, it needs dependencies installed so we can import requests and dateutil. I defined a requirements/pub.txt file that includes all the needed dependencies.
Here's what the requirements file looks like:
#
# This file is autogenerated by pip-compile
# To update, run:
#
#    pip-compile requirements/pub.in
#
certifi==2019.9.11        # via requests
chardet==3.0.4            # via requests
idna==2.8                 # via requests
python-dateutil==2.8.0
requests==2.22.0
six==1.12.0               # via python-dateutil
urllib3==1.25.3           # via requests
Finally, we get to the step that runs the publisher.
      - name: Run publisher
        run: python bin/publish.py
        env:
          DEV_API_KEY: ${{ secrets.DEV_API_KEY }}
This is pretty vanilla except for the DEV_API_KEY line. Look back at the DEVGateway.__init__ method. The method pulls from os.environ to get the API key. In our YAML file, we're wiring the DEV_API_KEY environment variable to the secrets.DEV_API_KEY. We need to tell GitHub about our API key.
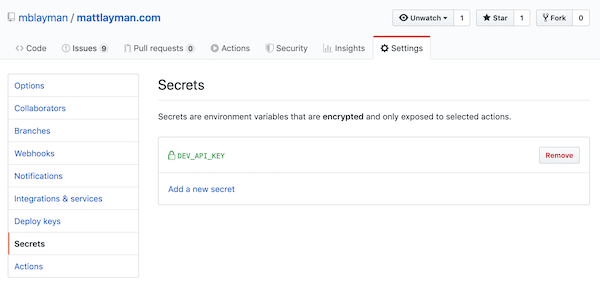
In your GitHub repository settings, we can define secrets. These secrets are available to workflow files as we see from the "Run publisher" step. Create a secret named DEV_API_KEY that contains your DEV API key.
Now everything is in place to run the publisher. This workflow will execute every hour and run the publish job. That job will setup the environment and execute the publish.py script. The script will call DEV and publish any articles in your schedule that should be published.
What did we learn?
In this article, I tried to show off a few different topics.
- How to communicate with the DEV API
- How to create a file that a computer can read and parse (i.e., the JSON schedule)
- How to use GitHub actions to run some code for your repository.
Want to see all this code in context? The repository for this website has all the files we covered.
There are so many other things you can do with GitHub Actions. Now you can write about them all and put them on a schedule for other developers to read when you're ready.
If you have questions or enjoyed this article, please feel free to message me on Twitter at @mblayman or share if others might be interested too.
This article first appeared on mattlayman.com.


Top comments (2)
hmm are you using wordpress? Im asking because i noticed your controlling your content with markdown. I would like to be able to integrate this with wordpress to control the rendering of post content across my react app and dev.to. For example, how code blocks are rendered in your app vs dev.to on an automated post
I'm using Hugo, a static site generator written in Go.
Hugo let's me use "fenced" code with the triple backtick characters so I can paste my code directly into my posts without much reformatting (I do tweak things for width sometimes).
Maybe there's a WordPress plugin that will convert a post to Markdown, but I'm not sure.