Part 1 - back-end with ASP.NET Core 2.2 and Entity Framework Core
Let’s take a look at how to build a CRUD web app using ASP.NET Core 2.2, Entity Framework Core, and Angular 8. This is part 1 where we focus on the back-end.
Part 2 is here - Angular 8 app with REST API
We’ll have a REST API in the back-end and the Angular app on the front-end.
The basic CRUD app will be a blog, where we can Create, Read, Update, and Delete blog posts.
Github repo is here: Angular 8 blog app tutorial using .NET Core 2.2 and Entity Framework back-end
Prerequisites
For the Angular front-end we'll also use:
Make sure above are installed. We will use Visual Studio 2019 for the back-end and VS Code for the front-end. You can however use only Visual Studio 2019 if you want to.
As of Sept 15th, there are previews of .NET Core 3 that work with previews of Visual Studio 2019. However, in this tutorial we won’t use any previews and only use fully released versions of .NET Core 2 and Visual Studio 2019.
Create ASP.NET Core 2.2 REST API
In Visual Studio 2019, create a new project and choose ASP.NET Core Web Application. Name our project (Blog). Then choose .ASP.NET Core 2.2 version and the API template:

Add models and Entity Framework Database Context
Next up, let’s create a folder called Models, and then add a class file called BlogPost.cs. Make sure to import necessary namespaces.
Then create an API controller — right click the Controllers folder, choose Add -> Controller. Then choose API controller with actions, using Entity Framework.
Choose BlogPost as Model class.
Under Data context class, press the + button and call the context BlogPostsContext.

When you press Add, Visual Studio will add the necessary NuGet packages and create a new database context, BlogPostContext, in the Data folder. You will also have the BlogPostsController created for you, filled with lots of API methods.
The contents of BlogPostsContext.cs:
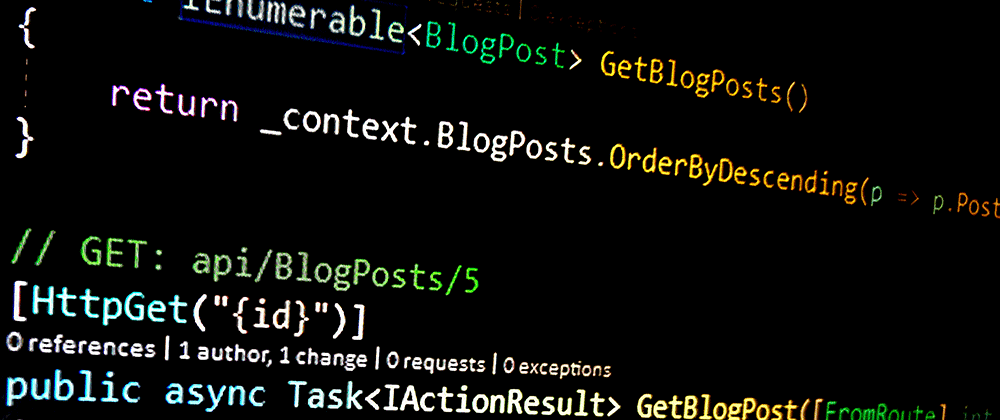
The contents of newly created BlogPostsController.cs, our ApiController:
This is fully working code, with route configuration, all CRUD operations and correct HTTP verbs using annotations (HttpPost, HttpGet, HttpPut, HttpDelete). We also force our API to serve JSON, using the [Produces("application/json")] filter.
We’re following the best practices for REST APIs, as we use GET for listing data, POST for adding new data, PUT for updating existing data, and DELETE for deleting data.
Note that the BlogPostContext is dependency injected. This context is used to perform all actions needed for our app’s back-end.
We can however improve this a little bit, using the Repository design pattern to create a data repository, and inject it.
Create a data repository
Our existing code works, however as applications grow, it’s better to split the logic into different layers:
Data layer with the data repository that communicates with the database.
Service layer with services used to process logic and data layer communication.
Presentation layer with only the API controller.
For our application, we will have an API controller which communicates with the data repository. Let’s create the repository.
Right click the Data folder and create a new interface called IDataRepository. Copy and paste this code into IDataRepository.cs:
Then right click the Data folder again and create a new class called DataRepository. Copy and paste this code into DataRepository.cs:
As you can see, we have dependency injected the BlogPostContext into our DataRepository class.
Update BlogPostsController to use the data repository
Replace the code in BlogPostsController with the following:
You can see the data repository in action in the PutBlogPost, PostBlogPost and DeleteBlogPost methods, like this:
We however choose to keep our dependency on BlogPostsContext in the controller, using both the context and data repository.
CORS in app configuration
In Startup.cs, you already can see some configuration — our app will use MVC and have a db context for instance. Update the ConfigureServices method to look like this:
Since we’re going to call our REST API from JavaScript, we need to enable CORS. We will use a default policy.
Also, we register our DataRepository here.
Make sure to import necessary namespaces.
Note that we’ve commented out services.AddSpaStaticFiles(). We will uncomment this when we’ve created the Angular application, but we’re not there yet.
Then update the Configure method to look like this:
UseCors must come before UseMvc here. Don’t forget to import the necessary namespaces.
We’ve commented out SPA specific configuration here. We will uncomment app.UseSpaStaticFiles() and app.UseSpa() later, when we’ve created our Angular application.
Let’s also update launchSettings.json to set launchUrl to empty in two places:
"launchUrl": “”
Also delete ValuesController.cs in the Controllers folder.
Setup migrations and create the database
We’re almost there!
Now that we have the BlogPostsContext and use the code first approach for Entity Framework, it’s time to setup migrations. First, let’s take a look at the database connection string in appSettings.json.
The connection string was created for us earlier and the app will use SQL Server Express LocalDb. You can, of course, use your own instance of SQL Server instead, just make sure the connection string is correct!
To enable migrations, open the Package Manager Console (Tools->NuGet Package Manager->Package Manager Console) and run this command:
Add-Migration Initial
We’ll get this message back:
Microsoft.EntityFrameworkCore.Infrastructure[10403]

Entity Framework Core 2.2.6-servicing-10079 initialized 'BlogPostsContext' using provider 'Microsoft.EntityFrameworkCore.SqlServer' with options: None

To undo this action, use Remove-Migration.
Perfect! A Migrations folder is created with your Entity Framework migrations, which will contain changes to the Entity Framework model. We have one migration file, named something like 20190912150055_Initial.cs
In this file, we have the Up and Down methods, which will upgrade and downgrade the database to the next or previous version.
To create the database, we now have to execute the following command in the Package Manager Console:
Update-Database
Let’s open the SQL Server Object Explorer (View -> SQL Server Object Explorer). We now have this:

Remember, if you make any changes to the data model, you need to use the Add-Migration YourMigrationName and Update-Database commands to push changes to the database.
Try the API
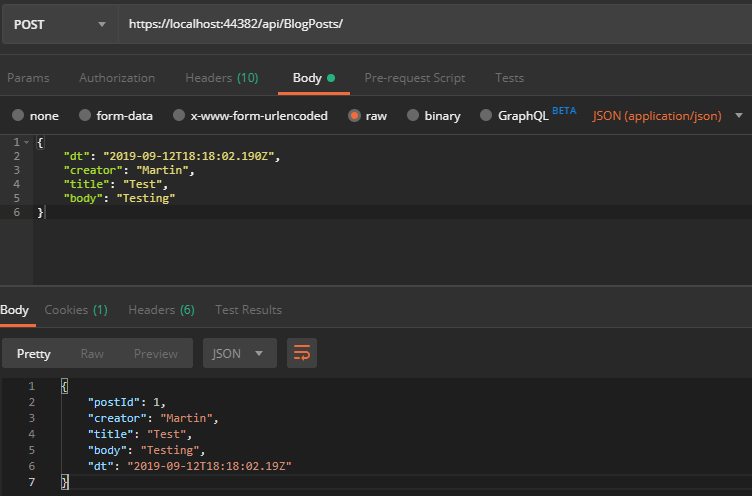
Press F5 in Visual Studio to start the application. On localhost, browse to /api/blogposts which should return an empty JSON string. You can now use Postman to create a new blog post.
Here’s the JSON to post:
{
  "dt": "2019-09-12T18:18:02.190Z",
  "creator": "Martin",
  "title": "Test",
  "body": "Testing"
}
In Postman, make sure the API URL is correct and POST is used as the http verb. Fill in above JSON in the editor (choose raw) and choose JSON (application/json) before you press Send. The request and returned body result should look like this:
And if you change http verb from POST to GET, you’ll now get this result:

Our API is up and running!
Now on to our Angular 8 front-end app. Here's part 2 of the tutorial. Part 2 is here - Angular 8 app with REST API


Top comments (17)
Hi Martin,
This was such a useful tutorial, thank you! I knew a little Angular and a little ASP.NET and this was perfect for filling the gaps and getting an application up and running.
My only question is why do you only use the DataRepository for the POST/PUT methods and stick with the db context for the GET methods?
Thanks Matt
Hello Martin,
This tutorial is great!
I am, however, getting stuck on the adding the migration section of this tutorial. When I type "Add-Migration Initial" the build starts then fails imminently.
Any ideas on what is causing this?
Thanks again!
Cameron
Hi and thanks!
Does the solution build? Do you get any build errors?
I tried reproducing your error and could reproduce it when building an old version of this app (with url slugs actually) and got the same migration error. I also got build errors related to TypeScript and IteratorResult.
Then I used VS Code to run ng build in the ClientApp folder and got the following error:
ERROR in src/app/blog-post-add-edit/blog-post-add-edit.component.ts:8:27 - error TS2307: Cannot find module 'path'.
8 import { delimiter } from 'path';
I simply commented out this section in blog-post-add-edit.component.ts and ran ng build again and then building worked.
I finally ran ng serve (which builds and runs the ClientApp application) and then everything worked fine.
So after some investigation, I changed line 35 of Startup.cs from "options.UseSqlServer(Configuration.GetConnectionString("BlogPostsContext")));" to "options.UseInMemoryDatabase(Configuration.GetConnectionString("BlogPostsContext")));" This allowed me to skip the section of doing "Add-Migrations Initial"
Thanks for sharing!
Installing these packages via Nuget might solve it too:
Microsoft.EntityFrameworkCore
Microsoft.EntityFrameworkCore.SqlServer
I followed the tutorial but when I get to doing a post in post man. I get a "Could not get any response" error. Could you elaborate on how to find your exact url and in my post man I have 9 headers and in your example you have 10.
Hi Martin,
Thanks for the tutorial.
I encountered an exception though when I tried to run it:
"The CORS protocol does not allow specifying a wildcard (any) origin and credentials at the same time. Configure the policy by listing individual origins if credentials needs to be supported"
This was caused by setting both "AllowAnyOrigin()" and "AllowCredentials()" when setting up the CORS policy. However, when I remove "AllowCredentials()" and run it, it says the page cannot be found.
Any suggestions on how to overcome this? Has this requirement come into play since you wrote this tutorial, if not how did it work for you?
Any help would be greatly appreciated.
Thanks,
Gavin
Hi Gavin,
Yes, you need to remove the AllowCredentials() to run the solution. After that build the solution and the first page will be Not found and you need to put /api/blogposts into the url for calling the get all method.
Best regards,
Bogdan
Hi Bogdan,
Thanks for the help. I had realised my error but hadn't had a chance to come back and update my comment.
Thanks again for your help!
Gavin
Thanks for clarifying that, Bogdan!
Martin,
If this is not the best tutorial on how get a back end for a blog, I missed it! Thanks for allowing me to have a backend in less than an hour. Now to the front end!
Thank you very much and the best of development luck :D
Thank you very much!!! Great Project to me, because It show me step by step how create an Web Api and how use Angular with him.
Hi Martin,
Thank you for this awesome tutorial :)
Could you suggest some method or documentation, to implement a basic authentication for the project?
Thanks,
Adam
Hi and thanks - I'd take a look at Okta. developer.okta.com/quickstart/#/an...
Here's another good write-up: jasonwatmore.com/post/2019/06/26/a...
Why did you keep the dependency to the BlogPostsContext and use it for the Get methods, rather than the Data Repository? Any benefit to doing so?
awesome tutorial, thanks for your efforts