
Building an Instagram clone in React with GraphQL and Hasura - Part I

This tutorial was written by Abhijeet Singh and published as part of the Hasura Technical Writer Program - an initiative that supports authors who write guides and tutorials for the open source Hasura GraphQL Engine.
Introduction
In this tutorial I will show you how to use Hasura GraphQL Engine and React to build a clone of the Instagram web app. The final code is hosted here. See live demo of the app here.
The app will have the following features:
- Users can create account (using Auth0 authentication)
- Authenticated users can upload new posts
- Authenticated users can like posts
- Authenticated users can follow user accounts
- Display posts in feed
- Realtime updates when other users upvote a post, create a new post or follow user profile (using react state management and updating apollo cache)
Initial Setup
Let's start by building the frontend of our app using React.
To get started quickly, we will create a basic react app with no build configuration using create-react-app. Run the following commands in terminal:
$ npx create-react-app instagram-clone
$ cd instagram-clone
$ npm start
Note : npx is a npm package runner. The typical use is to download and run a package temporarily or for trials. create-react-app is an npm package that is expected to be run only once in a project’s lifecycle. Hence, it is preferred to use npx to install and run it in a single step. (source)
Server will start and you should be able to see a welcome to react screen (like below) on http://localhost:3000.

To improve the project structure, let’s create two directories, both inside the src folder. The first is called components and will hold all our React components. Second one styles, that is for all the CSS files you’ll use.
Move the required jsx and css files to appropriate directories and change the references to these files in both index.js and App.js accordingly. Your directory structure should look like this:
├── node_modules
├── package.json
├── public
│ ├── favicon.ico
│ ├── index.html
│ └── manifest.json
├── src
│ ├── App.test.js
│ ├── components
│ │ └── App.js
│ ├── index.js
│ ├── logo.svg
│ ├── serviceWorker.js
│ └── styles
│   ├── App.css
│   └── index.css
└── README.md
I’ll be using react-bootstrap package for the styling. Install the package using:
$ npm install react-bootstrap bootstrapMake sure to add the CDN links to stylesheets in /public/index.html. Copy the links from here.
Also install react-apollo GraphQL Client using the following command:
$ npm install apollo-boost apollo-link-context @apollo/react-hooks @apollo/react-hoc graphqlApollo Client helps you consume a GraphQL API from the front-end.
Next we will setup the backend using the Hasura GraphQL Engine and Postgres.
See this guide to quickly get started with Hasura Cloud, which gives you a fully managed, production ready GraphQL API as a service. Follow the steps to create a free database with Heroku.
Setting up the backend
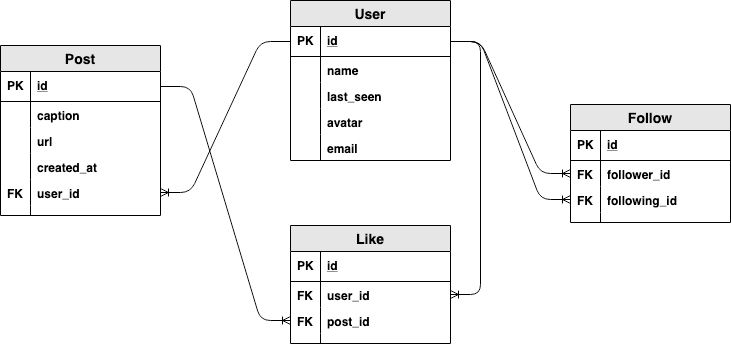
Our Postgres Database structure :
type Post {
id - integer, primary key
caption - text
url - text
created_at - timestamp with time zone
user_id - text
}
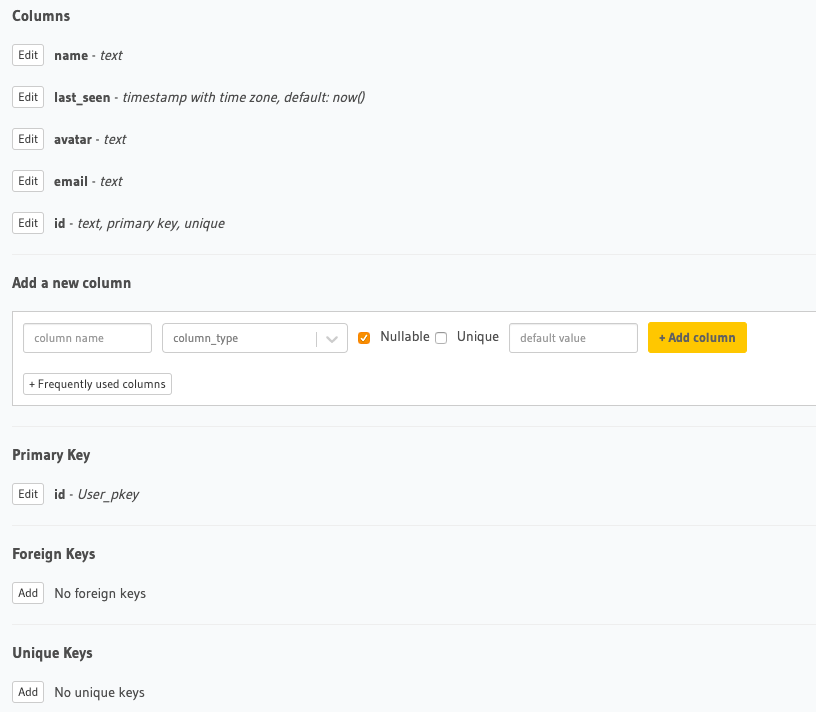
type User {
name - text
last_seen - timestamp with time zone
avatar - text
email - text
id - text, primary key
}
type Like {
id - integer, primary key
user_id - text
post_id - integer
}
type Follow {
id - integer, primary key
follower_id - text
following_id - text
}
Creating tables
Create the following tables : User table
Post table (id has type integer(autoincrement)):
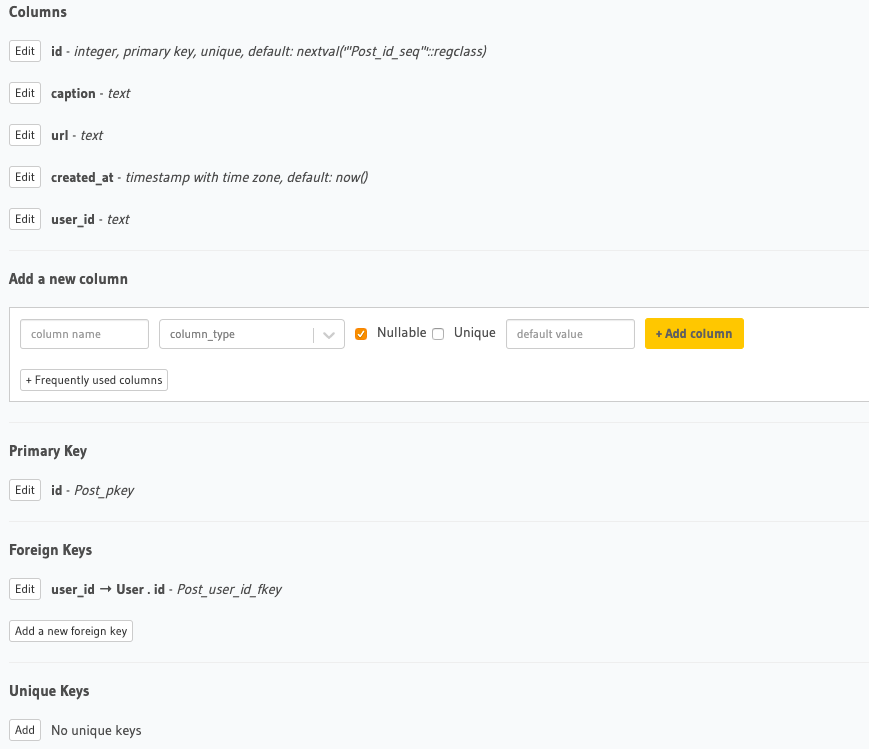
Add the foreign key constraint from user_id column to User.id . Set Update and Delete Violation as restrict.
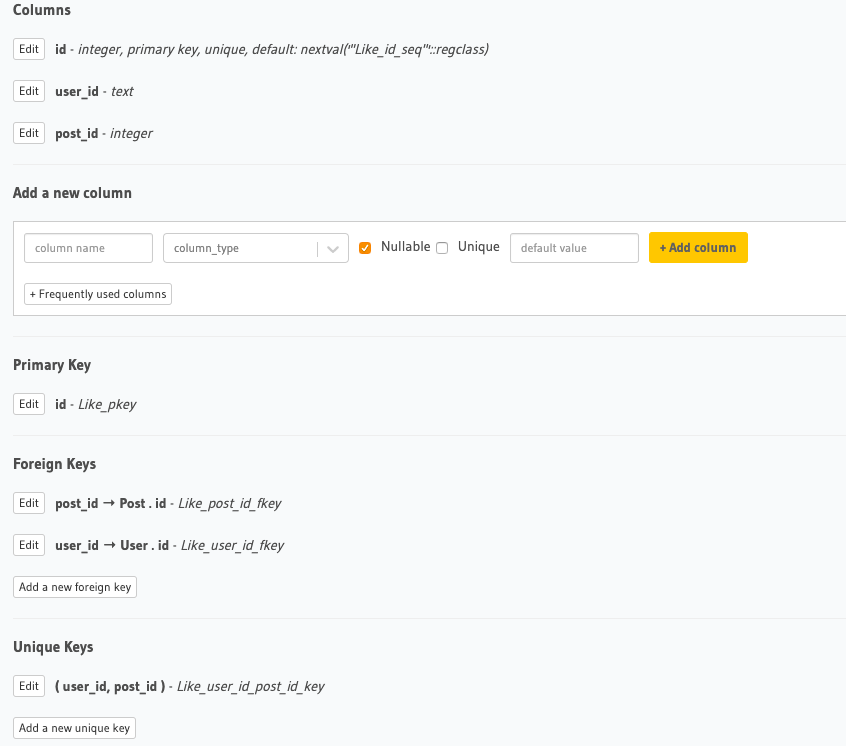
Like table (id has type integer(autoincrement)):
Follow table (id has type integer(autoincrement)):
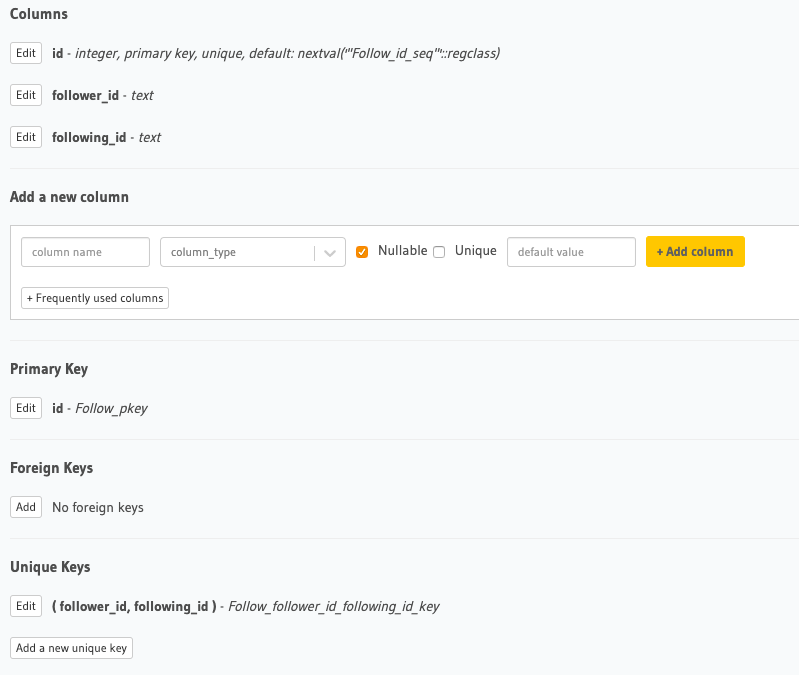
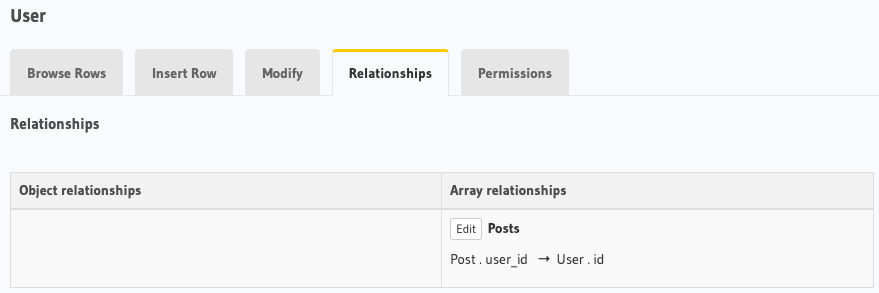
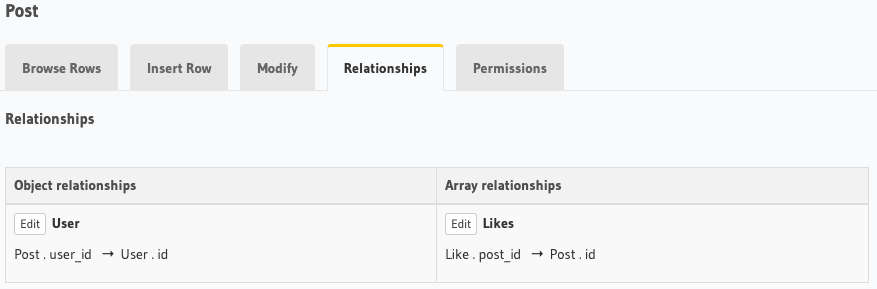
Create an object relationship by jumping to relationship section of tables. These relationships will help us to query data in a single query and also perform various kinds of aggregate functions like getting number of posts for every user. See this link for creating relationships through foreign key in hasura. We just need the following relationships.
Now we will set up the permissions for the tables, so that only logged in users can do certain things. Set up the permissions as shown below:
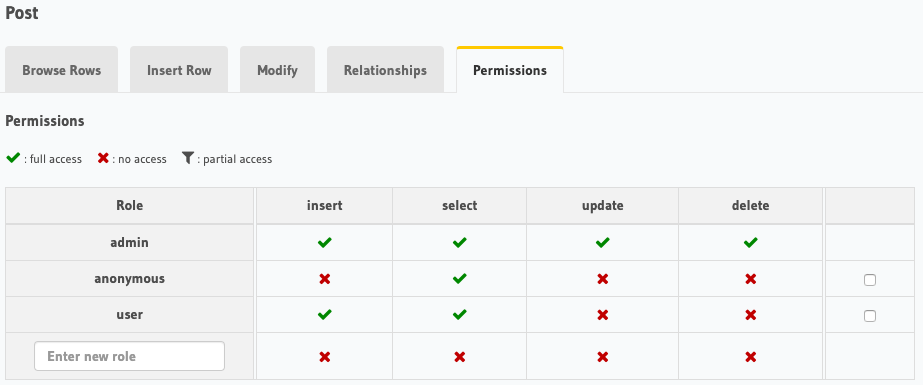
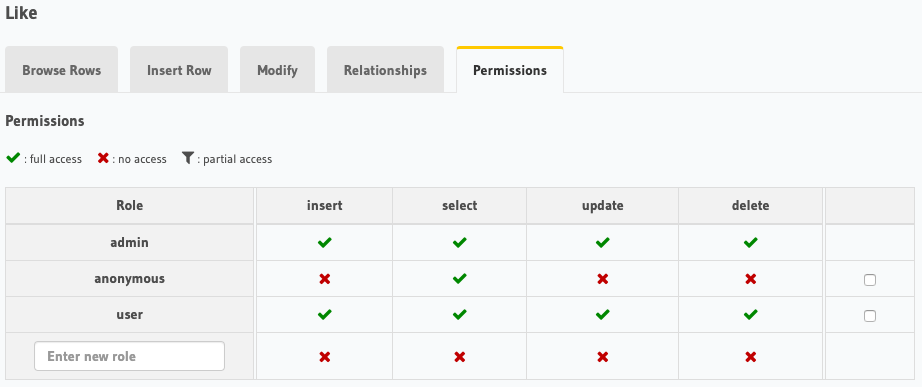
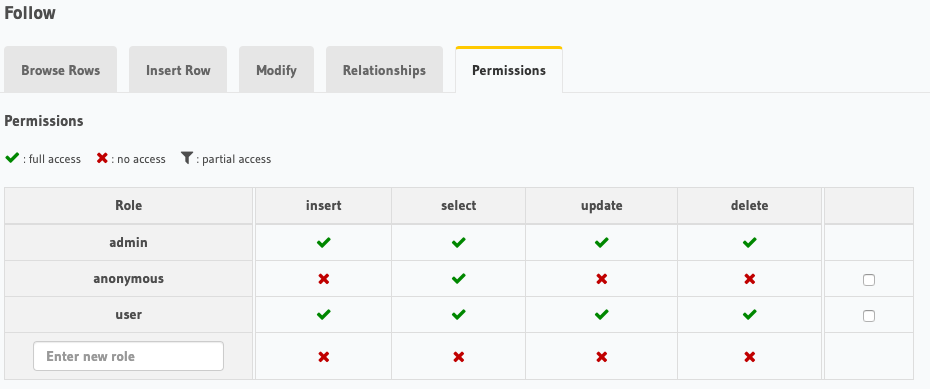
See access control basics if you are not much familiar with access control and how it works in hasura.
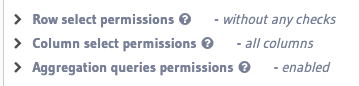
To make it less complicated, I have given all the row level permissions as without any checks and column level as all columns and aggregation queries (used to count number of points for a post).
Using Auth0 JWT for Authentication
The following figure quickly explains how JWT authentication works. Here, Application Server (our backend) needs to be configured to verify that the incoming JWT are created by the authentication server (Auth0).
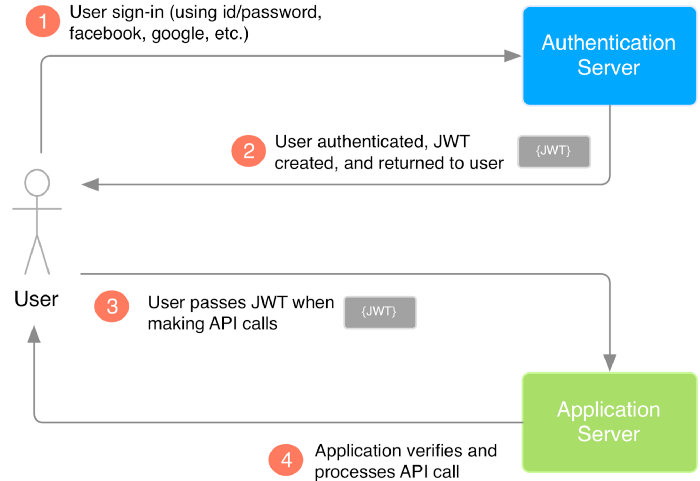
We are using Auth0 as authentication server. It will create a JWT and pass to our react app. Then, using apollo client, we will send the auth_token(access_token in our case) to our backend (application server), i.e. Hasura GraphQL Engine. Hasura is needed to be configured to verify that incoming JWT is created by Auth0 authentication server.
Let's get started with Auth0, using @apollo/react-hooks and @auth0/auth0-spa-js. We have to follow these steps:
Auth0 JWT integration with Hasura : See this guide for Auth0 JWT Integration with Hasura and get the JWK (key for validation of incoming JWT). In Auth0 dashboard, set Allowed Callback URLs, Allowed Web Origins, Allowed Logout URLs to http://localhost:3000 and save changes.
You may also need to disable OIDC Conformant in Auth0 > Applications > Your_app > Settings > Advanced Settings. Once you have the key, next step is to activate the JWT mode in Hasura. Go to your heroku dashboard, choose our app and go to settings. Here you can see some Config Varswhich we will set-up now. Add the config vars as following:
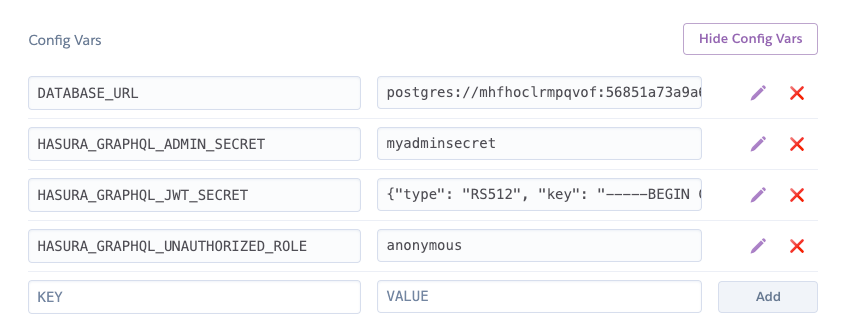
Here, HASURA_GRAPHQL_ADMIN_SECRET key for the JWT mode to work. Put the key in HASURA_GRAPHQL_JWT_SECRETenvironment variable. Once you have added this, the GraphQL endpoints can only be queried using Authorization header or X-Hasura-Admin-Secret header.
Finally, set HASURA_GRAPHQL_UNAUTHORIZED_ROLE to anonymous because we do allow unauthenticated users to read some data.
Unauthorized role: used when access-key is not sent in access-key only mode or “Authorization” header is absent in JWT mode. Example: anonymous. Now whenever “Authorization” header is absent, request’s role will default to “anonymous”.Next step is to add rules in our Auth0 app. We will add 2 more rules to Auth0 app as shown below:
Here we are replacing idToken with accessToken . Basically, auth0 provides different types of tokens and the auth0-spa-js does not expose the idToken anymore, so we will use accessToken.
Update: From version 1.2.0 of auth0-spa-js, the raw value of idToken is exposed using getIdTokenClaims method.
Read more about tokens here.
The new SPA SDK only uses Authorization Code Grant + PKCE (not Implicit Grant anymore) Thus we have to useaccessTokensin place ofidTokens.(See this thread).
Add one more rule for keeping our postgres database and Auth0 users in sync:
Change admin_secret and url accordingly. Now, whenever a new user signs up or a user logs in, our hasura postgres database will be updated automatically to store the user information in our users table. See this for more details.
Note: Here we are just doing a post request with graphql mutations, and we have x-hasura-admin-secret in header, thus the incoming request have full access to mutate the database.
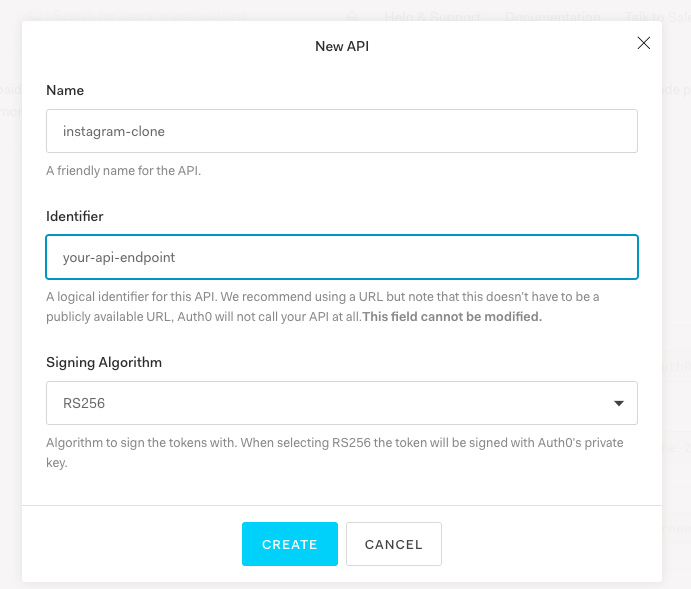
We also need to create a custom API in Auth0 Dashboard > APIs which will point to our Hasura GraphQl API. Create a new api as shown below and give it any name. Change Identifier with your graphql endpoint.
Now that we have got our backend and Auth0 setup, we can get started on building out the React app. Head over to the 2nd part of this series to learn how.
About the author
Abhijeet Singh is final year UG student in Computer Science and Engineering from IIIT Kalyani. He has done work in Full Stack Development, Android, Deep Learning, Machine Learning and NLP. He actively takes part in competitive programming contests and has interest in solving algorithmic problems. He is a startup enthusiast and plays table tennis and guitar in spare time.


