Single Page Applications are the new wave of the moment. In the midst of several frameworks and libraries that arose during the last decade to tackle better ways to build web applications, React is now the most popular one. It’s a lightweight library (yes, React is not a framework, so it means it doesn’t come with all the rules, specifications and patterns that Angular, e.g., comes with), that is embraced and powered by the community, simple to use, flexible, and relies on a strong concept: components.
Components are not a concept created by React, you may say, and you would be correct. However, React made them far simpler for JavaScript developers. Now, with just the use of a single .js file, as well as the power of ECMAScript (especially from 6+) and some good old patterns, you can create complex web applications from scratch, reusing as many components you need. This makes the reuse of code a big plus for JavaScript apps: more testable, concise, understandable, etc.
Besides that, the community grew rapidly around the React world, creating tons of new related libraries that help to boost React’s power to a whole new level. From libs for centralized state management (Redux), stylizing your components (or add known libs like Bootstrap, Antd, etc.), to completely new ways of dealing with forms, remote calls, server-side rendering… The number of options is huge and continuously growing.
In this article, you’ll learn how to integrate a well-known back-end API (that’ll be served on top of ASP.NET) to a SPA totally made in React from scratch. React, in fact, can be integrated with whatever back-end services you want; however, this will be an excellent opportunity for you to analyze how both environments (front and back) work together in real-world scenarios.
To do this, the article covers building a CRUD application of user data, exploring the construction of both back and front ends, from the installation and configuration to the implementation. It makes use of Bootstrap for the UI, in order to cut down on worry about CSS and styles. This is the final representation of the view, once done:
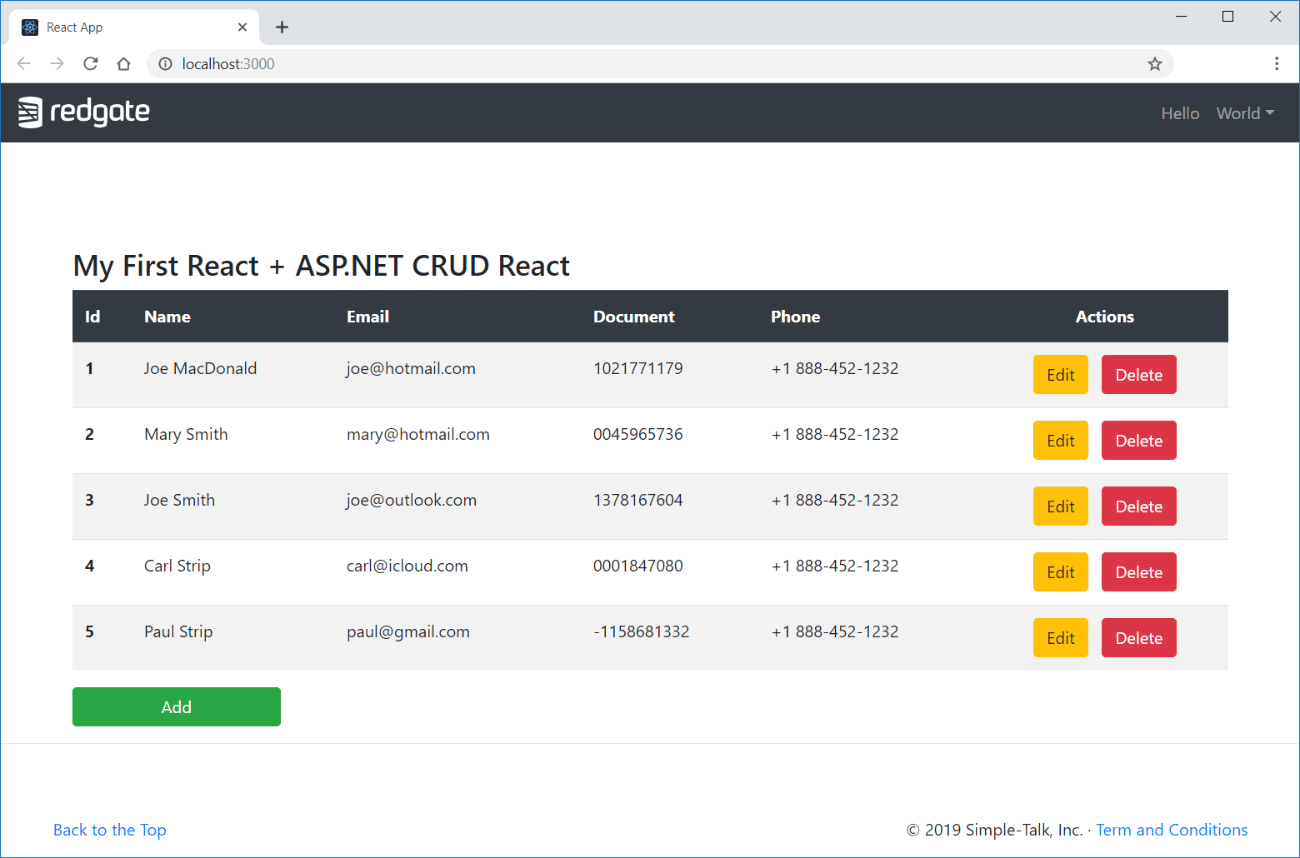
Figure 1. The final application visualization.
Setup – Back-end
First, make sure you have a recent version of Visual Studio Community installed on your computer. Then, create an API project by going to the File –> New –> Project… menu and selecting the ASP.NET Core Web Application option, as shown in Figure 2.

Figure 2. Creating the new API project.
Give it a name and click OK. For the next wizard screen, you’re going to see that a React.js project template is already available along with the ASP.NET Core projects. It’s useful to have this, mainly for experienced developers who don’t want to spend much time on setting up and copy-pasting stuff. However, as beginners, I’d suggest starting from zero, with preset config. This will lead you a better understanding of the basics around how React works, as well as how you will connect the front to the back-end API.
Additionally, this example will not use the same structure VS sets up there. It consists of a project in which the front will be hosted the same place as the back-end code. Nevertheless, you will work in a side front project independent of the ASP.NET suite. This means that they’ll exist in two different worlds that still communicate with each other.
After completing this tutorial, I’d encourage you to go back and create another project, this time, with the project template. That way, you’ll have enough knowledge to understand what VS has magically created for you.
Once finished, move on to the ASP.NET API architecture. This is going to be simple: you’ll expose some /users endpoints to add, list, search, update and delete users in an in-memory static list in the back-end application. This way, you’ll maintain three main packages in the project:
- Controllers: already created within the project, they’ll store the user’s controller;
- Models: will store the data transfer objects, as plain and simple user data objects;
- Services: will store the service classes that’ll handle the operations over the user’s list.
Make sure to create each folder in the root source folder. Start with the User.cs file. Listing 1 shows its content.
Listing 1. User.cs class
|
1 2 3 4 5 6 7 8 9 10 11 12 |
using System; namespace ReactASPCrud.Models { public class User { public int Id { get; set; } public string Name { get; set; } public string Email { get; set; } public string Document { get; set; } public string Phone { get; set; } } } |
It’s just simple code with a bunch of fields to represent each input shown in Figure 1.
Listing 2 shows how the UserService.cs will look:
Listing 2. UserService.cs class code.
|
1 2 3 4 5 6 7 8 9 10 11 12 13 14 15 16 17 18 19 20 21 22 23 24 25 26 27 28 29 30 31 32 33 34 35 36 37 38 39 40 41 42 43 44 45 46 47 48 49 50 51 52 53 54 55 56 57 58 |
using ReactASPCrud.Models; using System; using System.Collections.Generic; using System.Linq; namespace ReactASPCrud.Services { public class UserService { private static List<User> users = new List<User>(); private static int Count = 1; private static readonly string[] names = new string[] { "Jonathan", "Mary", "Susan", "Joe", "Paul", "Carl", "Amanda", "Neil" }; private static readonly string[] surnames = new string[] { "Smith", "O'Neil", "MacDonald", "Gay", "Bailee", "Saigan", "Strip", "Spenser" }; private static readonly string[] extensions = new string[] { "@gmail.com", "@hotmail.com", "@outlook.com", "@icloud.com", "@yahoo.com" }; static UserService() { Random rnd = new Random(); for (int i = 0; i < 5; i++) { string currName = names[rnd.Next(names.Length)]; User user = new User { Id = Count++, Name = currName + " " + surnames[rnd.Next(surnames.Length)], Email = currName.ToLower() + extensions[rnd.Next(extensions.Length)], Document = (rnd.Next(0, 100000) * rnd.Next(0, 100000)).ToString().PadLeft(10, '0'), Phone = "+1 888-452-1232" }; users.Add(user); } } public List<User> GetAll() { return users; } public User GetById(int id) { return users.Where(user => user.Id == id).FirstOrDefault(); } public User Create(User user) { user.Id = Count++; users.Add(user); return user; } public void Update(int id, User user) { User found = users.Where(n => n.Id == id).FirstOrDefault(); found.Name = user.Name; found.Email = user.Email; found.Document = user.Document; found.Phone = user.Phone; } public void Delete(int id) { users.RemoveAll(n => n.Id == id); } } } |
There are a couple of new things going on. First, you need a static List to store the elements, simulating something like a database (feel free to implement whatever storage strategy you would like). The next three arrays represent some random names, surnames and mail extensions in order to facilitate the process of generating a prelist of users and randomize their field values as well.
The static block initializes this list, making sure to generate as many random values as possible. The rest of the methods are just performing usual operations over the list, with the help of Linq.
Simple, isn’t it? Time to move to the controller. Make sure to rename the default one already created to UsersController.cs (the plural is important here, once it’s used for ASP.NET to apply the URI path for all operations). Then, substitute its content with the code shown in Listing 3.
Listing 3. UsersController.cs class code.
|
1 2 3 4 5 6 7 8 9 10 11 12 13 14 15 16 17 18 19 20 21 22 23 24 25 26 27 28 29 30 31 32 33 34 35 36 37 38 39 40 41 42 43 44 45 46 47 48 49 50 51 52 53 54 55 56 57 |
using System.Collections.Generic; using System.Threading.Tasks; using Microsoft.AspNetCore.Cors; using Microsoft.AspNetCore.Mvc; using ReactASPCrud.Models; using ReactASPCrud.Services; namespace ReactASPCrud.Controllers { [Produces("application/json")] [Route("api/[controller]")] [ApiController] [EnableCors("ReactPolicy")] public class UsersController : ControllerBase { private readonly UserService userService; public UsersController(UserService userService) { this.userService = userService; } // GET api/users [HttpGet] public IEnumerable<User> Get() { return userService.GetAll(); } // GET api/users/5 [HttpGet("{id}")] public async Task<IActionResult> Get(int id) { return Ok(userService.GetById(id)); } // POST api/users [HttpPost] public async Task<IActionResult> Post([FromBody] User user) { return CreatedAtAction("Get", new { id = user.Id }, userService.Create(user)); } // PUT api/users/5 [HttpPut("{id}")] public async Task<IActionResult> Put(int id, [FromBody] User user) { userService.Update(id, user); return NoContent(); } // DELETE api/users/5 [HttpDelete("{id}")] public async Task<IActionResult> Delete(int id) { userService.Delete(id); return NoContent(); } public override NoContentResult NoContent() { return base.NoContent(); } } } |
Note that most operations perform the exact same calls through the UserService methods; they’re practically equal. However, some things are noticeable:
EnableCorsannotation is an important point here, mainly because it sets the CORS policy this controller must use, the one to be configured soon. Without it, request calls from a different origin (the React application, in this case) won’t be allowed by the server;- The service is being injected via the controller’s constructor. This is only possible because you’ll also set it up soon in the Startup class;
- The Post method makes use of
CreatedAtAction()method to return a reference to theGetequivalent method of the then-created user. This allows the API to return a 201 HTTP status along with the header of where the created resource is located; - The rest of the endpoints return a 204 HTTP status representing a No Content action.
Finally, you need to make some important configurations to the Startup.cs class. Open it and add the following changes shown in Listing 4. These are the code you need to add to the ConfigureServices() method:
- The registration of
UserServiceas a singleton object that’ll be automatically available for injection throughout the project; - The Cors policy previously mentioned. Here, you’re just allowing any method, origin, header and credentials that arrive at the house (which wouldn’t be appropriate for production security reasons).
Listing 4. Code to add to ConfigureServices() method.
|
1 2 3 4 5 6 7 8 9 10 |
using ReactASPCrud.Services … services.AddSingleton<UserService>(); services.AddCors(o => o.AddPolicy("ReactPolicy", builder => { builder.AllowAnyOrigin() .AllowAnyMethod() .AllowAnyHeader() .AllowCredentials(); })); |
Then, you need to make sure that the Cors is enabled by adding the following code snippet to the Configure() method:
|
1 |
app.UseCors("ReactPolicy"); |
Now you can run the application and the test the endpoints on your own. Make sure to pay attention to the port where your service will be run since this is going to be important when calling the endpoints from the React code.
Setup – Front-end
Now, it’s React time. The first thing you must install on your computer is Node.js. I’m not getting into details about Node.js and how it works or how to install it, but if you don’t have it yet, follow this link for instructions. It’s very straightforward. Please, remember that, for this article, you’ll need a Node.js at, at least, 8.16.0+. So, make sure to upgrade it if you’re under an older version.
For the IDE, use Visual Studio Code for the front-end, but feel free to use whichever tool you’re more used to.
Because of the complexities involving React, use create-react-app, a great shortcut to creating a preset React application that comes with default folders, initial config files, serviceWorker, a package.json file, some JavaScript/CSS files and more. It makes it very easy to create an application from nothing and run it with npm or yarn.
The first command you need to run is the following:
|
1 |
npx create-react-app react-ui-crud |
npx is a tool that facilitates using packages from the npm registry. Npm is a better way to deal with dependencies on the registry, and so it is the same for npx for CLI tools/executables on the registry. You can read more about it here.
The first limitation is the name of the project. There are some restrictions like the use of capital letters or special characters. Once you enter the command, some basic React dependencies will be immediately installed:
- react: the React lib itself. Main module;
- react-dom: this package serves as the entry point to the DOM and server renderers for React. It is intended to be paired with the generic React package, which is shipped as react to npm.
- react-scripts: this package includes scripts and configuration used by Create React App.
At the end, the script will have created your project with the following structure:
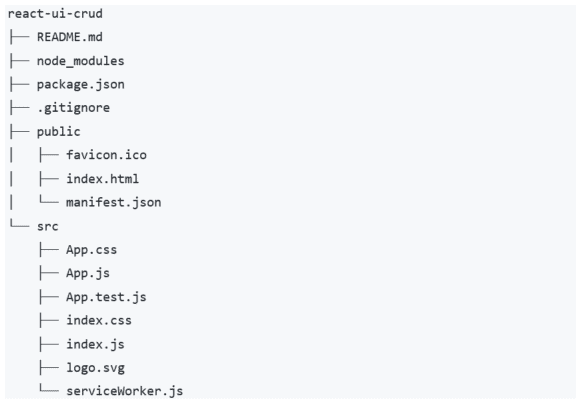
The node_modules is the directory where all your Node.js dependencies will be installed. They’re going to be read from the package.json file, which instructs npm to handle what packages retrieve from the registry (remote repo) every time you run the command npm start. That’s why this directory is usually ignored in your .gitignore file, once npm knows where to search for all of them in case you’re cloning the project for the first time or accidentally delete them.
The public folder is the place you’ll store the files that can be directly accessed from the client, like images, HTML or public scripts. Generally, the src folder, the one that stores your JavaScript dynamic files as well as CSS, is the folder where you spend most of the time working.
Figure 3 shows the output generated by the command.
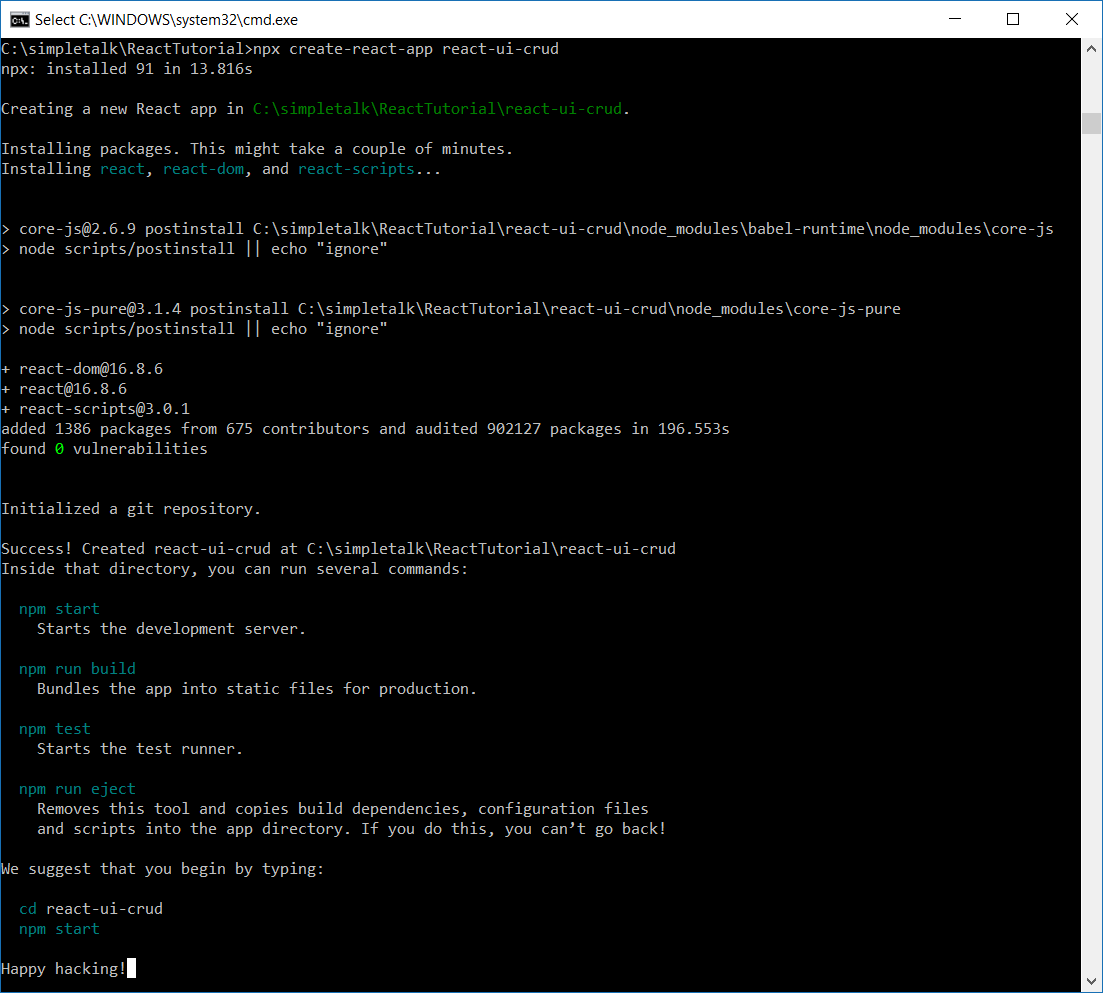
Figure 3. create-react-app output.
You still need to add some more dependencies to the project. Since you won’t take too much time on the styling of the UI, you’ll make use of Bootstrap for that job. More specifically, you’ll use the reactstrap library, which is a great encapsulation of Bootstrap components as React ones.
For this, issue the following command in the root folder of the project:
|
1 |
npm install --save bootstrap reactstrap |
That’s it. Before diving into the React code, analyze the contents of package.json file in Listing 5.
Listing 5. package.json code.
|
1 2 3 4 5 6 7 8 9 10 11 12 13 14 15 16 17 18 19 20 21 22 23 24 25 26 27 28 29 30 31 32 |
{ "name": "react-ui-crud", "version": "0.1.0", "private": true, "dependencies": { "react": "^16.8.6", "react-dom": "^16.8.6", "react-scripts": "3.0.1", "reactstrap": "^8.0.1" }, "scripts": { "start": "react-scripts start", "build": "react-scripts build", "test": "react-scripts test", "eject": "react-scripts eject" }, "eslintConfig": { "extends": "react-app" }, "browserslist": { "production": [ ">0.2%", "not dead", "not op_mini all" ], "development": [ "last 1 chrome version", "last 1 firefox version", "last 1 safari version" ] } } |
The main parts of the file are contained under dependencies and scripts properties. The first lists the exactly same dependencies previously installed (this is part of the way npm knows where to fetch again in case you delete them); the second configures the commands npm used when you run start, build, etc. along with npm in the command line.
Go and test it. Run npm start in the root folder, and npm will run the application, as well as open a browser window with a simple logo of React and some code as an example.
Let’s React
First take a look at the usual header and footer parts. It’s easier since you’ll have contact with the menu and footer links first and understand how you can connect Bootstrap with React. For this, create a new folder /components into /src folder, which is the place to store all the scripts regarding React components. Then, create two files AppHeader.js and AppFooter.js. Listing 6 shows the code of the first JavaScript file.
Listing 6. First React component: AppHeader.js
|
1 2 3 4 5 6 7 8 9 10 11 12 13 14 15 16 17 18 19 20 21 22 23 24 25 26 27 28 29 30 31 32 33 34 35 36 37 38 39 40 41 42 43 44 45 46 47 48 49 50 |
import React, { Component } from 'react'; // 1 import { Navbar, NavbarBrand, NavbarToggler, Collapse, Nav, NavItem, NavLink, UncontrolledDropdown, DropdownToggle, DropdownMenu, DropdownItem } from 'reactstrap'; // 2 class AppHeader extends Component { // 3 state = { // 4 isOpen: false }; toggle = this.toggle.bind(this); // 5 toggle() { // 6 this.setState({ isOpen: !this.state.isOpen }) } render() { // 7 return <Navbar color="dark" dark expand="md"> <NavbarBrand href="/"> <img src="https://cdn.rd.gt/assets/images/global/redgate-logo--white.svg?v=1" width="128" className="d-inline-block align-top" alt="" /> </NavbarBrand> <NavbarToggler onClick={this.toggle} /> <Collapse isOpen={this.state.isOpen} navbar> <Nav className="ml-auto" navbar> <NavItem> <NavLink href="/">Hello</NavLink> </NavItem> <UncontrolledDropdown nav inNavbar> <DropdownToggle nav caret> World </DropdownToggle> <DropdownMenu right> <DropdownItem href="/">For U</DropdownItem> <DropdownItem>For Us</DropdownItem> </DropdownMenu> </UncontrolledDropdown> </Nav> </Collapse> </Navbar>; } } export default AppHeader; // 8 |
There are some numbers in the comments help explain what every part of the code represents:
- The first thing with React components is importing. Here, you import all the other components, functions, constants, etc., needed alongside the rest of the JS file. React is the main and default import; it’s necessary to inject React stuff into the current file. Component is one of the possible ways React allows you to represent a component: via class. This way, in point 3, you can extend from the React
Componentelement to create a React component by class extension. - Here, you import all the different Reactstrap components you’ll need: from navbar to dropdownmenu. Check their official list of possible components.
- Creating a new component called AppHeader.
- When using the class-based component model, React allows you to have a direct
statevariable, which can be defined right after the class declaration, and will store all the properties that are important for the functioning of the current component and just for it. Here, you’re creating a boolean prop calledisOpenthat’ll store the current state of thedropdownmenu(that’ll be created soon). - Here, you merely bind the current component to the
toggle()function below. - The
toggle()function: it’ll alter the state of the component every time is called, i.e., every time the Reactstrap component orchestrate a call to it to manage if the dropdown is open or not. - The
render()function: it’s the most important overwritten function of every React component because it is responsible for returning the JSX code (JSX is a syntax extension to JS, is similar to a template language, but with JavaScript) that visually and functionally represents the component itself. Take a closer look at the code. It’s like a mix of HTML with some tags that were imported earlier from Reactstrap. They are organized in such way that needs to be correctly nested and receive the proper properties. Like in the case of<NavbarToggler>and<Collapse>components which rely on both thetogglefunction andisOpenproperty respectively, and previously set. The first determines which function must be called for every click on the toggle icon of the navbar, and the second gets the boolean state value that it’ll use to apply the correct style for open/closed states. Normal HTML tags are also present, but they are also JSX-like components. For example, notice the declaration of the class name of the<img>component:className. This is JSX. - Lastly, you must export the component. The name here doesn’t need to be the same as your class, but it’s the one you’ll use when importing your component outside of this class.
It’s also important to remember that React will make sure to recall the render() function every time the state is changed.
Listing 7 shows the footer component code.
Listing 7. Second React component: AppFooter.js
|
1 2 3 4 5 6 7 8 9 10 11 12 13 |
import React, { Fragment } from 'react'; class AppFooter extends React.Component { render() { return <Fragment> <hr className="featurette-divider" /> <footer style={{ padding: "0 50px" }} className="navbar fixed-bottom"> <p className="float-right"><a href="/">Back to the Top</a></p> <p>© 2019 Simple-Talk, Inc. · <a href="/">Term and Conditions</a></p> </footer> </Fragment>; } } export default AppFooter; |
This one is simpler. It doesn’t make use of any state manipulation nor JavaScript functions. It’s basically HTML and inline style via JSX syntax. However, notice that you’re importing a new React element: Fragment. This is an important shortcut for encapsulating coding in React. In other words, the render() function expects to receive a root element that encloses all the other inner elements; otherwise you’ll see a syntax error. In other times, you’d need to use a <div> boilerplate tag to do this, but not anymore. <Fragment> will do the job without having to insert useless HTML tags into the page.
Before running the example, you need to change the index.js and App.js files. For instance, every React application starts by a single index.js file placed at the root of the app that’ll make some initial configs and call the hierarchy of mounted components. Have a look at the final index.js content at Listing 8.
Listing 8. index.js file.
|
1 2 3 4 5 6 7 8 9 10 11 |
import React from 'react'; import ReactDOM from 'react-dom'; import './index.css'; import 'bootstrap/dist/css/bootstrap.min.css'; import App from './App'; import * as serviceWorker from './serviceWorker'; ReactDOM.render(<App />, document.getElementById('root')); // If you want your app to work offline and load faster, you can change // unregister() to register() below. Note this comes with some pitfalls. // Learn more about service workers: https://bit.ly/CRA-PWA serviceWorker.unregister(); |
Notice that React also makes a call to its render() function, passing the root element of the whole application, in this case, <App>. But who’s App? Precisely, the App.js that is also already preset into the src folder (its code is in Listing 9 below). Finally, observe the import of the bootstrap.mim.css to make sure the styling will be correctly applied.
Listing 9. App.js content.
|
1 2 3 4 5 6 7 8 9 10 11 12 |
import React, { Component, Fragment } from 'react'; import AppHeader from './components/AppHeader'; import AppFooter from './components/AppFooter'; class App extends Component { render() { return <Fragment> <AppHeader /> <AppFooter /> </Fragment>; } } export default App; |
App components import the two previously implemented components and mount them into another Fragment. And that’s it. Issue the npm start command again and see what happens to your view (Figure 4).
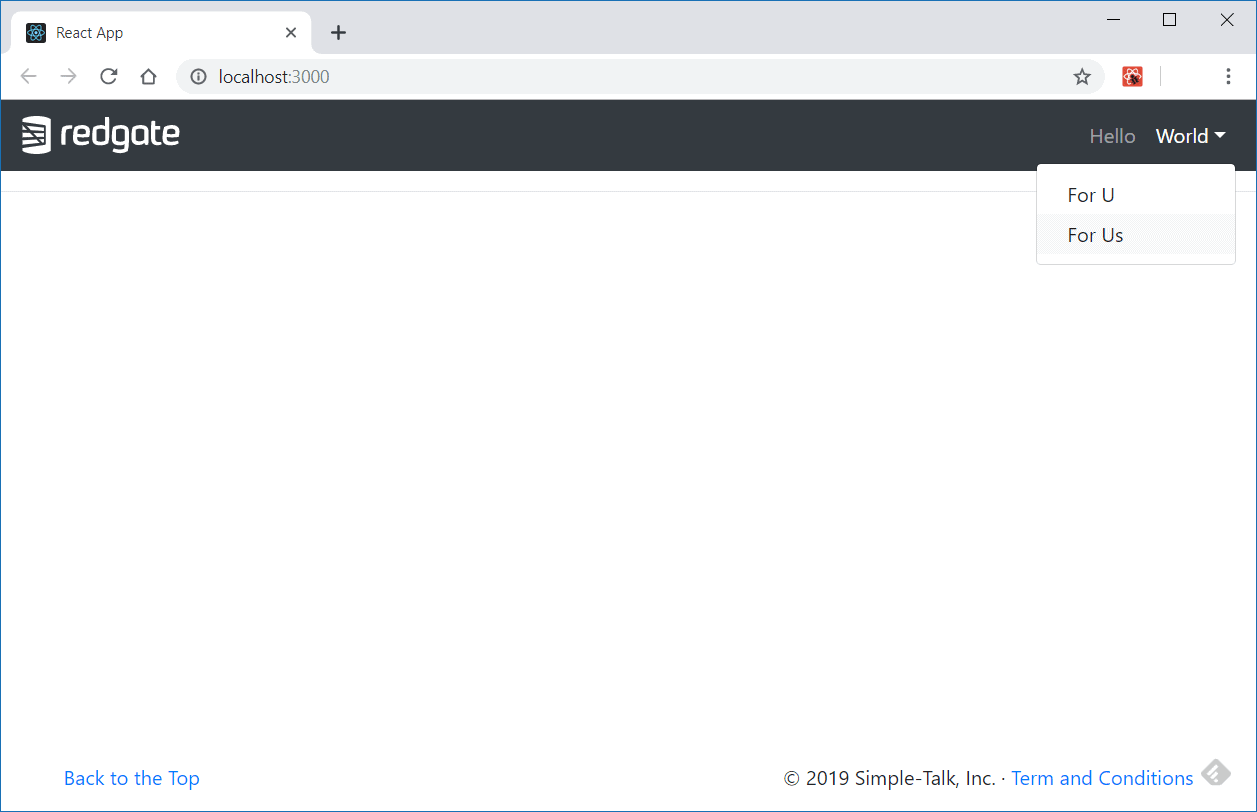
Figure 4. Home page with Reactstrap header and footer.
Now, it’s time to get started with the body page content. However, instead of going directly to the table implementation or the fetching the data from the back-end, you’ll begin with the modal component that’ll be responsible for getting the form data information from the user, just like shown in Figure 5.
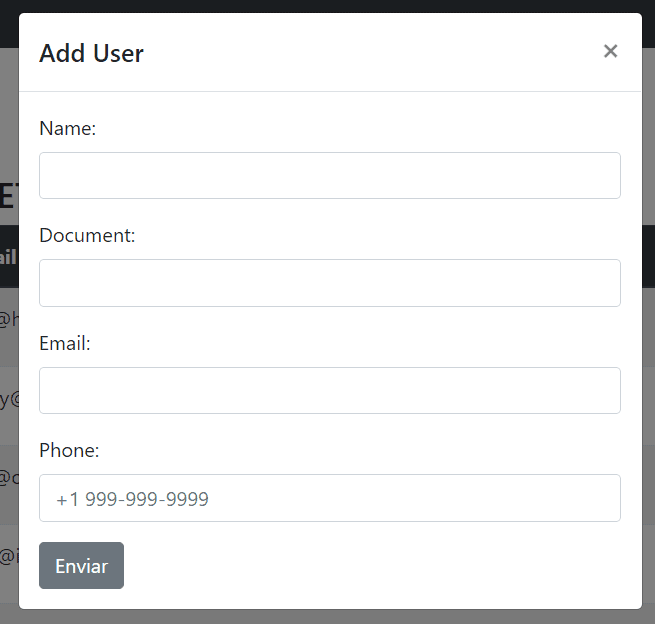
Figure 5. Modal with form data.
Why this? This is a bottom-up strategy to help you understand the details from a more fine-grained perspective.
For instance, the same form will be used for both adding and editing information of a user. That’ll simplify the code and allow reuse of components. Before diving in, create a new folder /constants at the same level of /components folder. Inside of it, create an index.js file and place the following content into it:
|
1 |
export const USERS_API_URL = 'https://localhost:5001/api/users'; |
This will be the constant of the API address. Then, create a new folder into /components called /form, to store the components related to form manipulation. Inside, create two new files: RegistrationForm.js and RegistrationModal.js. Listing 10 shows the code for the first one.
Listing 10. Creating the RegistrationForm.js file.
|
1 2 3 4 5 6 7 8 9 10 11 12 13 14 15 16 17 18 19 20 21 22 23 24 25 26 27 28 29 30 31 32 33 34 35 36 37 38 39 40 41 42 43 44 45 46 47 48 49 50 51 52 53 54 55 56 57 58 59 60 61 62 63 64 65 66 67 68 69 70 71 72 73 74 75 76 77 78 79 80 81 82 83 84 85 |
import React from 'react'; import { Button, Form, FormGroup, Input, Label } from 'reactstrap'; import { USERS_API_URL } from '../../constants'; class RegistrationForm extends React.Component { state = { id: 0, name: '', document: '', email: '', phone: '' } componentDidMount() { if (this.props.user) { const { id, name, document, email, phone } = this.props.user this.setState({ id, name, document, email, phone}); } } onChange = e => { this.setState({ [e.target.name]: e.target.value }) } submitNew = e => { e.preventDefault(); fetch(`${USERS_API_URL}`, { method: 'post', headers: { 'Content-Type': 'application/json' }, body: JSON.stringify({ name: this.state.name, document: this.state.document, email: this.state.email, phone: this.state.phone }) }) .then(res => res.json()) .then(user => { this.props.addUserToState(user); this.props.toggle(); }) .catch(err => console.log(err)); } submitEdit = e => { e.preventDefault(); fetch(`${USERS_API_URL}/${this.state.id}`, { method: 'put', headers: { 'Content-Type': 'application/json' }, body: JSON.stringify({ name: this.state.name, document: this.state.document, email: this.state.email, phone: this.state.phone }) }) .then(() => { this.props.toggle(); this.props.updateUserIntoState(this.state.id); }) .catch(err => console.log(err)); } render() { return <Form onSubmit={this.props.user ? this.submitEdit : this.submitNew}> <FormGroup> <Label for="name">Name:</Label> <Input type="text" name="name" onChange={this.onChange} value={this.state.name === '' ? '' : this.state.name} /> </FormGroup> <FormGroup> <Label for="document">Document:</Label> <Input type="text" name="document" onChange={this.onChange} value={this.state.document === null ? '' : this.state.document} /> </FormGroup> <FormGroup> <Label for="email">Email:</Label> <Input type="email" name="email" onChange={this.onChange} value={this.state.email === null ? '' : this.state.email} /> </FormGroup> <FormGroup> <Label for="phone">Phone:</Label> <Input type="text" name="phone" onChange={this.onChange} value={this.state.phone === null ? '' : this.state.phone} placeholder="+1 999-999-9999" /> </FormGroup> <Button>Send</Button> </Form>; } } export default RegistrationForm; |
First, consider the React imports. Here, you’re making use of Reactstrap form components. Then, comes the state definition: just single properties representing each one of the inputs in the user registration form.
The function componentDidMount() is new: it is invoked immediately after a component is mounted (inserted into the tree), which is good because the user props will be passed down to this component as a property (available through this.props snippet). The props are like params of a function in JavaScript, but in this case, as params from one component to another. The code is checking for its existence, which will mean that it’s an editing action; otherwise consider it just a new registration. If the user is present, extract its props and set them to the current state. You may already guess why. Yes, it’s because they need to fill the inputs before the modal opens.
The onChange() function is a simple function to receive an onChange event and change the component state accordingly.
The submitNew() function will handle the onSubmit event, specifically on calling the API to submit a new user. Notice the reliance on the Fetch API to make the HTTP calls, but feel free to use whichever library in which you feel comfortable. The function code is very intuitive by itself. Notice that at the end, it gets the json response data and sends it to the function addUserToState() (which is not implemented in this component, since this comes within the props object). The toggle() is another function implemented later, so don’t worry about it now.
The submitEdit() function will do practically the exact same things as submitNew(), except for the API endpoint and the response dealing function, this time updateUserIntoState().
Finally, the render function is prepared to identify whether the user comes within the props or not and places the correct submit function to the <Form> component. Based on this, if the state of the component was previously set with the user’s info, then the value of each input will be filled correspondently.
Great! Next stop is the RegistrationModal component which will import the form and hold the rules for its exhibition. Look at the Listing 11 for its code.
Listing 11. Creating the RegistrationModal.js file.
|
1 2 3 4 5 6 7 8 9 10 11 12 13 14 15 16 17 18 19 20 21 22 23 24 25 26 27 28 29 30 31 32 33 34 35 36 37 38 39 40 41 42 43 |
import React, { Component, Fragment } from 'react'; import { Button, Modal, ModalHeader, ModalBody } from 'reactstrap'; import RegistrationForm from './RegistrationForm'; class RegistrationModal extends Component { state = { modal: false } toggle = () => { this.setState(previous => ({ modal: !previous.modal })); } render() { const isNew = this.props.isNew; let title = 'Edit User'; let button = ''; if (isNew) { title = 'Add User'; button = <Button color="success" onClick={this.toggle} style={{ minWidth: "200px" }}>Add</Button>; } else { button = <Button color="warning" onClick={this.toggle}>Edit</Button>; } return <Fragment> {button} <Modal isOpen={this.state.modal} toggle={this.toggle} className={this.props.className}> <ModalHeader toggle={this.toggle}>{title}</ModalHeader> <ModalBody> <RegistrationForm addUserToState={this.props.addUserToState} updateUserIntoState={this.props.updateUserIntoState} toggle={this.toggle} user={this.props.user} /> </ModalBody> </Modal> </Fragment>; } } export default RegistrationModal; |
Way more straightforward than the form component, this one has its own toggle() function (the one called in the previous listing) to be passed as a props function. It simply toggles the state of the boolean modal state attribute every time an HTTP call is finished in order to close the modal automatically.
Here, you’re also receiving values via props from the outer components that call it. In this case, isNew will tell if the user is a new one or an existing one, which is essential information for determining which form state will be presented. Also, you can use this info to change the labels of the button, for example. It can be either an Add or Edit labeled button. Notice how you’re also applying the class of the modal based on another property passed via props. The rest of the code is just filling the blanks of each property needed by a RegistrationModal.
This is good until now, but you need to move forward to the next two components that’ll close the implementation: DataTable.js and Home.js. The DataTable component, as you may guess, is the one who’s going to store the table with the list of users fetched from the back-end.
Listing 12. Creating the DataTable.js file.
|
1 2 3 4 5 6 7 8 9 10 11 12 13 14 15 16 17 18 19 20 21 22 23 24 25 26 27 28 29 30 31 32 33 34 35 36 37 38 39 40 41 42 43 44 45 46 47 48 49 50 51 52 53 54 55 56 57 58 59 60 61 62 63 64 65 66 67 68 69 70 71 72 |
import React, { Component } from 'react'; import { Table, Button } from 'reactstrap'; import RegistrationModal from './form/RegistrationModal'; import { USERS_API_URL } from '../constants'; class DataTable extends Component { deleteItem = id => { let confirmDeletion = window.confirm('Do you really wish to delete it?'); if (confirmDeletion) { fetch(`${USERS_API_URL}/${id}`, { method: 'delete', headers: { 'Content-Type': 'application/json' } }) .then(res => { this.props.deleteItemFromState(id); }) .catch(err => console.log(err)); } } render() { const items = this.props.items; return <Table striped> <thead className="thead-dark"> <tr> <th>Id</th> <th>Name</th> <th>Email</th> <th>Document</th> <th>Phone</th> <th style={{ textAlign: "center" }}>Actions</th> </tr> </thead> <tbody> {!items || items.length <= 0 ? <tr> <td colSpan="6" align="center"><b>No Users yet</b></td> </tr> : items.map(item => ( <tr key={item.id}> <th scope="row"> {item.id} </th> <td> {item.name} </td> <td> {item.email} </td> <td> {item.document} </td> <td> {item.phone} </td> <td align="center"> <div> <RegistrationModal isNew={false} user={item} updateUserIntoState={this.props.updateState} /> <Button color="danger" onClick={() => this.deleteItem(item.id)}>Delete</Button> </div> </td> </tr> ))} </tbody> </Table>; } } export default DataTable; |
The first function of the component is the deleteItem(), which will perform an HTTP call for deleting a user. The id is received as a param, and the function deleteItemFromState() (shown later) will be called as soon as the request completes.
Note that the render function is receiving a prop called items from the outer component with the list of users to iterate and show into the table. For the <tbody>, it first checks for the absence of any item into the list and then shows a corresponding message of “No Users yet”, otherwise, the list will be iterated and, at the Actions column, each item will have a <RegistrationModal> imported along with a button for items deletion.
Pay attention to how React makes use of its componentization style to make it simple to reuse components and reference them from the others.
Listing 13 shows the code of the Home.js component.
Listing 13. Creating the Home.js file.
|
1 2 3 4 5 6 7 8 9 10 11 12 13 14 15 16 17 18 19 20 21 22 23 24 25 26 27 28 29 30 31 32 33 34 35 36 37 38 39 40 41 42 43 44 45 46 47 48 49 50 51 52 53 54 |
import React, { Component } from 'react'; import { Col, Container, Row } from 'reactstrap'; import DataTable from './DataTable'; import RegistrationModal from './form/RegistrationModal'; import { USERS_API_URL } from '../constants'; class Home extends Component { state = { items: [] } componentDidMount() { this.getItens(); } getItens = () => { fetch(USERS_API_URL) .then(res => res.json()) .then(res => this.setState({ items: res })) .catch(err => console.log(err)); } addUserToState = user => { this.setState(previous => ({ items: [...previous.items, user] })); } updateState = (id) => { this.getItens(); } deleteItemFromState = id => { const updated = this.state.items.filter(item => item.id !== id); this.setState({ items: updated }) } render() { return <Container style={{ paddingTop: "100px" }}> <Row> <Col> <h3>My First React + ASP.NET CRUD React</h3> </Col> </Row> <Row> <Col> <DataTable items={this.state.items} updateState={this.updateState} deleteItemFromState={this.deleteItemFromState} /> </Col> </Row> <Row> <Col> <RegistrationModal isNew={true} addUserToState={this.addUserToState} /> </Col> </Row> </Container>; } } export default Home; |
Here are some assumptions to analyze:
- The state will have an array of items (the users) to manipulate throughout the app use;
- Once the component mounts, it fetches the list of users from the API (
getItensfunction); - The
getItens()function will make a GET request, convert the response to json, set it to the current state, or log any error if it happens; - The
addUserToState()function (which you’ve seen called before) will receive a user and add it to the current state; - The
updateState()function will also fetch the items from the server, but note that it’s receiving the id as a param, that you can use to update it just into the state list, if you want; - The
deleteItemFromState()function will receive the id to perform the user’s corresponding deletion from the current state; - The
render()function is just a summary of a simple JSX content for building the<DataTable>and<RegistrationModal>components into Bootstrap row/column structures.
You still need to add the <Home> component to the main one, <App>:
|
1 2 3 4 5 6 7 |
render() { return <Fragment> <AppHeader /> <Home /> <AppFooter /> </Fragment>; } |
Finally, don’t forget to import the new Home component at the top of the file:
|
1 |
import Home from './components/Home'; |
Once the application is refreshed in the browser, and if the API is not running, this is the screen you’ll see:
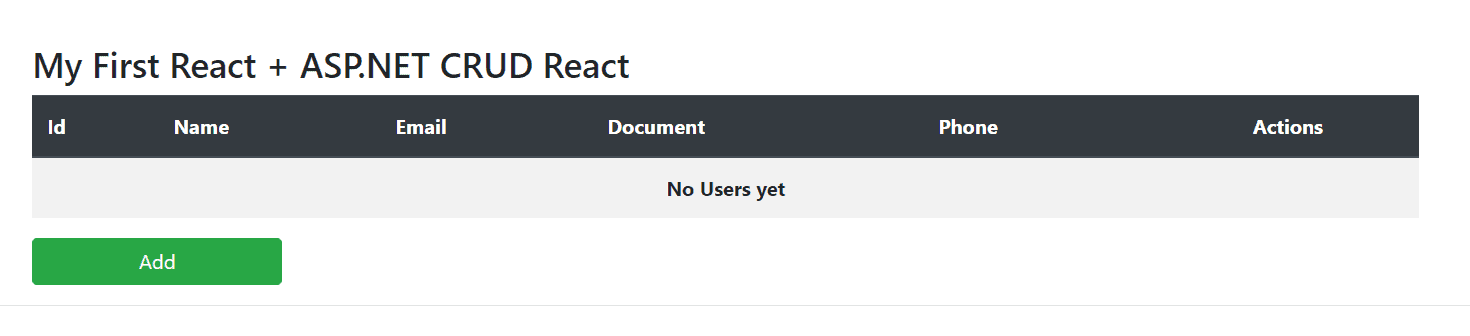
Figure 6. Table of users with no entries.
Conclusion
That’s it. Go ahead, run the API and test the interface it by yourself, making sure to verify if Reacstrap made it responsive for you as well.
This was just a brief intro around the universe of React and how you can connect it, not only with ASP.NET based APIs, but with any type of API. Some details, like the Cors configs, are essential to make sure they can communicate with each other.
You can also check the full source code here. Good studies!
Load comments