
While Django is useful for writing APIs, its main purpose is as a framework for creating full websites. Rendering HTML is one of Django's fundamental abilities, and it uses Jinja templates to make writing flexible, reusable webpages straightforward. This article will teach you how to make a basic website with Django; we will create a login-protected sales dashboard. This project will demonstrate essential techniques of web development with Django: writing views for HTML, authentication with forms, showing data from the DB, and including static assets.
This article will take an iterative approach to developing the webpage. You can start with Python 3 and Django 2.2 installed and follow along, or you can skip ahead and clone the final version from GitHub. If you're building along with me, start by running django-admin startproject dashboard. cd dashboard to enter the directory then python manage.py startapp core will create the app. Make sure to add 'core.apps.CoreConfig' to INSTALLED_APPS in settings.py. From there, you will be able to follow along by modifying the individual files.
Whether you started by cloning the project or creating your own, make sure you run python manage.py migrate and python manage.py createsuperuser to finish setup. Run python manage.py runserver to start the Django site.
We'll start by writing a simple view for rendering HTML in a browser. Django supports function-based views and class-based views. In these examples we will use class-based views but that decision comes down to personal preference as both provide the same features with different syntax. Class-based views are most useful when you want to support multiple interactions with a single URL, for example, if you need to support several HTTP methods.
In this article, we're practicing Django, not HTML or CSS. Thus, we're going to use a fantastic open-source template from Start Bootstrap. The template will provide us with all of the HTML, CSS, and JS that we need for this exercise, allowing us to focus on the Django. If you are starting from scratch, download the template and copy the index.html and the login.html files into /core/templates. While we will leave a lot of the functionality in these templates as placeholders, they will help us write an interactive website.
After saving the template to "/core/templates/index.html," we can use the following view in "/core/views.py" to render the page.
from django.shortcuts import render
from django.views import View


class Index(View):
    template = 'index.html'

    def get(self, request):
        return render(request, self.template)
Then, add the route to "/dashboard/urls.py" as follows:
from django.contrib import admin
from django.urls import path
from core import views


urlpatterns = [
    path('admin/', admin.site.urls),
    path('', views.Index.as_view(), name='index')
]
With the view written, when we run the server and navigate to http://127.0.0.1:8000, we see the page.
Right now, the page doesn't look very good. Fortunately, the template included a bunch of static assets (CSS, JavaScript, and other files) that we can include to improve the site. To do so, first make a folder "static" under "core," then copy the folders "css," "js," and "vendor" into static. Finally, within the html page, you need to prepend "/static/" to the paths of the three CSS imports in the header and the nine JavaScript imports in the footer. Afterwards, the page looks much better.

Once we can properly see the contents of the page, it turns out that there is a lot of (fake) sensitive data here! Let's restrict access by implementing a login page, which will serve as a great introduction to using forms within webpages in Django.
Start by copying the "login.html" template in to the same "core/templates/" folder as "index.html." You will also want to make the same change as before to the two CSS imports and the three JavaScript sources. We'll add a route and view to support this new page.
In urls.py:
path('login', views.Login.as_view(), name='login'),
In views.py:
class Login(View):
    template = 'login.html'

    def get(self, request):
        return render(request, self.template)
You'll note that for the moment our login view is nearly identical to our index view. That will soon change to support the actual page. Let's visit the login page at http://127.0.0.1/login/. Try to sign in using the superuser credentials that you created earlier.

While the page looks great, it doesn't do anything yet. For that, we will need to use a form. Fortunately, Django provides a great default AuthenticationForm that accepts a username and password. We can add that to the view as follows:
from django.contrib.auth.forms import AuthenticationForm
from django.contrib.auth import login, authenticate


class Login(View):
    template = 'login.html'

    def get(self, request):
        form = AuthenticationForm()
        return render(request, self.template, {'form': form})


    def post(self, request):
        form = AuthenticationForm(request.POST)
        username = request.POST['username']
        password = request.POST['password']
        user = authenticate(request, username=username, password=password)
        if user is not None:
            login(request, user)
            return HttpResponseRedirect('/')
        else:
            return render(request, self.template, {'form': form})
This will also require some modifications to the HTML of the login page. Django supports Jinja templating out of the box. Jinja templating is an extension of HTML that allows you include data with a double bracket {{ data }} and expressions with similar syntax {% expression %}. We will use Jinja tags to incorporate the form into the HTML page.
<form method="post" action="/login/">
    {% csrf_token %}
  <div class="form-group">
    <div class="form-label-group">
      {{ form.username }}
    </div>
  </div>
  <div class="form-group">
    <div class="form-label-group">
      {{ form.password }}
    </div>
  </div>
  <button class="btn btn-primary btn-block" type="submit">Login</button>
</form>
We can add some css by including this script afterwards. Because Jinja elements are rendered into HTML server-side, we can rely on the element ids existing in the DOM by the time this script runs on the client.
<script>
  document.getElementById("id_username").classList.add("form-control");
  document.getElementById("id_password").classList.add("form-control");
  document.getElementById("id_username").placeholder = "Username";
  document.getElementById("id_password").placeholder = "Password";
  document.getElementById("id_username").type = "text";
  document.getElementById("id_password").type = "password";
  document.getElementById("id_username").required = "required";
  document.getElementById("id_password").required = "required";
  document.getElementById("id_username").autofocus = "autofocus";
</script>
After these changes, visiting the login page will allow us to sign in and view the main dashboard. However, eagle-eyed readers will notice that we have yet to implement any protections for the dashboard. Indeed, anyone could still visit the index and view all of the sensitive information there. Thus, we have to inherit another class in the Index view.
from django.contrib.auth.mixins import LoginRequiredMixin


class Index(LoginRequiredMixin, View):
    template = 'index.html'
    login_url = '/login/'

    def get(self, request):
        return render(request, self.template)
The LoginRequiredMixin class prevents anyone but authenticated users from accessing the pages that it protects. If someone tries to go to the index before signing in, it will conveniently redirect them to the login page to authenticate themselves.
We've used Jinja to incorporate a form; we can also use it to avoid repeated code. Right now, we only have two html pages, but a full implementation of this application would have dozens. Rather than copying and pasting common elements, we can inherit the header from a base template.
We'll start by making a new file, "base.html," in "core/templates." This file will include common header information between the two pages.
<!DOCTYPE html>
<html lang="en">


<head>


  <meta charset="utf-8">
  <meta http-equiv="X-UA-Compatible" content="IE=edge">
  <meta name="viewport" content="width=device-width, initial-scale=1, shrink-to-fit=no">
  <meta name="description" content="">
  <meta name="author" content="">

  <title>{% block title %}{% endblock %}</title>


  <!-- Custom fonts for this template-->
  <link href="/static/vendor/fontawesome-free/css/all.min.css" rel="stylesheet" type="text/css">


  <!-- Page level plugin CSS-->
  <link href="/static/vendor/datatables/dataTables.bootstrap4.css" rel="stylesheet">


  {% block links %}
  {% endblock %}


</head>


{% block body %}
{% endblock %}


</html>
Then, future pages can use the following syntax from the modified "index.html."
{% extends "base.html" %}


{% block title %}Employee Dashboard{% endblock %}


{% block links %}
  <!-- Custom styles for this template-->
  <link href="/static/css/sb-admin.css" rel="stylesheet">
{% endblock %}
{% block body %}
<!--html goes here-->
{% endblock %}
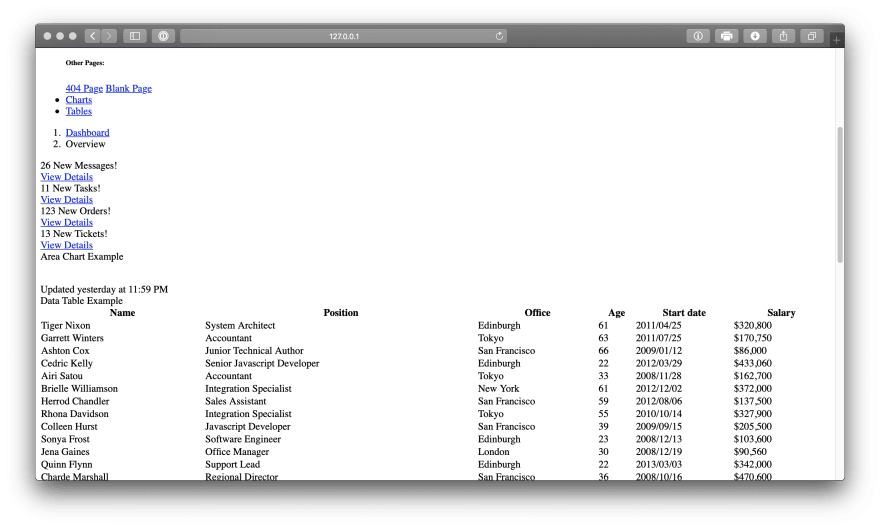
We have one more place to apply Jinja templating in the home page. Currently, all of the figures in the table are hard-coded into the HTML, requiring editing the webpage itself whenever the data changes. Instead, we can store that data in our database and pass it to the view. This will also save us nearly 500 lines of manual HTML with the current data.
First, we need a model to represent employees in the database. In "core/models.py", we define an employee as follows.
from django.db import models


class Employee(models.Model):
    name = models.CharField(max_length=150)
    position = models.CharField(max_length=150)
    office = models.CharField(max_length=150)
    age = models.PositiveIntegerField()
    start_date = models.DateField()
    salary = models.PositiveIntegerField()


    def __str__(self):
        return self.name
Make sure you register the model in "core/admin.py."
from django.contrib import admin
from .models import Employee


class EmployeeAdmin(admin.ModelAdmin):
    list_display = [f.name for f in Employee._meta.fields]


admin.site.register(Employee, EmployeeAdmin)
With the model written and registered, we can make and run migrations (quit the server, python manage.py makemigrations, python manage.py migrate, python manage.py runserver). Navigate to /admin and click on the employees table. Click "Add Employee" in the upper right corner and enter whatever data you want in the form.

Do this a few more times until you have a small fake company. Then, return to our "views.py" and modify Index to pass the employee database into the HTML file as a QuerySet.
def get(self, request):
    employees = Employee.objects.all()
    return render(request, self.template, {'employees': employees})
Finally, delete the entire fake table in "index.html" and replace it with a for loop over the data we entered into the database.
<tbody>
  {% for employee in employees %}
  <tr>
    <td>{{ employee.name }}</td>
    <td>{{ employee.position }}</td>
    <td>{{ employee.office }}</td>
    <td>{{ employee.age }}</td>
    <td>{{ employee.start_date }}</td>
    <td>${{ employee.salary }}</td>
  </tr>
  {% endfor %}
</tbody>
Django creates the index by rendering from our database instead of simply returning the filler data. All of the search and ordering features still work exactly as they used to, the only difference is that the html is generated server-side from the database rather than hard-coded.

We have now seen several powerful patterns for creating web pages with Django and Jinja. Using templates and extensions allows us to reuse common code between pages. Forms allow us to securely collect and transmit user data (when the website is served over HTTPS). We can use server-side rendering to include data in the HTML and send it to the client. These fundamental patterns are the essential skills that will let you create a wide array of web pages in Django.
This is an mkdev article written by Philip Kiely. You can hire our Python mentors to learn Python & Django yourself.


Top comments (4)
Your article is a really great introduction to Django development but I believe that you are mistaken about the template engine. The default template engine in Django is the Django Template Engine. It is, in some respects, similar to Jinja but it is not Jinja. However, Jinja is an optional template engine that can be used and that Django provides built in support for.
From what I can tell you do not provide any explanation about switching to Jinja nor do you appear to be using any Jinja specific markup in your templates.
If you want information on how to configure Django to use Jinja you should see these documents: docs.djangoproject.com/en/2.2/topi...
There actually plenty of ways to build a more efficient Django Front End.
I would recommend people check this out:
udemy.com/course/build-a-user-auth...
Hi,
I'm trying to follow your example, but am stuck. I found and downloaded your project from GitHub. I copied the three .html templates to my project, and then copied the the folder 'Static' from your project to 'Core' in my project. I only found one CSS reference and found the nine JavaScript reference in index.html, but all reference already had '/static'/ prepended to the path since I got index.html from GitHub. I cannot get the visually pleasing version of the page to display, nor any of the data you have shown in the dashboard screenshot. Any thoughts?
Matt
This is cool for nwbiee