Vue.js and Webpack 4 From Scratch, Part 3
Packing up
This is the final part in this series on configuring a Vue project from scratch using Webpack 4, part 1 is available here and part 2 here. Below I’ll cover:
- Linting.
- Testing.
- Processing of static assets.
And, based on a question from a previous article, I’ll also mention css extraction.
The final code is available on github.
In a comment on part 1, @blacksonic86 suggested that the entry point for our application should be called index.js, rather than app.js. This makes a lot of sense as it is the default in webpack 4 meaning we can remove it from our webpack.config.dev.js.
In practice I often have multiple entrypoints as I use this configuration to add polyfills to support older browsers such as Internet Explorer but in this case it’s a change I should have thought of. Changing the name of the file means that the current webpack configuration is as below.
'use strict'const webpack = require('webpack')
const { VueLoaderPlugin } = require('vue-loader')
const HtmlWebpackPlugin = require('html-webpack-plugin')module.exports = {
  mode: 'development',

  devServer: {
    hot: true,
    watchOptions: {
      poll: true
    }
  },  module: {
    rules: [
      {
        test: /\.vue$/,
        use: 'vue-loader'
      }, {
        test: /\.js$/,
        use: 'babel-loader'
      }, {
        test: /\.styl(us)?$/,
        use: [ 'vue-style-loader', 'css-loader', 'stylus-loader' ]
      }
    ]
  },plugins: [
    new webpack.HotModuleReplacementPlugin(),
    new VueLoaderPlugin(),
    new HtmlWebpackPlugin({
      filename: 'index.html',
      template: 'index.html',
      inject: true
    })
  ]
}
Linting
Linting is the process of applying static analysis to your codebase to detect issues or enforce style guidelines. It is very useful when working with dynamically typed languages such as javascript. ESLint is the standard linter, it allows you to define sets of rules to run against your codebase, or use plugins to use a pre-defined set. We will use the Vue eslint plugin to enforce the recommended rules for a Vue application.
There are quite a few npm packages we need to install to enable linting:
npm install --save-dev eslint eslint-plugin-import eslint-plugin-node eslint-plugin-promise eslint-plugin-standard eslint-config-standard babel-eslint eslint-loader eslint-plugin-vueOnce this is done, we need to tell eslint which rules we want to use, create a file called .eslintrc.js in the project root and and add these settings:
module.exports = {
  parserOptions: {
    parser: 'babel-eslint'
  },
  extends: [
    'plugin:vue/recommended',
    'standard'
  ],
  plugins: [
    'vue'
  ]
}
Here we are telling eslint that we want to use babel to parse our javascript and then apply the standard linting rules and the recommended rules from the vue plugin.
The easiest way to run ESLint is via an npm script. Add this to package.json in the scripts section:
"lint": "eslint --ext .js,.vue src"We’re running ESLint against anything in our src folder with the file extension .js or .vue. Running this now and you should actually get an error already.
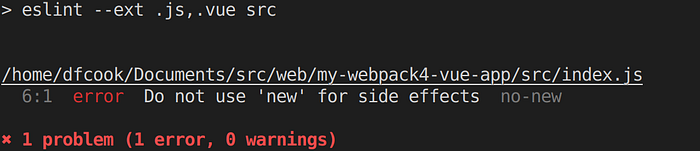
This is pointing at these lines in our index.js, I have the eslint extension for VSCode installed so if I open this file now I can see another visual cue that something is wrong.
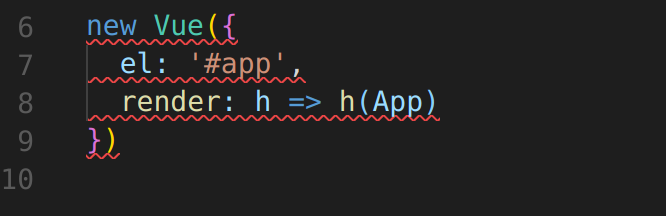
There are various ways to fix this, we could export the new Vue object for instance, however let’s tell ESLint that this line is actually OK and we want it to ignore it. Add this comment immediately before the offending code:
/* eslint-disable-next-line no-new */Now when you rerun our lint script it should report no errors.
ESLint also supports autofixing some classes of errors, I like to add a shortcut script to my npm config to allow me to run the autofix when required:
"lint:fix": "eslint --ext .js,.vue src --fix"Once our linting is configured to run on-demand we want to change our webpack build so it runs automatically. For this we need to install the webpack loader:
npm install --save-dev eslint-loaderAnd change our webpack config to add a rule to associate our .js and .vue files with the ESLint loader:
{
  test: /\.(js|vue)$/,
  use: 'eslint-loader',
  enforce: 'pre'
}
This rule has one change to our others, enforce: ‘pre’. This means the ESLint loader is a pre-loader, it will run before the other loaders and apply the linting rules before the babel-loader kicks in and start processing the javascript.
Static Assets
Static assets are things like images and video, they will not be processed by Webpack but we will require them to be copied to our dist folder so they will be available to the built application.
To do this we use the copy-webpack-plugin. Following the by-now familiar path we need to install the package:
npm install --save-dev copy-webpack-pluginThen in our webpack config we pull the plugin in and add it to our plugins section.
const CopyWebpackPlugin = require('copy-webpack-plugin')
const path = require('path')function resolve (dir) {
  return path.join(__dirname, '..', dir)
}plugins: [
  new CopyWebpackPlugin([{
    from: resolve('static/img'),
    to: resolve('dist/static/img'),
    toType: 'dir'
  }])
]
This is pretty straightforward, all the images we put in our static/img folder will be copied to the equivalent folder in our dist build folder.
Testing
Part of the Vue ecosystem, vue-test-utils is the official unit testing library for Vue.js. It supports multiple test runners, shallow rendering, simulating user interactions, mocking vuex and vue-router and synchronous updates (removing the need for calling nextTick to trigger dom updates).
In this example, I’m going to use jest for running the tests. Jest is from facebook and is closely associated with React, however it is can adapt to any Javascript library or framework and there is a vue-specific ecosystem allowing us to run our tests without any difficulty.
Let’s install jest:
npm install --save-dev jest babel-jest vue-jest jest-serializer-vue @vue/test-utilsJest is the test-runner, vue-jest is a package for transforming vue components into the correct format for jest and jest-serializer-vue is a package that supports taking snapshots of vue components. Snapshot testing allows rendering of a complete DOM and then performing comparisons to ensure it does not change.
Instead of a standalone configuration file, Jest is configured from our package.json. Add this to the end of our json object:
"jest": {
  "moduleFileExtensions": [
    "js",
    "vue"
  ],
  "moduleNameMapper": {
    "^@/(.*)$": "<rootDir>/src/$1"
  },
  "transform": {
    "^.+\\.js$": "<rootDir>/node_modules/babel-jest",
    ".*\\.(vue)$": "<rootDir>/node_modules/vue-jest"
  },
  "snapshotSerializers": [
    "<rootDir>/node_modules/jest-serializer-vue"
  ]
}
While we’re in package.json let’s add a script to actually run our tests:
"test": "jest"We need to configure babel to transpile our tests, add this to the .babelrc file:
"env": {
  "test": {
    "presets": [
      ["env", { "targets": { "node": "current" }}]
    ]
  }
}
And tell ESLint about our test environment by adding this to the .eslintrc.js file:
env: {
  browser: true,
  node: true,
  mocha: true
},
globals: {
  expect: true
}
Now jest is configured we can actually write a test. Keeping it simple we will just mount our App component and verify that it has the “.center-content” class. Jest will by default look for tests in a folder called __tests__ so create this under the src folder and add a file called App.spec.js.

We use Vue test-utils to mount the app and then run a simple expect against the returned wrapper.
To run this test it’s as simple as:
npm run test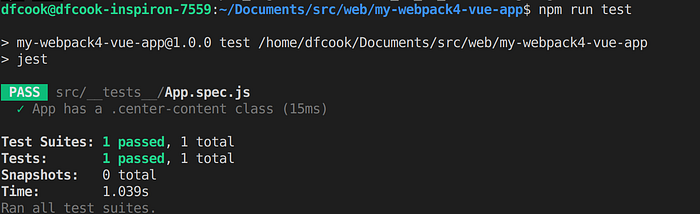
Extracting CSS
This was something that Ahsath asked about in the comments to part 2. It’s a testament to the pace of change in the webpack arena that in the week since I published that the method of extracting CSS into a separate file has changed completely. With the release of vue-loader 15 MiniCssExtractPlugin is the standard way to extract CSS from your Vue single-file-components.
Install the plugin from npm:
npm install --save-dev mini-css-extract-pluginAdd it to the plugins in our webpack config file:
const MiniCssExtractPlugin  = require('mini-css-extract-plugin').
.
plugins: [
  new MiniCssExtractPlugin({
    filename: 'main.css'
  })
]
And finally configure our stylus loader to use this plugin to extract the css and the vue loader to extract the CSS from our single file components:
module: {
rules: [
{
test: /\.vue$/,
use: 'vue-loader'
}, {
test: /\.styl(us)?$/,
use: [
MiniCssExtractPlugin.loader,
'css-loader',
'stylus-loader'
]
}
]
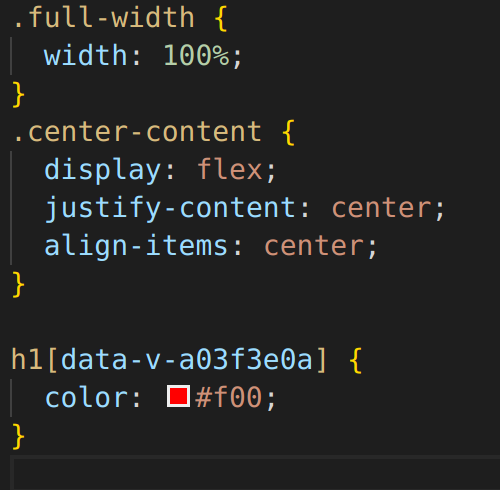
}Now when our application builds all the stylus will be extracted and placed in a single css file (main.css) under our dist folder. Scoped CSS from our single-file-components will also be included, for example:
That’s All Folks
I hope these articles have been helpful. With the imminent arrival of vue-cli 3 there is an element of obsolescence to them already, the method of working with webpack will go through significant changes. However, it will always be important to have some knowledge of how these things are configured under the hood, and there is no better way to do that than working through from scratch.