A combination of functional front-end JavaScript and state machines leads to unit and business logic tests which can approach mathematical proof. Watch as Cypress steps through the app, using an auto-generated graph of the state machine that defines the app's possible UI actions and transitions.
Disclaimer - to follow this post you can probably get away with knowing that Hyperapp manages state immutably, uses a virtual DOM and hosts pure functions to handle actions (such as click handlers), effects such as http requests and subscriptions to external events or streams. XState manages state machine nodes and transitions plus actions triggered by transition. The key to this demo is associating Hyperapp and XState actions. Some familiarity with basic Cypress testing will help too.
However, it might help to have some knowledge of Hyperapp actions and events plus state machines, as these are big subjects mostly out of scope of this post.
Why state machines?
De-stress app development.
Not only will you know that your app's pure functions work (existing unit testing) but you will also know that the business logic which wires them together also works!
You can use easily accessible mathematical principles to build reliable apps rather than depending on software process. This article focuses on business logic rather than unit testing.
Using an XState machine means that you can pre-define and test how sequences of user actions and events lead to state change and therefore app behaviour. The logic is clear and easy to reason about (rather than potentially obscured in collections of functions or separate hard-to-maintain flow diagrams). You can visualise the logic with interactive state machine charts and create tests easily. More on tests later but note that the state machine drives UI tests which prove functionality matches the logic.
More - if you update the requirements and change the state machine(s) the tests will automatically update as well.
How?
A Hyperapp demo
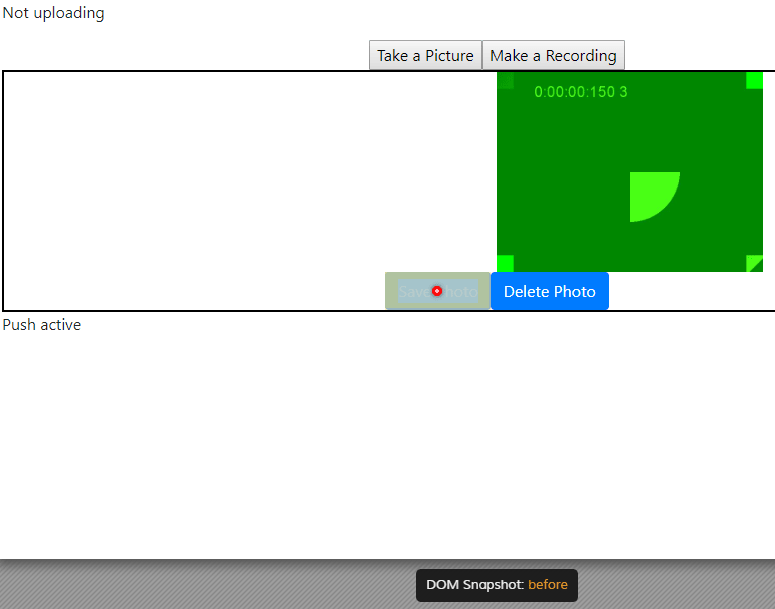
Here I introduce a Hyperapp demo, which implements a simple multi-media PWA (Progressive Web App) with XState. You can take a photo, create a recording and simulate uploading them to the cloud. If offline, the PWA will save locally and automatically 'upload' when you're back online. Apologies for the requested browser permissions - video, audio and push notifications - they are necessary for the app's functionality. But nothing leaves your browser!
The repository is here. The master branch just uses Hyperapp, whilst the xstate branch modifies the app to use XState state machines as well. Use 'npm start' to build and run using Parcel. There are two state machines, one to control taking and saving a photo, the other to make a sound recording.
Note that unlike most Hyperapp implementations, this app uses Pug to render HTML. You may prefer to convert to the more usual JSX or hyperscript approach.
How it works - Hyperapp
Hyperapp maintains a central state and message handler which listens for user actions and browser events. When an action or event changes the state, Hyperapp uses a virtual-DOM to update the app. A loop exists, half visible to the developer and half within the framework.
Action -> Event -> [ Listener -> State management -> Virtual-DOM ] -> DOM-change -> Action...
How it works - XState
State machines are a long-standing mathematical tool. Their practical application to apps has some common practical and conceptual features with how Hyperapp defines app behaviour. The main difference is that XState enables the relationships between Actions, Events and State to be defined unambiguously in one place.
A state machine is created in JSON, whilst the XState system provides pure functions for interacting with it. Your app can respond to action and event-driven change from the machine or request state changes directly.
Action -> [ Transition -> Possible Actions too choose from] -> Action...
There are two state machines in the demo, one to manage taking photo's and the other for recordings.
You can visualize and interact with the machines defined in machines.js. I have found it useful to compare the experience of visual logic with that of using the actual app or a mock-up. You can focus on the function without being distracted by form.
How it works - XState within Hyperapp
Two new functions that manage the link. One captures events (e.g. button clicks) and the other converts XState actions into Hyperapp actions. In effect, these functions act as a bridge between Hyperapp actions and state, and XState actions and transitions.
There are some important features of the app implementation which help this process. In particular, I get easy linking between UI and logic by using the same id names for UI elements as for their associated Hyperapp action function names and XState transitions. Conversely, it is a bit fiddly switching between different state machines - a balance between monolithic vs distributed.
For the video handling part of the app, each button has this onclick=[updateVideoState, targetId] tuple as a click handler.
The click handler function updateVideoState receives state and the element's id from Hyperapp, which handles the DOM event. It passes these and state machine details to processNewState shown below. This function calls runActions to link state machine actions associated with the transition to the execution of Hyperapp actions. It must handle the results of Hyperapp actions (new state), events (which return [state, event] tuples) and one-shot effects (no returned object). Finally processNewState returns the updated state to Hyperapp, along with the latest state machines.
const processNewState = (state, { machineState, machineName, machine, id }) => {
    const previousState = pathOr(machineState, [machineState, 'value'], state)
    const newMachineState = machine.transition(previousState, id) // 'id' is synonymous with 'newState'
    const requests = runActions(state, newMachineState, id)
    const videoState = machineName === STATE_MACHINES.VIDEO_MACHINE ? newMachineState : state.videoState
    const audioState = machineName === STATE_MACHINES.AUDIO_MACHINE ? newMachineState : state.audioState
    if (requests.length === 1) { // capture the result of an action
        return { ...requests[0], videoState, audioState }
    } else if (requests.length === 2) { // capture the result of an action-effect tuple
        return [
            { ...requests[0], videoState, audioState },
            requests[1]
        ]
    }
    return { ...state, videoState, audioState } // state machine was updated
}
The runActions function executes the action defined by the machine and allows Hyperapp to process the result. The actions are all regular Hyperapp action functions, the only difference from regular use of Hyperapp is that the state machine determines what action to execute when a valid transition occurs. Note that an action in XState is maintained as an array of action.exec functions.
const runActions = (state, calcState, evtObj) => { // make recursive or map
    let requests = []
    calcState.actions.forEach(action => {
        const stateChangeRequest = action.exec(state,evtObj)
        const isArray = Array.isArray(stateChangeRequest)
        requests = concat(requests, isArray ? stateChangeRequest : [stateChangeRequest])
    });
    return requests
}
Testing!
There are two parts to the testing issue - unit testing of pure functions and testing the app logic generated by sets of functions.
Unit testing Pure functions
Written about by many others...
Testing app logic with state machines
Self-writing tests! What's not to love?
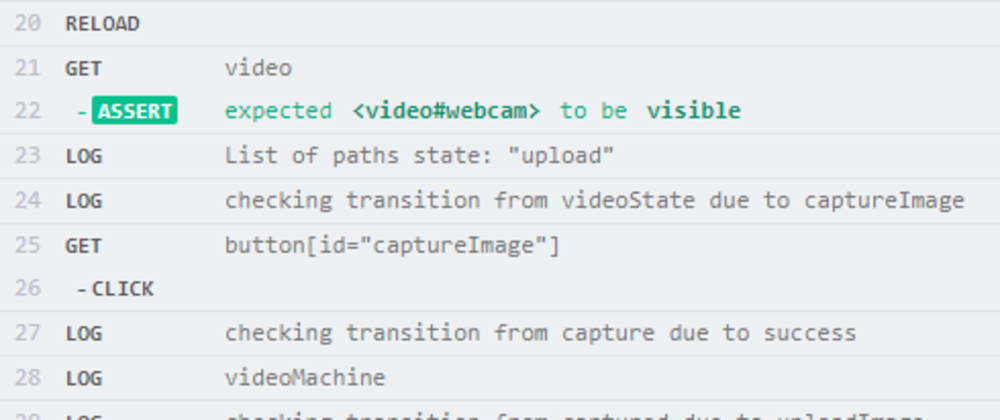
Well, not completely self-writing but not far off. XState provides a graph feature which generates a set of objects and arrays which describe the paths through your app's state machines. I've implemented an approach using Cypress where control of the app tests is managed by these paths. See cypress/integration/tests/tests.js in the xstate branch of the repo.
Here's an example of the Cypress output, showing execution of a 3-stage path to reach 'upload'. Notice again the shared naming between DOM element id and transition.

In the example, there are four states and actions defined in the machine:
const videoMachine = Machine ({
    id: 'videoMachine',
    initial: 'videoState',
    states: {
        videoState: {
            on: {
                captureImage: {
                    target: 'capture',
                    actions: ['captureImage']
                }
            }
        },
        capture: {
            on: {
                success: 'captured',
                fail: 'videoState'
            }
        },
        captured: {
            on: {
                uploadImage: {
                    target: 'upload',
                    actions: ['uploadImage']
                },
                discardImage: {
                    target: 'videoState',
                    actions: ['discardImage']
                }
            }
        },
        upload: {
            on: {
                uploadSuccess: {
                    target: 'videoState',
                    actions: ['discardImage']
                },
                uploadFail: 'captured'
            }
        }
    }
})
Follow through the Cypress results alongside the state machine. Here's a summary, with the transition 'actions' in []
videoState -> [captureImage] -> capture -> [success] -> captured -> [uploadImage] -> upload -> [uploadSuccess] -> videoState
The first transition captureImage takes a picture and displays the result in a div. If this is successful, the second transition doesn't involve an action as Hyperapp resolves the result of an Effect in the background. success of the Effect allows the display of new buttons - to upload or discard. The path gives us an uploadImage action followed by the final step where Hyperapp manages the result of the 'uploadSuccess' effect in the background.
The outcome of the final 'uploadSuccess' step is not immediately obvious, but Cypress 'time-travel' (scrolling back through each test step) shows that we requested upload and received a success response afterwards.
Make the upload request (button click):
Uploaded and ready to take the next picture:

Here is the core of the test code for Cypress (I've not show the XState-graph objects as they're complex, but are essentially lists of transitions).
const checkTransition = ({ state, event }) => {
    cy.log(`checking transition from ${state.value} due to ${event.type}`)
    // if there are paths[x].state.actions[y] then have Hyperapp and XState run the action(s) for us
    // Optionally we could drive the machine from here too
    if (state.actions.length > 0) {
        cy.log(view(machineName, state))
        const machine = currentMachine(state)
        // machine.transition(...)
        return
    }
    // else run paths[x].event
    // add logic to check for DOM elements with id === paths[x].event
    return cy.get(`button[id="${event.type}"]`).click()
}
const listOfPaths = curry((selectPaths, currentState) => {
    cy.log(`List of paths state: ${currentState}`)
    return selectPaths(currentState)
})
const checkPath = (path) => map(checkTransition, path)

// the test
it('tests each state path', () => {
    cy.visit('http://localhost:1234')
    const listOfVideoPaths = listOfPaths(selectSimpleVideoPaths)
    const testVideo = map(compose(appIsReady, reload, checkPath, listOfVideoPaths))
    cy.log('Test video paths')
    testVideo(videoStateList)
})
As such, the core code is pretty reusable for any XState-graph, the only custom tweaking needed is selection of the actual UI action, .click() in this case.
What's next?
Other aspects of the app may be suitable for state machines, including upload/http, online/offline state and PWA installation.
There is an interesting boundary of responsibility between Hyperapp and XState that this demo has only just started to explore - such as state management and action definition.
It would be useful to build a system for defining the relationship between DOM elements being acted upon and the desired action (e.g. click, hover etc.). This is rather manual at present.
Also check out Rosmaro for a state machine implementation - it has a handy graphical UI for creating machines rather than hand-coding JSON.
What role components?
How many state machines do you need and how big should they be?
XState/graph returns a subset of possible paths but not all, so it would be a useful upgrade to ensure full coverage.
Is it a scalable concept?
Please add comments!


Top comments (0)