


We all know that Jenkins is a well-known open-source continuous integration and continuous deployment automation tool which is written in Java. By using Jenkins, software companies can accelerate their software development process, as Jenkins can automate CI/CD at a rapid rate. Jenkins supports the complete development lifecycle of software from building, testing, deploying and other stages of a software development lifecycle. In this blog, we are going to learn how Jenkins multibranch pipeline works for the multiple branches.
The Multibranch Pipeline allows you to automatically create a pipeline for each branch on your repository with the help of Jenkinsfile.
Jenkinsfile is stored along with your source code inside a Source Code Management (SCM) eg. GitHub, BitBucket, etc.
A Jenkinsfile is nothing but a pipeline script that defines your CI/CD pipeline:
Definition from Jenkins :
The Multibranch Pipeline project type enables you to implement different Jenkinsfiles for different branches of the same project. In a Multibranch Pipeline project, Jenkins automatically discovers, manages and executes Pipelines for branches which contain a Jenkinsfile in source control.
Create a simple Multi-branch Pipeline Project:
- Step-1: Open Jenkins UI.
- Step-2: Create a new item or job.
- Step-3: Insert the name of the item or job, click on Multibranch pipeline option.
- Step-4: Enter the display name and description if you want.
- Step-5: Select branch source option, click on add source and select Git option.
- Step-6: Enter the Project Repository name and Credentials if the account is private.
- Step-6: Apply the above configuration and save it.
Congratulations you have successfully created a simple multi-branch pipeline project.
Now go to the GitHub repository which we have specified in the multibranch pipeline project and push or add Jenkinsfile (pipeline script) to each branch root directory.
Jenkins server automatically triggers a build whenever there is a new code change on any of the branches on your Git/GitHub repository.
Let’s take an example to understand how multibranch pipeline work?
Suppose that we have already created a multibranch pipeline project from Jenkins UI for the GitHub repository which you can see in the diagram below.
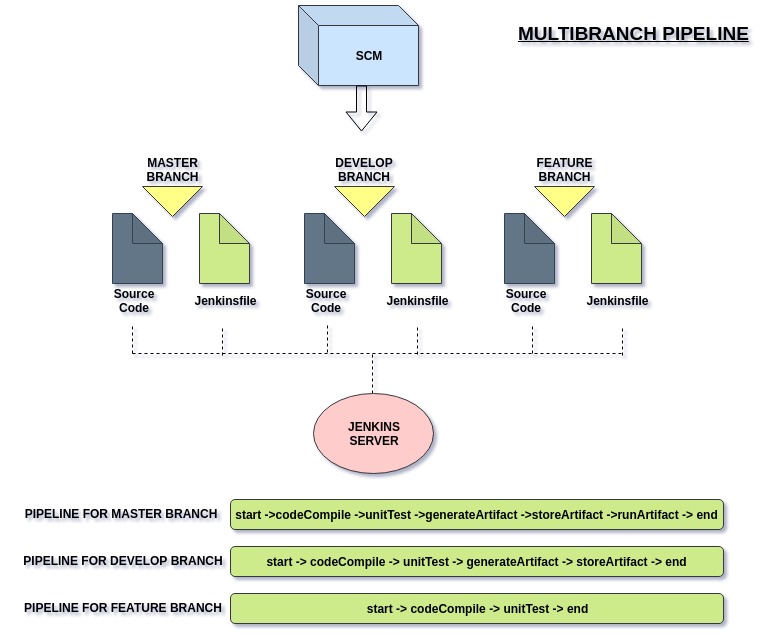
We can see that we have an SCM repository in which we have three branches these are Master, Develop and Feature. In each branch, we have a source code along with the Jenkinsfile and each Jenkinsfile have different pipeline script we can see that in the diagram.
Master branch have complete CI/CD pipeline script, Develop branch have Only CI pipeline script and feature branch have online unit test pipeline script.
First, Jenkins server will automatically discover all the branches from the repository and take a pull from each branch and It runs pipeline automatically run the pipeline according to the Jenkinsfile.
After that Jenkins server automatically triggers a build whenever there is a new code change on any of the branches on your Git/GitHub repository.
If you change the code in the master branch, the master branch pipeline will automatically start executing and same as with other branches.
The purpose of the multibranch pipeline is to handle all branches in the repository. We make different pipeline for each branch.
Suppose you want to perform complete CI/CD pipeline for the master branch and Only CI pipeline for the develop branch. You can do this with the help of multibranch pipeline project.
Points to ponder:
We Should :
- try to make Jenkinsfile static.
- make Jenkinsfile same for all the branches.
- write the script(groovy or shell) for each stage outside the Jenkinsfile. You should call those script in the Jenkinsfile.
That’s all for now, I will follow it up with more knowledge on this topic next time.
References:
