Hi again everyone
First of all, thank you very much for all the support on the previous post, I can't believe it has a lot of reactions :)
During the previous post we review the project creation, some basics on design, and adding some basic components. Continuing from the last checkpoint, the topics for this post will be:
- Write functionality to allow the user write his username, considering some limitations.
- Code a datepicker that popup when user click on text view.
For username functionality the limitations will be:
- User can pick any kind of characters either numbers, letter, or special characters; except new lines. The field may have a limited length of 15 characters. For datepicker the idea behind is:
- The datepicker needs to popup when the user click on a textview.
- The datepicker has to read the user selection.
- Once the date is selected, the textview may show the full date.
As said, the first functionality to check is the field for user name, considering the limitations previously mentioned. I’ll show all images about configuring all attributes, when everything is set up, then I show the code.
We’re going to see our design and open the attributes

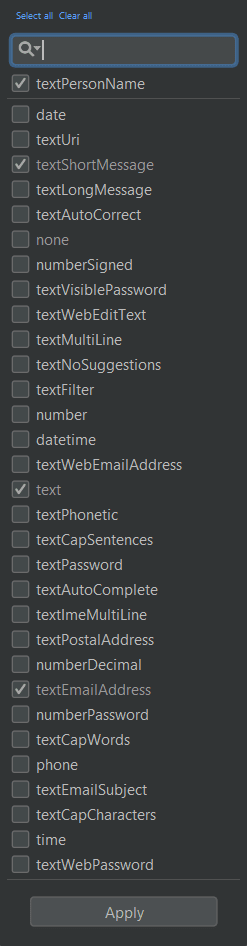
As you can see, the default inputType is textPersonName, but we can changed to whatever we want (or at least whatever is available) clicking on the flag side left of textPersonName text, you should see something like this.
To us, the default selection is functional. Now go down on your attributes menu and look for maxLength attribute. After we locate the attribute, we’ll set 15 as max length.

Other limitations mentioned is to allow the user just write one line for his username. As previously, go down on your menu looking for singleLine attribute and change it to true.

Our XML code should look like this. As I said, you can prefer coding it instead of searching for the attributes on the menu.
    <EditText
        android:id="@+id/profile_username_edittext"
        android:layout_width="207dp"
        android:layout_height="45dp"
        android:layout_marginStart="20dp"
        android:layout_marginLeft="20dp"
        android:layout_marginTop="40dp"
        android:layout_marginEnd="8dp"
        android:layout_marginRight="8dp"
        android:ems="10"
        android:inputType="textPersonName"
        android:maxLength="15"
        android:singleLine="true"
        app:layout_constraintEnd_toEndOf="parent"
        app:layout_constraintHorizontal_bias="0.172"
        app:layout_constraintStart_toEndOf="@+id/profile_username_textview"
        app:layout_constraintTop_toBottomOf="@+id/profile_photo_textview" />
With this, the functionality described is done (yes, this fast and easy). It’s time to raise the difficulty. Android allow us to select an EditText with inputType date, but it only show the keyboard and let you write your date, as developers we should imagine that anything that could go wrong, will actually go wrong with the user interactions. That's the reason we're going to use a datepicker, creating an easy-to-use mechanic.
Go to your main activity class and declare four variables at the top of the class, before our first method; remember to make all of them private.
public class MainActivity extends AppCompatActivity
        implements NavigationView.OnNavigationItemSelectedListener {

    private TextView birthday;
    private int mYear;
    private int mMonth;
    private int mDay;

    @Override
    protected void onCreate(Bundle savedInstanceState) {
        super.onCreate(savedInstanceState);
        setContentView(R.layout.activity_main);
        Toolbar toolbar = findViewById(R.id.toolbar);
        setSupportActionBar(toolbar);
//        FloatingActionButton fab = findViewById(R.id.fab);
//        fab.setOnClickListener(new View.OnClickListener() {
//            @Override
//            public void onClick(View view) {
//                Snackbar.make(view, "Replace with your own action", Snackbar.LENGTH_LONG)
//                        .setAction("Action", null).show();
//            }
//        });
        DrawerLayout drawer = findViewById(R.id.drawer_layout);
        NavigationView navigationView = findViewById(R.id.nav_view);
        ActionBarDrawerToggle toggle = new ActionBarDrawerToggle(
                this, drawer, toolbar, R.string.navigation_drawer_open,
                R.string.navigation_drawer_close);
        drawer.addDrawerListener(toggle);
        toggle.syncState();
        navigationView.setNavigationItemSelectedListener(this);

        birthday = findViewById(R.id.profile_birthday_textview);

    }
Inside the onCreate method initialize birthday variable with a findViewById. If you don't initialize your variable, the IDE won’t tell you about an error and you won't notice it until running it, crashing the application because of a null pointer exception.
Later, create a method inside this class, I’ll name it pickDateOnClick. The method has to require a parameter of type View, has to be public, and return nothing, that is, void.
Note that every time you create a method to be performed on click event, it has a view parameter of type View, otherwise, the IDE will show you a syntax error, saying your method doesn’t exist even you coded it in the right way.

Inside the method pickDateOnClick, we’ll create:
- Calendar instance (getting today’s date)
- Date picker dialog using android widget. It’ll require you to implement the method
onDateSet, the IDE won’t let you skip this warning, and also the most important part of the code will be written there.
Your code should be similar to this.
Important note: Calendar instance needs to be final, in other words, our
cvariable can’t be modified. Remember, final keyword is to let a variable be assigned once.
final Calendar c = Calendar.getInstance();
mYear = c.get(Calendar.YEAR);
mMonth = c.get(Calendar.MONTH);
mDay = c.get(Calendar.DAY_OF_MONTH);

DatePickerDialog datePickerDialog =
    new DatePickerDialog(this, new DatePickerDialog.OnDateSetListener() {
               @Override
               public void onDateSet(DatePicker datePicker, int i,
                                      int i1, int i2) {

               }
    });
As you might notice, our date picker dialog implementation has three variables, i, i1, and i2. These variables mean to be year, month, and day respectively. In my personal opinion… they’re not understandable, and to tackle down the meaning of every one of them you have to debug and evaluate their values, awful. For the sake of our mental health, we change it to their corresponding variable names.
Calendar widget has to be initialized, too; else it throw an error. The initialization corresponds to the initial date the widget will show. Here’s when our global variables enter in action, after the second curly bracket, before the parenthesis and semicolon we add the year, month, and date, separated by comma. At this point, your code is something akin this.
final Calendar c = Calendar.getInstance();
mYear = c.get(Calendar.YEAR);
mMonth = c.get(Calendar.MONTH);
mDay = c.get(Calendar.DAY_OF_MONTH);

DatePickerDialog datePickerDialog =
    new DatePickerDialog(this, new DatePickerDialog.OnDateSetListener() {
               @Override
               public void onDateSet(DatePicker datePicker, int year,
                                      int month, int day) {

               }
    }, mYear, mMonth, mDay);
We’re not far away to accomplish our goals, keep it up.
The logic inside our datepicker implementation is the following:
- Convert input variables into string
- Convert month number into month name
- Add missing zero to day
- Show final text
The reason of converting the input variables into string is to concatenate them into a single string with the date.
We’ll create one more method in the main class named getMonth, the logic of this method is getting the month name using DateFormatSymbols.
private String getMonth(int month){
    return new DateFormatSymbols().getMonths()[month];
}
This section is optional, you can bypass it to continue with the rest of the code, implying no impact in the results.
Further you need to translate or convert the month into something else, for example, I’m a Spanish speaker, so I’d want the month in Spanish. This achievement will be done by creating a Map<Integer, String> variable.
private Map<Integer, String> monthTranslation = new HashMap<>();
I’ll populate this variable inside the onCreate method, remind to start from 0.
monthTranslation.put(0, "Enero");
monthTranslation.put(1, "Febrero");
monthTranslation.put(2, "Marzo");
monthTranslation.put(3, "Abril");
monthTranslation.put(4, "Mayo");
monthTranslation.put(5, "Junio");
monthTranslation.put(6, "Julio");
monthTranslation.put(7, "Agosto");
monthTranslation.put(8, "Septiembre");
monthTranslation.put(9, "Octubre");
monthTranslation.put(10, "Noviembre");
monthTranslation.put(11, "Diciembre");
Next, go to your method getMonth and make a get from your map variable (in my case is monthTranslation)
private String getMonth(int month) {
    return monthTranslation.get(month); Translation
}
And here you go, you got month in Spanish. Returning to our main objective.
The fourth point is adding a zero to the left in our day variable. I opt to complement the variable with a zero because my perception says it looks great.
One more method will be created, on our main class, with a string parameter and returning a string. The logic is checking the parameter length, if it’s lower than 2, that is 1, then we add a zero behind the parameter, and otherwise stay the same. I made use of ternary operator to avoid adding unnecessary lines.
private String addLeftZero(String s) {
    String newString = (s.length() < 2) ? "0"+s : s;
    return newString;
}
The final part is joining everything together inside the datepicker implementation. We’ll convert day and year to string, month stay integer but is parameter for our method getMonth.
String day is parameter of addLeftZero method, to lastly concatenate everything together in the textview.
So your code should be like this
    public void pickDateOnClick(View view) {
        final Calendar c = Calendar.getInstance();
        mYear = c.get(Calendar.YEAR);
        mMonth = c.get(Calendar.MONTH);
        mDay = c.get(Calendar.DAY_OF_MONTH);

        DatePickerDialog datePickerDialog = new DatePickerDialog(this,
                 new DatePickerDialog.OnDateSetListener() {
            @Override
            public void onDateSet(DatePicker datePicker, int year, int month, int day) {
                String sDay = String.valueOf(day);
                String sMonth = getMonth(month);
                String sYear = String.valueOf(year);

                sDay = addLeftZero(sDay);

                birthday.setText(sMonth + " " + sDay + ", " + sYear);
            }
        }, mYear, mMonth, mDay);
        datePickerDialog.show();
    }
I almost forget it!, don’t miss to add a show to your datepicker variable, contrarily it won’t be shown in your screen.
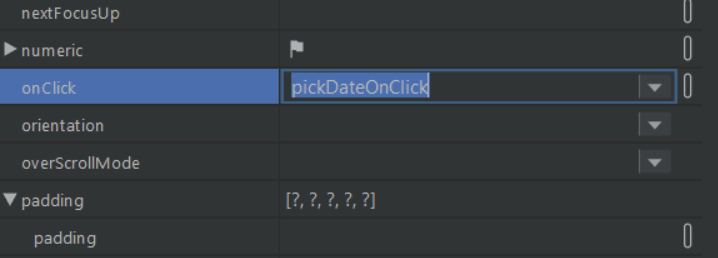
To finalize all functionality, we return to the design, select your textview appointed to be the datepicker and look for the onClick attribute on the attributes menu, editing it with the datepicker method name.
All code shown here is public on github, feel free to make use of it.


Top comments (0)