
I started this project with two goals:
Solidify my understanding of GraphQL.
Learn and implement Apollo Server/Client.
I decided to take a deep dive into Apollo, gain a better understanding of its use cases and figure out how to make it play nice with other technologies. In my opinion, the best way to learn a technology is to build something with said tech — then write about it.
We're going to be building a currency exchange with a GraphQL server. We'll use MongoDB/Mongoose to persist our data. We'll implement ApolloServer on the backend and ApolloClient on the front. ApolloClient will provide us with our remote data — React, our local state. Apollo provides an InMemoryCache that we'll utilize on the frontend.
We'll extract our currency data from the Alpha Vantage Finance API. If you are looking for a wider range of options, this review article also covers other stock and currency APIs for you to consider. With this data we'll allow users to buy long, or sell short currency pairs. Later, we'll use Chartjs to implement, well, a chart. 😉
Let's get to work!
We're going to need to install a few dependencies. I'll go over each one in depth as we need them, but for now let's just get them installed.
Create a new project folder and run the following command in your terminal:
npm init -y
Now that we have a package.json file, let's get to the business of installing our dependencies.
First, let's install nodemon as a dev dependency.
npm i -D nodemon
Now for the rest:
npm i apollo-datasource apollo-datasource-rest apollo-server-express bcryptjs express express-session graphql isemail mongoose
Head into package.json, remove the test script and add the following:
  "scripts": {
    "start": "nodemon index.js"
  },
Create an index.js file and add the below code:
  // index.js

  const app = require('express')()

  app.get('/', (req, res) => res.send('Hello world!'))

  const PORT = 4000

  app.listen(PORT, () => console.log(`Server running on port ${PORT}`))
Type npm start into your terminal, then head to localhost:4000. Greeting you should be no other than the ancient, solemn ritual that is, 'Hello World!' With the ritualistic niceties out of the way, let's get to Apollo.
Right now we're just running an express server. Apollo doesn't require us to install express. The reason I've decided to do so is because I'd like to integrate express-session. For this reason, we're utilizing express and apollo-server-express instead of apollo-server.
Head over to Alpha Vantage and grab your API key. It's very simple. Click on the green 'GET YOUR FREE API KEY TODAY' button and you'll be all set.

The advantages of Apollo will unveil themselves as we begin to work with it. Head to index.js and make the following adjustments:
  // index.js

  const app = require('express')()
  const { ApolloServer } = require('apollo-server-express')

  const typeDefs = require('./typeDefs')
  const resolvers = require('./resolvers')
  const CurrencyAPI = require('./datasources/currencies')

  const server = new ApolloServer({
    typeDefs,
    resolvers,
    dataSources: () => ({
      currencyAPI: new CurrencyAPI()
    })
  })

  server.applyMiddleware({ app })

  app.listen(PORT, () => {
    console.log(`🚀 Server ready at http://localhost:4000${server.graphqlPath}`)
  })
We import the ApolloServer class from apollo-server-express and store a new instance in a variable named server. We also import three local files we still have to create. We pass our GraphQL schema (or typeDefinitions) to the typeDefs property on the ApolloServer configuration Object. We do the same for our resolvers and dataSources (this will be explained in detail). Afterwards, we pass app as our lone middleware — for now.
Create a new file named typeDefs.js and add the following:
  // typeDefs.js

  const { gql } = require('apollo-server-express')

  const typeDefs = gql`
    type Query {
      currencyPairInfo(fc: String, tc: String): PairDisplay!
    }

    type PairDisplay {
      fromCurrency: String!
      fromCurrencyName: String
      toCurrency: String!
      toCurrencyName: String
      exchangeRate: String
      lastRefreshed: String
      timeZone: String
      bidPrice: String
      askPrice: String
    }
  `

  module.exports = typeDefs
Unlike a REST API, GraphQL uses only one route. You don't ping different endpoints for each task. Instead, the schema (or typeDefs) describe exactly what data you want and how you want to receive it.
When working with GraphQL there's three things you must understand: Queries, Mutations, and resolvers. Everything revolves around them. You can think of it as GraphQL queries describe how you get data, and GraphQL mutations describe how you mutate (post/put/delete) data. You describe exactly what variables are needed (if any) and what the response should look like. Resolvers are just functions that handle the execution of queries and mutations.
Declare what you want then write the function to do it.
In the query above we're making GraphQL aware that whenever we ask for currencyPairInfo, that two arguments may or may not be provided. After the colon we declare that the response should be returned in the shape described by the type that we name PairDisplay. The exclamation mark at the end declares that this response is required.
I didn't make the arguments to currencyPairInfo required because we're going to set default parameters on the request. We'll set the default parameter for fc (fromCurrency) to EUR and tc (toCurrency) to USD. If we wanted these arguments to be required, we'd simply add an exclamation mark after the type like so: String!.
Let's add our resolvers. Create a new file named resolvers.js and add the following code:
// resolvers.js

const resolvers = {
  Query: {
    currencyPairInfo: async (_, { fc, tc }, { dataSources }) => {
      try {
        const currencyPairs = await dataSources.currencyAPI.getCurrencyPair(fc, tc)
        return currencyPairs
      } catch (error) { throw err }
    }
  }
}

module.exports = resolvers
In GraphQL, resolvers have access to the context. The context is an Object shared by all resolvers. It's useful for keeping track of things such as authentication info, the current user, database connections, and data sources. The context is available as the third argument of each resolver.
A resolvers function signature:
- First argument = parent.
- Second argument = args.
- Third argument = context.
It's considered best practice to keep your resolvers clean and concise, so we abstract the heavy lifting out to another file. This is the file we imported into index.js and still need to create. Data sources get access to the GraphQL context. This is why we don't have to import it into resolvers.js. We just destructor it from the context Object.
Create a new folder named datasources. Inside make a new file and name it currencies.js. Add the below code:
// currencies.js

const { RESTDataSource } = require('apollo-datasource-rest')
const keys = require('../config/keys')

class CurrencyAPI extends RESTDataSource {
  constructor() {
    super()
    this.baseURL = ''
  }

  async getCurrencyPair(fc='EUR', tc='USD') {
    try {
      const data = await this.get(`https://www.alphavantage.co/query?
function=CURRENCY_EXCHANGE_RATE&from_currency=${fc}
&to_currency=${tc}&apikey=${keys.alphaVantageAPIKey}`),
            response = data['Realtime Currency Exchange Rate'],
            fromCurrency = response['1. From_Currency Code'],
            fromCurrencyName = response['2. From_Currency Name'],
            toCurrency = response['3. To_Currency Code'],
            toCurrencyName = response['4. To_Currency Name'],
            exchangeRate = response['5. Exchange Rate'],
            lastRefreshed = response['6. Last Refreshed'],
            timeZone = response['7. Time Zone'],
            bidPrice = response['8. Bid Price'],
            askPrice = response['9. Ask Price']
      return data && response && {
          fromCurrency,
          fromCurrencyName,
          toCurrency,
          toCurrencyName,
          exchangeRate,
          lastRefreshed,
          timeZone,
          bidPrice,
          askPrice
        }
    } catch (err) { throw err }
  }
}

module.exports = CurrencyAPI
We import RESTDataSource from apollo-datasource-rest. We extend this class (create a child class) to define our data source. An Apollo data source is a class that encapsulates all of the data fetching logic, as well as caching and deduplication for a particular service.
From the docs:
The Apollo RESTDataSource also sets up an in-memory cache that caches responses from our REST resources with no additional setup. We call this partial query caching. What's great about this cache is that you can reuse existing caching logic that your REST API exposes. Apollo REST data sources also have helper methods that correspond to HTTP verbs like
GETandPOST.
We'll discuss this cache in more detail once we get to ApolloClient.
All this file does is fetch some data from the Alpha Vantage API. We extend the RESTDataSource class and in our contructor function we initialize our baseURL. baseURL is given to us curtesy of Apollo. A simple example of how this is useful, is if we had two methods in this class that had to hit separate endpoints of the same URL.
For instance:
  constructor() {
    super()
    this.baseURL = 'https://github.com/'
  }

  // Later in some method
  this.get('marlonanthony') // https://github.com/marlonanthony

  // In some other method
  this.get('peggyrayzis') // https://github.com/peggyrayzis
You can also set URL's dynamically. Let's take a look at an example from the docs:
  get baseURL() {
    if (this.context.env === 'development') {
      return 'https://movies-api-dev.example.com/';
    } else {
      return 'https://movies-api.example.com/';
    }
}
After our constructor function we implement the method we called in our resolver, getCurrencyPair. This method is responsible for fetching our realtime currency exchange rate data. We utilize the URL given to us by Alpha Vantage, add our arguments and our API key.
The Alpha Vantage API is free, which means convienent. That said, their naming conventions are a bit goofy and require us to use bracket notation, hence the verbosity.
By default Apollo Server supports GraphQL Playground. The Playground is an interactive, in-browser GraphQL IDE for exploring your schema and testing your queries/mutations. Think Postman but for GraphQL.
Start your server with npm start. Then head to localhost:4000/graphql and take a look.

On the left side of the play button we declare that we want to query some data. We then explain which query and provide the necessary arguments. If you press control + spacebar (on Mac), you should get autocomplete suggestions for your schema. Afterwards, we declare what data we want returned. Once you press the play button you'll see the response on the right half of the playground.
Inside of our getCurrencyPair method, we define everything that is possible to return from this query. The difference between GraphQL and REST is that if we wished, we could limit our request to any slice of this data we like.
Sweet! We're fetching realtime currency exchange rates from the Alpha Vantage API! That said, we're not done here. I stated earlier that we'd be implementing a chart to display a monthly time series of currency pair data. To do this we need to add another method to our CurrencyAPI class.
  // currencies.js

  async getMonthlyTimeSeries(fc='EUR', tc='USD') {
    try {
      const data = await this.get(`https://www.alphavantage.co/query?
function=FX_MONTHLY&from_symbol=${fc}&to_symbol=${tc}&apikey=${keys.alphaVantageAPIKey}`),
            timeSeries = data && data['Time Series FX (Monthly)'],
            timesArray = timeSeries && Object.keys(timeSeries).reverse(),
            valuesArray = timeSeries && Object.values(timeSeries).map(val => val['4. close']).reverse()

      return { timesArray, valuesArray }

    } catch (error) { throw error }
  }
Here we utilize a different Alpha Vantage endpoint. We provide the arguments and API key as we did before. We return an object containing two arrays, the timesArray (x-axis) and the valuesArray (y-axis). This is all we need for our chart.
We need to make a resolver to call this method and add a query to our typeDefs. Head into typeDefs.js and adjust the query type to the following:
// typeDefs.js

  type Query {
    currencyPairInfo(fc: String, tc: String): PairDisplay!
    monthlyTimeSeries(fc: String, tc: String): TimeSeries!
  }
Here we expect to receive a fromCurrency (fc) and toCurrency (tc) argument. Again, we don't make the arguments required because we just set default parameters on the request. The reason I chose to do this is so that when a person navigates to the chart, the page will load with data instead of being blank until the user enters a currency pair.
Our monthlyTimeSeries query requires us to return data of the type TimeSeries. Let's define exactly what this is. Add the following type to typeDefs.js:
// typeDefs.js

  type TimeSeries {
    timesArray: [String!]!
    valuesArray: [String!]!
  }
Here we declare that two arrays must be returned and that those arrays must be filled with Strings. Both the string and the arrays are required (!).
Lastly, let's add our resolver. Adjust resolvers.js such that it resembles the following:
// resolvers.js

  const resolvers = {
    Query: {
      currencyPairInfo: async (_, { fc, tc }, { dataSources }) => {
        try {
          const currencyPairs = await dataSources.currencyAPI.getCurrencyPair(fc, tc)
          return currencyPairs
        } catch (error) { throw err }
      },
      monthlyTimeSeries: async (_, { fc, tc }, { dataSources }) => {
        try {
          const timeSeries = await dataSources.currencyAPI.getMonthlyTimeSeries(fc, tc)
          return timeSeries
        } catch (error) { throw error }
      }
    }
  }

module.exports = resolvers
Open up GraphQL Playground and query monthlyTimeSeries.

The GraphQL pattern should be becoming clear by now.
- Create a query/mutation.
- Create a resolver to handle said query/mutation.
And like that we're done with the Alpha Vantage API!
We're slowly getting familiar with GraphQL and Apollo. Let's get a little more comfortable and tackle authentication. Handling authentication/authorization is a well-covered topic. We'll simply focus on integration with Apollo.
The first thing we should do is create a database. We'll be using MongoDB/Mongoose. Head to MongoDB Atlas and sign up/sign in. Creating a remote database with Atlas is fairly straightforward. Once you login, click on the 'New Project' button. From here just choose your cloud provider of choice, select your region, and name your cluster. Once your cluster is built, click the connect button. Whitelist your IP address and create an admin user for the project. Choose the 'Connect Your Application' option and copy the connection string provided. Finally, click on the 'collections' button. This is where we'll see our data.
Replace <password> in your connection string with your user password but store it in a variable and place it in either an env file or a config folder. As long as you don't push it to GitHub.
Let's connect to our database and define our user schema. Back in index.js import mongoose, import your MongoDB password, then adjust index.js to the following:
// index.js

const app = require('express')()
const { ApolloServer } = require('apollo-server-express')
const mongoose = require('mongoose')

const typeDefs = require('./typeDefs')
const resolvers = require('./resolvers')
const CurrencyAPI = require('./datasources/currencies')
const { mongoPassword } = require('./config/keys')

const server = new ApolloServer({
  typeDefs,
  resolvers,
  dataSources: () => ({
    currencyAPI: new CurrencyAPI()
  })
})

server.applyMiddleware({ app })

mongoose
.connect(`mongodb+srv://marlon:${mongoPassword}@cluster0-o028g.mongodb.net/forex?retryWrites=true&w=majority`, { useNewUrlParser: true })
.then(() => app.listen(4000, () => {
  console.log(`🚀 Server ready at http://localhost:4000${server.graphqlPath}`)
})).catch(err => console.log(err))
You'll notice that at the end of the URL we added a bit of configuration to rid ourselves of that pesky MongoDB/Mongoose warning. Once you save index.js we'll be connected to our database.
Now for the schema. Create a folder named models. Inside of models create a new file named User.js and insert the following:
// User.js

const mongoose = require('mongoose')
const Schema = mongoose.Schema

const User = new Schema({
  email: {
    type: String,
    required: true
  },
  password: {
    type: String,
    required: true
  },
  name: {
    type: String,
    required: true
  },
  bankroll: {
    type: Number,
    default: 1000000,
    required: true
  },
  pairs: [
    {
      type: Schema.Types.ObjectId,
      ref: 'Pair'
    }
  ]
}, {
  timestamps: true
})

module.exports = mongoose.model('User', User)
We import the Schema class from mongoose and create a new instance with which we name User. Afterwards, we define our schema. Each user will have an ID gifted to them by MongoDB so we need not define it. Users will have to provide an email, password, and name. We start each user off with a million bucks — because we can. Each user will want to track which currency pair positions they've opened. We assign a pairs property that will provide us an array of IDs for each pair a user opens. Finally, by adding timestamps: true to our schema, Mongoose provides us with two properties: createdAt and updatedAt.
Create a new file in the models folder and name it Pair.js. Inside write the following code:
// Pair.js

const mongoose = require('mongoose')
const Schema = mongoose.Schema

const Pair = new Schema({
  user: {
    type: Schema.Types.ObjectId,
    ref: 'User'
  },
  pair: {
    type: String,
    required: true
  },
  lotSize: {
    type: Number,
    required: true
  },
  position: {
    type: String,
    required: true
  },
  openedAt: {
    type: Number,
    required: true
  },
  closedAt: {
    type: Number,
  },
  pipDif: {
    type: Number,
  },
  profitLoss: {
    type: Number
  },
  open: {
    type: Boolean,
    required: true,
    default: false
  }
}, {
  timestamps: true
})

module.exports = mongoose.model('Pair', Pair)
We store the users ID in a property called user. The pair property will look something like this: EUR/USD. lotSize is the amount of money the user placed on the position. position is either 'long' or 'short.' pipDif will be explained in detail later but for now just know that it's how we'll calculate the relative difference in value between a currency pair, and therefore the profit/loss of a position. open informs us whether or not the position has been closed.
Open up typeDefs.js and add two types: User and Pair.
// typeDefs.js

  type User {
    id: ID!
    email: String!
    name: String!
    bankroll: Float!
    pairs: [Pair]
    createdAt: String!
    updatedAt: String!
  }

  type Pair {
    id: ID!
    user: ID!
    pair: String!
    lotSize: Int!
    position: String!
    openedAt: Float!
    closedAt: Float
    pipDif: Float
    profitLoss: Float
    open: Boolean!
    createdAt: String!
    updatedAt: String!
  }
For the most part, if something is required in your model schema, then it should probably be required in your GraphQL schema.
Time to add our first mutation. Inside typeDefs.js add the Mutation type.
// typeDefs.js

  type Mutation {
    register(email: String!, password: String!, name: String!): Boolean!
  }
The user must submit an email, password, and their name. We return true or false depending on the success of a users registration.
We've handled the typeDefs, now for the resolver. We'll need to add a Mutation property to our resolvers Object.
// resolvers.js

const resolvers = {
  Query: {
    currencyPairInfo: async (_, { fc, tc }, { dataSources }) => {
      try {
        const currencyPairs = await dataSources.currencyAPI.getCurrencyPair(fc, tc)
        return currencyPairs
      } catch (error) { throw err }
    },
    monthlyTimeSeries: async (_, { fc, tc }, { dataSources }) => {
      try {
        const timeSeries = await dataSources.currencyAPI.getMonthlyTimeSeries(fc, tc)
        return timeSeries
      } catch (error) { throw error }
    }
  },

  Mutation: {
    register: async (_, { email, password, name }, { dataSources }) => {
      try {
        const newUser = await dataSources.userAPI.createNewUser({ email, password, name })
        return newUser
      } catch (error) { throw error }
    },
  }
}

module.exports = resolvers
Again we keep our resolvers clean and abstract the heavy lifting to another file. But what file? RESTDataSource is responsible for fetching data from a REST API. This is not what we're doing here. Apollo allows us to create custom data sources with the generic apollo-datasource package. This is what we'll be using.
Create a new file in the datasources folder and name it user.js.
// user.js

const { DataSource } = require('apollo-datasource')
const { UserInputError } = require('apollo-server-express')
const isEmail = require('isemail')
const bcrypt = require('bcryptjs')

const User = require('../models/User')

class UserAPI extends DataSource {

  // gain access to the GraphQL context
  initialize(config) {
    this.context = config.context
  }

  async createNewUser({ email, password, name }) {
    try {
      if(!isEmail.validate(email)) { throw new UserInputError('Invalid Email!') }
      const existingUser = await User.findOne({ email })
      if(existingUser) { throw new UserInputError('User already exist!') }
      const hashedPassword = await bcrypt.hash(password, 12)
      const user = await new User({
        name,
        email,
        password: hashedPassword
      })
      await user.save()
      return true
    } catch (error) { throw error }
  }
}

module.exports = UserAPI
First, we import Apollo's DataSource class. We then create a subclass by extending DataSource and name it UserAPI. Apollo grants us access to the context from inside this class by adding the initialize function. This is a function that gets called by ApolloServer when being setup. This function gets called with the datasource config including things like caches and context. This allows us to utilize this.context, granting us access to the request context, so we can know about the user making requests.
We also import UserInputError from apollo-server-express. This allows us to differentiate between error types. Apollo Client distinguishes two kinds of errors: graphQLErrors and networkError. Let's take a look at a blog post written by the Apollo team last year.
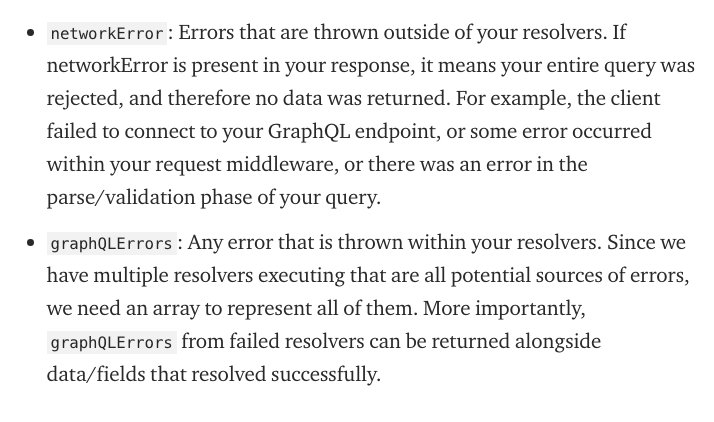
What about these graphQLErrors thrown in our resolvers? Again, let's take a look at this blog post.

We import isemail to ensure a valid email was provided. We also import bcrypt to hash user passwords before saving them to the database. Lastly, we import our User schema.
Head to index.js and import our newly created data source. Then add a new instance of our UserAPI class to ApolloServer's configuration Object:
// index.js

const UserAPI = require('./datasources/user')

const server = new ApolloServer({
  typeDefs,
  resolvers,
  dataSources: () => ({
    currencyAPI: new CurrencyAPI(),
    userAPI: new UserAPI()
  })
})
Save your files and take a look at the GraphQL Playground.

If you try to register the same user twice, you should get the UserInputError we defined earlier ("User already exist!"). You should also be able to see our newly created user in the database. Now that we can register users, let's get them logged in.
We'll be using express-session to keep track of our user. The idea is that once a user successfully logs in, we'll attach the users id to the session on the request Object. We'll gain access to the request Object curtesy of the context Object in our resolvers, or via this.context in our UserAPI Class — once we place it on the context.
Head to index.js and make the following adjustments:
// index.js

const app = require('express')()
const { ApolloServer } = require('apollo-server-express')
const mongoose = require('mongoose')
// Import express-session
const session = require('express-session')

const typeDefs = require('./typeDefs')
const resolvers = require('./resolvers')
const CurrencyAPI = require('./datasources/currencies')
const UserAPI = require('./datasources/user')
// import your session secret
const { mongoPassword, secret } = require('./config/keys')

const server = new ApolloServer({
  typeDefs,
  resolvers,
  dataSources: () => ({
    currencyAPI: new CurrencyAPI(),
    userAPI: new UserAPI()
  }),
  // add req Object to context
  context: ({ req }) => ({ req })
})

// add express-session to middleware
app.use(session({
  secret,
  resave: false,
  saveUninitialized: false
}))

// add cors to middleware
server.applyMiddleware({
  app,
  cors: {
      credentials: true,
      origin: 'http://localhost:3000'
  }
})

mongoose
.connect(`mongodb+srv://marlon:${mongoPassword}@cluster0-o028g.mongodb.net/forex?retryWrites=true&w=majority`, { useNewUrlParser: true })
.then(() => app.listen(4000, () => {
  console.log(`🚀 Server ready at http://localhost:4000${server.graphqlPath}`)
})).catch(err => console.log(err))
Import express-session then create and import your session secret. Any String will do. Then add the request Object to the context and pass our express-session and cors middleware.
Let's add login to our typeDefs.
// typeDefs.js

type Mutation {
  register(email: String!, password: String!, name: String!): Boolean!
  login(email: String!, password: String!): User
}
The login resolver:
// resolvers.js

Mutation: {
  register: async (_, { email, password, name }, { dataSources }) => {
    try {
      const newUser = await dataSources.userAPI.createNewUser({ email, password, name })
      return newUser
    } catch (error) { throw error }
  },
  login: async (_, { email, password }, { dataSources }) => {
    try {
      const user = await dataSources.userAPI.loginUser({ email, password })
      return user
    } catch (error) { throw error }
  },
}
Head to datasources/user.js and add a method named loginUser to the UserAPI class.
// datasources/user.js

async loginUser({ email, password }) {
  try {
    if (!isEmail.validate(email)) { throw new UserInputError('Invalid Email') }
    const user = await User.findOne({ email })
    if(!user) { throw new UserInputError('Email or password is incorrect!') }
    const isEqual = await bcrypt.compare(password, user.password)
    if(!isEqual) { throw new UserInputError('Email or password is incorrect!') }
    this.context.req.session.userId = user.id
    return user
  } catch (error) { throw error }
}
We validate the email with isemail. Next, we compare the given password with the hashed password from the database. If all goes well, we place a userId property on req.session. This is how we'll keep track of our user. I'm returning the entire user Object here for the sake of simplicity. That said, in a production app you'd never want to return the users password.
Head to the GraphQL Playground and run the login mutation.

The way we'll keep track of the user on the frontend is with a me query. This me query will tell us which user is attempting to perform an action, hence allowing us to decide whether this user has authorization to perform said action.
Let's get to it!
First, add the me query to typeDefs.js.
// typeDefs.js

type Query {
  currencyPairInfo(fc: String, tc: String): PairDisplay!
  monthlyTimeSeries(fc: String, tc: String): TimeSeries!
  me: User
}
Add me query to the resolvers Query Object.
// resolvers.js

me: async (_, __, { dataSources }) => {
  try {
    const user = await dataSources.userAPI.getMe()
    return user
  } catch (error) { throw error }
},
Next, we need to add the getMe method to our data source. Head to datasources/user.js and add the following:
// datasources/user.js

  async getMe() {
    try {
      if(!this.context.req.session.userId) return null
      const user = await User.findById(this.context.req.session.userId)
      return user
    } catch (error) { throw error }
  }
Now head back to the GraphQL Playground. Click on the settings gear icon at the top right of the playground and adjust "request.credentials" to: "request.credentials":"include". Log in then execute the me query and you should get back the logged in user.

Now log in with a different user and when you perform the me query, it'll provide the new users info. This is because on every request a new context is being built. Therefore, req.session.userId will always belong to the user that made the request.
Sweet! This is a good time to create a logout mutation. Let's get to it! Head to typeDefs.js and add the logout mutation.
// typeDefs.js

type Mutation {
  register(email: String!, password: String!, name: String!): Boolean!
  login(email: String!, password: String!): User!
  logout: Boolean
}
Add logout to the Mutation Object in resolvers.js.
// resolvers.js

Mutation: {
  register: async (_, { email, password, name }, { dataSources }) => {
    try {
      const newUser = await dataSources.userAPI.createNewUser({ email, password, name })
      return newUser
    } catch (error) { throw error }
  },
  login: async (_, { email, password }, { dataSources }) => {
    try {
      const user = await dataSources.userAPI.loginUser({ email, password })
      return user
    } catch (error) { throw error }
  },
  logout: async (_, __, { req }) => {
    try { req.session.destroy(() => false) }
    catch (error) { throw error }
  },
}
When a user clicks logout we destroy the session and return false. When you perform the logout Mutation you should get back null.
Behold! A user can log out!
Being this is a currency exchange, it'd probably be best if we allow users to exchange currency. 🤔 Open up typeDefs.js and add the openPosition mutation.
// typeDefs.js

type Mutation {
  register(email: String!, password: String!, name: String!): Boolean!
  login(email: String!, password: String!): User!
  logout: Boolean
  openPosition(pair: String!, lotSize: Int, openedAt: Float!, position: String!): PairUpdateResponse!
}
Now add PairUpdateResponse to typeDefs.js:
// typeDefs.js

type PairUpdateResponse {
  success: Boolean!
  message: String!
  pair: Pair!
}
When a user attempts to open a positon (buy/sell a currency pair), they'll get back a success response (true/false), a message describing the action taken, and information about the pair.
Add the openPosition mutation to resolvers.js.
// resolvers.js

openPosition: async (_, { pair, lotSize, openedAt, position }, { dataSources }) => {
  try {
    const open = await dataSources.userAPI.newPosition({
      pair,
      lotSize,
      openedAt,
      position
    })
    return open
  } catch (error) { throw error }
},
openPosition takes a few arguments. pair will look something like: 'EUR/USD'. lotSize is the size of the position you're taking (how much money you're placing on the position). openedAt is the price that you bought/sold at. position will be either 'long' or 'short' depending on if the user wants to buy long (bet the price will go up) or sell short (bet the price will go down).
Add the newPosition method to datasources/user.js, but first import AuthenticationError and ForbiddenError from apollo-server-express. We'll also need to import our Pair schema.
// datasources/user.js

const {
  UserInputError,
  AuthenticationError,
  ForbiddenError
} = require('apollo-server-express')

const Pair = require('../models/Pair')

async newPosition({ pair, lotSize, openedAt, position }) {
  try {
    const user = await User.findById(this.context.req.session.userId)
    if(!user) throw new AuthenticationError('Invalid Crendentials!')
    if(user.bankroll < lotSize) throw new ForbiddenError(`Insufficient funds!`)

    const newPair = new Pair({
      pair,
      lotSize,
      openedAt,
      position,
      open: true,
      user: this.context.req.session.userId
    })
    const pairResult = await newPair.save()
    user.pairs.unshift(pairResult)
    user.bankroll -= lotSize
    await user.save()
    const message = `Congrats ${user.name}! You've opened a ${position} position on ${pair} at ${openedAt}!`
    const success = true
    return { success, message, pair: pairResult }
  } catch (error) { throw error }
}
First we check if the user has enough money to complete the transaction. If they do we create the pair and add it to the pairs array. We subtract the position size from the users bankroll, and return a response in the shape of PairUpdateResponse.
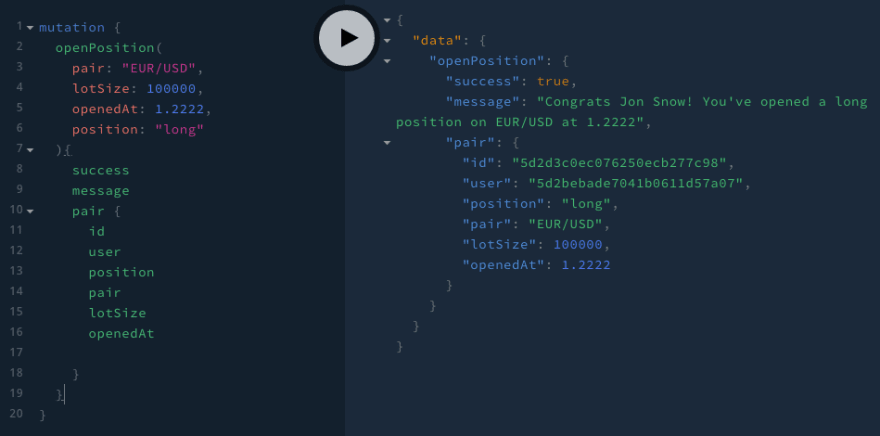
Open up GraphQL Playground, login and run the openPosition mutation.
Now that our users can open a position, it might be a good idea to provide a way of closing said position. Let's add a closePosition mutation to typeDefs.js.
// typeDefs.js

type Mutation {
  register(email: String!, password: String!, name: String!): Boolean!
  login(email: String!, password: String!): User!
  logout: Boolean
  openPosition(pair: String!, lotSize: Int, openedAt: Float!, position: String!): PairUpdateResponse!
  closePosition(id: ID!, closedAt: Float!): PairUpdateResponse!
}
The closePosition mutation takes as arguments the pair id and the exit price (closedAt). It then returns a response in the form of PairUpdateResponse.
Let's handle the resolver.
// resolvers.js

closePosition: async(_, { id, closedAt }, { dataSources }) => {
  try {
    const close = await dataSources.userAPI.exitPosition({ id, closedAt })
    return close
  } catch (error) { throw error }
},
Back to datasource/user.js to implement the exitPosition method.
// datasources/user.js

async exitPosition({ id, closedAt }) {
  try {
    const user = await User.findById(this.context.req.session.userId)
    if(!user) throw new AuthenticationError('Invalid credentials!')

    const pair = await Pair.findById(id)
    if(!pair) throw new AuthenticationError('Invalid credentials!')
    if(!pair.open) throw new ForbiddenError('Transaction already complete!')
    let pipDifFloat
    pair.position === 'long'
      ? pipDifFloat = (closedAt - pair.openedAt).toFixed(4)
      : pipDifFloat = (pair.openedAt - closedAt).toFixed(4)
    pair.pipDif = pipDifFloat
    pair.closedAt = closedAt
    pair.profitLoss = pipDifFloat * pair.lotSize
    pair.open = false
    const savedPair = await pair.save()

    user.bankroll += (pair.lotSize + savedPair.profitLoss)
    await user.save()

    const success = true
    const message = `${ savedPair.profitLoss > 0
      ? 'Congrats!'
      : ''
      } ${user.name} you've closed your ${savedPair.position} position on ${savedPair.pair} at ${closedAt}${ savedPair.profitLoss > 0
      ? '! For a profit of '+Math.round(savedPair.profitLoss)+'!'
      : '. For a loss of '+Math.round(savedPair.profitLoss)+'.'}`
    return { success, message, pair: savedPair }
  }
  catch (error) { throw error }
}
Once we find our pair we create a variable named pipDifFloat. If the position is long, we subtract the openedAt price from the closedAt price. If the position is short, we subtract the closedAt price from the openedAt price. We store the result in pipDifFloat then set the pairs pipDif property to pipDifFloat.
Next, we set the closedAt price and calculate the profitLoss by multiplying the pipDifFloat by the lotSize. Afterwards, we set the open property to false and save our pair. Once we save the pair we adjust the users bankroll accordingly. finally, we return PairUpdateResponse and give the user the good/bad news.
Take a look at the GraphQL Playground:

We're making some serious progress. Let's make some more!
We have two related queries left so let's tackle them together. Inside typeDefs.js adjust the Query type to the following:
// typeDefs.js

type Query {
  currencyPairInfo(fc: String, tc: String): PairDisplay!
  monthlyTimeSeries(fc: String, tc: String): TimeSeries!
  me: User
  findPair(id: ID!): Pair!
  getPairs: [Pair!]
}
One query to get a pair by id. Another query to retreive all of a users pairs. Let's take care of the resolvers. Adjust the Query Object such that it resembles the below code:
// resolvers.js

Query: {
  currencyPairInfo: async (_, { fc, tc }, { dataSources }) => {
    try {
      const currencyPairs = await dataSources.currencyAPI.getCurrencyPair(fc, tc)
      return currencyPairs
    } catch (error) { throw err }
  },
  monthlyTimeSeries: async (_, { fc, tc }, { dataSources }) => {
    try {
      const timeSeries = await dataSources.currencyAPI.getMonthlyTimeSeries(fc, tc)
      return timeSeries
    } catch (error) { throw error }
  },
  me: async (_, __, { dataSources }) => {
    try {
      const user = await dataSources.userAPI.getMe()
      return user
    } catch (error) { throw error }
  },
  findPair: async (_, { id }, { dataSources }) => {
    try {
      const foundPair = await dataSources.userAPI.getPair({ id })
      return foundPair
    } catch (error) { throw error }
  },
  getPairs: async (_, __, { dataSources }) => {
    try {
      const foundPairs = await dataSources.userAPI.findPairs()
      return [...foundPairs]
    } catch (error) { throw error }
  },
},
On to datasources/user.js to define getPair and findPairs.
// datasources/user.js

async getPair({ id }) {
  try {
    const pair = await Pair.findById(id)
    if(!pair || pair.user.toString() !== this.context.req.session.userId) {
      throw new AuthenticationError('Invalid credentials!')
    }
    return pair
  } catch (error) { throw error }
}

async findPairs() {
  try {
    const pairs = await Pair
      .find({ user: this.context.req.session.userId })
      .sort({ updatedAt: -1 })
    if(!pairs.length) throw new UserInputError('Nothing to show!')
    return [...pairs]
  } catch (error) { throw error }
}
You should see something similar in the GraphQL Playground:


One last mutation and we're done with the backend! Our final specimen — addFunds. Users will want to add money to their account. Far be it from us to leave them wanting.
We'll start in typeDefs.js. Create the addFunds mutation and define its response type — AddFundsResponse.
// typeDefs.js

type Mutation {
  register(email: String!, password: String!, name: String!): Boolean!
  login(email: String!, password: String!): User!
  logout: Boolean
  openPosition(pair: String!, lotSize: Int, openedAt: Float!, position: String!): PairUpdateResponse!
  closePosition(id: ID!, closedAt: Float!): PairUpdateResponse!
  addFunds(amount: Int!): AddFundsResponse!
}

  type AddFundsResponse {
    success: Boolean!
    message: String!
    user: User!
  }
addFunds takes amount as a lone argument because we already know about the user via the context. Let's tackle our last resolver. Once we implement addFunds, our Mutation Object should resemble the following:
// resolvers.js

Mutation: {
  register: async (_, { email, password, name }, { dataSources }) => {
    try {
      const newUser = await dataSources.userAPI.createNewUser({ email, password, name })
      return newUser
    } catch (error) { throw error }
  },
  login: async (_, { email, password }, { dataSources }) => {
    try {
      const user = await dataSources.userAPI.loginUser({ email, password })
      return user
    } catch (error) { throw error }
  },
  logout: async (_, __, { req }) => {
    try { req.session.destroy(() => false) }
    catch (error) { throw error }
  },
  openPosition: async (_, { pair, lotSize, openedAt, position }, { dataSources }) => {
    try {
      const open = await dataSources.userAPI.newPosition({ pair, lotSize, openedAt, position })
      return open
    } catch (error) { throw error }
  },
  closePosition: async(_, { id, closedAt }, { dataSources }) => {
    try {
      const close = await dataSources.userAPI.exitPosition({ id, closedAt })
      return close
    } catch (error) { throw error }
  },
  addFunds: async (_, { amount }, { dataSources }) => {
    try {
      const weeee = await dataSources.userAPI.additionalFunds({ amount })
      return weeee
    } catch (error) { throw error }
  }
}
On to datasources/user.js:
// datasources/user.js

async additionalFunds({ amount }) {
  try {
    const user = await User.findById(this.context.req.session.userId)
    if(!user) throw new AuthenticationError('Invalid credentials!')
    user.bankroll += amount
    const savedUser = await user.save()
    const success = true
    const message = `Congrats ${user.name} you've added ${amount} to your bankroll!`
    return { bankroll: savedUser.bankroll, success, message }
  } catch (error) { throw error }
}
Your GraphQL Playground should look something like this:

Behold! We're done with the backend! The frontend awaits!
The code for this project is on my GitHub.


Top comments (1)
excited🤩 to learn something new from this article.