
If you’re going to do any serious amount of work with Vue, it’ll pay dividends in the long run to invest some time in setting up your coding environment. A powerful editor and a few well-chosen tools will make you more productive and ultimately a happier developer.
In this post, I’m going to demonstrate how to configure VS Code to work with Vue. I’m going to show how to use ESLint and Prettier to lint and format your code and how to use Vue’s browser tools to take a peek at what’s going on under the hood in a Vue app. When you’ve finished reading, you’ll have a working development environment set up and will be ready to start coding Vue apps like a boss.
Let’s get to it!
Want to learn Vue.js from the ground up? This article is an extract from our Premium library. Get an entire collection of Vue books covering fundamentals, projects, tips and tools & more with SitePoint Premium. Join now for just $9/month.
Installing and Setting Up Your Editor
I said that I was going to be using VS Code for this tutorial, but I’m afraid I lied. I’m actually going to be using VSCodium, which is an open-source fork of VS Code without the Microsoft branding, telemetry and licensing. The project is under active development and I’d encourage you to check it out.
It doesn’t matter which editor you use to follow along; both are available for Linux, Mac and Windows. You can download the latest release of VSCodium here, or download the latest release of VSCode here and install it in the correct way for your operating system.
Throughout the rest of this guide, for the sake of consistency, I’ll refer to the editor as VS Code.
Add the Vetur Extension
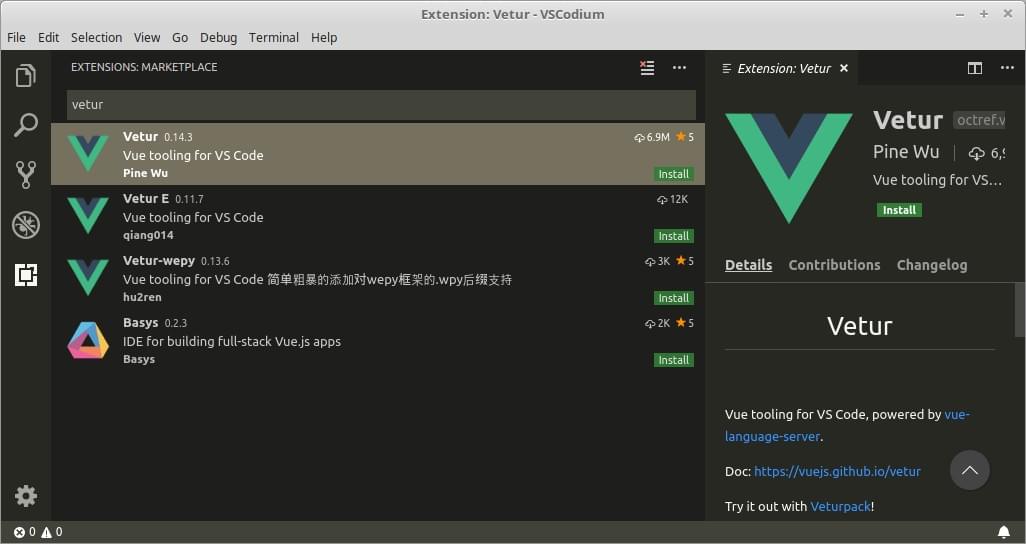
When you fire up the editor, you’ll notice a set of five icons in a toolbar on the left-hand side of the window. If you click the bottom of these icons (the square one), a search bar will open up that enables you to search the VS Code Marketplace. Type “vue” into the search bar and you should see dozens of extensions listed, each claiming to do something slightly different.
Depending on your use case, you might find something here to suit you. There are lots available. For example, TSLint for Vue could be handy if you’re working on a Vue project involving TypeScript. For now, I’m going to focus on one called Vetur.
Type “Vetur” into the search box and select the package authored by Pine Wu. Then hit Install.
Once the extension has installed, hit Reload to activate and you’re in business.
Exploring Vetur’s Features
If you visit the project’s home page, you’ll see that the extension gives you a number of features:
- syntax highlighting
- snippets
- Emmet
- linting/error checking
- formatting
- auto completion
- debugging
Let’s see some of these in action now.
Note: many of these features only work when you have a project set up. This means you need to create a folder to contain your Vue files, open the folder using VS Code and access the files via VS Code’s explorer.
Syntax highlighting
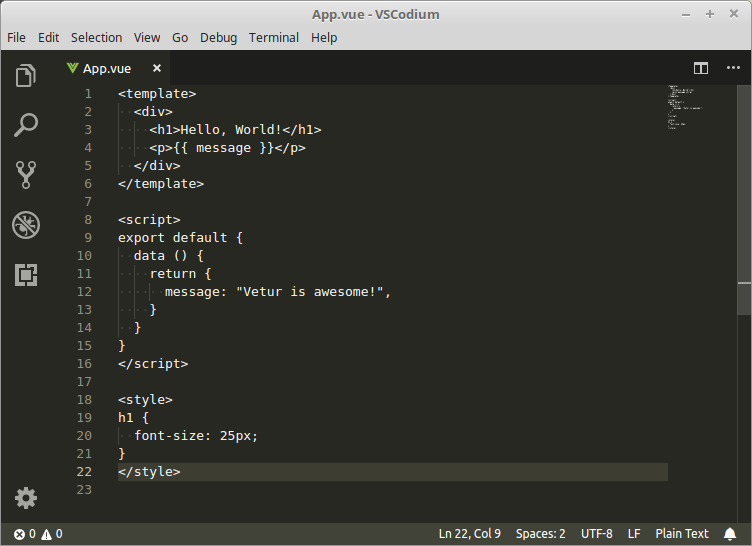
As your app grows, you’ll undoubtedly want to make make use of single-file components (SFCs) to organize your code. These have a .vue ending and contain a template section, a script section and a style section. Without Vetur, this is what an SFC looks like in VS Code:
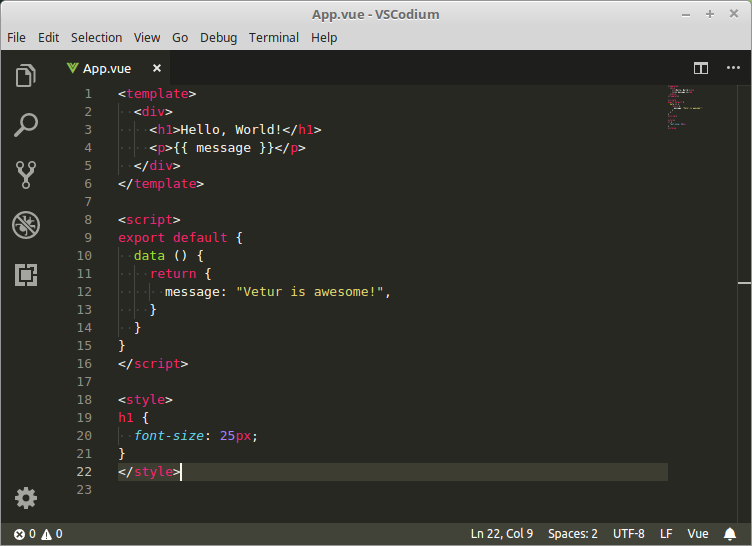
However, installing Vetur will make it look like so:
Snippets
As you can read on the VS Code website, snippets are templates that make it easier to enter repeating code patterns, such as loops or conditional-statements. Vetur makes it possible for you to use these snippets in single-file components.
It also comes with some snippets of its own. For example, try typing “scaffold” (without the quotes) into an area outside a language region and it will generate all the code you need to get going with an SFC:
<template>

</template>

<script>
export default {

}
</script>

<style>

</style>
Emmet
Emmet takes the idea of snippets to a whole new level. If you’ve never heard of this and spend any amount of time in a text editor, I’d recommend you head over to the Emmet website and spend some time acquainting yourself with it. It has the potential to boost your productivity greatly.
In a nutshell, Emmet allows you to expand various abbreviations into chunks of HTML or CSS. Vetur ships with this turned on by default.
Try clicking into a <template> region and entering the following:
div#header>h1.logo>a{site Name}
Then press Tab. It should be expanded to this:
<div id="header">
  <h1 class="logo"><a href="">sitename</a></h1>
</div>
Error Checking/Linting
Out of the box, Vetur offers some basic error checking. This can be handy for spotting typos in your code.
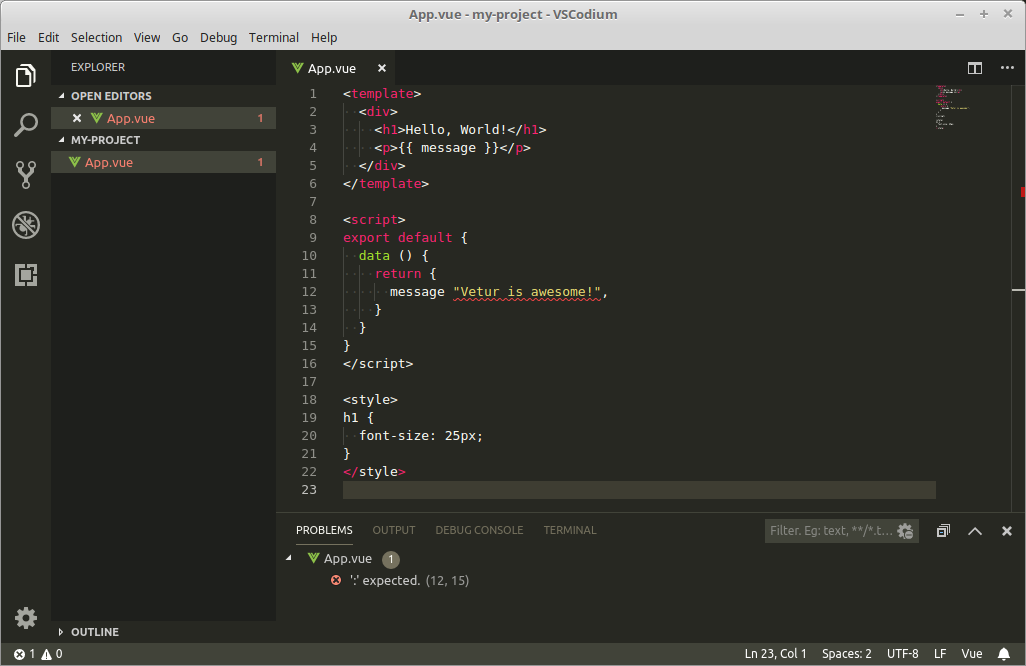
In the above example, Vetur has noticed that I’ve forgotten the colon following the object property name and has consequently underlined it in red. Opening up the error panel (click on the small cross in the bottom left-hand corner) gives you a description of the error.
Vetur also uses eslint-plugin-vue to lint templates. We’ll find out more about why linting your code is a good idea in the next section, but for now, let’s just see it in action.
Let’s add an items key to our data property:
export default {
  data () {
    return {
      message: "Vetur is awesome!",
      items: [
        { message: 'Foo' },
        { message: 'Bar' }
      ]
    }
  }
}
Then add some code to output it in our template:
<template>
  <div>
    <h1>Hello, World!</h1>
    <p>{{ message }}</p>

    <ul>
      <li v-for="item in items">
        {{ item.message }}
      </li>
    </ul>
  </div>
</template>
Straight away we’ll see that <li v-for="item in items"> is underlined in red. What gives?
Well, you can hover over the offending code, or open the error console to see what’s bothering Vetur.
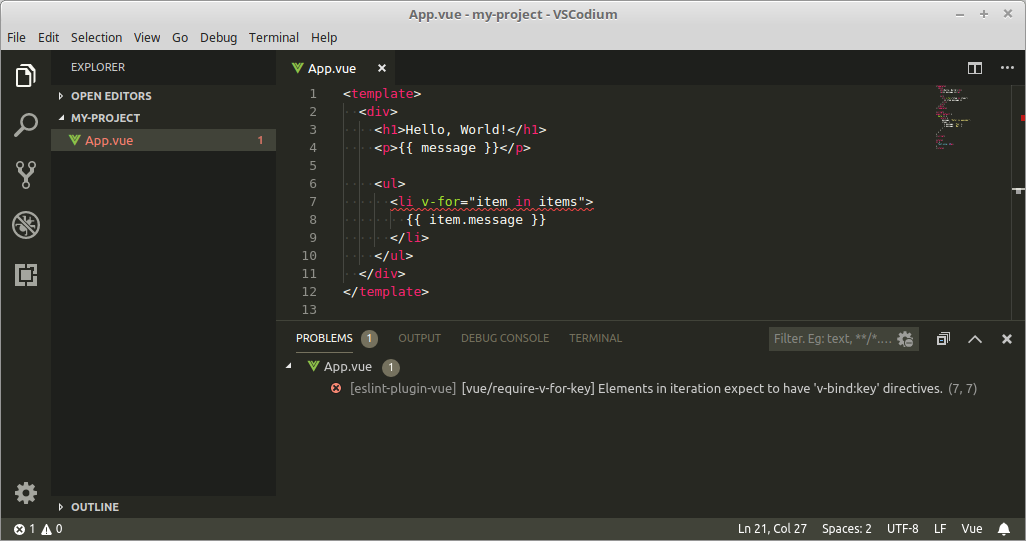
The error appears to be that we’ve forgotten to declare a key. Let’s remedy that:
<li v-for="(item, i) in items" :key="i">
  {{ item.message }}
</li>
And the error vanishes from our editor.
IntelliSense
IntelliSense is one of my favorite features in VS Code, but it’s limited to a few formats that the editor can understand. Installing Vetur makes IntelliSense available in your .vue file, which is mighty handy.
You can try this out by clicking into the <template> region of a Vue component and typing “v-” on any tag (minus the quotes). You should see this:
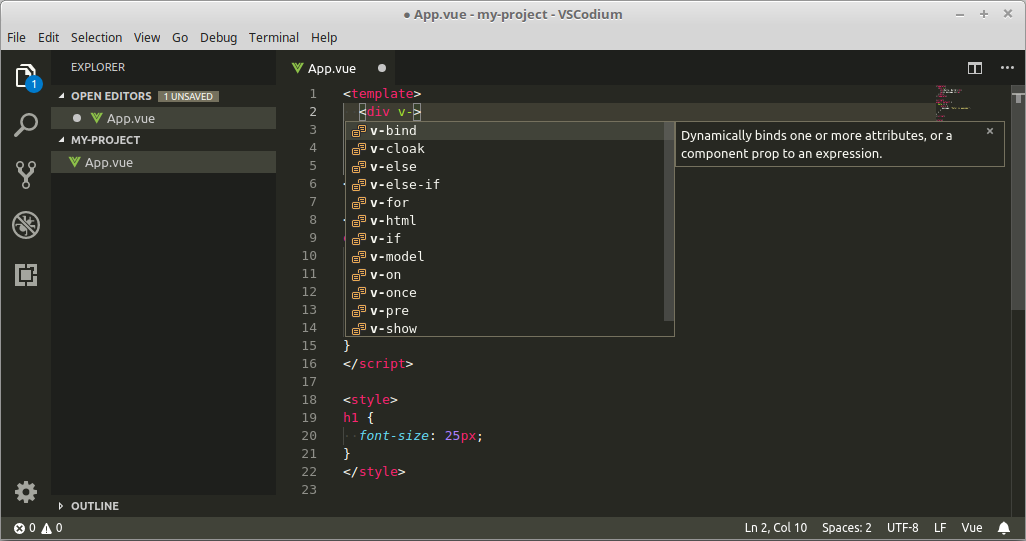
This allows you to select from any of the listed directives, and also provides you with an explanation of what each does.
That’s not all that Vetur can do, but we’ll leave the extension there and turn our attention to setting up a project with Vue’s CLI.
An Example Project with Vue CLI
When building a new Vue app, the best way to get up and running quickly is using Vue CLI. This is a command-line utility that allows you to choose from a range of build tools which it will then install and configure for you. It will also scaffold out your project, providing you with a pre-configured starting point that you can build on, rather than starting everything from scratch.
Note: if the CLI is new for you, you might like to check out our tutorial “A Beginner’s Guide to Vue CLI” in this Vue series.
To get started, you’ll need to have Node installed on your system. You can do this by downloading the binaries for your system from the official website, or using a version manager. I recommend the second of the two methods.
With Node installed, execute the following command:
npm install -g @vue/cli
And create a new Vue project with the command:
vue create my-project
This will open a wizard which asks you to choose a preset. Choose to manually select features, then accept the defaults for everything, apart from when you’re asked to pick a linter/formatter config. In this step, be sure to select ESLint + Prettier and Lint on save, and to place config files in package.json.
Linting Your Code with ESLint
If you open this newly created project and take a peek inside the package.json file, you’ll notice that the CLI has set up ESLint for you. This is a tool that can automatically check your code for potential problems. This provides many benefits, such as:
- keeping your code style consistent
- spotting potential errors and bad patterns
- enforcing quality when you follow a style guide
- saving time for all of the above reasons
Note: if you’d like to dive deeper into ESLint, check out our article “Up and Running with ESLint — the Pluggable JavaScript Linter”.
If you look at the devDependencies property in package.json, you’ll see that the CLI is also using eslint-plugin-vue. This is the official ESLint plugin for Vue.js, which is able to detect code problems in your .vue files.
Let’s put that to the test.
Start the Vue dev server with npm run serve and navigate to localhost:8080.
In VS Code, open up the project you just created with the CLI (File > Open Folder), then navigate to src/components/HelloWorld.vue in the VS Code explorer. Let’s add a method to our Vue instance:
export default {
  name: 'HelloWorld',
  props: {
    msg: String
  },
  methods: {
    sayHi() {
      console.log("hi");
    }
  }
}
Now, if you look at the terminal window in which the dev server is running, you’ll see Vue complaining.
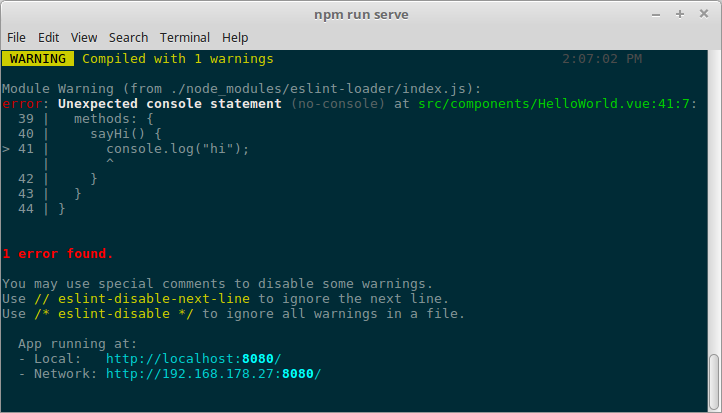
This is because, under the hood, Vue CLI has configured ESLint to use the eslint:recommended ruleset. This enables any rules marked with a check mark on the ESLint rules page, of which no-console is one.
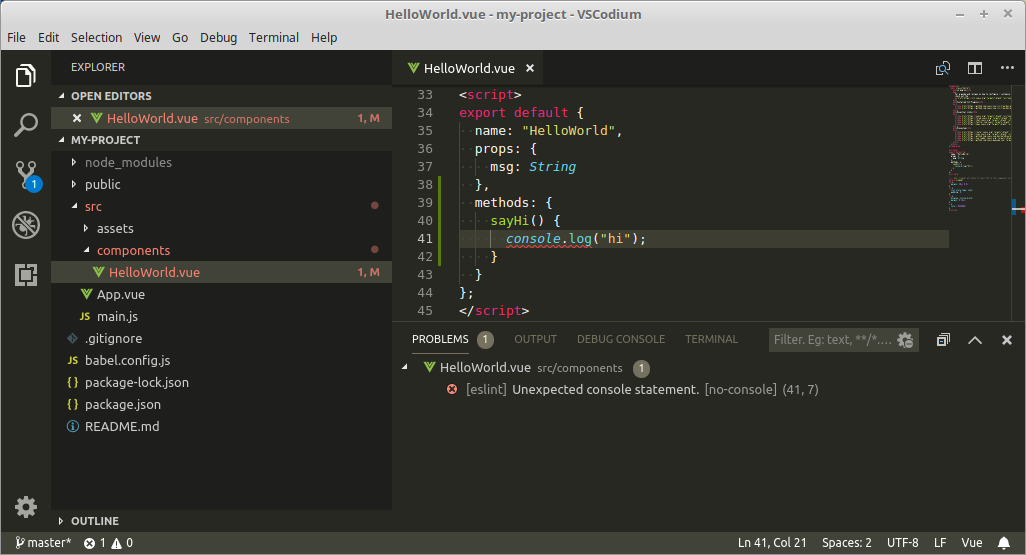
While it’s nice that the CLI shows us ESLint errors in the terminal, wouldn’t it’d be nicer if we could see them in our editor, too? Well, luckily we can. Hop back into VS code, click the extensions icon and type in “ESLint” (without the quotes). The top result should be for a package named ESLint by Dirk Baeumer. Install that and restart VS Code.
Finally, you’ll need to edit your VS Code preferences. Go to File > Preferences > Settings and edit the User Settings file and add the following configuration:
"eslint.validate": [
  "vue"
]
This will tell the ESLint plugin we just installed to perform validation for .vue files.
Should you desire, you can turn this (or any) rule off in the rules: {} section of package.json:
"eslintConfig": {
  ...
  "rules": {
    "no-console": 0
  },
  ...
}
Formatting Your Code with Prettier
Prettier is an opinionated code formatter. As you can read on the project’s home page, it enforces a consistent style by parsing your code and re-printing it with its own rules that take the maximum line length into account, wrapping code when necessary.
That might sound a little draconian at first, but once you get used to it, you literally never have to think about code formatting again. This is very useful if you’re part of a team, as Prettier will halt all the on-going debates over styles in their tracks.
Note: if you’re not convinced, you can read more about why you should use Prettier here.
The way Prettier works in conjunction with Vue CLI is similar to ESLint. To see it in action, let’s remove the semicolon from the end of the console.log("hi"); statement from our previous example. This should display a warning in the terminal:
warning: Insert `;` (prettier/prettier) at src/components/HelloWorld.vue:41:24:
  39 |   methods: {
  40 |     sayHi() {
> 41 |       console.log("hi")
     |                        ^
  42 |     }
  43 |   }
  44 | };

1 error and 1 warning found.
1 warning potentially fixable with the `--fix` option.
It will also display a warning in VS Code, thanks to the ESLint plugin we installed previously.
We can also have Prettier fix any formatting errors for us whenever we save a file. To do this, go to File > Preferences > Settings and edit the User Settings file to add the following configuration:
"editor.formatOnSave": true
Now when you press save, everything will be formatted according to Prettier’s standard rule set.
Note, you can configure a handful of rules in Prettier via a "prettier" key in your package.json file:
"prettier": {
  "semi": false
}
The above, for example, would turn the semicolon rule off.
You can read more about configuration options here.
Vue Browser Tools
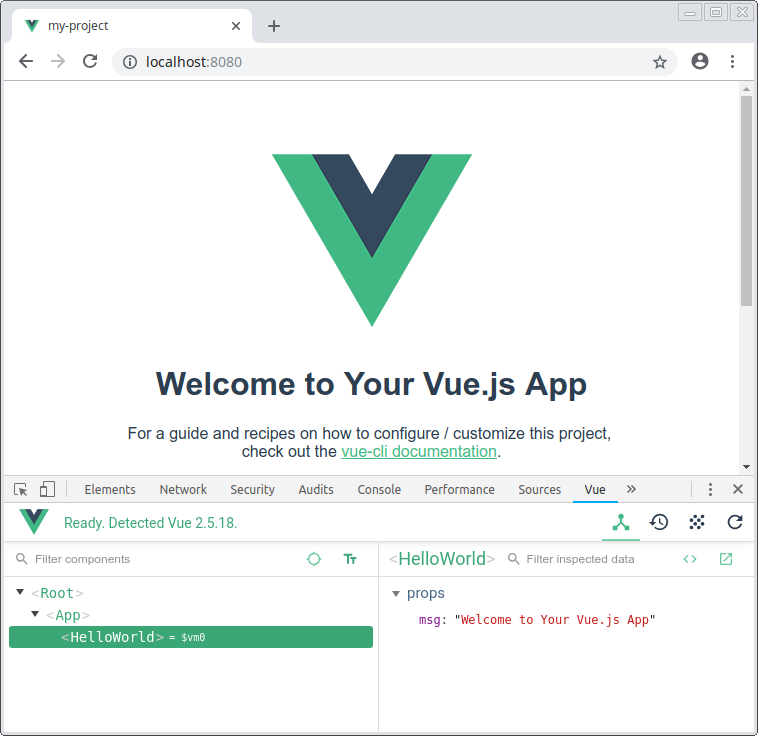
In this section, I want to take a look at the the Vue.js devtools, which are available as a browser plugin for both Chrome and Firefox, and as a cross-platform Electron app, which can also debug Vue apps running on mobile devices.
Once you have them installed, you can access them by visiting a running Vue app, opening your browser’s console and hitting the Vue button. You’ll then see three further sections: Components, Vuex and Events.
The first section gives you a hierarchical view of all the components that make up your application. Selecting a component from the tree allows you to inspect its state (for example, the props it received) in the right-hand pane. Some of its values (such as its data object) can be dynamically edited while the app runs.
The Vuex tab is only active if a Vuex store is detected in the application. (For more information on this, check out “Getting Started with Vuex: a Beginner’s Guide” in this Vue series.) It allows you to examine the state of the store at any point in time, and all the mutations that have been committed. You can even move back and forth through the mutations, effectively time traveling through the state of your application.
The Events tab aggregates all the events emitted by your application, from anywhere in the component tree. Selecting an event will display more information about it in the right-hand pane, allowing you to see which component emitted it and any payload that was sent.
There’s a lot more to Vue’s browser tools than I’ve demonstrated here, so I encourage you to install them and experiment with them as your application grows.
Conclusion
And that’s a wrap. In this guide, I’ve demonstrated how to install the Vetur plugin for VS Code and highlighted several of its features. I’ve also shown how to use Vue CLI to generate a project and how to use ESLint and Prettier to ensure code quality and consistency. We also took a brief look at Vue’s browser tools and saw how to inspect the state of a running Vue application, something which is important for debugging purposes.
This should see you well on the way to having a sensible environment for writing Vue applications and hopefully make you a productive and happy developer.
Frequently Asked Questions on Vue Development Environment
What are the key components of a Vue development environment?
A Vue development environment consists of several key components. First, you need Node.js, a JavaScript runtime that allows you to run JavaScript on your server or your machine. Next, you need npm (Node Package Manager) to manage your JavaScript packages. Vue CLI, the standard tooling for Vue.js development, is another essential component. It provides a full system for rapid Vue.js development. Lastly, you need a code editor like Visual Studio Code, which supports Vue.js development with features like syntax highlighting and IntelliSense.
How do I set up environment variables in Vue.js?
Environment variables in Vue.js can be set up using the .env files. These files should be in the root of your project and you can have different .env files for different environments. For example, you can have .env.development for development environment and .env.production for production environment. In these files, you can define your environment variables like VUE_APP_TITLE=My App. These variables can then be accessed in your application using process.env.VUE_APP_TITLE.
How do I use Vue CLI for setting up my development environment?
Vue CLI is a powerful tool that helps in setting up the development environment for Vue.js. First, you need to install Vue CLI globally on your machine using npm install -g @vue/cli. Once installed, you can create a new project using vue create my-project. This will set up a new Vue.js project with a basic development environment. You can then navigate into the project using cd my-project and start the development server using npm run serve.
What is the role of Node.js and npm in Vue.js development?
Node.js is a JavaScript runtime that allows you to run JavaScript on your server or your machine. It’s essential for Vue.js development as it allows you to use npm (Node Package Manager), which is used to manage JavaScript packages. npm provides a way to install, update, and use JavaScript libraries in your projects, including Vue.js and its associated libraries.
How can I configure my Vue.js application for different environments?
Vue.js allows you to configure your application for different environments using .env files. You can have different .env files for different environments like development, testing, and production. In these files, you can define environment-specific variables. These variables can then be accessed in your application using process.env. For example, if you have a variable VUE_APP_TITLE in your .env file, you can access it in your application using process.env.VUE_APP_TITLE.
How do I install Vue.js?
Vue.js can be installed using npm, the Node Package Manager. First, you need to install Node.js which comes with npm. Once Node.js is installed, you can install Vue.js globally on your machine using npm install -g vue. This will install the latest version of Vue.js and make it available globally on your machine.
What is Vue CLI and why is it important?
Vue CLI is the standard tooling for Vue.js development. It provides a full system for rapid Vue.js development, including features like scaffolding, a development server with hot module replacement, and a build system for production. It’s important because it simplifies the process of setting up a new Vue.js project and provides a consistent development environment.
How do I update Vue.js to the latest version?
You can update Vue.js to the latest version using npm, the Node Package Manager. First, you need to uninstall the current version of Vue.js using npm uninstall -g vue. Then, you can install the latest version using npm install -g vue. This will install the latest version of Vue.js globally on your machine.
How do I debug a Vue.js application?
Debugging a Vue.js application can be done using Vue Devtools, a browser extension for Chrome and Firefox. It allows you to inspect your Vue.js components, view their data, and trigger their methods. You can also use the console in your browser’s developer tools for debugging JavaScript code.
How do I deploy a Vue.js application?
Deploying a Vue.js application involves building the application for production and then hosting it on a server. You can build the application for production using npm run build. This will create a dist directory with the built files. These files can then be hosted on a server. There are many options for hosting, including traditional web hosts, cloud platforms like AWS and Google Cloud, and static site hosts like Netlify and Vercel.
 James Hibbard
Network admin, freelance web developer and editor at SitePoint.