
Cover image by Lianhao Qu
Preface
In this small article we will talk about, you guessed it, Screen Capture API. It's hard to call it a "new" API since it's spec dates as far back as 2014. But even with browser support still lacking, it looks like a fun thing to experiment with or use in personal projects where supporting a variety of browsers is not a requirement.
Here are some tldr links to get us started:
And here is how the end product is supposed to work in case links stop working:

Let's start building.
Why
Recently I’ve had an idea of a particular web app that involves using QR codes. While they are good for transmitting complex data in physical world where you can point a mobile device on them, they are not so easy to use when you have them on screen of your desktop device AND you need info encoded into them on that device. You have to save the image or make a screenshot, find a recognition service, upload your screenshot. Meh.
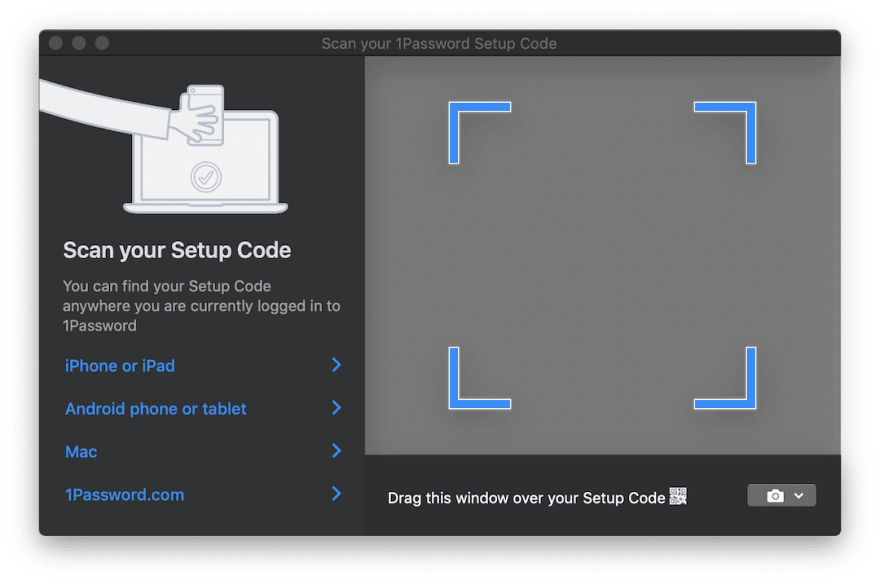
Some vendors, like, for instance, 1Password have found a way to make use of QR codes on desktop fun, easy and kinda magical. If you are not familiar with it — they have a transparent modal window appear on screen. You drag it over your QR code and boom! You have added an account! Or something else. Here's what it looks like.
Pretty neat. But we cannot have a browser window capturing whatever is underneath it. Or can we?
Enter getDisplayMedia
Well, sort of. Here's where the Screen Capture API with it's sole member getDisplayMedia comes into play. It is kind of like getUserMedia but for the user's screen instead of a camera. Unfortunately, browser support for this API is much less widespread, but, according to MDN, Screen Capture API is supported by Firefox, Chrome, Edge (with non-standard location of the method) + Edge Mobile and… Opera for Android.
A peculiar set of mobile user agents in this company of usual big actors indeed.
Now, the API itself is dead simple. It works in the same fashion as getUserMedia, but allows you to capture video feed from screen, or to be more specific — from one of the defined display surfaces:
- a monitor (entire screen)
- a window or all windows of a specific application
- a browser in a form of a document. In Chrome it looks like this means every individual open tab. In FF this option seems to be lacking
This means that we can grab video feed from any of those and parse it however we want. Do live text recognition and modification similar to what Google Translate Camera is doing or many other cool things. I'll leave inventions part to the reader. And best part of it — unlike with many other browser APIs we are not completely caged inside of the browser (not that I am advocating giving browsers such powers, no).
Wiring it up
So, we got power of realtime screen capture in our hands. How do we harness it?
We will use <video> and <canvas> with some JS glue. On a high level the process looks like this:
- Feed stream into
<video> - With a set refresh rate draw frame from
<video>into a<canvas> - Grab
ImageDatafrom<canvas>usinggetImageData
It might sound a bit weird but to my knowledge it's a quite popular method that is also commonly used for grabbing feed from camera with our other friend getUserMedia.
Omitting all the setup code for starting the stream and grabbing a frame — the meaningful part looks like this:
async function run() {
  const video = document.createElement('video');
  const canvas = document.createElement('canvas');
  const context = canvas.getContext('2d');

  const displayMediaOptions = {
    video: {
      cursor: "never"
    },
    audio: false
  }

  video.srcObject = await navigator.mediaDevices.getDisplayMedia(displayMediaOptions);

  const videoTrack = video.srcObject.getVideoTracks()[0];
  const { height, width } = videoTrack.getSettings();

  context.drawImage(video, 0, 0, width, height);
  return context.getImageData(0, 0, width, height);
}

await run();
As described before — here we create our <video> and <canvas> and obtain a CanvasRenderingContext2D.
Then, we define constraints for our capture requests. Not a lot of them. We don't want a cursor and we don't need audio. Although at the moment of writing this article nobody supports audio capture in Screen Capture.
After that, we hook the resulting MediaStream to our <video>. Be aware that getDisplayMedia returns a Promise, hence await in the sample code.
Finally, we get actual video feed dimensions from the video track draw the frame to canvas and extract it back as ImageData.
Now, in a real world scenario you would probably want to process frames in a loop rather than once, waiting for specific data to appear in the frame or continuously operate on some data. And this has a few caveats.
When somebody mentions "processing something in a continuous loop in background" first thing that comes to mind is likely the requestAnimationFrame. And in this case it is, unfortunately, not the right choice. See, browsers tend to pause your rAF loop as soon as the tab enters background, and this is where all the work will be happening.
So, instead of the rAF we will be using the good old setInterval. Although still there is a gotcha. A setInterval loop in a background can not run more often than once per 1000ms. But, I guess that is good enough for most purposes.
As you have now probably guessed — at this point the frames can be sent to any processing pipeline. In our case — to jsQR. It is super simple to use: you just provide the ImageData, width and height and if there is a QR code in the image — you get back a JS object with recognition data. So you can augment previous example with a simple
const imageData = await run();
const code = jsQR(imageData.data, streamWidth, streamHeight);
and it's done!
Wrap it up
I thought it might be neat to wrap it into an npm module to save the hassle of setting everything up yourself. Right now it is quite simple — it sends data to a callback provided by you in a loop and takes only one additional option — interval between captures. I'll see if there is a point in expanding the functionality.
The package is called stream-display: NPM | Github.
The core module does not have any parsers included, so bring your own. Using this library all the code you have to write to get it up and running comes down to this:
const callback = imageData => {...} // do whatever with those images
const capture = new StreamDisplay(callback); // specify where the ImageData will go
await capture.startCapture(); // when ready
capture.stopCapture(); // when done
To showcase the the idea behind this article I created this little demo. Also available in a CodePen format for quick experiments. It uses the aforementioned module.
A note on testing
Making a library out of this code forced me to think about how one would approach testing code that relies on this API.
I wanted to avoid having to download 50 MB of headless Chrome just to run a few small tests and ended up using tape and mocking everything manually. It might seem tedious at first but in the end you really only need to mock the following:
-
documentand DOM elements. I used jsdom - Some methods that are not implemented in jsdom —
HTMLMediaElement#play,HTMLCanvasElement#getContextandnavigator.mediaDevices#getDisplayMedia - Time-space continuum. I used sinon's
useFakeTimerswhich callslolexunder the hood. It comes with replacements forsetInterval,requestAnimationFrameand all the other time-based things that can be precisely controlled with a magical time remote. Skip milliseconds, skip to next timer, skip to next tick, you name it. One word of warning though: if you enable custom timers before jsdom — the universe will freeze due to jsdom trying to initialize some things based on time.
I also used sinon for all the fake methods that needed tracking. Other methods used plain JS functions. Of course, you can use whatever tools you are already most comfortable with. The end result can be seen in the library's git repo. It might be not pretty but it seems to be working and should give you an idea.
Conclusion
It's not as elegant as a desktop solution pictured in the beginning of this article, but I am sure the web will get there, eventually. Let's just hope that when time comes and browsers can literally see through their windows — it will be properly secured and you will be fully in control of such functionality. But for now keep in mind that whenever you are sharing your screen through Screen Share API someone can be parsing whatever it is on it, so don't share more than you are comfortable with and keep your password managers away.
Anyway, I hope you learned a new trick today. If you have any ideas how else this can be applied — please share. Until next time!


Top comments (2)
So long for the barcode API for which I can no longer find any reference.
Terrific post BTW
Here is a list of barcode apis.