
Michael Aboagye is a backend software/security engineer based in Ghana. He is interested in building secure backend services with Python.
In this tutorial, we will look at how we can build a diary web application based on the flask framework with Couchbase as the backend server.
By the end of this tutorial, you’ll be able to build a simple web application with the Flask framework to send users’ details to a Couchbase server. In addition, you will learn how to set up and configure a Couchbase server.
Prerequisites
You need the following packages to run or clone the project from GitHub.
- Flask framework (latest version)
Flask framework is a micro framework written in Python. It is a micro framework because it does not come with a validation form, authentication mechanism, and so on. It allows you to customize applications in your own way.
- Jinja template (latest version)
Jinja template is simply a text file which contain variables and expressions, which get replaced when a template is rendered or displayed.
- Couchbase Server (community edition)
Couchbase Server is a scalable NoSQL document database. We will use the Couchbase server to store users’ data.
Create a Virtual Environment
First, create a directory to hold the virtual environment using mkdir command.
The command below creates a directory as webproject and changes it into the webproject directory.
|
1 2 |
mkdir webproject && cd webproject Virtualenv diary |
Afterwards, change to the diary directory to activate the virtual environment using the following commands:
|
1 2 3 |
mkdir webproject && cd webproject Virtualenv diary |
Once we are inside the virtual environment, we can install packages without fear of conflicting with system packages.
Install Flask Framework and Other Packages
In this section, we will install Flask framework written in Python and other packages needed for the project.
Let’s install the packages we need for this project using pip and dpkg.
|
1 2 3 4 5 |
pip install couchbase pip install jinja Pip install flask |
In this tutorial, we will run Couchbase Server via Docker. You need to have Docker in your localhost or development machine to be able to pull or download Couchbase images from dockerhub.
Navigate to the terminal and type the following to access the DockerHub repository:
|
1 |
docker login |
Then you’re prompted to provide your credentials before you can access or “pull” images from DockerHub.
|
1 |
docker pull couchbase/server |
You need to run Docker commands as a root user.
However, if you prefer to install Couchbase Server manually, Couchbase provides two ways of installing for Debian-based and Redat distribution. You can check it out on Couchbase.
Download Python SDK 2.5 for Couchbase Server
In order to access the Couchbase server, we need to download the Couchbase SDK client to access a Couchbase cluster. Couchbase provides SDKs for programming languages such as Python, .NET, and Java. Let’s download and install Couchbase SDK for Python using pip:
|
1 |
pip install couchbase |
Configure and Start Couchbase Server
Once you have pulled Couchbase Server images from DockerHub, we can create and run a new container using the following command:
|
1 |
docker run -d --name db -p 8091-8094:8091-8094 -p 11210:11210 couchbase |
docker run: This command creates a container layer over the Couchbase image and starts it.
-d : The -d flag means the container is run as a daemon
–name : This is the name for the new container
-p : This flag is for port mapping
We are now running the Couchbase server in a container.
Inside your browser, visit http://localhost:8091 on your machine to configure the Couchbase server.
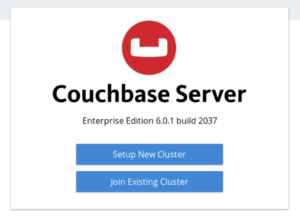
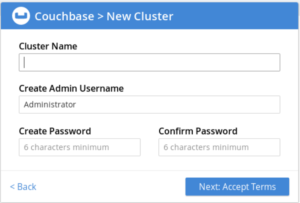
As you can see, we have options to create a new cluster or join an existing cluster. Let’s choose the option to set up a new single cluster. Set a Cluster name, create username for Admin and a password of 6 characters as shown below:
Let’s go with the default settings. We need to set the hostname or IP Address for our new cluster. We will not change the data disk, Indexes disk path, and Analytics disk path for the purpose of this project.
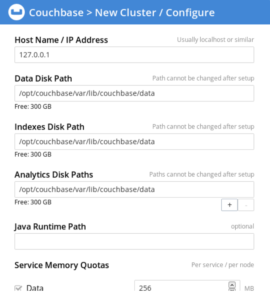
In addition, there is no need to alter memory quotas unless you don’t have enough RAM. Finally, we are presented with two options: start the Couchbase server with default settings or configure memory and services.
Click on the button which allows you to configure memory and services for Couchbase Server.
The Host Name or IP Address section allows you to set a hostname such as localhost or 192.168.15.12. The Data Disk Path allows you to define the path.
Then create a bucket called “users-data” via the Couchbase web console.
Write Server-side Code for Diary Application
Still inside your virtual environment, create a file named app.py. Inside app.py file, copy and paste the following code:
|
1 2 3 4 5 6 7 8 9 10 11 12 13 14 15 16 17 18 19 20 21 22 |
from flask import Flask from couchbase import Couchbase client = Couchbase.connect(host = "localhost", Password = “Password_here”, bucket = "Users-data") @app.route('/home', method=['GET']) def home_page(): return render_template('home.html') @app.route('/home/create-memo'), method=['POST']) def create_memo(): if method == “POST”: diary = { "memo" : request.form["memo"], "year" : request.form["year"], "month" : request.form["month"], "day" : request.form["day"] } Key=uuid.uuid1.hex() user_doc=json.dumps(diary) client.set(key, user_doc) return redirect(url_for("index")) return render_view("create.html") |
In the code above, we imported Flask framework, and the Couchbase client for Python. Next, we connected to the bucket Users-data via the Couchbase client connect method. Then, we created a route for the homepage and create-memo page for users.
We can also create a route for the messages page. This page will display message submitted by a user. Inside the “app.py” file, write down the following code to retrieve a specific user message from Couchbase server:
|
1 2 3 4 5 6 7 8 9 10 11 12 13 14 15 16 17 18 19 |
@app.route(‘home/saved-messages‘, method=[‘GET’,‘POST’]) def get saved_messages(): Saved_messages = client.get(key) Saved_event = json.loads(saved_messages) if request.method == “POST”: Saved_event.memo = request.form[“memo”] Saved_event.year = request.form[“year”] Saved_event.month = request.form[“month”] Saved_event.day = request.form[“day”] user_doc = json.dumps(diary) client.set(key, user_doc) return redirect(url_for(home_page)) return render_template(“saved.html”, model=Saved_event) |
Still inside your project directory, create a subdirectory using the mkdir command as shown below:
|
1 |
mkdir templates |
Inside the templates directory, create home.html, savedmemo.html, and postmemo.html files with the touch command:
|
1 |
touch home.html create.html saved.html |
Paste the following code inside the home.html file:
|
1 2 3 4 5 6 7 8 9 |
<html> <head> <title>Welcome to Daily Memo Book</title> </head> <body> <h1> Remember Your Memorable Events</h1> <p>Welcome to the world of Flask!</p> </body> </html> |
Paste the following code inside the memo.html file:
|
1 2 3 4 5 6 7 8 9 10 11 12 13 14 15 16 17 18 19 20 21 |
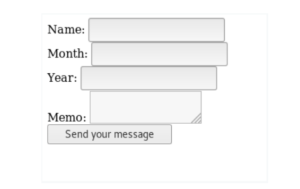
<form action="/home/create-memo" method="post"> <div> <label for="name">Name:</label> <input type="text" id="name" name="name" </div> <div> <label for="month">Month:</label> <input type="text" id="month" name="month"> </div> <div> <label for="year">Year:</label> <input type="text" id="year" name="year"> </div> <div> <label for="memo">Memo:</label> <textarea id="memo" name="memo"></textarea> </div> </form> <div class="button"> <button type="submit">Send your message</button> </div> |
Inside the savedmemo.html file, paste the following code to render a form which will display forms with saved messages:
|
1 2 3 4 5 6 7 8 9 10 11 12 13 14 15 16 17 18 19 20 21 22 23 24 25 26 |
<form action=”/home/savedmemo” method=”POST”> <div>Name: <input type=”text” name=”name” values=”{{model.Name}}” /> </div> <div>Month: <input type=”text” name=”month” values=”{{model.Month}}” /> </div> <div>Year: <input type=”text” name=”year” values=”{{model.Year}}” /> </div> <div>Memo: <input type=”text” name=”memo” values=”{{model.Memo}}” /> </div> <div> <input type=”hidden” name=” </form> |
Execute the following command to start the flask-based application as shown below:
|
1 |
python app.py |
Open your browser and navigate to the following url to display the page where you can submit details to the Couchbase server:
http://localhost.com/home/create-memo
Also, if you want to navigate to the page where users’ messages will be displayed and can be edited or modified and saved before submitting to Couchbase Server, use the following:
http://localhost.com/home/saved-messages/:5000
Conclusion
In this tutorial, we learned how to build a simple Flask-based diary application with Couchbase Server as the backend where users can send data via a form to a Couchbase server.
You can download or clone the whole project from GitHub if you want to try it out.
This post is brought to you by the Couchbase Community Writing Program