Angular 10/9 ElementRef/ViewChild/Renderer2 By Example

In this tutorial, we'll be learning about ElementRef with an Angular 10 example.
We'll see what ElementRef is and how it can be used with the ViewChild decorator, and AfterViewInit life-cycle event to access the DOM in the Angular way to avoid using native JavaScript APIs like querySelector, querySelectorAll, getElementbyId and getElementsByClassName for querying elements by ID, class name, or any selector.
Finally, we'll see why using ElementRef for directly accessing the DOM is not the best way in Angular 10 and previous versions but instead you need to use Renderer2.
We'll use the online Stackblitz development IDE, so you don't need to set up your development environment or create an Angular 10/9 project for our quick examples.

Visit the https://stackblitz.io/ website. If you don't have an account, you can simply use GitHub to quickly sign up and create a new Angular app with the latest version.
What's Angular ElementRef?
Before writing any code, let's see what ElementRef is and why it's used in Angular.
According to the official docs
Angular
ElementRefis a wrapper around a native element inside of a View.
It's simply a class that wraps native DOM elements in the browser and allows you to work with the DOM by providing the nativeElement object which exposes all the methods and properties of the native elements.
Angular 10/9 Example with ElementRef, ViewChild and AfterViewInit
Let's now see a simple Angular 10 example for how to access the DOM using the ViewChild decorator combined with the ElementRef interface. Go back to your Angular application created in Stackblitz and open the the src/app/app.component.ts file. Next, add the following changes:
import { Component, ViewChild, ElementRef, AfterViewInit } from '@angular/core';

@Component({
  selector: 'my-app',
  templateUrl: './app.component.html',
  styleUrls: [ './app.component.css' ]
})
export class AppComponent implements AfterViewInit {

  @ViewChild("myDiv") divView: ElementRef;

  ngAfterViewInit(){

    console.log(this.divView);
    this.divView.nativeElement.innerHTML = "Hello Angular 10!";

  }
}
We simply import the AfterViewInit, ElementRef, ViewChild APIs. Next, we implement the AfterViewInit interface which provides our component with the ngAfterViewInit() life-cycle method that gets called after the view is intialized (This is important since we can query or modify the view only after it's intialized).
Next, we declare the divView component property and decorate it with @ViewChild() decorator which is used to create a DOM query configuration. Here, we create a query that looks for the element with the myDiv template reference.
The type of the divView variable is our ElementRef interface which means we can access the nativeElement object that reprents the DOM element in the browser.
After that, we add the ngAfterViewInit() life-cycle event and set the innerHTML of our <div> to Hello Angular 10!
This is equivalent to document.getElementById("myDiv").innerHTML = "Hello Angular 10!"; in plain JavaScript. Except that we use template reference variables instead of IDs in Angular.
We also printed the divView in the console. If you open the Stackblitz console, you'll see the properties of ElementRef:
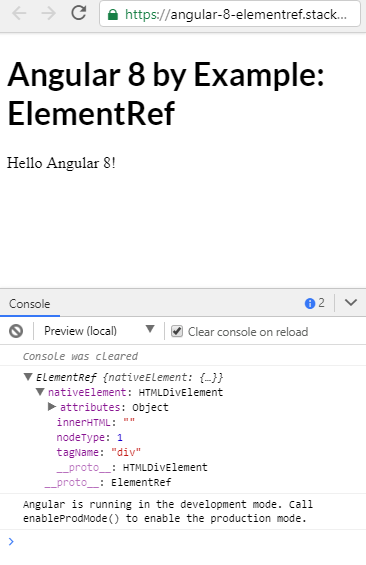
To make our code works as in the screenshot, one thing left is adding a <div> with the myDiv reference in our component template. Open the src/app/app.component.html file and change as follows:
<h1>Angular 10 Example with ViewChild, AfterViewInit and ElementRef</h1>

<div #myDiv>
</div>
Note:
ElementRefallows direct access to the DOM which could risk your app to XSS attacks. There are other alternatives (templating, data binding and also theRenderer2API) to directly access the DOM which will cover in other tutorials.
You can see the live example from this link.
Using ElementRef with Directive Example
We usually put the code required for manipulating the DOM inside a directive that can be then applied to elements in templates.
For example, let's create a directive named makeRed that makes the background color red.
First, you need to have an Angular 10 project then head back to your terminal and run the following command to generate a new directive using the following command:
$ ng generate directive makered
Next, open the src/app/makered/makered.directive.ts file and update it as follows:
import { Directive, ElementRef, OnInit } from '@angular/core';

@Directive({
  selector: '[appMakered]',
})
export class MakeredDirective {
  constructor(
    private elementRef: ElementRef
  ) { }

  ngOnInit() {
    this.elementRef.nativeElement.style.backgroundColor = 'red';
  }

}
We first import ElementRef from the @angular/core package, next we inject it via the directive's constructor. Next, in the ngOnInit method of the directive we use the nativeElement interface of ElementRef to access the native style property of the DOM element to which the directive is applied.
Next, open the src/app/app.component.html file and update it as follows:
<h1>Angular 10 ElementRef with Directive Example</h1>
<div appMakered>
  Add the <code>appMakered</code> attribute to change the background color to red.
</div>
We simply apply the appMakered directive to our <div> element to make the backgound red.
See the example live here.
Is It Safe to Manipulate the DOM With ViewChild and ElementRef?
While it's quite easy to manipulate the DOM using ViewChild and ElementRef but it's not actually safe to do that.
According to the docs for ElementRef:
Use this API as the last resort when direct access to DOM is needed. Permitting direct access to the DOM can make your application more vulnerable to XSS attacks. Carefully review any use of ElementRef in your code. Use templating and data-binding provided by Angular instead. Alternatively you take a look at Renderer which provides API that can safely be used even when direct access to native elements is not supported. Relying on direct DOM access creates tight coupling between your application and rendering layers which will make it impossible to separate the two and deploy your application into a web worker.
There is an alternative API called Renderer2 so let's see an example of that.
Accessing the DOM with Renderer2, ElementRef and Angular Directives
Let's now see how to safely access and manipulate our DOM elements using Renderer2 combined to ElementRef but without using the nativeElement interface for direct access.
We'll change our example directive to use Renderer2 instead. Open the src/app/makered/makered.directive.ts file and update it as follows:
import { Directive, ElementRef, Renderer2 } from '@angular/core';

@Directive({
  selector: '[appMakered]',
})
export class MakeredDirective {

  constructor(private elementRef: ElementRef, private renderer: Renderer2) {
      this.renderer.setStyle(this.elementRef.nativeElement, 'background-color', 'red');
  }
}
We import both ElementRef and Renderer2 and we inject them via the directive's constructor. Next, we call the setStyle method of Renderer2 on the nativeElement of ElementRef to apply the style.
See the live example here.
Conclusion
In this post, we've seen what ElementRef is and how it can be used with other APIs to access the native DOM elements with simple Angular 10 examples.
ElementRef is usually combined with ViewChild and AfterViewInit to access child DOM elements from an Angular directive.
ViewChild is a custom Angular decorator for making DOM access in the Angular way. It returns the first element that matches a given component, directive or template reference selector.
Note: For querying multiple children, you need to use the
ViewChildrendecorator instead.
AfterViewInit is a life-cycle method of components that gets called when the view of the component is completely rendered. You need to put the code to access the view elements in this method so you can safely access them.
- Author: Ahmed Bouchefra Follow @ahmedbouchefra
-
Date:
Hands-on Angular eBook
Subscribe to our Angular newsletter and get our hands-on Angular book for free!

✋If you have any questions about this article, ask them in our GitHub Discussions 👈 community. You can also

✋ Want to master Angular 14? Read our angular tutorial and join our
#DailyAngularChallengewhere we learn to build components, directives, services, pipes and complete web, mobile, and desktop applications with latest Angular version.
✋ Make sure to join our Angular 14 Dev Community 👈 to discuss anything related to Angular development.
❤️ Like our page and subscribe to our feed for updates!
Find a list of emojis to copy and paste
ADVERTISEMENT

