

At Yalantis, we work on different types of mobile and web services every day – enterprise healthcare development, digital banking solutions, IoT, and others. Even though they may be different in terms of the features they provide, these apps have one thing in common – they all have a client-server architecture, meaning they constantly communicate with servers via the internet.
RESTful APIs have become the main standard for enabling communication between the server part of a product and its clients, both web and mobile. That’s why designing clear and smooth RESTful APIs is a hot topic.
We recognize the importance of comprehensive and beautifully designed APIs. Your API should ideally support different types of clients and should be easily understandable by any developer. The quality of your project depends on it.
A practical example of the value REST API can bring to a complex product is a communication platform we developed for KPMG, a Big Four Accounting firm. A simple integration brought the system to the next level by making it possible to add photo and audio files to user messages as well as helped to manage user authorization, session, and profile data.
So what should you keep in mind when designing an API? We’ve gathered the best practicies that will help you avoid the main pitfalls associated with API design, such as badly written documentation, unstructured architecture, inconsistency, poor security, and rigidity.
Documentation
Documentation is an API introduction that helps developers understand your API and gives them a clue about where to get started. By documenting your API, you can increase awareness and adoption of the API and decrease the time and costs of onboarding both remote and in-house developers. Moreover, documentation helps your internal teams know the details of your methods, resources, requests, and responses, making maintenance and updates easier and quicker.
Ideally, you should write concise tutorials to help developers get up and running quickly. Don’t neglect creating a glossary where you define terms used in your API. You should define resources and methods used in a way that’s easy to understand. Make sure to list all the terms used in your project and get everybody on the same page so your end users (developers) will be able to get the concept of URLs and URIs, for instance, even without fully understanding the technology behind it. LinkedIn has a separate page with terminology used in their API.
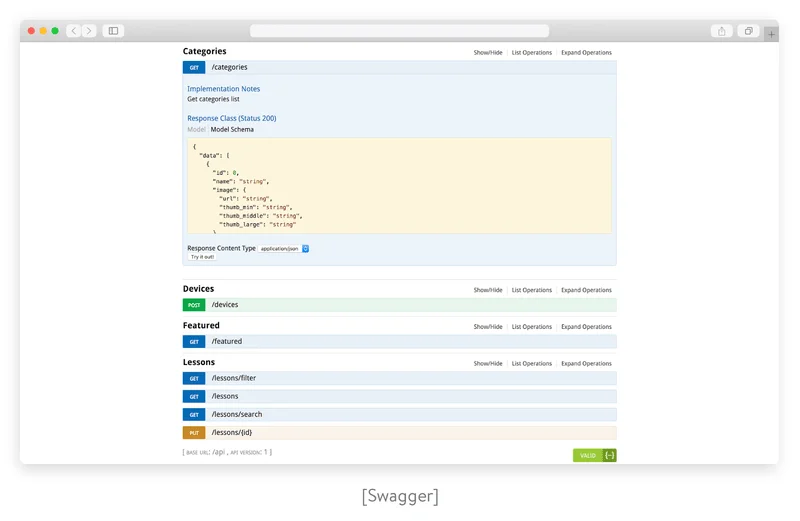
Fortunately, there are a lot of software tools (Swagger, Raml, Apiary, etc.) that simplify the task of generating documentation.
Supported data formats
In the client-server architecture, an API is a bridge that connects the client with the server. That’s why your API should send and receive information in a format convenient and understandable for both parties. Your choice of data format defines how effective your API will work, affecting the success of routine and specific calls.
Common data formats used in modern APIs are:
- Direct data formats. These are designed to handle data for direct use in other systems (users). They’re best for interaction with other APIs and for machine to machine integration. The three most common direct data formats are JSON, XML, and YAML.
- Feed data formats. Formats of this type are typically used to serialize updates from servers, sites, and frontend interfaces and alert users to these changes. Feed data formats – which include RSS, Atom, and SUP – are best used for blogs, video sharing, and social media.
- Database data formats. These formats are typically used to handle communication between databases and between databases and users. Formats in this category include CSV and SQL.
Uniform Resource Identifiers
The key principle of REST is to divide your API into logical resources. A Uniform Resource Identifier, or URI, is a sequence of symbols that identifies a resource and often allows developers to access representations of that resource. The current structure and syntax of URIs is defined by the RFC 3986 standard.
At this point, we can’t avoid the evergreen question: What are the differences between a URI and a URL? Actually, a URL (Uniform Resource Locator) and URN (Uniform Resource Name) are both types of URIs.
A URL identifies the location of a certain resource and how you can retrieve it; for instance: http://example.com/example.html
A URN identifies the resource by its name but doesn’t necessarily shows its location. It often starts with a urn: prefix; for instance: urn:uuid:6e7bc280-7c3a-11d9-9889-0800200c9a66

Your URI should clearly communicate the API’s resource model. We’ve collected several rules to help you design clear and beautiful URIs:
- Use hyphens but not underscores to make your URI readable. This is good practice:
http://api.example.com/best-products/home-decor. This is bad practice:http://api.example.com/best_products/home_decor/. Underscores are nearly invisible due to the underlining and can cause confusion. - Don’t include extensions in URIs. Leave determining the type of content in the body to the Content-Type header.
- Use lowercase if possible. Keep in mind that all URI components, excluding the host components and schema, are case sensitive. This means that
http://api.example.com/best-products/home-decorandhttp://API.EXAMPLE.COM/best-products/home-decorare identical. Buthttp://api.example.com/My-Folder/my-docis a completely different URI. - Use a forward slash to indicate relationships. Avoid using a backslash, as it can cause confusion. Some APIs will just redirect users to a URI without a slash, but others will send the 301: Moved Permanently response.
- In general, each resource of your API will have at least one URI. That’s why each URI should adequately describe the resource and follow a predictable, hierarchical structure to improve usability.
Endpoints
Endpoints specify where resources are located and how they can be accessed by third-party software. Usually, they’re accessed via a URI to which HTTP requests are sent and from which the response is expected.
If you search for ‘What is a RESTful API’, you’ll find the following definition: an application program interface that uses HTTP requests to GET, PUT, POST and DELETE data. So what are GET, PUT, POST, DELTE and why are they capitalized? These are the main methods that indicate what type of operation is to be performed. Let’s take a closer look at them:
- GET – retrieve resources from the server using a given URI
- POST – send resources to the server
- PUT – update existing information with uploaded content
- DELETE – remove all existing resources
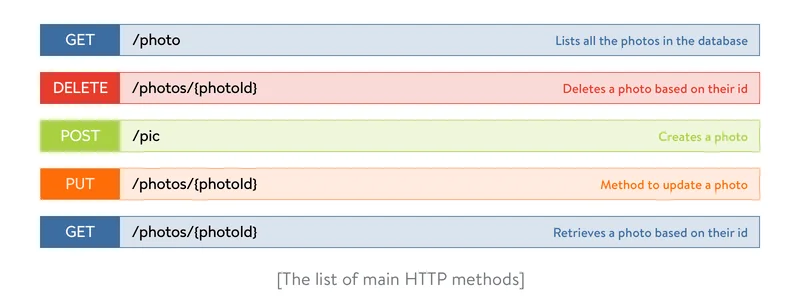
Just like with URIs, naming resource endpoints is crucial for API usability. Here are some tips on how to name endpoints:
- Use nouns (not verbs) when coming up with your resource path name; in our case, let’s call the path photos. The following resource naming should be strictly avoided: /getAllPhotos, /createPhoto, /updatePhoto, /deletePhoto.
- Don’t mix singular and plural nouns. Although you may consider it wrong to describe a single instance of a resource using a plural form, the API design rules state that you should be consistent and always use plural nouns for all resources. Use
/settingsinstead of/settingand/productsinstead of/product. - Use sub-resources for relations if a resource is related to another resource. For example,
GET /products/:id/reviewsreturns a list of reviews for a specific product, andGET /products/:id/reviews/:idreturns a specific review for a specific product.
Versioning
APIs change slowly, but they still change. Let’s be crystal clear about this: Even if your API is completely rewritten and updated numerous times, you should keep the old versions of your API running and supported for as long as your users need them. There are four common ways to version an API so users can still rely on the earlier versions and upgrade to any subsequent versions when they’re ready:
- URI. With this method, a version is explicitly put into the API’s URI. (Example:
api.example.com/v1/resource or example.com/api/v1/resource) - Custom request headers. APIs can also be versioned by providing custom headers with the version number included as an attribute. (Example:
curl -H “API-version: 1.0” http://www.example.com/api/products) - Media type versioning (also known as content negotiation or accept header). In this case, you modify the accept header to specify the version. (Example:
curl -H “Accept: application/vnd.example.v2+json” http://www.example.com/api/products) - Parameter versioning. Another option is to include the version number as a query parameter. (Example:
http://www.example.com/api/products?version=1)
Security & authentication
Always protect application information from hackers and other shady users. Here are some essential rules for ensuring security during the backend development:
- Use HTTPS. A secure REST API should only provide HTTPS endpoints. This is a good way to protect authentication credentials like API keys, passwords, and JSON Web Tokens (JWT).
- Add a timestamp to HTTP requests. Alongside other parameters, include a timestamp for your request. This way the server can compare the request timestamp with the current timestamp and accept the request only within a certain timeframe, for instance one or two minutes. This eliminates cases of replay attacks from hackers trying to brute force the system.
- Restrict HTTP methods. Create a list of permitted methods and reject all requests not on this list. Also, ensure that the caller is authorised to use the incoming HTTP method on the resource.
- Consider input validation. Validate request parameters at the very first step. Put strong validation checks in place and reject a request immediately if validation fails. Validate input type, length, format, and range.
- Use OAuth. Even though basic authentication is good and is secure enough, consider OAuth. The OAuth 2.0 authorization framework allows third-party apps to obtain limited access to an HTTP service, either on behalf of a resource owner by orchestrating an approval interaction between the resource owner and the HTTP service or by allowing the third-party application to obtain access on its own behalf.
- Don’t expose sensitive data in URLs. Usernames, passwords, JWT, and API keys should never appear in a URL. If they do, they can be captured in web server logs, making them easily exploitable.
- Perform security checks. Сreate a security checklist to minimize the possibility of SQL and XSS injections: protect headers, sessions and cookies, and permit params; hide sensitive data in logs; use CSRF tokens; validate redirects and forwards; implement strong security password checking; protect databases, etc. To simplify these tasks, you can use automated tools such as Brakeman.
Companies use APIs to connect services and transfer data. Broken, exposed, or hacked APIs are behind major data breaches. A poorly secured API may be risky for a business, and hence developers won’t want to use it.
Read also: Secure Application Development: From Planning to Production
Scalability and flexibility
Scalability is the ability of the system to handle a growing number of requests in a quick and stable manner or the ability of the system to be expanded to accommodate growth. It’s a key consideration for all API platforms.
There are two types of scalability: vertical (use a more powerful machine) or horizontal (distribute the load across multiple machines). If a cloud is used, then it can automatically scale they system. Before designing a system, you should assess its estimated load (requests per second, size of requests, etc.). During system uptime, you should then check various metrics like load distribution, latency, and response time.
Design the architecture of your API with scalability in mind. That way when your application grows, you won’t have trouble adding new features and improving performance. To accomplish this, keep the architecture simple.
To resolve scalability issues, it’s preferable to use a cloud. Cloud services allow you to quickly launch new server instances on demand instead of adding costly equipment to handle more data.
Also, it’s important to perform manual code optimization, which involves analyzing code by hand to define poorly performing parts and optimize them.
Monitoring and error handling
Monitoring real-time API access and usage trends is a must. It’s important to get control over exception handling so you can provide important information that allows API clients to know what happens on the server.
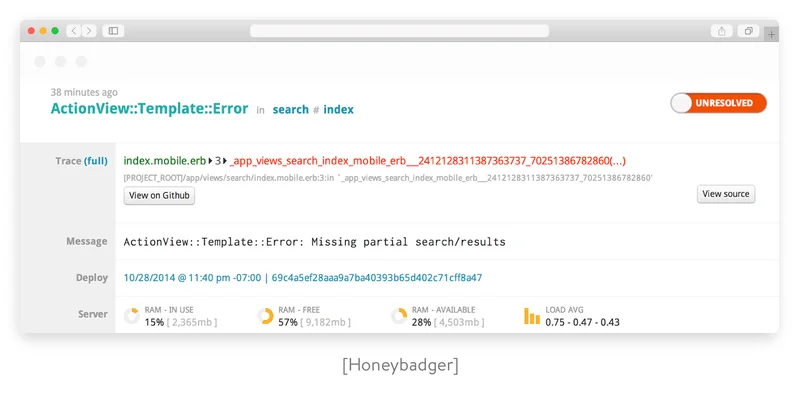
All exceptions should be mapped in an error payload. Usually, it’s important to demonstrate where an error came from. It’s also important to provide some guidance on how to fix a failing call. If you build your API using Ruby on Rails, you can use the exception_notification gem to quickly set up the most used notification channels like email, Slack, and WebHooks. Or if you need to view statistics, you can use third-party services like Honeybadger, Sentry, and NewRelic.
HTTP status codes
HTTP status codes, sometimes called internet or browser error codes, are standard response codes sent by a web server that identify whether an operation performed was successful or why pages or resources aren’t loading properly. They also help developers with troubleshooting and error handling.
There are five categories of responses and more than fifty response codes. We’ve created a list of the most commonly used codes:
2XX (Success)
200: OK. This is the most commonly used response to inform that a request has succeeded.
201: Object created. The server has fulfilled the request and created a new resource.
204: No content. The server has successfully fulfilled the request and the API declines to send back any status message or representation in the response message body.
206: Partial content. The server has fulfilled the request and the body contains the requested ranges of data, as described in the Range header of the request.
3XX (Redirection)
304: Not modified. The client has requested cached data and there’s no need to transfer it again.
4XX (Client error)
400: Bad request. The server couldn’t understand the request because of invalid syntax (e.g. invalid request message framing or deceptive request routing).
401: Unauthorized. The user or the system is trying to operate on a protected resource without providing proper authentication credentials.
403: Forbidden. The server understands the request but refuses to authorize it.
404: Not found. The origin server can’t find a current representation for the target resource or is not willing to disclose that one exists.
5XX (Server error)
500: Internal server error. Ideally, you’re not going to be explicitly returning this, but if something unexpectedly breaks, this is what your user is going to receive.
503: Service unavailable. The server is currently unable to handle the request due to a temporary overload or scheduled maintenance.
These are standard status codes, but they’re extensible. If you create custom HTTP response codes, make sure you put them in the right category. Just remember that it’s not considered good practice, as some proxies filter unknown codes. Whether you create custom codes or standard codes, always document them. Here’s an example of status codes in the Twitter API documentation.
Testing, stability, and support
Always use testing tools to easily test endpoints and check their responses. There are a bunch of tools available to automate the testing routine: Rspec, API Fortress, API Science, Parasoft, Postman, SmartBear, Runscope, etc.
Maintability
After a successful deployment comes ongoing maintenance and support. This includes keeping the system operational, investigating failures, fixing bugs, and adding new features.
Keeping the system operational entails:
- Applying patches and fixes
- Planning capacity
- Enhancing configuration management
- Preserving the knowledge base about the system
Adding new features requires easily adapting to changes. This is closely linked to the system’s simplicity and abstractions. Simple and easy-to-understand systems are easy to modify.
Caching
Caching is used to store frequently (or the most recently) requested data in some fast-access storage (in memory or out of memory) to quickly satisfy a request. Using HTTP headers, an origin server indicates whether a response can be cached and, if so, by whom and for how long.
Usually, browsers treat all GET requests as cacheable. POST requests are not cacheable by default but can be made cacheable if you add an Expires header or a Cache-Control header to the response. Responses to PUT and DELETE requests are not cacheable.
There are four main HTTP response headers that we can use to control caching behavior:
-
Expires
The Expires HTTP header specifies an absolute expiry time for a cached representation. Beyond that time, the cached representation is considered stale and must be re-validated with the origin server. To indicate that a representation never expires, a service can include a time up to one year in the future.
-
Cache-Control
The header value comprises one or more comma-separated directives. These directives determine whether a response is cacheable, and, if so, by whom and for how long. Available directives:
– public – Indicates that a resource is cacheable by any component.
– private – Indicates that a resource is cacheable only by the client and the server (no intermediary can cache the resource).
– no-cache/no-store – Indicates that a resource is not cacheable.
– max-age – Indicates that the cached data is valid up to max-age in seconds. After this, the client has to make another request.
– s-max-age – Overrides max-age for a shared cache, such as on proxy servers. You usually have more control over the proxy cache than the client’s local cache, so you can add longer values here.
– must-revalidate – Tells the server to revalidate the resource if max-age has passed.
Example: `Cache-Control: max-age=3600`
Cacheable responses (whether to a GET or POST request) should also include a validator: either an ETag or a Last-Modified header.
-
ETag
An ETag value is an opaque string token that a server associates with a resource to uniquely identify the state of that resource over its lifetime. When the resource changes, the ETag changes accordingly. Example: `ETag: "abcd1234567n34jv"`
-
Last-Modified
Whereas a response’s Date header indicates when the response was generated, the Last-Modified header indicates when the associated resource last changed itself. The Last-Modified value cannot be later than the Date value.
Also, it’s a good idea to use cache layers not only in HTTP but along the whole request processing pipeline (memcached, Redis, Cassandra).
Searching, filtering, and sorting
Complex result filters, sorting requirements, and advanced searching can all be easily implemented as query parameters on top of the base URL and greatly ease developers’ lives.
For filtering a dataset, pass a unique query parameter for all fields via query language. URL parameters are the easiest way to add basic filtering to REST APIs. For example:
GET /dogs?breed=Akita&age<=2
For sorting items, use the sort URL parameter. To enable complex sorting requirements, let the sort parameter take a list of comma-separated fields, with a possible unary negative to enable a descending sort order. For instance:
GET /dogs?sort=-breed,+name or GET /dogs?sort=breed_desc,name_asc
Sometimes, basic filters aren’t enough and you need the power of full text search. If you require search on endpoints, you can add support for filters and ranges directly with the search parameter. You can use ElasticSearch or another Lucene-based search technology.
Pagination
In order to keep your servers happy, the API needs to automatically paginate the requested items. When the dataset is too large, divide it into smaller chunks. This is useful to improve performance and makes it easier to handle the responses. Make pagination more flexible by supporting per-page params.
GET /dogs?page=3&per_page=20
When creating an API, you must constantly remember that if it’s poorly designed, documented, or supported, nobody will use it unless they’re forced to. An API’s design must focus on a blend of functionality, usability, and developer experience. We hope this tutorial will help you to build a developer-friendly API. If you have questions or need a pair of hands to create your API, you can always rely on us.
Discover how we create custom software for enterprises
And consider cooperation with Yalantis
Check out our expertiseRate this article
4.1/5.0
based on 625 reviews