A Gentle and Practical Introduction to Progressive Web Apps - Part 3

In part three of this series, we cover one of the more complex aspects of the PWA - the Service Worker. This is key to making your web app act more like a native app.
Welcome to the third part of my series on Progressive Web Apps (PWAs). In the first article, I introduced you to some of the basics of what makes up a progressive web app (PWA). I helped define a PWA as well as listed the various components of what makes up a PWA. In the second article, I focused in on the "discoverable" aspect of PWAs. This comes down to how a website can describe itself. I covered things like how it can be added to the home screen (or desktop) and how it behaves when opened by the user. The main way this is handled is with a feature called the app manifest.
I hope you've enjoyed it so far because this is the part where things get serious. And by serious I mean incredibly complex to the point of truly being scary. As before, if we take things step by step, slowly, I think you'll do just fine, just prepare yourself for one of the most complex aspects of web development - the Service Worker.
Enter the Service Worker
As a web developer, you probably have some experience with JavaScript. You may not be "Able to Pass a Google Code Test"-capable, but you know the basic syntax, can interact with the DOM, and add simple interactivity to a web page. How you load your JavaScript and how it operates hasn't really changed in the past decade or so.
Service Workers operate in a completely new way compared to the past. First off, they can actually run after you've closed the browser tab. Yes, you read the right. They can be active and responding (to only certain things of course) even when you aren't on a page. Secondly, they can actually take over the network stack for your browser. Each and every request your web page makes (and not just AJAX, but even images) can be processed and manipulated by the service worker.
Because of this, service workers also have certain restrictions. So for example, they can't directly manipulate the DOM and must instead use messaging between itself and your "regular" JavaScript in order to affect changes. They also have a special "life cycle" which impacts when they can do things. So for example, the very first time a service worker is loaded by a page, it can't actually do anything. Instead it is considered as being loaded and prepared and will be used the next time it's loaded. This can create some incredible headaches for the developer. (Although there's a way around this - you'll see in the later article on dev tools.)
At a high level, Service Workers provide support for three main features, of which only one is truly "required" for a PWA:
- Service Workers help provide offline support for an application. It does this via its ability to handle network requests as defined earlier. This combined with the power to read and write from the browser's cache let a PWA not only handle offline support but can also be a powerful way to improve performance. Even if your app is online, if there is content that can be cached and reused, there's no need to fetch it from the network again. This is the one part of service workers you must create if you want to have a proper PWA, but of course, that's also up to you.
- Service Workers have a "background sync" feature. This lets you create a process where data can be synced between the client and a server. As the developer, you handle the "get the stuff I need to sync" aspect, and the browser itself handles the scheduling. I won't be covering this feature in this series of articles, but you can read more about it here: Introducing Background Sync by Jake Archibald. I'll be sharing other resources for learning about this, and PWAs, later in this series.
- Service Workers let web apps support push notifications. This along with the ability to create notifications (which isn't a PWA feature itself) lets you create apps that can bring users back in when something important happens.
Before we go any further, note that service workers require HTTPS to work. You can use them on your local server (localhost), but you cannot use them on a server still running regular HTTP. Since HTTPS is one of the requirements for PWAs in general, consider this your official notice that it is time to upgrade if you haven't already. (Also note that at the time I wrote this article, Chrome is very close to adding warnings for non-HTTPS sites. The "normal" people will start getting warnings about this so you can consider this one more reason to make the move.)
Ready? Hold on to your hats!
Adding a Service Worker
Normally, JavaScript is added to a page by either embedded it on the page between <script> tags or linking to an external file using <script src="some url">. A service worker is loaded differently. Let's look at a simple example.
The code below, and all code listings for this series of articles, may be downloaded here:
This code may be found in the demo3 folder. First, here is an HTML file. It's making use of an app manifest (again, available in the ZIP archive you can download) and a "regular" JavaScript file:
<!DOCTYPE html>
<html>
  <head>
    <meta charset="utf-8" />
    <title></title>
    <meta name="description" content="" />
    <meta name="viewport" content="width=device-width" />
    <link rel="manifest" href="manifest.json" />
  </head>
  <body>
    <h1>My SW Test</h1>
    <p>
      <img src="images/kitten.jpg" />
    </p>
    <p>
      Photo by <a href="https://unsplash.com/photos/Qpjl_dXQrD8?utm_source=unsplash&utm_medium=referral&utm_content=creditCopyText">Koen Eijkelenboom</a> on Unsplash
    </p>
    <script src="js/app.js"></script>
  </body>
</html>
The JavaScript loaded by the script tag is app.js. Let's take a look at that:
document.addEventListener('DOMContentLoaded', init, false);

function init() {
  if("serviceWorker" in navigator) {
    navigator.serviceWorker.register('/serviceworker.js')
    .then((registration) => {
      console.log('Service Worker installed!');
    }).catch((err) => {
      console.error('Service Worker failed', err);
    });
  }
}
The script begins by adding an event listener for the DOMContentLoaded event. In that event, a simple check is done to ensure the service workers are supported, and if they are, the API is used to load one. This is done via the register command you can see above. That returns a Promise where you can listen in for a successful registration or an error.
Note the value passed to the register event: ./serviceworker.js. I said earlier that service workers have special powers. But they only impact URLs on your site that match the folder they are loaded in and any subdirectories. Let me rephrase that. Our "regular" JavaScript was loaded from a js folder. That's a fairly typical thing developers do to organize their code. However, if I put my service worker there, it would only be active for HTML pages that exist at /js and lower. By placing my service worker in the root of my site, I know that my service worker will be useful for the entire site. It is entirely feasible that you may want service worker support for only a portion of your "dot com", and in that case, you would simply move the file.
Alright, now let's look at the service worker - and to set expectations - this one is pretty minimal and doesn't actually do much:
self.addEventListener('install', function(event) {
  console.log('sw:install');
});

self.addEventListener('fetch', e => {
  console.log('Loading '+e.request.url);
});
Alright, so what's going on here? First, we have an event listener which for now is just using logging to announce itself. If you remember earlier I said that service workers have a "life cycle" that determines what they can do and when. The very first time a user hits this page, you can think of it like an installation request. The service worker is "installed" but can't really do anything yet outside of setting up resources for use later. Secondly, you can see an example of service worker's ability to listen to network requests. In this case, the event is called fetch, but remember, it represents every single network request the web page is making, whether that's fancy AJAX stuff or loading a style sheet and images. Let's see this in action. On the first load of the page, you'll see this in the console. Specifically Firefox's console:

Note that Firefox added its own message ("Service Worker installed!") so you see that along with the custom message from the code. At this point, nothing else is shown. The service worker isn't activated yet (it was just installed) and the cool network level support isn't available yet. Now, watch what happens if you reload:

You can see the console messages from the fetch event being fired. Also note Firefox letting us know, again, that a service worker is in play. Cool!
Working with the Cache
So at this point, you have code that can notice and potentially do "stuff" when a network request is made. How can you use this to build an offline capable web site? You use the (nicely-named) Cache API (CacheStorage - Web APIs, MDN). The Cache API is like an advanced version of the browser cache that has been around since day one of the web. While you've had some ability to work with it via AppCache, the Cache API is a much better, much easier to use system.
Using the API begins with naming your cache. This is typically how people will do versioning with caching. So, instead of naming your cache something like "myOfflineSupport" or just "cache", a typical name will instead use a number of some sort to represent the version: "my-site-cache-v1".
You use the name to open the cache. Once opened, you have the ability to add to the cache, read from it, and remove items as well. You can also completely delete a cache and this is where that versioning I mentioned above comes in. If you need to create a new cache you will typically give it a new version number ("my-site-cache-v2") and then completely nuke the previous cache.
For the most part, this is all done via a simple API. However, what's not so simple is figuring out the best way to use this cache API. Consider these options:
- When offline, use the cache. When online, skip it.
- When offline or online, always use the cache. That's fast and fast is always better.
- When offline, always use the cache, but when online, let's use the cache but also in the background fetch the information again because maybe there is new stuff and we can update the cache and then we can decide if we want to update the display.
- For the heck of it, let's use caching, but there are some things that we know can be cached a long time but some things that can't be cached more than X hours, oh and some things can only be cached for Y minutes and only on a business day but not on holidays.
That may seem a bit complex and over the top, but there are definitely cases where how you cache must match some pretty complex business processes. These forms of caches are called caching strategies and the good news is that you can find boilerplate code for almost all of these various scenarios. At the end of this series of articles I plan on focusing on tools to help you with PWAs. I'll be sharing a link specifically for this in that article.
For the purpose of this article, we can focus on a simple, generic strategy: Always use the cache, even when online, as this gives the best performance. If we have to update a cached resource, we will use versioning to update the cache. Let's look at an example, but before we do, a quick warning.
Testing PWAs Locally?
When I was first learning PWAs, I ran into an issue that caused me probably close to three hours of frustration and turned out to be incredibly simple. As I've said above, service workers require an https server, unless you're running locally. That means you can use Apache locally or some other web server. I use a tool called httpster. I go into the folder with my code, type in httpster, and boom, I've got a web server running locally with the files in my directory. This is really handy, but it also means that every time I test, I'm at http://localhost.
OK, so remember when I said that service workers have a scope based on where they load? That's going to bite you in the rear here. If you ran my previous demo at http://localhost and then run this next demo in the same location, you're going to have a conflict as the service worker from demo3 will be active even though you're using demo4. You could fire up a web server at the root of where you extracted the files and test at http://localhost/demo3 and http://localhost/demo4. The other option is to manually "unregister" the service worker. I plan on talking more about devtools later in the series, but for now, here are quick instructions and screen shots.
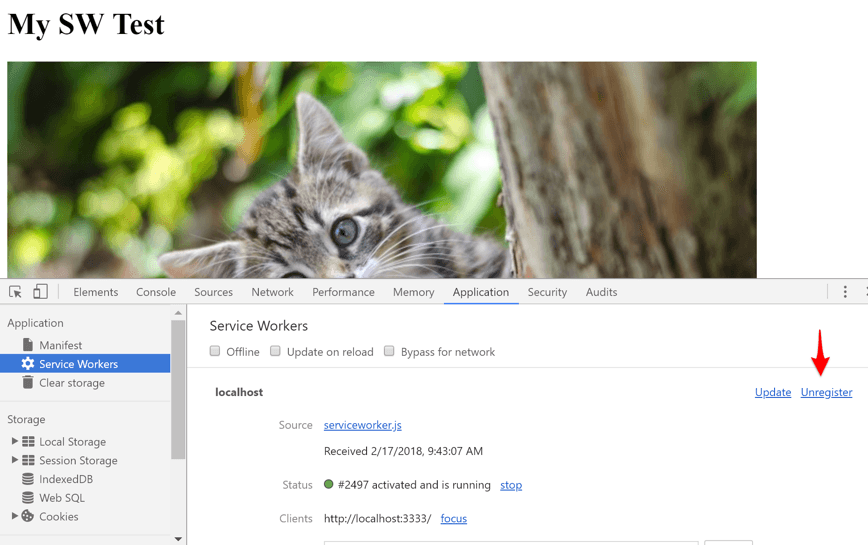
For Chrome, open up devtools, go to the Application tab, ensure Service Workers is selected on the left, and click the Unregister button:

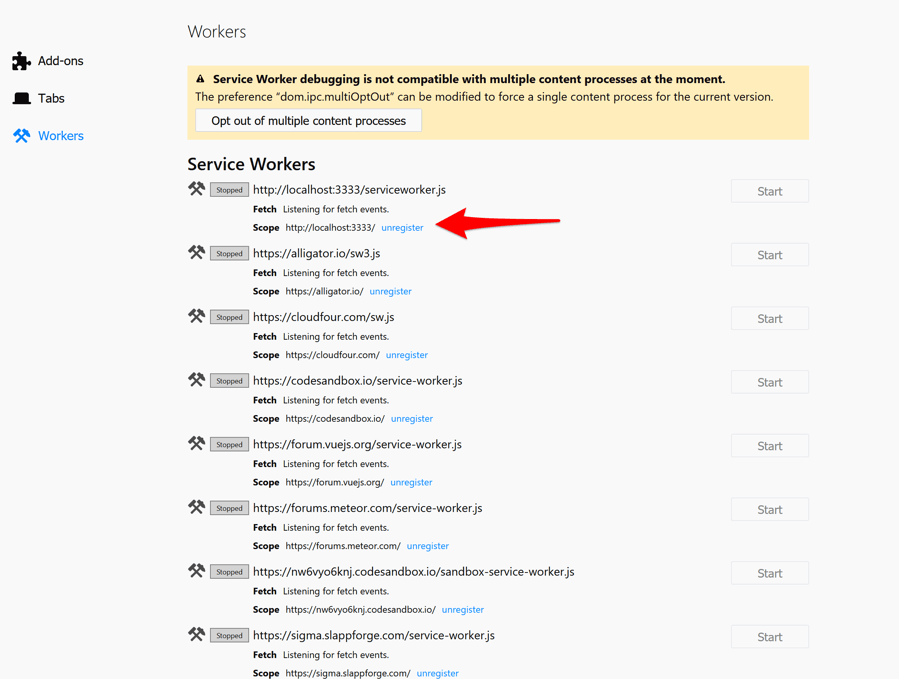
For Firefox, it isn't available in devtools. (At least for now.) Open your browser to about:debugging#workers, find your service worker, and use the unregister link there:

OK, with those warnings out of the way, let's look at demo4. The only change to this version of the app is the service worker so we'll only show that file:
var CACHE_NAME = 'my-site-cache-v1';

var urlsToCache = [
  './',
  './index.html?utm_source=homescreen',
  './js/app.js',
  './images/kitten.jpg'
];

self.addEventListener('install', function(event) {
  // Perform install steps
  event.waitUntil(
    caches.open(CACHE_NAME)
    .then(function(cache) {
      console.log('Opened cache '+CACHE_NAME);
      return cache.addAll(urlsToCache);
    })
    .catch(function(e) {
      console.log('Error from caches open', e);
    })
  )
});

self.addEventListener('fetch', function(event) {
  event.respondWith(
    caches.match(event.request)
    .then(function(response) {
      // Cache hit - return response
      if (response) {
        console.log('got it from cache', event.request.url);
        return response;
      }

      return fetch(event.request);
    })
  );
});

self.addEventListener("activate", function(event) {
  event.waitUntil(
    caches.keys().then(function(cacheNames) {
      return Promise.all(
        cacheNames.map(function(cacheName) {
          if (CACHE_NAME !== cacheName) {
            return caches.delete(cacheName);
          }
        })
      );
    })
  );
});
Let's start at the top. I've got two variables here related to my caching needs. The first is the name of the current cache. I can change this later to force an update to the cache. I don't have to, but I'd probably change just "v1" to "v2." The names are arbitrary, but you do want to use something sensible. Next is an array of items to cache. In this app, our strategy is to cache everything immediately. Again, remember that this may not meet your needs and you can customize the code for nearly any requirement.
In the "install" event, we've got our first instance of using the caching API. First, we use "event.waitUntil" as a shorthand for saying, I'm doing some asynchronous stuff here, delay the end of the event until I'm done. Next we open the cache. Remember this is done by name and here we make use of the variable created earlier. Finally, we use a super convenient method of the caching API, "addAll", which lets us pass an array of values to cache. All of this is asynchronous and returns promises, so by returning the promise on that line, the outer "event.waitUntil" knows when things will be done.
That's a lot to chew there, but it boils down to: Add a list (ok, an array) of URLs to the cache.
In the next event, we intercept every network request. If the request matches something we have in our cache, we return it. You can do more here - like modifying the request - but in our case we just return it as is.
Finally, we have an event listener for the activate phase of a service worker. This is where we're handling cache "cleanup". Basically we ask for all the caches that exist, iterate over them, and if the name doesn't match our current cache, we delete it. Again, there may be situations where you want to keep an older cache around, so this code is arbitrary, but follows the most likely use case of not needing previous caches when a new one is used.
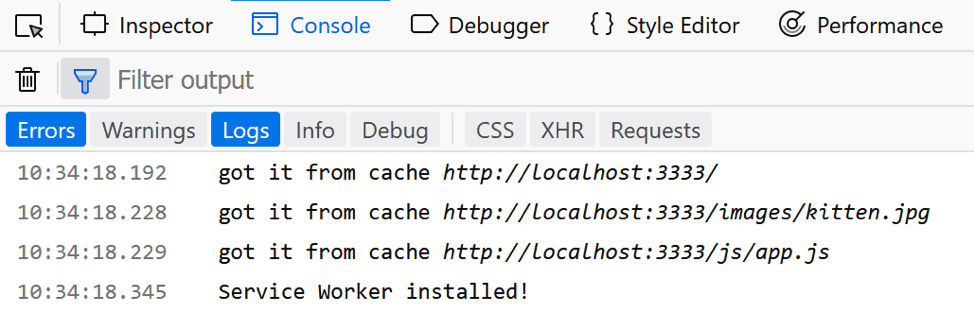
And, that's it. The first time you run the app, the new service worker will be installed and start caching. If you run it again, you can see the cache being used:

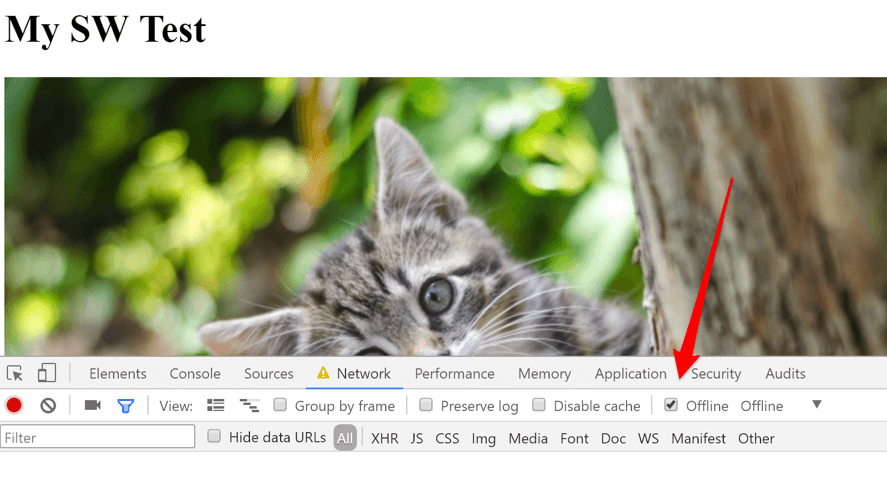
And if you want, you can go offline. Unfortunately, Firefox doesn't support a simple way of doing that. You could just turn your wifi off. If you use Chrome, however, it's network tool has an offline option:

But Wait - There's Still More!
In this article I introduced the concept of service workers and gave an example of using it to add caching and offline support to your web apps. Please do not forget that this is absolutely not the only thing a service worker can do. Both background syncing and push notifications are enabled with this technology but require a bit more work to get started. Later when I share resources I'll provide some links talking about these aspects of service workers.
In the next installment in this series, I'll be doing just that along with showing more about how devtools can be used to work with PWAs.

Raymond Camden
Raymond Camden is a senior developer advocate for Auth0 Extend. His work focuses on Extend, serverless, and the web in general. He's a published author and presents at conferences and user groups on a variety of topics. Raymond can be reached at his blog (www.raymondcamden.com), @raymondcamden on Twitter, or via email at raymondcamden@gmail.com.
