
Communication is one of the biggest challenges that companies have to solve and more and more companies are adopting a chat platform of some sort to get the job done. Chat can power everything from internal communications to customer-facing support and live events. It is an incredibly powerful tool that can take a good product and make it into an industry leading company. With that said, it’s difficult to build (or find) a scalable chat platform – at least from scratch. Check out the Messaging UI Kit for inspiration!
Luckily, there are many companies that offer chat solutions that are accessible via an API. Take Stream Chat, for example. Stream Chat offers a beautiful solution that can power nearly any type of chat solution – the first version of Stream Chat can already help you implement “live streaming” like YouTube or Twitch, “messaging” such as WhatsApp, “gaming” for in-game communication, “commerce” for solutions similar to Intercom, or “team” chat if you want to build your own Slack style application.
In this tutorial, I’ll walk you through how to create a React Native Chat App using Stream Chat and Gifted Chat for styling.
Prerequisites
Basic knowledge of React Native and Node.js is required to follow this tutorial. The following package versions will be used:
- Node 11.2.0
- Yarn 1.13.0
- React Native CLI 2.0.1
- React Native 0.59.8
- Stream Chat 0.13.3
We all know that React Native moves at a very fast pace so things can break rather easily. Try ensuring you’ve installed those specific versions in the event the app isn’t working the way I’ve described.
App Overview
We will build a chat app which has the following features:
- Sending and receiving messages.
- Viewing the online presence of room members.
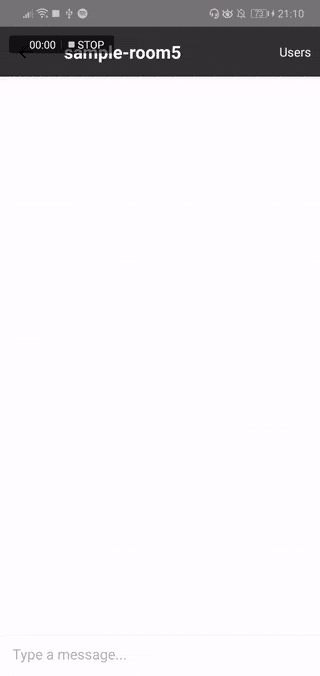
Here’s what the final output will look like:
You can view the app’s code in this GitHub repo.
1. Creating a Stream Chat App
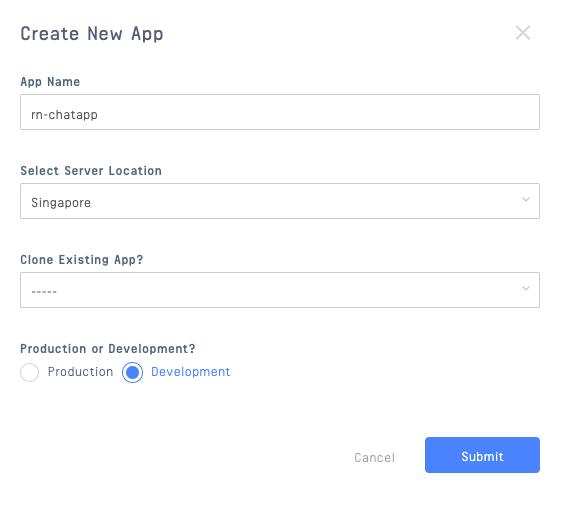
Before we can make use of Stream Chat, we first have to create a corresponding chat app instance. Sign up here if you don’t already have an account. If you just signed up, you can use the access keys from the app that's automatically created for you. If you already have an account, then log in to your dashboard and create the app:
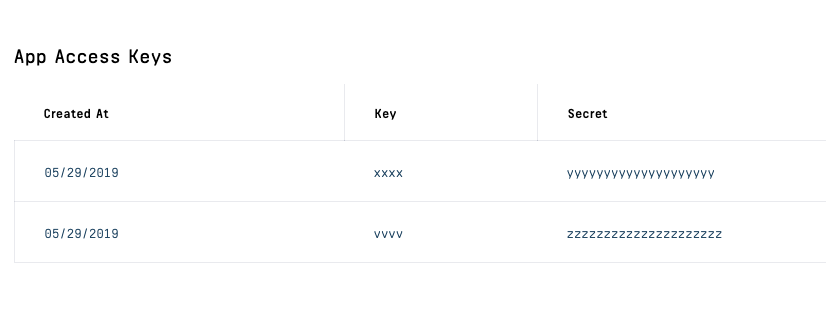
Once the app is created, you can view the access keys at the bottom of the page. You’ll use these to connect the React Native app to the Stream Chat service:
2. Bootstrapping the App
To get you set up quickly, I’ve prepared a starter project over at GitHub. Clone the repo and install the dependencies:
git clone https://github.com/anchetaWern/RNStreamChat.git
cd RNStreamChat
git checkout starter
yarn
react-native eject
react-native link react-native-gesture-handler
react-native link react-native-config
One of the dependencies (React Native Config) has an extra step each for Android and iOS. Be sure to follow those guides before you proceed to the next section.
3. Building the App
Now we’re ready to build the app! We will start by setting up the navigation. Then, we’ll proceed to the two screens: Login and Chat. Finally, we’ll add the code for the server.
Start by creating a Root.js file and adding the following:
// Root.js
import React, { Component } from 'react';
import { YellowBox } from 'react-native';
import { createStackNavigator, createAppContainer } from 'react-navigation';
import Login from './src/screens/Login';
import Chat from './src/screens/Chat';

YellowBox.ignoreWarnings(["Setting a timer"]);

const RootStack = createStackNavigator(
  {
    Login,
    Chat
  },
{This sets up the navigation for us using the React Navigation library.
Next, import the Root.js file in the App.js file and render it:
// App.js
import React, { Component } from 'react';
import { View } from 'react-native';

import Root from './Root';

export default class App extends Component {

  render() {
    return (
      <View style={styles.container}>
        <Root />
      </View>
    );
}This will provide us with the navigation functionality so the users can easily navigate between pages.
Login Screen
Next, we proceed to the Login screen. Create a src/screens directory at the root of your project directory. Once that’s done, create a Login.js file inside it and add the following:
// src/screens/Login.js
import React, { Component } from 'react';
import { View, Text, TextInput, Button } from 'react-native';
import axios from 'axios';
import StringHash from 'string-hash';
import Config from 'react-native-config';

const CHAT_SERVER = 'YOUR NGROK HTTPS URL'; // the server's base URL

class Login extends Component {
  static navigationOptions = {
    title: "Login"
  }

state = {This imports all the packages that we need for this screen:
- axios - for making HTTP requests to the server. The
CHAT_SERVERis the base URL of the corresponding chat server for this app. Even though most chat operations can be performed without the need for a server. Stream Chat requires it for things like authenticating the user or other sensitive operations such as adding members to a channel. - string-hash - for generating a hash for a specific string. We’re using this to come up with the user’s unique ID based on their username.
- react-native-config - for reading environment variables from
.envfiles. We’re specifically using this to have a single place where we can add things like the Stream Chat access keys.
Before we proceed with the rest of the code, create a .env file at the root of the project directory and add your Stream Chat app instance key: APP_KEY="xxxxx"
Moving on with the rest of the login code, we now render the UI:
// src/screens/Login.js
render() {
  const { username, is_loading } = this.state;
  return (
    <View style={styles.wrapper}>
      <View style={styles.container}>

        <View style={styles.main}>
          <View style={styles.field_container}>
            <Text style={styles.label}>Enter your username</Text>
            <TextInput
              style={styles.text_input}
              onChangeText={username => this.setState({ username })}
              value={username}
/>From the code above, there’s a TextInput for entering the username and a button for logging in.
When the login button is tapped on, the code below is executed. The executed code calculates the username’s hash using the string-hash library and submits it to the server’s /auth endpoint. The endpoint returns a unique token that’s based on the user’s ID. Later on, we’ll use that token to set the current user:
// src/screens/Login.js
login = async () => {
  const username = this.state.username;
  this.setState({
    is_loading: true
  });

  if (username) {
    try {
      const user_id = StringHash(username).toString();
      const response = await axios.post(`${CHAT_SERVER}/auth`, {
        user_id
      });

this.props.navigation.navigate("Chat", {Chat Screen
The Chat screen is where the meat of the app is. We’ll start by importing the packages we need, creating the component, and adding the styles. We’ll also initialize the Stream Chat client by supplying the APP_KEY from the .env file:
// src/screens/Chat.js
import React, { Component } from 'react';
import { View, TouchableOpacity, Text, FlatList } from 'react-native';
import { GiftedChat } from 'react-native-gifted-chat';
import { StreamChat } from 'stream-chat';
import Config from 'react-native-config';
import axios from 'axios';
import Modal from 'react-native-modal';

const CHAT_SERVER = 'YOUR NGROK HTTPS URL';

const client = new StreamChat(Config.APP_KEY);

class Chat extends Component {
We’re using the same set of libraries that we used in the login screen with the addition of the following:
- react-native-gifted-chat - used for easily building the chat UI.
- react-native-modal - used for showing modals. We’re specifically using it to show the modal which lists the channel members.
- stream-chat - Stream Chat’s official JavaScript SDK for the client side. This allows us to easily make use of Stream’s service.
Now that we have the preliminary framework of the app set up, we’ll initialize the navigation header:
// src/screens/Chat.js
static navigationOptions = ({ navigation }) => {
  const { params } = navigation.state;
  return {
    headerTitle: 'sample-room1',

    headerRight: (
      <View style={styles.header_right}>
        <TouchableOpacity style={styles.header_button_container} onPress={params.showUsersModal}>
          <View>
            <Text style={styles.header_button_text}>Users</Text>
          </View>
        </TouchableOpacity>
      </View>
In the code above, we’re setting the headerTitle to sample-room1 because that’s the name of the channel which we will be creating later. Additionally, headerRight contains the button for opening the modal for viewing the list of members.
Next, we’ll add the constructor. The main job of the controller is to get the navigation params that were passed from the login screen earlier. We’ll need this data to set the current user:
// src/screens/Chat.js
constructor(props) {
  super(props);
  const { navigation } = this.props;
  this.user_id = navigation.getParam('user_id');
  this.username = navigation.getParam('username');
  this.user_token = navigation.getParam('user_token');
}
Once the component is mounted, we’ll set the current user. For this, we need to pass in an object containing the id,name, and image as the first argument, and the user token as the second. We got the id and name from the navigation params earlier. The image is the user’s avatar. This is displayed in the chat UI. To keep it simple, we’ll use ui-avatars.com to generate an avatar image based on the user’s name:
// src/screens/Chat.js
async componentDidMount() {

  this.props.navigation.setParams({
    showUsersModal: this.showUsersModal
  });

  try {
    const user = await client.setUser(
      {
        id: this.user_id,
        name: this.username,
        image: `https://ui-avatars.com/api/?background=d88413&color=FFF&name=${this.username}`,
      },
this.user_tokenOnce the user is set, it means that Stream’s servers recognize the current user as a user, so we can now make a request to add them as a member of the channel:
// src/screens/Chat.js

await axios.post(`${CHAT_SERVER}/add-member`, {
  user_id: this.user_id
});
We’ll add the corresponding server code later. It’s important to understand that there are certain operations that are only available in the client side of Stream Chat’s SDK, whereas others are only available on the server side of the SDK; since these are different (though synchronous) parts of the app, we’ll take care of the client side operations all at one time and then go back to the server side of the app to perform the mirroring operations there.
Next, we’ll “subscribe” to the channel. “Subscribing” to a channel allows us to fetch the messages sent in that channel and listen for updates for when a new message is sent. To “subscribe” to a channel, we use the channel() method to connect. This accepts the channel type as the first argument and the channel ID as the second. In Stream Chat, there are various channel types we can use (messaging, gaming, livestream, etc.):
// src/screens/Chat.js
const channel = client.channel('messaging', 'sample-room1');
this.channel = channel;

const channel_state = await channel.watch({ presence: true });

this.channel_state = channel_state;

await this.asyncForEach(channel_state.messages, async (msg) => {
  const { message } = this.getMessage(msg);
  await this.setState((previousState) => ({
    messages: GiftedChat.append(previousState.messages, message)
  }));
});
The main purpose of channel types is to contain default permissions in a chat room. For example, we’re using the messaging channel type. This specific channel type only allows users to read channel data if they are an admin, moderator, or a member. But for livestream channel type, all users, including guest and anonymous users, may perform these actions.
Going back to the code, you’ll remember sample-room1 is the channel ID of the channel that we’ll be creating later, on the server.
To read the channel data (members, messages) and listen for changes in the channel (for example, when a new message is sent), we execute the watch() method from the channel. This accepts an optional object containing the settings for watching this channel. In this case, we set { presence: true } to specify that we want to get information on the online presence of the members.
Once that’s done, it returns the previous messages that were sent in the room. We loop through it and update the state with those messages. Note that we’re using a custom function for looping through the messages (asyncForEach). This is because we’re using the async/await pattern to wait for the state to be updated with the message on the current iteration before we proceed to the next one. This helps us avoid problems such as messages being jumbled.
Lastly, we listen for new messages being sent by subscribing to the channel’s message.new event. This is fired every time a new message is sent in the channel (including that of the current user).
Here’s the asyncForEach() function:
// src/screens/Chat.js
asyncForEach = async (array, callback) => {
  for (let index = 0; index < array.length; index++) {
    await callback(array[index], index, array);
  }
}
Below is the getMessage() function. This reformats the message data coming from Stream Chat, so it fits nicely to what the React Native Gifted Chat library is expecting:
// src/screens/Chat.js
getMessage = ({ id, user, text, created_at }) => {
  const data = {
    _id: id,
    text: text,
    createdAt: new Date(created_at),
    user: {
      _id: user.id,
      name: user.name,
      avatar: user.image
    }
  }

  return {
    message: data
  }
}
Next, we render the chat screen’s UI. React Native Gifted Chat is already doing most of the heavy-lifting for us when it comes to the chat UI. All we have to do is supply the necessary props and everything will be rendered for us. The other piece of UI in this code is the modal for viewing the members of the channel. It uses a FlatList to list the users:
// src/screens/Chat.js
render() {
  if (this.channel_state) {
    const { messages, is_users_modal_visible } = this.state;
    const channel_users = this.channel_state.members;

    return (
      <View style={styles.container}>
        <GiftedChat
          messages={messages}
          onSend={messages => this.onSend(messages)}
          user={{
            _id: this.user_id
          }}
/>Below is the code for renderUser(). This shows a pretty standard UI for indicating the user’s online presence (gray circle for offline and green circle for online):
// src/screens/Chat.js
renderUser = ({ item }) => {
  const online_status = (item.user.online) ? 'online' : 'offline';

  return (
    <View style={styles.list_item_body}>
      <View style={styles.list_item}>
        <View style={styles.inline_contents}>
          <View style={[styles.status_indicator, styles[online_status]]}></View>
          <Text style={styles.list_item_text}>{item.user.name}</Text>
        </View>
      </View>
    </View>
  );
}
When the user presses the send button, the code below is executed. It uses the sendMessage() method from the channel and accepts an object containing the message data. In this case, we’re only supplying the text because that’s the only piece of data that we need. But if you want, you can also supply attachments, mentioned users, and other custom data:
// src/screens/Chat.js
onSend = async ([message]) => {
  const response = await this.channel.sendMessage({
    text: message.text
  });
}
Here’s the code for showing and hiding the users’ modal:
// src/screens/Chat.js
hideModal = (type) => {
  this.setState({
    is_users_modal_visible: false
  });
}

showUsersModal = () => {
  this.setState({
    is_users_modal_visible: true
  });
}
Lastly, disconnect the user before the component is unmounted. This will update the user’s online presence to offline so it’s also reflected on the UI of the other users:
// src/screens/Chat.js
componentWillUnMount() {
  client.disconnect();
}
Stream Server
Let’s proceed to the final part of this tutorial, the server. The server is responsible for authenticating the user, creating the channel, and adding members to it.
Start by installing the dependencies. You can do that by executing yarn inside the server directory.
Next, create a .env file and add the APP_KEY and APP_SECRET from your Stream Chat app dashboard.
After that, we’ll import and initialize the packages we need:
// server/server.js
const express = require("express");
const bodyParser = require("body-parser");
const cors = require("cors");
const StreamChat = require('stream-chat').StreamChat;

require("dotenv").config();
const app = express();

const server_side_client = new StreamChat(
  process.env.APP_KEY,
  process.env.APP_SECRET
);

app.use(bodyParser.urlencoded({ extended: true }));That includes the following:
- express – for spinning up a Node.js server.
- body-parser – for parsing the request body. In this case, we’re parsing it as JSON object.
- cors – for enabling cross-origin resource sharing in the server. This allows us to make a request from the React Native app.
- stream-chat – Stream Chat’s server SDK for Node.js.
- dotenv – for loading environment variables from a
.envfile.
Going back to the code, we now add the route for authenticating the user:
// server/server.js
app.post("/auth", async (req, res) => {
  const user_id = req.body.user_id;
  console.log('user ID: ', user_id);
  if (!user_id) {
    return res.status(400);
  }

  return res.send({
    token: server_side_client.createToken(user_id)
  });
});
Note: In the code above, we’re simply generating a token based on the user ID. However, in a production app, you would most likely have a database of existing users and you’ll have to authenticate them via your own authentication system before you actually generate the token and return it to the requester.
Next, add the route for creating the channel that we will be using for demo purposes. To create a channel, call the channel() method from the Stream Chat server-side client we initialized earlier. The first and second arguments are pretty much the same as when we connected to the channel earlier, in the chat screen: channel type, channel ID. But this time, we also have to supply a third argument: an object containing the basic channel data. This object includes the name, cover image, and user ID of the creator. We’ll hit this route later, once we run the app:
// server/server.js
app.get("/create-channel", async (req, res) => {
  const user_id = req.query.user_id;
  const sample_channel = server_side_client.channel('messaging', 'sample-room1', {
    name: 'Sample Room 1',
    image: 'http://bit.ly/2O35mws',
    created_by_id: user_id,
  });

  const create_channel = await sample_channel.create();
  console.log("channel: ", create_channel);

  res.send('ok');
});
Now, add the route for adding a room member. This expects the user_id to be passed in the request body. To add members to the room, you first get the channel instance by calling the channel() method and passing in the channel type and channel ID. Once that’s done, call the addMembers() method and supply the ID of the user you want to add:
// server/server.js
app.post("/add-member", async (req, res) => {
  const user_id = req.body.user_id;
  const sample_channel = server_side_client.channel('messaging', 'sample-room1');
  const add_member = await sample_channel.addMembers([user_id]);
  console.log("members: ", add_member);
  res.send('ok');
});
Next, add the route for testing the sending of messages. This will be useful in case you don’t have another device on hand to test the chat. At this point, you already know the drill: get the channel instance, then call the method for the operation that you want to do. In this case, we want to send a message, so we call the sendMessage() method. This method accepts the text and the user_id of the person who will send it:
// server/server.js
app.get("/send-message", async (req, res) => {
  const user_id = req.query.user_id;
  const sample_channel = server_side_client.channel('messaging', 'sample-room1', {
    created_by_id: user_id,
  });

  const create_message = await sample_channel.create();
  console.log('create message: ', create_message);

  const text = 'Hello world!';
  const message = {
    text,
    user_id,
  }
  const send_message = await sample_channel.sendMessage(message);
  console.log('send message: ', send_message);

  res.send('ok');
});
Lastly, let’s run the server on port 5000:
// server/server.js
const PORT = 5000;
app.listen(PORT, (err) => {
  if (err) {
    console.error(err);
  } else {
    console.log(`Running on ports ${PORT}`);
  }
});
4. Running the React Native App
At this point, we can now test the app! We’ll start by running the server:
cd server & node server.js
Then, we’ll expose the server to the internet using ngrok:
~/.ngrok http 5000Next, update the src/screens/Login.js and src/screens/Chat.js file with the ngrok HTTPS URL.
At this point, we haven’t really created the channel yet so the app won’t work. To set this up, we have to temporarily comment out the code for adding a member into the channel, and the code for subscribing to it:
// src/screens/Chat.js
async componentDidMount() {

  this.props.navigation.setParams({
    showUsersModal: this.showUsersModal
  });

  try {
    const user = await client.setUser(
      {
        id: this.user_id,
        name: this.username,
        image: `https://ui-avatars.com/api/?background=d88413&color=FFF&name=${this.username}`,
      },
this.user_tokenOnce that’s done, you can run the app. Enable live reload and remote debugging so you can see the console.log output. Then run one of the following commands:
react-native run-android
OR
react-native run-ios
Log in with the user that we will use as the channel creator.
Once the user is logged in, and the code for setting the user is executed (indicated by “user is set!” console.log output) we know that the user is now recognized by Stream Chat.
In the server terminal, you should see the user ID outputted in the console. Copy that and access http://localhost:5000/create-channel?user_id=THE_USER_ID in your browser. That will create the channel for us. If it responds with “ok”, you can go ahead and remove the comments on the code we commented out earlier!
At this point, you can now test the app. If you use a new username for logging in, they will be automatically added as a member of the room and you can send messages. If you don’t have another device to test on, simply hit the following URL to test the receiving of messages: http://localhost:5000/send-message?user_id=THE_USER_ID.
Now, have some fun!
Final Thoughts & Next Steps
In this tutorial, you learned how to create a simple chat application using Stream Chat. Specifically, you learned how to create a channel, add members, send and receive messages, and show the online presence of the members. This is obviously a very simple implementation of how you might build an internal chat platform for your company (or even a very casual “chat room” style way for you to communicate with your users and them to communicate with each other, in order to solve problems or come up with ideas collaboratively), but it gets the creative juices flowing for building a more robust, production-ready solution for your own use case(s).
If you want to learn more about Stream Chat, be sure to check out this tutorial. It shows how to use Stream’s chat components to build the UI of the app (more customization!), as opposed to using the styles built into Gifted Chat. The documentation is also a good place to learn more about all the features Stream Chat has to offer!
If you don’t have time to go through the whole tutorial now, but want to peer into how we built any individual part of the app, you can view the full code in this GitHub repo.
