
Nic Raboy is an advocate of modern web and mobile development technologies. He has experience in Java, JavaScript, Golang, and a variety of frameworks such as Angular, NativeScript, and Apache Cordova. Nic writes about his development experiences related to making web and mobile development easier to understand.

It is no question that the future is going to be automated. We have automated self-driving vehicles, voice assistants, call center and text-based bots, and so much more. However, what does it take to bring automation to your business?
The short answer is that it doesn’t take much more than building standard applications if you’re using the right tools.
In this tutorial we’re going to explore creating a chatbot that can take some of the workload off your human employees by leveraging Amazon Lex for deep learning and conversational interfaces, Couchbase NoSQL as the database, and Node.js for interacting with the database.
The Requirements for this Tutorial
There are a few software requirements that must be met in order to be successful with this tutorial and project:
- Couchbase Server 5.0+ must be installed and available remotely.
- An AWS account.
- Docker or a virtual machine software.
Because we’ll be using Amazon products such as Lex and Lambda, an AWS account must be available. Both products are pay as you go, so a free tier will likely be more than enough. Since we’ll be using Amazon products, these products need access to Couchbase. For this reason Couchbase cannot be running from localhost, it must be installed somewhere remotely. Finally, since the Couchbase Node.js SDK uses native dependencies, Docker or some other virtual machine software must be available to download the dependencies as Linux, which is what Lambda expects.
Configuring Amazon Lex for User Interaction
Before we get into the code, we can spend our time configuring Lex. While Lambda will allow us to make our bot useful, you don’t need any kind of backend to play around with Lex.
Go to Lex in your AWS portal and choose to create a new custom bot.
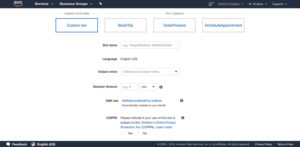
Since we’re creating a text-based bot, the output voice should be none. Everything else should just be the defaults or whatever you deem to be most appropriate.
With the custom bot created, the first step is to start creating intents. For this example we’re going to create an AboutIntent, GetProfileIntent and UpgradeServiceIntent, two of which will use Couchbase for information.
Let’s start with the AboutIntent.
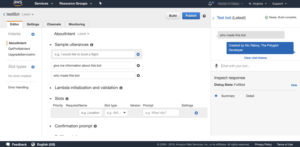
The idea behind the AboutIntent is to just get us started. We won’t be using the database for this intent, but it will eventually connect to our Lambda function. This intent is to give us information about the bot.
To trigger our intent, we need to define some sample utterances which are basically a list of possible phrases. Take the following for example:
|
1 2 3 |
who made this chatbot what can you tell me about yourself give me information about this bot |
The above phrases are what a user might ask. The more the better because Lex will learn from the training data and be able to fill in the gaps if someone asks something that isn’t from the list.
For now we’ll leave Fulfillment as Return parameters to client, but we’ll eventually switch it to Lambda.
Let’s take a look at GetProfileIntent now.
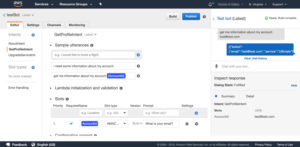
This intent is a slightly different because we want to be able to accept dynamic information from the user, something that will change between different users. We can allow dynamic information through slot variables.
Take the following sample utterances which contain slot variables:
|
1 2 |
i need some information about my account get me some information about my account {AccountId} |
Not all sample utterances need to contain slot variables, but notice that the variable is wrapped in curly brackets. Each variable used can be defined within the intent configuration. For example, our AccountId is defined as an AMAZON.EmailAddress with a default prompt phrase.
So what does this mean?
When Lex determines our slot variable exists, it must be a valid email address. If Lex determines we’re trying to execute the GetProfileInfo intent, but the variable doesn’t exist, it will use our prompt phrase to ask the user for that variable information. This makes the conversation fluid, but without omitting any required data.
Finally, let’s look at UpgradeServiceIntent.
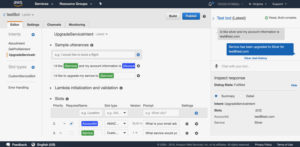
The UpgradeServiceIntent is similar to our GetProfileIntent, but this time we have two possible slot variables. Take the following sample utterances:
|
1 2 |
i'd like {Service} and my account information is {AccountId} i'd like to upgrade my service to {Service} |
Remember, two sample utterances is not nearly enough, but hopefully you get the idea when it comes to how variables can be used. The idea is that you want conversation with this chatbot to be fluid like a real person because then you can replace the real person with the bot.
There is an exception though with the UpgradeServiceIntent slot variables. The Service variable is a custom slot that we must create.
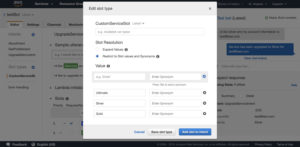
In our example we want to create a CustomServiceSlot where the name isn’t important, but the data is. We want to define the possible things that can exist within the variable. In our example we are saying that the slot can be any of the following:
- Silver
- Gold
- Ultimate
We’re assuming the three items above are possible services. This is just an example and your needs may vary.
At this point in time you can save each of the three intents and build your bot.
Developing AWS Lambda Logic with Simple JavaScript and Couchbase
We have our intents, our sample utterances, and our slot variables. It is time to create logic to respond back to our user when intents are triggered.
You should already have Couchbase installed, configured, and ready to go. The goal of this tutorial is not how to setup Couchbase, but how to use it with Lex.
Within Couchbase, add the following document to your Bucket:
|
1 2 3 4 |
{ "email": "test@test.com", "service": "Silver" } |
We’re going to assume the above document is a customer and they currently have the “Silver” plan, whatever that might mean. In theory, this example could be useful to any organization that has a call or chat line. For example, think Comcast for internet. If you create a bot, your users could call in or chat in, and request changes to their account. The bot could interpret this and do the changes without a person doing them.
On your computer, create a new directory and execute the following:
|
1 2 3 |
npm init -y npm install git+https://github.com/couchbase/couchnode.git#v2.5.1 --save touch index.js |
The above commands will create a new package.json file and install the Couchbase SDK. We are using the GitHub URL for reasons of it having native dependencies that need to be built from source. If you don’t have the touch command, create an index.js file manually.
Within the index.js file, add the following boilerplate code:
|
1 2 3 4 5 6 7 8 9 10 11 12 13 14 15 16 17 18 19 20 21 22 23 24 25 26 27 28 29 30 31 32 33 34 35 36 |
const Couchbase = require("couchbase"); var cluster, bucket; const dispatcher = async (event) => { let response = { "dialogAction": { "type": "Close", "fulfillmentState": "", "message": { "contentType": "PlainText", "content": "" } } }; let cbResult; switch(event.currentIntent.name) { default: response.dialogAction.fulfillmentState = "Failed"; response.dialogAction.message.content = "The request could not be understood."; break; } return response; } const handler = (event) => { if(cluster == null || bucket == null) { cluster = new Couchbase.Cluster("couchbase://COUCHBASE_HOST_HERE"); cluster.authenticate("COUCHBASE_USERNAME", "COUCHBASE_PASSWORD"); bucket = cluster.openBucket("COUCHBASE_BUCKET"); console.log(bucket); } return dispatcher(event); }; exports.handler = handler; |
There are a few things to note in the above code. I’ve only added placeholder information for the host, username, password, and Bucket. You’ll need to replace it with that of your actual Couchbase installation.
What’s happening above is we’re creating a Lambda function with a dispatcher function. When Lex receives a chat message, it creates a request object to be sent to Lambda. In our scenario, Lambda takes the request object and feeds it into a dispatcher after establishing a connection to the database. Inside the dispatcher, a response object is created and the intent is analyzed.
As of right now all intents are bad intents as they will only hit the default condition. We’re going to change that.
Let’s start by worrying about our AboutIntent since it is the most simple:
|
1 2 3 4 5 6 7 8 9 10 |
switch(event.currentIntent.name) { case "AboutIntent": response.dialogAction.fulfillmentState = "Fulfilled"; response.dialogAction.message.content = "Created by Nic Raboy, The Polyglot Developer"; break; default: response.dialogAction.fulfillmentState = "Failed"; response.dialogAction.message.content = "The request could not be understood."; break; } |
If Lex determines the user is asking for information and chooses the AboutIntent we’re going to respond with a basic, but appropriate message. Otherwise, we’re still going to fail the request.
Now let’s take a look at a more complicated intent, for example, the GetProfileIntent:
|
1 2 3 4 5 6 7 8 9 10 11 12 13 14 |
case "GetProfileIntent": cbResult = await new Promise((resolve, reject) => { let statement = "SELECT * FROM lexbot WHERE email = $email"; let query = Couchbase.N1qlQuery.fromString(statement); bucket.query(query, { email: event.currentIntent.slots.AccountId }, (error, result) => { if(error) { return reject({ status: "Failed", message: error.message }); } resolve({ status: "Fulfilled", message: JSON.stringify(result) }); }); }); response.dialogAction.fulfillmentState = cbResult.status; response.dialogAction.message.content = cbResult.message; break; |
The idea behind this intent is when the user asks for information about their profile, the document should be returned. What we’re doing is we’re creating a N1QL query with the email as the condition. Remember the Lex AccountId variable is just an email for our example. The results of that query are then serialized and returned back to Lex to be shown to the user.
Now let’s complicate things a little more. Let’s look at our UpgradeServiceIntent:
|
1 2 3 4 5 6 7 8 9 10 11 12 13 14 15 16 17 18 19 20 21 22 23 24 25 26 27 28 29 30 31 |
case "UpgradeServiceIntent": cbResult = await new Promise((resolve, reject) => { let statement = ` UPDATE lexbot SET service = $service WHERE email = $email `; let query = Couchbase.N1qlQuery.fromString(statement); bucket.query( query, { service: event.currentIntent.slots.Service, email: event.currentIntent.slots.AccountId }, (error, result) => { if(error) { return reject({ status: "Failed", message: error.message }); } resolve({ status: "Fulfilled", message: "Service has been upgraded to " + event.currentIntent.slots.Service + " for " + event.currentIntent.slots.AccountId }); } ); }); response.dialogAction.fulfillmentState = cbResult.status; response.dialogAction.message.content = cbResult.message; break; |
We’re going to do another N1QL query, but this time an UPDATE operation. The idea is that the user wants to upgrade their service. They provide their account information and the service they want, and our Lambda logic handles it without human intervention.
We’re not doing any data sanitization, but we could.
At this point our Lambda function is done. We can respond to three different queries through fluid human chatting with Lex. Now I mentioned that the Couchbase SDK uses native dependencies. Because the focus of this tutorial is not Lambda, I’m going to refer you to a previous tutorial I wrote titled, Deploying Native Node.js Dependencies on AWS Lambda.
After you upload the Lambda package, you need to go back into the Lex dashboard and for each intent choose AWS Lambda function as the Fulfillment option. Once done, rebuild and your chatbot should get its data from your Lambda code, which is getting its data from Couchbase.
Conclusion
You just saw how to create a simple, but potentially useful chatbot with Amazon Lex and Couchbase. Chatbots are very useful and probably the future when it comes to replacing humans in call centers or other support lines.
In a production scenario, you’ll probably want to do data validation on anything that comes in from Lex. For example checking if data exists, or even doing things more securely. In this example I could change the service of anyone just by providing the email address. You’ll probably want to change that in production.
This post is brought to you by the Couchbase Community Writing Program