Fasten Your Seatbelts! RadTabbedWindow Lands on XAML Islands

Telerik UI for WPF in R2 2019 is here and I am happy to announce that it can help you take the navigation in your WPF application to the next level. Say hi to the latest addition to our collection of WPF navigation controls – the brand new RadTabbedWindow.
Introducing RadTabbedWindow
It may sound like a hybrid WPF control, born from the equation RadTabControl + RadWindow = RadTabbedWindow. Don’t worry, RadTabbedWindow is not like hybrid cars – this control is the best of both worlds and there are no two ways about it.
Any application deserves an efficient navigation system. Luckily, tabbed navigation is one good such system. Tabbed navigation can absolutely be described as a “good conversation” with your clients. If implemented properly, it clearly and precisely tells the users exactly:
- where they are
- what's available to them
- how can they access what's available
Therefore, a good navigation system needs to meaningfully separate content into different sections, clearly show what content is available and interactively present that content.
Want to bring the productivity of tabbed window management to your WPF application? Let me guide you through its key features.
Key Features & Events
The control has a rich API that greatly facilitates the customization of its functionality and appearance. Some of the tabbed window's key features include:
- DragDrop support:
- Reorder tabs in a single window
- Drag out tabs to create new window
- Drag drop tabs from one window to another
- Pin/unpin/close functionality (through the UI or programmatically)
- Adding tabs runtime (through the UI or programmatically)
- Data Binding
- Out-of-the-box touch support
Oh, let’s not forget to mention that the RadTabbedWindow control also exposes a number of events that greatly contribute to the easy customization of the control’s behavior:
- TabbedWindowCreating (new one created via drag and drop)
- AddingNewTab
- PreviewTabPinned & TabPinned
- PreviewTabUnpinned & TabUnpinned
- PreviewTabClosed & TabClosed
- PreviewSelectionChanged & SelectionChanged
More detailed information can be found in the great documentation article for the control.
P.S. The tabbed window comes with the built-in variety of our Telerik UI for WPF Themes Suite (this means even easier look and feel enhancements). Also, do not hesitate to benefit from the flawless color customization and rapid palette creation using the Color Theme Generator. Now let’s move on to the interesting part! The next sections will guide you through embedding UWP’s WebView control inside RadTabbedWindow.
Hosting WebView in RadTabbedWindow
Do you remember XAML Islands? They are like little containers inside WPF apps - ones that can hold little pieces of XAML to render UWP controls. This way, we can now bring an even richer app experience with the modern UWP WebView control within our tabbed window.
With the newer Windows 10 versions, you can host UWP controls in non-UWP desktop applications using this feature. More information on this can be found here.
Have you already tried them? Shame on me, I haven’t.
What better time than now to test the waters of XAML Islands? :)
Requirements for Hosting WebView
There are some requirements that you need to be sure are met before we proceed:
- Visual Studio 2017
- Windows 10, version 1803
- .NET Framework 4.6.2 or a later release
- Microsoft.Toolkit.Forms.UI.Controls.WebView NuGet package
Once we have check marks next to all the above bullets, we are ready to drag the WebView control from Visual Studio’s Toolbox!
Step-by-Step Guide
In this guide, I am using the tabbed window with NoXaml version and the Fluent theme.
- Create an empty WPF application, add references to the following assemblies and merge the corresponding ResourceDictionaries in App.xaml:
- Telerik.Windows.Controls
- Telerik.Windows.Controls.Navigation
- Telerik.Windows.Controls.Data
Add an empty Style targeting the main window which is based on RadTabbedWindowStyle. Your App.xaml should look like:
<Application.Resources><ResourceDictionary><ResourceDictionary.MergedDictionaries><ResourceDictionarySource="/Telerik.Windows.Themes.Fluent;component/Themes/System.Windows.xaml"/><ResourceDictionarySource="/Telerik.Windows.Themes.Fluent;component/Themes/Telerik.Windows.Controls.xaml"/><ResourceDictionarySource="/Telerik.Windows.Themes.Fluent;component/Themes/Telerik.Windows.Controls.Navigation.xaml"/></ResourceDictionary.MergedDictionaries><StyleTargetType="local:MainWindow"BasedOn="{StaticResource RadTabbedWindowStyle}"/></ResourceDictionary></Application.Resources> - Add xmlns:telerik="http://schemas.telerik.com/2008/xaml/presentation," replace Window with telerik:RadTabbedWindow and remove the empty Grid. Your MainWindow.xaml should look like the following:
<telerik:RadTabbedWindowx:Class="WpfApplication1.MainWindow"xmlns:local="clr-namespace:WpfApplication1"mc:Ignorable="d"Header="MainWindow"Height="800"Width="1300"></telerik:RadTabbedWindow>To be able to show WebView as RadTabbedWindow’s Content you need to add the following namespace and set AllowTransparency property to false. This property is true by default because of the underlying shadow, present in all themes.
xmlns:navigation="clr-namespace:Telerik.Windows.Controls.Navigation;assembly=Telerik.Windows.Controls.Navigation"navigation:RadWindowInteropHelper.AllowTransparency="False"In MainWindow.xaml.cs, you should inherit from RadTabbedWindow instead of Window:
publicpartialclassMainWindow : RadTabbedWindow{publicMainWindow(){InitializeComponent();}} - If you want the tabbed window to be the main window, you need to remove the StartupUri from the App.xaml file and modify App.xaml.cs to contain the following:
protectedoverridevoidOnStartup(StartupEventArgs e){newMainWindow().Show();base.OnStartup(e);}Otherwise - you can create it as a separate window by adding a new Window to your project and changing the TargetType of the empty style from step 1 accordingly.
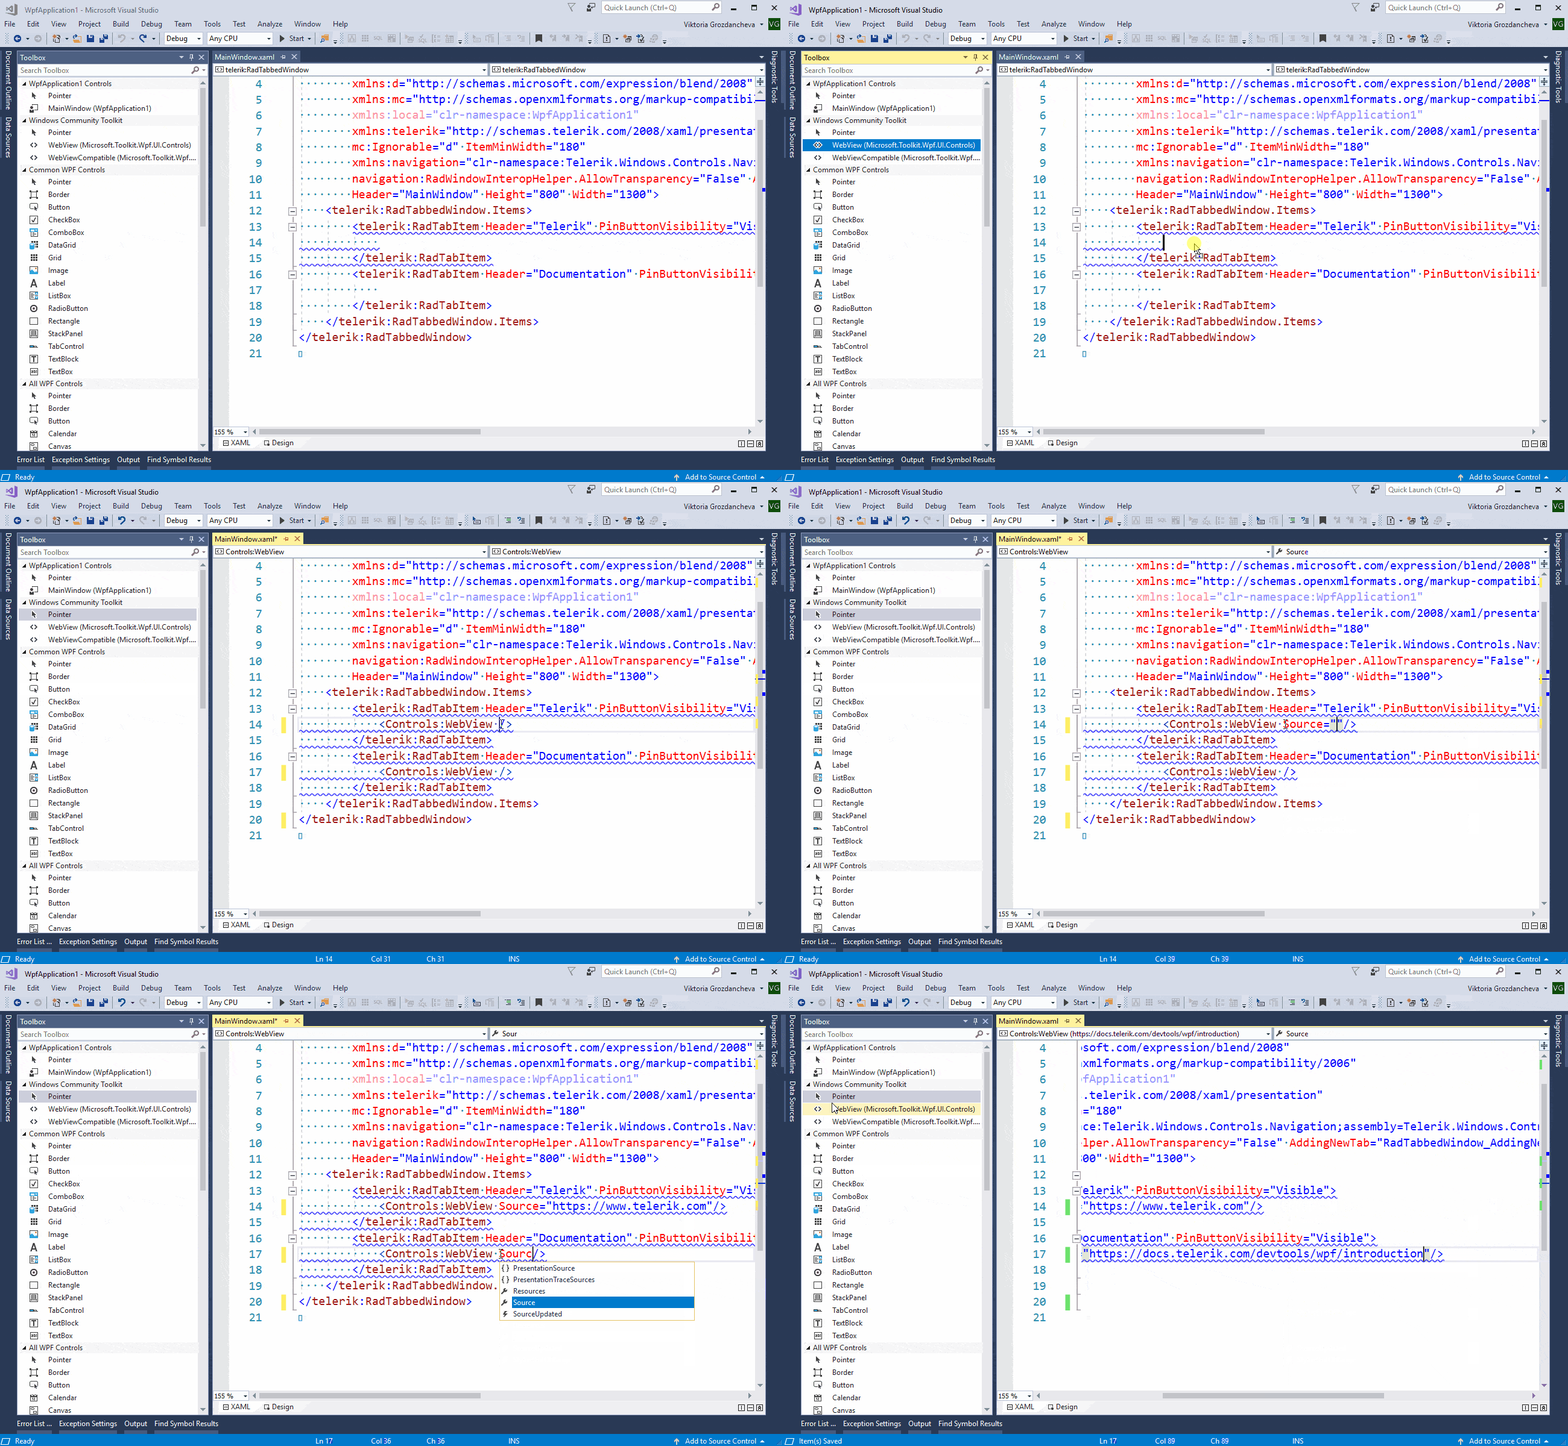
- Add new item to tabbed window, drag WebView from Visual Studio’s Toolbox as its content and make the desired configurations:

- Run the application and enjoy!

private void RadTabbedWindow_AddingNewTab(object sender, Telerik.Windows.Controls.TabbedWindow.AddingNewTabEventArgs e)

{

    var wv = new WebView();

    wv.Source = new Uri("https://google.com");

    RadTabItem newTab = e.Item as RadTabItem;

    if (newTab != null)

    {

        newTab.Header = "New tab";

        newTab.Content = wv;

    }

}
It didn’t hurt, and it actually looks pretty cool, doesn’t it? As the Telerik R2 2019 Release is already live, do not hesitate to give RadTabbedWindow a try right away and feel more than welcome to share your thoughts in the comments section below.
If by some chance this is the first time you've heard about Telerik UI for WPF, then you can explore the great variety of key features, controls and themes ready for the taking on our product page.

Viktoria Grozdancheva
Viktoria is a Senior Front-end Developer with 5+ years of experience designing and building modern UI for desktop and mobile platforms on Microsoft/Telerik technology stacks. Her spare time is dedicated to friends and family and discovering new pieces of the world. Find her on Twitter and LinkedIn.
