Localization and Globalization for Xamarin.Forms Applications Using Telerik UI for Xamarin

This blog will introduce you to the built-in mechanism for globalization and localization of the Telerik UI for Xamarin suite, and help you understand the difference between the two terms.
I have the feeling that these two terms - globalization and localization - are often misunderstood. Therefore I would like to start with more general questions and then will dive into some specifics.What is Globalization?
According to W3, “Globalization is the process of design and development of a product, application or document content that enables easy localization for target audiences that vary in culture, region, or language. Some people use other terms, such as "internationalization” to refer to the same concept.”
What about Localization?
The process of adaptation of a product, application or document content to meet the language, cultural and other requirements of a specific target market (a locale). Often thought of only as a synonym for “translation of the user interface and documentation,” localization is a substantially more complex issue. It can include customization related to:
- Numeric, date and time formats
- Use of currency
- Keyboard usage
- Collation and sorting
- Symbols, icons and colors
- Text and graphics containing references to objects, actions or ideas which, in a given culture, may be subject to misinterpretation or viewed as insensitive
- Varying legal requirements
This list is just a start - localization can apply to many more things as well.
How Do These Relate to Application Development?
When it comes to the user interface of an application, these terms boil down to applying correct strings and various formats depending on the language settings of the respective device. This task sounds simple and straightforward, but it can become hard for execution, especially in cases where third party UI components are used.
We understand this, and therefore Telerik UI for Xamarin provides an easy to use mechanism which can change the predefined strings in our components. Examples of such strings can be found in several of our controls including RadDataGrid, RadCalendar & Scheduling UI, RadAutoCompleteView, RadNumerInput and more.
It is worth mentioning that not all the components take advantage of this mechanism simply because there are no predefined strings in every single one. For those which need any predefined string(s) the TelerikLocalizationManager is used to resolve the exact characters to display. Internally those components work with keys instead of specific string values. At runtime, the localization manager is expected to resolve those keys to concrete strings.
What is TelerikLocalizationManager?
This is a class which uses one of two available approaches to map the predefined keys of all components of the Telerik UI for Xamarin suite with exact strings which will be visualized.
The first method requires extending the default manager by overriding a single function which does the actual mapping. It returns a string for a given key (a.k.a. key-value pair). Here is an example:
public class CustomTelerikLocalizationManager : TelerikLocalizationManager
{
    public override string GetString(string key)
    {
        if (key == "And")
        {
            return "И";
        }
        if (key == "Or")
        {
            return "Или";
        }
        if (key == "ResetText")
        {
            return "Изчисти";
        }
        if (key == "FilterText")
        {
            return "Филтрирай";
        }
        if (key == "FilterUISectionText")
        {
            return "Филтрирай по:";
        }
        return base.GetString(key);
    }
}
Once the mapping is done, an instance of the customized localization manager should be assigned to the static TelerikLocalizationManager.Manager property before the UI is initialized and rendered. In a XamarinForms application a good place to do this is just before the InitializeComponent() function of a page.
public MainPage()
{
    TelerikLocalizationManager.Manager = new CustomTelerikLocalizationManager();

    this.InitializeComponent();
}
However, if your application initializes any resources at earlier stage, you should consider instantiating the extended manger on an earlier stage as well.
Using TelerikLocalizationManager to Localize a Xamarin.Forms Application
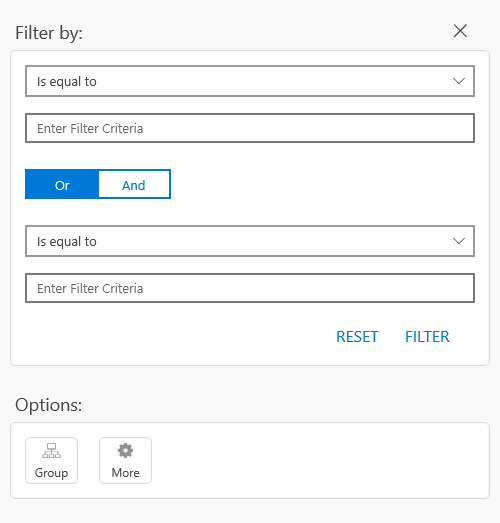
This example translates part of the filtering UI of the RadDataGrid component to Bulgarian. You can recreate the exact scenario by following the Getting Started article in our documentation. Here is how the filtering UI looks like by default.
After applying the customized localization manager, the visualized strings change like this:
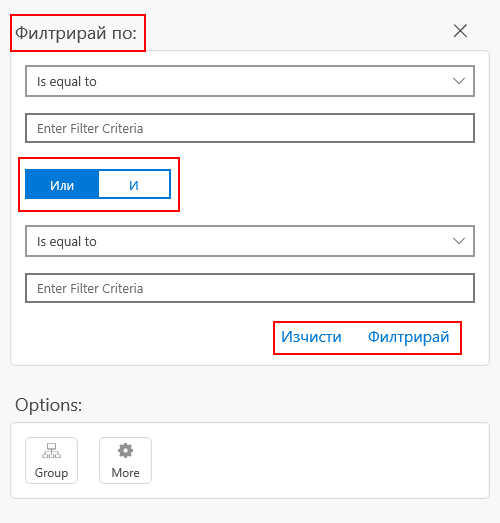
If you are going to translate an application, most likely you will have to translate it to many languages. This can be done by creating many customized localization managers – one for each supported language. In addition to this, the developer should decide which manager is to be used when instantiating one. Here is one way to do it:
public partial class MainPage : ContentPage
{
    public MainPage()
    {
        ILocalizationManager manager = null;

        if(CultureInfo.CurrentUICulture.Name == "bg-BG" )
        {
            manager = new CustomTelerikLocalizationManager();
        }
        else if (CultureInfo.CurrentUICulture.Name == "fr-FR")
        {
            // new up your French manager
        }
        else if (CultureInfo.CurrentUICulture.Name == "de-DE")
        {
            // new up your German manager
        }
        ...

        TelerikLocalizationManager.Manager = manager;
        InitializeComponent();
        ...
    }
}
Localizing Xamarin Application with Resouces
On the other hand, the second available approach for providing key-value pairs eliminates the need of choosing between multiple managers. It makes use of the well-known .resx files. You just need to create one (or several), update them to match a convention and embed them into your application. Because of the convention the TelerikLocalizationManager will automatically pick and read the correct file depending on the language settings of the device.
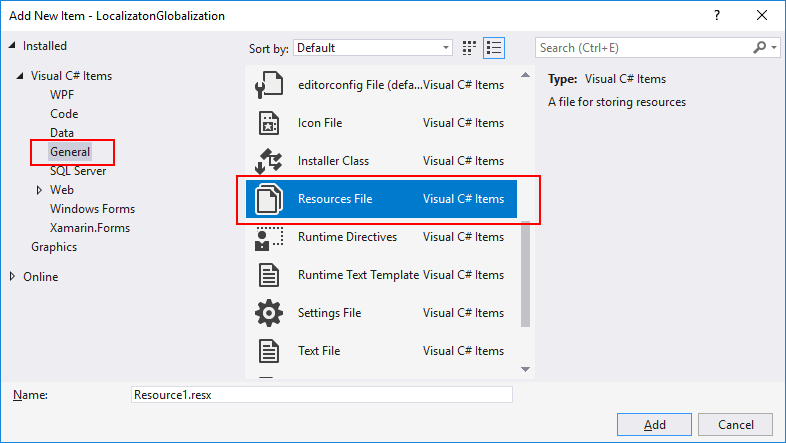
Speaking about creating such files, here are the steps that can be followed to do so. Usually Visual Studio provides a convenient item template for .resx files. It can be used by right-clicking on the portable project and navigating to Add > New Item… in the newly opened dialog navigate to Visual C# Items > General > Resources File.
However, as a mobile developer it is a common pitfall to install only the “Mobile development with .NET” workload when installing Visual Studio. It gives you everything you need to get started with XamarinForms, but unfortunately, by default, this workload does not provide the resources file item template. You will have to install another workload to get it. This can be done by opening the Visual Studio Installer, going to More > Modify under Workloads, checking “.NET desktop development” and pressing Modify.
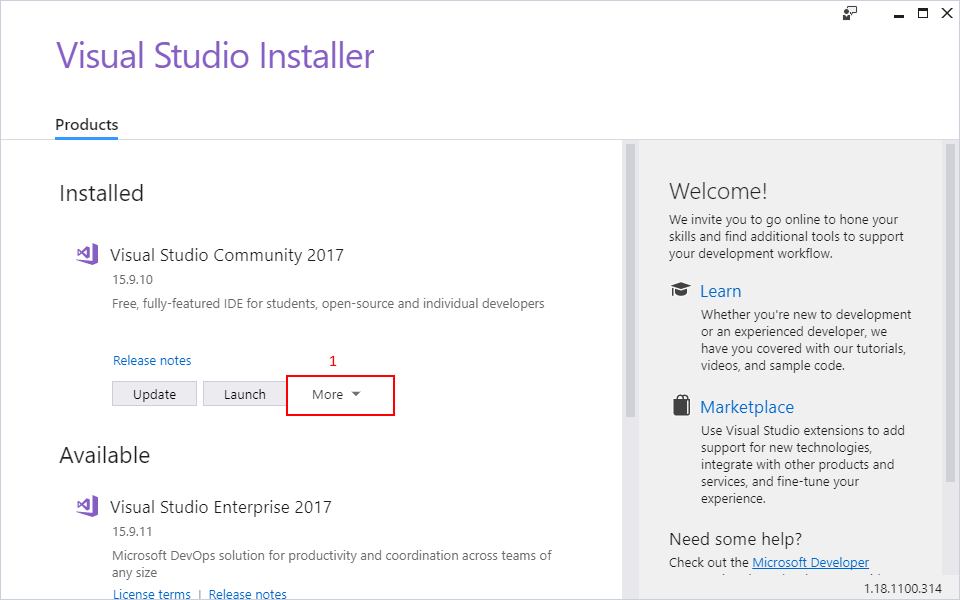
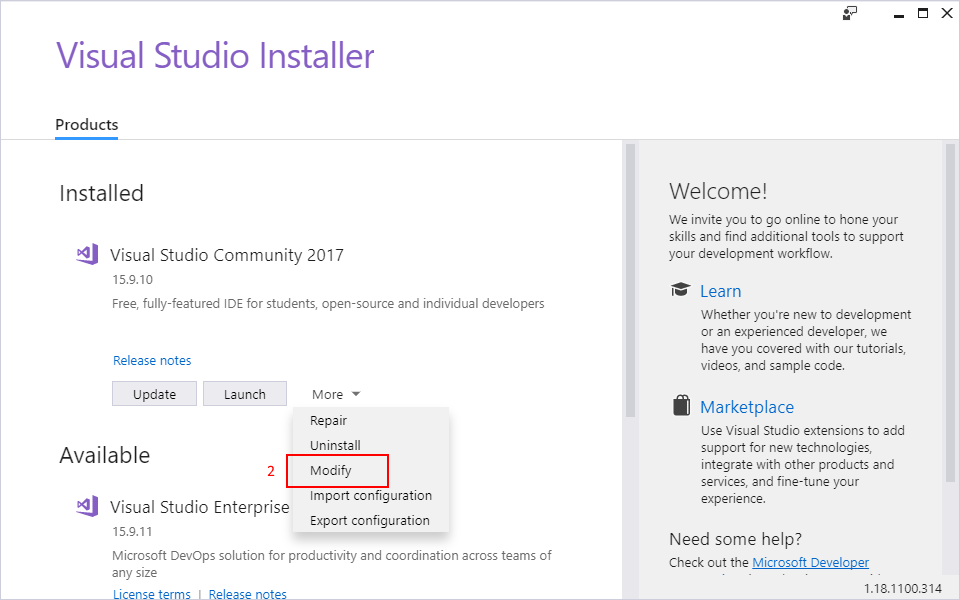
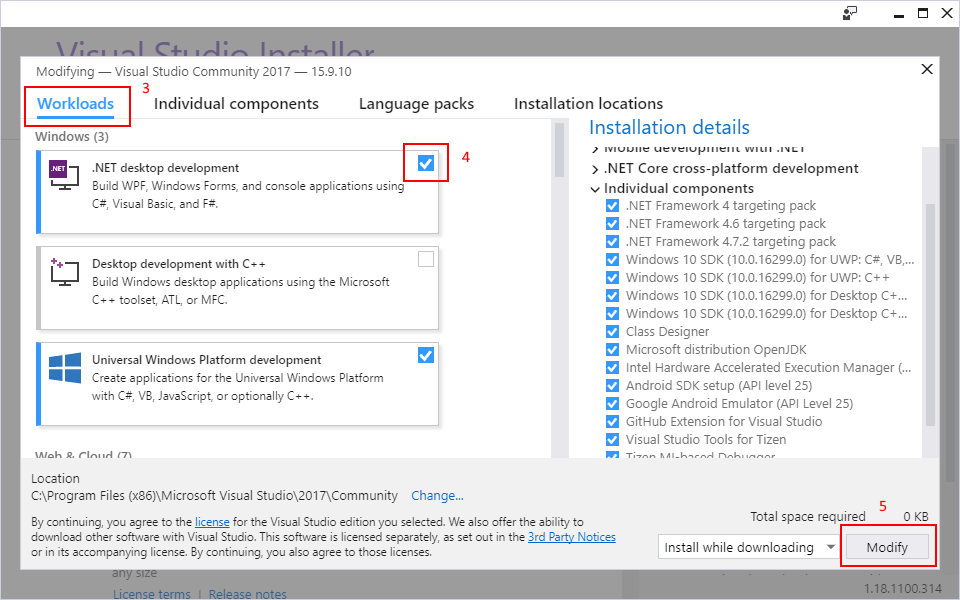
Let the installer do its job and then you will be able to create a .resx file from the Add New Item dialog. Visual Studio also provides a convenient editor for these files. In the editor, the key-value pairs can easily be provided in a tabular form. This makes reading, adding and editing entries much easier.
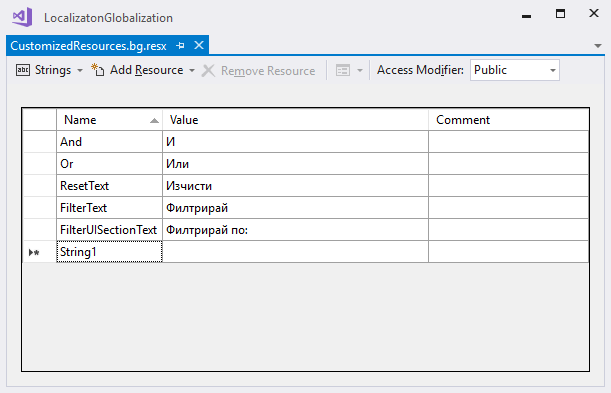
Once the resource file is ready, it is time to comply to the earlier mentioned convention. There are two aspects that need to be covered.
First is the name of the file. It should be structured like this [filename].[culture].resx. In this demonstration the file is named “CustomizedResources.bg.resx”. If I need to translate the app in German, the file containing the German key-value pairs would be named “CustomizedResources.de.resx”.
The second aspect is to provide a resources file for the neutral culture as well. This is achieved by creating an empty .resx which does not specify any culture in its name. In this example it should be named “CustomizedResources.resx”. This file is not required to provide any key-value pairs since leaving it empty none of the default strings will be overridden and the controls will visualize their default strings representation.
The final step is to provide a new resource manager to the default TelerikLocalizationManager. This once again should be done before the controls are visualized.
namespace LocalizatonGlobalization
{
    public partial class MainPage : ContentPage
    {
        public MainPage()
        {
            string resourceId = "LocalizatonGlobalization.CustomizedResources";

            TelerikLocalizationManager.Manager.ResourceManager = new System.Resources.ResourceManager(resourceId, typeof(MainPage).GetTypeInfo().Assembly);

            InitializeComponent();
        }
    }
}
Please note how the resourceId variable is constructed. It includes the fully qualified namespace name and the filename without the culture specific extension of the resource file. This allows the ResourceManager to pick and use the correct resources file.
Where Can I Find the Keys Used by the Components?
No matter which of the two approaches you choose to use, you will need to know the exact keys that the components internally use. In our xamarin-forms-sdk repository you can find the DefaultResources.resx file. It contains every key that is used by all components along with the default string values.
Basically, this is the type and volume of the resources file that is required if you are to translate all the components part of the Telerik UI for Xamarin suite.
Wrapping Up
If you are in a hurry and are looking for a fast and easy way to translate your application, you may find it useful to create a custom ResourcesManager and some .resx files. However, if you need more control over the translation process, you may like extending the default TelerikLocalizationManager and taking control in code.
Don't forget to install the newest version of Telerik UI for Xamarin from your Telerik account, check the available examples in the Demo Application as well as the SDK Samples Browser applications. As always, your feedback would be greatly appreciated.
Thanks for reading and I hope you find the globalization and localization a bit clearer and valuable to your projects.

