
Is your chat going global? Worry less about the language barrier when you pair Amazon Translate with our real-time messaging API.
When powering a chat product in a global environment, multilingual support should be top-of-mind. Doing so allows you to ensure that the communication barrier between yourself and the user on the other end is not broken.
Adding multilingual functionality to Stream Chat is easy with the support that Stream provides. In this tutorial, I’ll walk you through the inner workings of building multilingual chat with Stream Chat and Amazon Translate.
Here is a preview of what you will build at the end of this tutorial:
You can also find the complete code of this tutorial on GitHub.
Prerequisites
To follow along with this tutorial, you will need to have the following:
- A basic understanding of JavaScript
- A basic understanding of Vue.js
- You should also have Node installed on your system (version 8.9 or above — preferably the latest 12.x) and a basic understanding of Node
- You should have yarn installed on your system
- Have an understanding of how Vue sends data from a child to its parent component.
If you have all the above ready, then let’s get started!
Set up the Client App – Create a New Vue App
Using the Vue CLI, we can easily create a new Vue app.
# Install Vue-CLI globally if you don't have it installed already
$ yarn global add @vue/cli

# Create a new Vue project (for the prompt that appears, press enter to select the default preset.)
$ vue create chatx

# Change your directory to the project directory
$ cd chatx

# Install Stream Chat client SDK
$ yarn add stream-chat

# Install axios - a library for making request
$ yarn add axios

# Run the app!
$ yarn serve
Accessing the URL displayed on your terminal will take you to a Vue default page.
Get Your API Keys
Stream Chat Keys
To start using the Stream Chat API, you need to have an API key. Create an account here or log in if you already have an account.
Then, from your dashboard:
- Create a new app using any convenient name.
- Fill in the App Name
Finally, submit the form by clicking on the Submit button to create the app
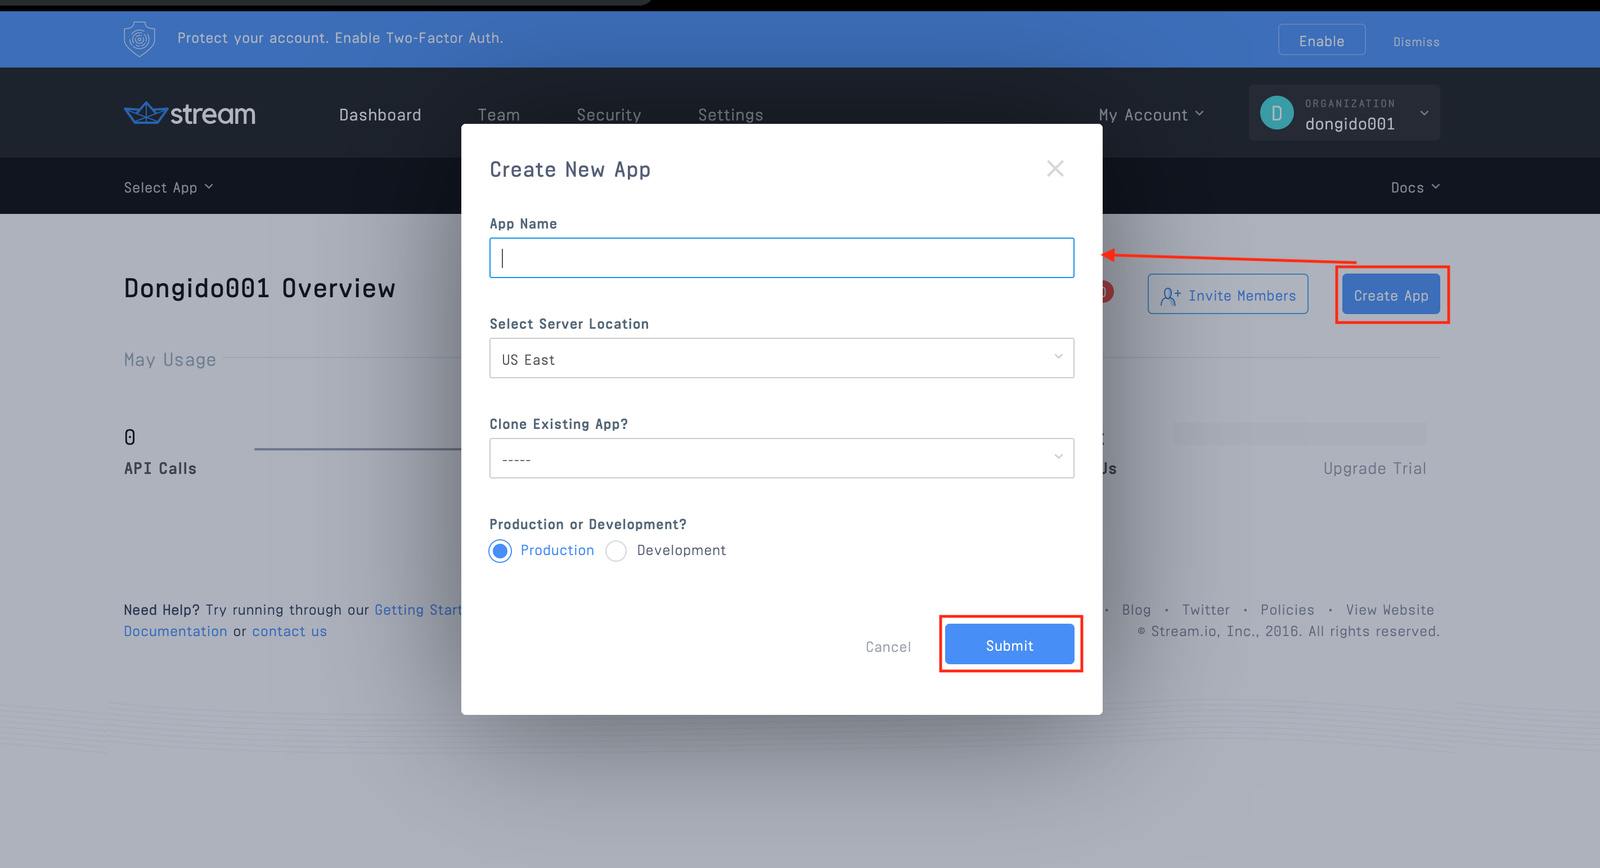
Once the app is created, you will be provided with a few options within your dashboard. Select Chat to go the Stream Chat dashboard.

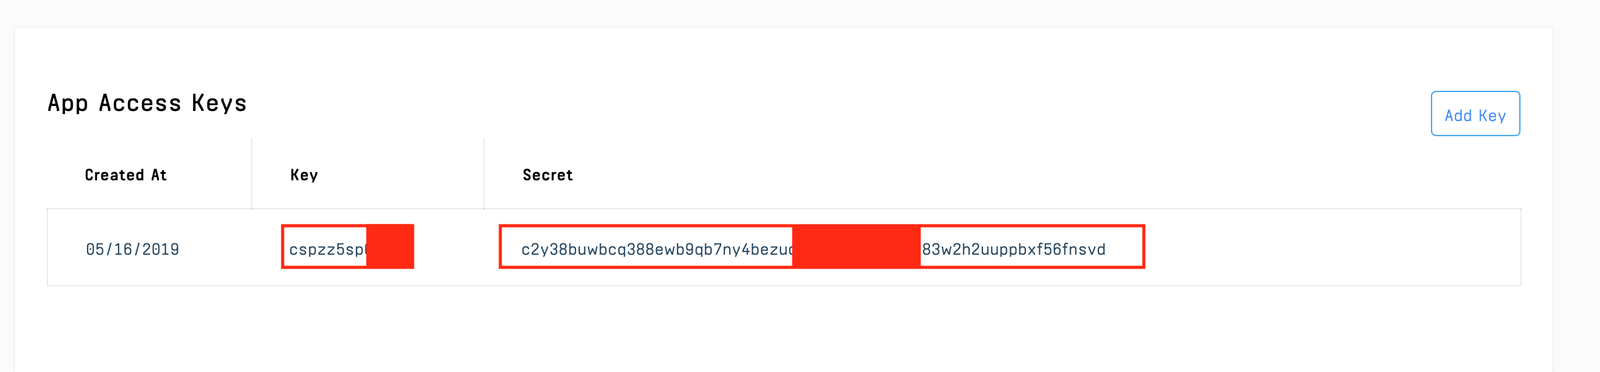
Finally, create a .env file in the root directory of the project and add your Stream keys:
Remember to replace
AWS App Keys
Amazon Translate uses advanced machine learning technologies to provide high-quality translation on demand. We’ll use the service to translate text from one language to another.
Now, head over to the Amazon website and create an account or log in if you already have an account.
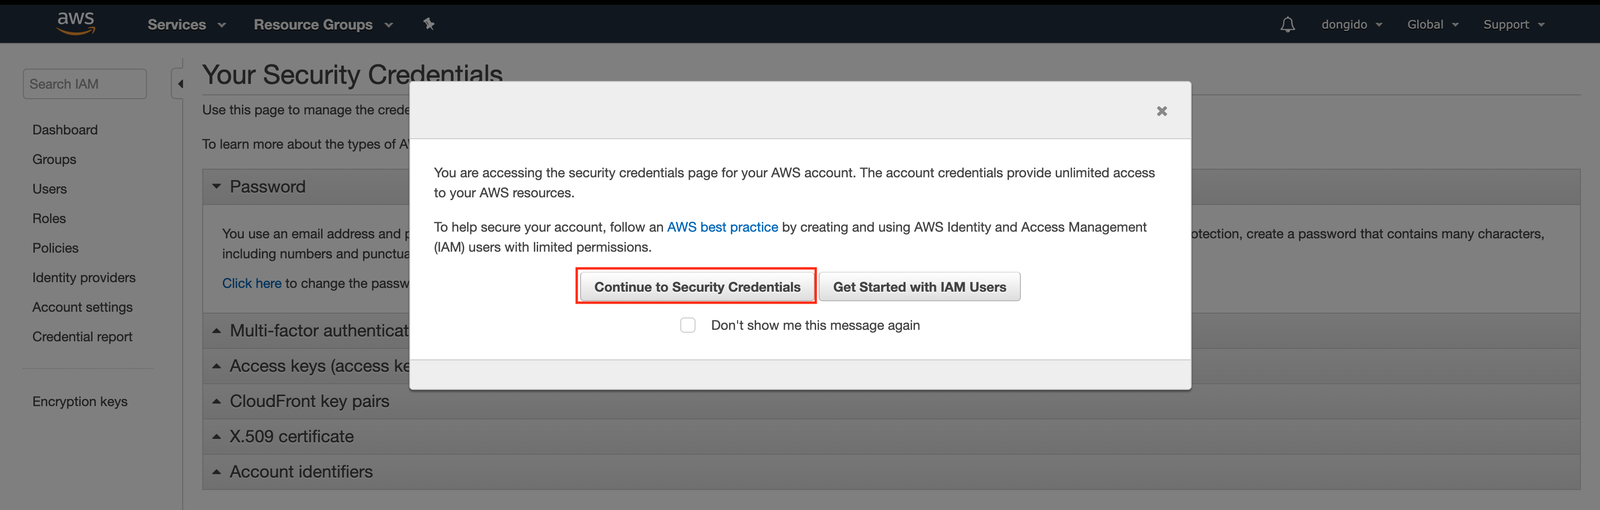
- From your console, head to the My Security Credentials page:
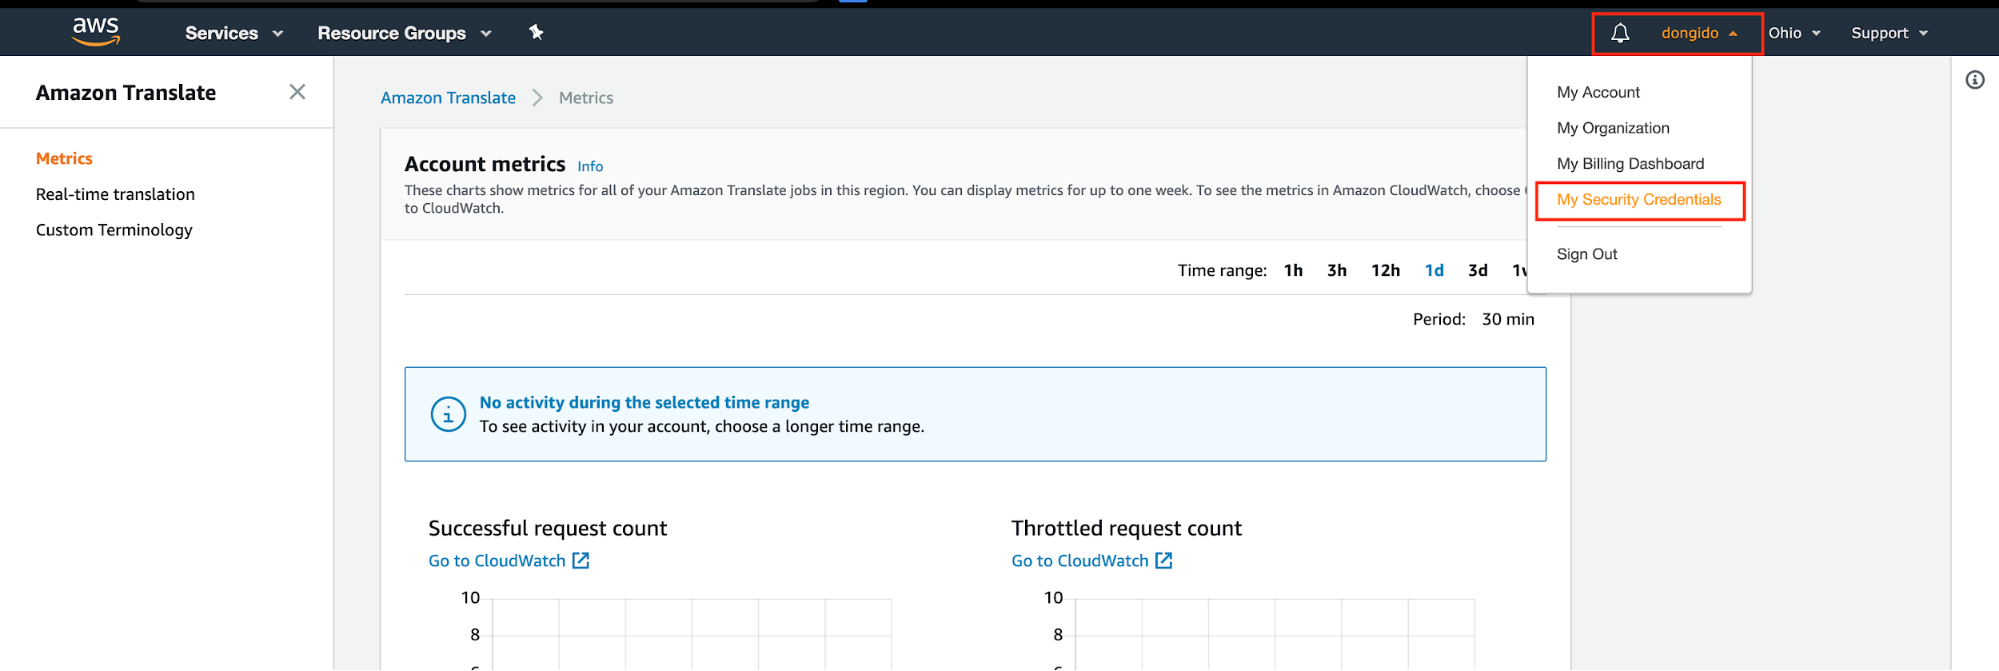
- Click on Continue to Security Credentials for the pop that comes up.
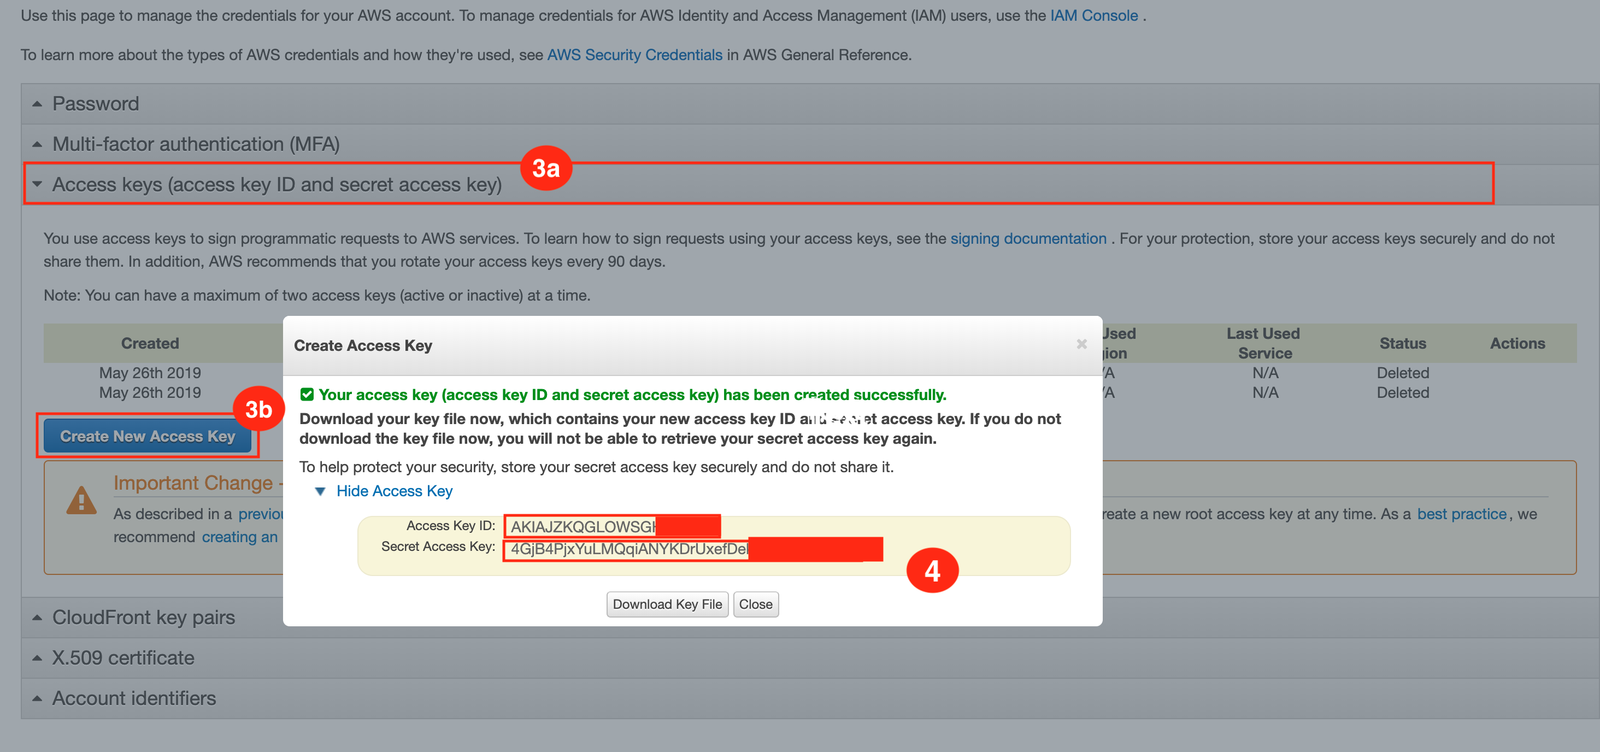
-
Click on the Access keys (access key ID and secret access key) tab and then click on Create New Account Key button.
-
Copy your Access Key ID and Secret Account Key and then update
and placeholders respectively in the .env file.
Set up the Server
We’ll be using Node to power the server.
Create a new directory named server in the root directory of the project. Then open up a new terminal and then change your current directory to the server directory.
Next, install the following dependencies that we’ll need for the server:
The above dependencies include:
- express - A Node framework we are using to build our server
- aws-sdk - AWS Translate Node SDK
- dotenv - An npm package for parsing configs from .env files
- cors,body-parser, anddotenv (all excellent npm packages)
Next, create an Express app by creating a new file named app.js to the server directory and then add the following code to it:
In the code above, after importing the packages that we have installed,
- We created anExpress app using const app = express()**;**
- Next, we initialize the Stream Chat SDK
- Then finally, we created an endpoint - / (**app.get('/',…**) for testing to know if the app works. So, if you visithttp://localhost:3000/, you will get a message — { hello: 'World!'}
To initialize the Stream Chat SDK, it requires a valid token. Create a new endpoint for creating a token.
Next, create a new endpoint for translating messages:
To translate a message, we’ll send a POST request to this endpoint passing along the language code of the language that we want to translate to (targetLanguage) and also the text that we want to translate (text).
Also, we are setting the SouceLanguageCode to auto so that the language is automatically detected.
The result of the request is a JSON object containing the translated text.
Finally, start up the server:
If it starts successfully, you will see a message printed to the terminal - “Node app listening on port 3000!”
Building the App Interface
For brevity’s sake, we’ll divide the app into four components:
- Messages.vue - for listing messages
- Login.vue - displays the login form
- Channels - for listing channels
- InputForm - renders a form for adding new messages
Create the files Messages.vue**, Login.vue**, Channels.vue, and Login.vue files into the src/components directory.
To keep the component file as minimal as possible, I have added all the CSS of the components to a single CSS file. Create the CSS file asApp.css in the src directory of the project and then add the below styles to it:
The Login Component
We are using the login form to get the username of a user which we’ll use to generate a token for that user. Then the token is used for initializing the Stream Chat SDK. The username is meant to be unique for identifying users.
However, for simplicity sake, we are not doing real authentication. This is the better place for you to authenticate your users in your database if you want to limit access to only the users that you know.
Now, update the Login component with the below code:
The Messages Component
Next, add the messages component for listing messages for a given channel:
Here, we are passing the array of messages for a given channel as props to this component. Also, using the messageDirection function, we determine the direction to place a message to either left or right depending on who sent the message.
The InputForm Component
Next, add the code that defines the InputForm component for adding new messages:
<!-- ./src/InputForm.vue -->

<template>
  <div class="input-area">
    <div class="input">
      <textarea
          v-if="activeChannel"
          v-model="new_message"
          class="input-message"
          placeholder="Type a message"
          rows="1"
          @keyup.shift.enter="resizeInput"
          @keyup.exact.enter="sendMessage"
      />
<divThe Channels Component
Next, add the code that defines the channels component:
<!-- ./src/Channels.vue -->

<template>
  <div class="channel-wrapper">
    <div class="new-channel">
      <input
        v-model="chan"
        type="text"
        placeholder="Create channel"
        class="input-search"
      >
      <input
        type="button"
        value="Create Channel"
class="new-channel-btn"In this component, we are listing the channels that we have on our app. Also, we added a form for creating a new channel.
The App Component
Finally, bring all the components together by replacing the content in the src/App.vue file with the below:
<!-- ./src/App.vue -->

<template>
  <div id="app">
    <div v-if="!authenticated">
      <Login @login="setAuthenticated" />
    </div>
    <div v-else class="main">
      <Channels
        :channels="channels"
        @joinChannel="setActiveChannel"
        @createChannel="createChannel"
      />
<div class="message-area">In the preceding code,
- We import all the components that we have created and render them to the template section.
- If authenticated is false, we render the login component else we render the chat interface.
- In the select tag (<select v-model**\="language"…), we are listing the languages that we want to support for translation. Also, we have the @change listener to listen for when the user changes their language so we can re-translate the chat messages by calling the translateLanguage** function. You can check here for more supported language on Amazon translate.
Now if you take a look at the Vue app, you’ll see a login form. If you also change the authenticated state to true, the chat interface will show up. For now, leave the authenticated state to false.
Making Chat Work
So far, we have our chat interface ready but we still can’t converse because we are yet to connect the app to Stream Chat. We’ll be doing so next.
To start using the SDK, we first need to initialize it. Do so by adding the below function in the methods: {…} block in the App.vue file:
// ./src/App.vue

// [...]
    async initializeClient () {
      // Initialize the StreamChat SDK
      const client = new StreamChat(
        process.env.VUE_APP_KEY,
        {timeout: 5000}
      );

      await client.setUser(
        {
          id: this.userId,
          name: this.userId,
},This function will be executed once the user logs in.
Next, add a function for fetching channels to the methods: {…} block of the App.vue file:
// ./src/App.vue

// [...]
    async getChannels () {
      const filter = {};
      const sort = {};

      const channels = await this.client.queryChannels(filter, sort, {
        watch: true,
        state: true,
      });

      this.channels = channels
    },
// [...]
Next, add the function that is called once the user submits the login form. Add the below code to the methods: {…} block of the App.vue file:
// ./src/App.vue

// [...]
    async setAuthenticated(userId) {
      const response = await axios.post(`${process.env.VUE_APP_SERVER}/login`, {userId})

      if (response.data.status === 'success') {
        this.token = response.data.token
        this.userId = userId
        this.initializeClient().then( () => {
          this.authenticated = true
          this.getChannels()
        })
      }
    },
// [...]
In the function above, once a user submits the login form, this function is called immediately. Then we initialize the Stream Chat SDK. After successfully initializing the channel, we set the authenticated state to true so that the login form is hidden and the chat interface shows up. Then finally, we fetch the channels that we have created by calling the this**.getChannels()** function.
We want to keep track of active channels, that is, channels the user is currently chatting in. When a user clicks on a channel, we’ll set the activeChannel state to the channel.
Add a function for setting the active channel to the methods: {…} block of the App.vue file:
// ./src/App.vue

// [...]
    setActiveChannel (channel) {
      // Before changing the active channel,
      // Stop listening to event from the previous one
      if (this.activeChannel) {
        this.activeChannel['listeners']['message.new'] = []
      }

      // Reset the messsages array
      this.messages = []

      // loop through messages in this channel and translate them
channel.state.messages.forEach( async message => {In the function above:
- We loop through messages on the channel and make a POST request to the /translate endpoint to translate the message.
- Then we listen for new messages on the channel so we can list the message using channel.on('message.new'…. Once we receive a new message, we’ll also make a request to the translate endpoint to translate the message.
Next, add a function for translating messages when a user changes their language option by adding the below code to the methods: {…} block of the App.vue file:
// ./src/App.vue

// [...]
    translateLanguage () {
      const translatedMessage = []

      this.messages.forEach( async message => {
        try {
          const { data, status} =
            await axios.post(`${process.env.VUE_APP_SERVER}/translate`, {
              targetLanguage: this.language,
              text: message.text
            })

this.messages.push({...message, text: data.TranslatedText})Next, add a function for creating channels to the methods: {…} block of the App.vue file:
// ./src/App.vue

// [...]
    async createChannel (channelName) {
      const channel = this.client.channel('messaging', channelName, {
        name: channelName
      });

      await channel.watch()

      this.channels.push(channel)
    },
// [...]
Finally, add a function for sending messages to the methods: {…} block of the App.vue file:
// ./src/App.vue

// [...]
    async sendMessage (message) {
      this.activeChannel && await this.activeChannel.sendMessage({
        text: message
      });
    },
// [...]
Testing Chat
Good job! you have successfully built a multilingual chat. Now let’s test the app to see that it works:
- Restart the Vue app terminals
- Open the Vue app in two or more tabs on your browser and log in (any username will work since we are not authenticating the user.)
- Create a channel and click on the channel
- Now, use different languages on the chat and send messages. Then notice the language translate according to the language chosen in real-time.
Final Thoughts
In this tutorial, we built a multilingual chat app by combining the service of Stream Chat and Amazon Translate.
There are other useful chat features that were not added to the app, like the typing indicator, showing if a user is online or offline and so on. You can check out events that enable you to add these features here.
You can find the complete code of this tutorial on GitHub. For more information on Stream Chat, have a look here.
