
Object detection is a task in computer vision that involves identifying the presence, location, and type of one or more objects in a given photograph.
It is a challenging problem that involves building upon methods for object recognition (e.g. where are they), object localization (e.g. what are their extent), and object classification (e.g. what are they).
In recent years, deep learning techniques have achieved state-of-the-art results for object detection, such as on standard benchmark datasets and in computer vision competitions. Most notably is the R-CNN, or Region-Based Convolutional Neural Networks, and the most recent technique called Mask R-CNN that is capable of achieving state-of-the-art results on a range of object detection tasks.
In this tutorial, you will discover how to use the Mask R-CNN model to detect objects in new photographs.
After completing this tutorial, you will know:
- The region-based Convolutional Neural Network family of models for object detection and the most recent variation called Mask R-CNN.
- The best-of-breed open source library implementation of the Mask R-CNN for the Keras deep learning library.
- How to use a pre-trained Mask R-CNN to perform object localization and detection on new photographs.
Kick-start your project with my new book Deep Learning for Computer Vision, including step-by-step tutorials and the Python source code files for all examples.
Let’s get started.
How to Perform Object Detection in Photographs With Mask R-CNN in Keras
Photo by Ole Husby, some rights reserved.
Tutorial Overview
This tutorial is divided into three parts; they are:
- R-CNN and Mask R-CNN
- Matterport Mask R-CNN Project
- Object Detection with Mask R-CNN
Note: This tutorial requires TensorFlow version 1.15.3 and Keras 2.2.4. It does not work with TensorFlow 2.0+ or Keras 2.2.5+ because a third-party library has not been updated at the time of writing.
You can install these specific versions of the libraries as follows:
|
1 2 |
sudo pip install --no-deps tensorflow==1.15.3 sudo pip install --no-deps keras==2.2.4 |
Mask R-CNN for Object Detection
Object detection is a computer vision task that involves both localizing one or more objects within an image and classifying each object in the image.
It is a challenging computer vision task that requires both successful object localization in order to locate and draw a bounding box around each object in an image, and object classification to predict the correct class of object that was localized.
An extension of object detection involves marking the specific pixels in the image that belong to each detected object instead of using coarse bounding boxes during object localization. This harder version of the problem is generally referred to as object segmentation or semantic segmentation.
The Region-Based Convolutional Neural Network, or R-CNN, is a family of convolutional neural network models designed for object detection, developed by Ross Girshick, et al.
There are perhaps four main variations of the approach, resulting in the current pinnacle called Mask R-CNN. The salient aspects of each variation can be summarized as follows:
- R-CNN: Bounding boxes are proposed by the “selective search” algorithm, each of which is stretched and features are extracted via a deep convolutional neural network, such as AlexNet, before a final set of object classifications are made with linear SVMs.
- Fast R-CNN: Simplified design with a single model, bounding boxes are still specified as input, but a region-of-interest pooling layer is used after the deep CNN to consolidate regions and the model predicts both class labels and regions of interest directly.
- Faster R-CNN: Addition of a Region Proposal Network that interprets features extracted from the deep CNN and learns to propose regions-of-interest directly.
- Mask R-CNN: Extension of Faster R-CNN that adds an output model for predicting a mask for each detected object.
The Mask R-CNN model introduced in the 2018 paper titled “Mask R-CNN” is the most recent variation of the family models and supports both object detection and object segmentation. The paper provides a nice summary of the model linage to that point:
The Region-based CNN (R-CNN) approach to bounding-box object detection is to attend to a manageable number of candidate object regions and evaluate convolutional networks independently on each RoI. R-CNN was extended to allow attending to RoIs on feature maps using RoIPool, leading to fast speed and better accuracy. Faster R-CNN advanced this stream by learning the attention mechanism with a Region Proposal Network (RPN). Faster R-CNN is flexible and robust to many follow-up improvements, and is the current leading framework in several benchmarks.
— Mask R-CNN, 2018.
The family of methods may be among the most effective for object detection, achieving then state-of-the-art results on computer vision benchmark datasets. Although accurate, the models can be slow when making a prediction as compared to alternate models such as YOLO that may be less accurate but are designed for real-time prediction.
Matterport Mask R-CNN Project
Mask R-CNN is a sophisticated model to implement, especially as compared to a simple or even state-of-the-art deep convolutional neural network model.
Source code is available for each version of the R-CNN model, provided in separate GitHub repositories with prototype models based on the Caffe deep learning framework. For example:
- R-CNN: Regions with Convolutional Neural Network Features, GitHub.
- Fast R-CNN, GitHub.
- Faster R-CNN Python Code, GitHub.
- Detectron, Facebook AI, GitHub.
Instead of developing an implementation of the R-CNN or Mask R-CNN model from scratch, we can use a reliable third-party implementation built on top of the Keras deep learning framework.
The best of breed third-party implementations of Mask R-CNN is the Mask R-CNN Project developed by Matterport. The project is open source released under a permissive license (i.e. MIT license) and the code has been widely used on a variety of projects and Kaggle competitions.
Nevertheless, it is an open source project, subject to the whims of the project developers. As such, I have a fork of the project available, just in case there are major changes to the API in the future.
The project is light on API documentation, although it does provide a number of examples in the form of Python Notebooks that you can use to understand how to use the library by example. Two notebooks that may be helpful to review are:
There are perhaps three main use cases for using the Mask R-CNN model with the Matterport library; they are:
- Object Detection Application: Use a pre-trained model for object detection on new images.
- New Model via Transfer Learning: Use a pre-trained model as a starting point in developing a model for a new object detection dataset.
- New Model from Scratch: Develop a new model from scratch for an object detection dataset.
In order to get familiar with the model and the library, we will look at the first example in the next section.
Want Results with Deep Learning for Computer Vision?
Take my free 7-day email crash course now (with sample code).
Click to sign-up and also get a free PDF Ebook version of the course.
Object Detection With Mask R-CNN
In this section, we will use the Matterport Mask R-CNN library to perform object detection on arbitrary photographs.
Much like using a pre-trained deep CNN for image classification, e.g. such as VGG-16 trained on an ImageNet dataset, we can use a pre-trained Mask R-CNN model to detect objects in new photographs. In this case, we will use a Mask R-CNN trained on the MS COCO object detection problem.
Mask R-CNN Installation
The first step is to install the library.
At the time of writing, there is no distributed version of the library, so we have to install it manually. The good news is that this is very easy.
Installation involves cloning the GitHub repository and running the installation script on your workstation. If you are having trouble, see the installation instructions buried in the library’s readme file.
Step 1. Clone the Mask R-CNN GitHub Repository
This is as simple as running the following command from your command line:
|
1 |
git clone https://github.com/matterport/Mask_RCNN.git |
This will create a new local directory with the name Mask_RCNN that looks as follows:
|
1 2 3 4 5 6 7 8 9 10 11 12 13 14 15 |
Mask_RCNN ├── assets ├── build │ ├── bdist.macosx-10.13-x86_64 │ └── lib │ └── mrcnn ├── dist ├── images ├── mask_rcnn.egg-info ├── mrcnn └── samples ├── balloon ├── coco ├── nucleus └── shapes |
Step 2. Install the Mask R-CNN Library
The library can be installed directly via pip.
Change directory into the Mask_RCNN directory and run the installation script.
From the command line, type the following:
|
1 2 |
cd Mask_RCNN python setup.py install |
On Linux or MacOS you may need to install the software with sudo permissions; for example, you may see an error such as:
|
1 |
error: can't create or remove files in install directory |
In that case, install the software with sudo:
|
1 |
sudo python setup.py install |
The library will then install directly and you will see a lot of successful installation messages ending with the following:
|
1 2 |
... Finished processing dependencies for mask-rcnn==2.1 |
This confirms that you installed the library successfully and that you have the latest version, which at the time of writing is version 2.1.
Step 3: Confirm the Library Was Installed
It is always a good idea to confirm that the library was installed correctly.
You can confirm that the library was installed correctly by querying it via the pip command; for example:
|
1 |
pip show mask-rcnn |
You should see output informing you of the version and installation location; for example:
|
1 2 3 4 5 6 7 8 9 10 |
Name: mask-rcnn Version: 2.1 Summary: Mask R-CNN for object detection and instance segmentation Home-page: https://github.com/matterport/Mask_RCNN Author: Matterport Author-email: waleed.abdulla@gmail.com License: MIT Location: ... Requires: Required-by: |
We are now ready to use the library.
Example of Object Localization
We are going to use a pre-trained Mask R-CNN model to detect objects on a new photograph.
Step 1. Download Model Weights
First, download the weights for the pre-trained model, specifically a Mask R-CNN trained on the MS Coco dataset.
The weights are available from the project GitHub project and the file is about 250 megabytes. Download the model weights to a file with the name ‘mask_rcnn_coco.h5‘ in your current working directory.
- Download Weights (mask_rcnn_coco.h5) (246 megabytes)
Step 2. Download Sample Photograph
We also need a photograph in which to detect objects.
We will use a photograph from Flickr released under a permissive license, specifically a photograph of an elephant taken by Mandy Goldberg.
Download the photograph to your current working directory with the filename ‘elephant.jpg‘.

Elephant (elephant.jpg)
Taken by Mandy Goldberg, some rights reserved.
Step 3. Load Model and Make Prediction
First, the model must be defined via an instance MaskRCNN class.
This class requires a configuration object as a parameter. The configuration object defines how the model might be used during training or inference.
In this case, the configuration will only specify the number of images per batch, which will be one, and the number of classes to predict.
You can see the full extent of the configuration object and the properties that you can override in the config.py file.
|
1 2 3 4 5 6 |
# define the test configuration class TestConfig(Config): NAME = "test" GPU_COUNT = 1 IMAGES_PER_GPU = 1 NUM_CLASSES = 1 + 80 |
We can now define the MaskRCNN instance.
We will define the model as type “inference” indicating that we are interested in making predictions and not training. We must also specify a directory where any log messages could be written, which in this case will be the current working directory.
|
1 2 |
# define the model rcnn = MaskRCNN(mode='inference', model_dir='./', config=TestConfig()) |
The next step is to load the weights that we downloaded.
|
1 2 |
# load coco model weights rcnn.load_weights('mask_rcnn_coco.h5', by_name=True) |
Now we can make a prediction for our image. First, we can load the image and convert it to a NumPy array.
|
1 2 3 |
# load photograph img = load_img('elephant.jpg') img = img_to_array(img) |
We can then make a prediction with the model. Instead of calling predict() as we would on a normal Keras model, will call the detect() function and pass it the single image.
|
1 2 |
# make prediction results = rcnn.detect([img], verbose=0) |
The result contains a dictionary for each image that we passed into the detect() function, in this case, a list of a single dictionary for the one image.
The dictionary has keys for the bounding boxes, masks, and so on, and each key points to a list for multiple possible objects detected in the image.
The keys of the dictionary of note are as follows:
- ‘rois‘: The bound boxes or regions-of-interest (ROI) for detected objects.
- ‘masks‘: The masks for the detected objects.
- ‘class_ids‘: The class integers for the detected objects.
- ‘scores‘: The probability or confidence for each predicted class.
We can draw each box detected in the image by first getting the dictionary for the first image (e.g. results[0]), and then retrieving the list of bounding boxes (e.g. [‘rois’]).
|
1 |
boxes = results[0]['rois'] |
Each bounding box is defined in terms of the bottom left and top right coordinates of the bounding box in the image
|
1 |
y1, x1, y2, x2 = boxes[0] |
We can use these coordinates to create a Rectangle() from the matplotlib API and draw each rectangle over the top of our image.
|
1 2 3 4 5 6 7 8 |
# get coordinates y1, x1, y2, x2 = box # calculate width and height of the box width, height = x2 - x1, y2 - y1 # create the shape rect = Rectangle((x1, y1), width, height, fill=False, color='red') # draw the box ax.add_patch(rect) |
To keep things neat, we can create a function to do this that will take the filename of the photograph and the list of bounding boxes to draw and will show the photo with the boxes.
|
1 2 3 4 5 6 7 8 9 10 11 12 13 14 15 16 17 18 19 20 |
# draw an image with detected objects def draw_image_with_boxes(filename, boxes_list): # load the image data = pyplot.imread(filename) # plot the image pyplot.imshow(data) # get the context for drawing boxes ax = pyplot.gca() # plot each box for box in boxes_list: # get coordinates y1, x1, y2, x2 = box # calculate width and height of the box width, height = x2 - x1, y2 - y1 # create the shape rect = Rectangle((x1, y1), width, height, fill=False, color='red') # draw the box ax.add_patch(rect) # show the plot pyplot.show() |
We can now tie all of this together and load the pre-trained model and use it to detect objects in our photograph of an elephant, then draw the photograph with all detected objects.
The complete example is listed below.
|
1 2 3 4 5 6 7 8 9 10 11 12 13 14 15 16 17 18 19 20 21 22 23 24 25 26 27 28 29 30 31 32 33 34 35 36 37 38 39 40 41 42 43 44 45 46 47 |
# example of inference with a pre-trained coco model from keras.preprocessing.image import load_img from keras.preprocessing.image import img_to_array from mrcnn.config import Config from mrcnn.model import MaskRCNN from matplotlib import pyplot from matplotlib.patches import Rectangle # draw an image with detected objects def draw_image_with_boxes(filename, boxes_list): # load the image data = pyplot.imread(filename) # plot the image pyplot.imshow(data) # get the context for drawing boxes ax = pyplot.gca() # plot each box for box in boxes_list: # get coordinates y1, x1, y2, x2 = box # calculate width and height of the box width, height = x2 - x1, y2 - y1 # create the shape rect = Rectangle((x1, y1), width, height, fill=False, color='red') # draw the box ax.add_patch(rect) # show the plot pyplot.show() # define the test configuration class TestConfig(Config): NAME = "test" GPU_COUNT = 1 IMAGES_PER_GPU = 1 NUM_CLASSES = 1 + 80 # define the model rcnn = MaskRCNN(mode='inference', model_dir='./', config=TestConfig()) # load coco model weights rcnn.load_weights('mask_rcnn_coco.h5', by_name=True) # load photograph img = load_img('elephant.jpg') img = img_to_array(img) # make prediction results = rcnn.detect([img], verbose=0) # visualize the results draw_image_with_boxes('elephant.jpg', results[0]['rois']) |
Running the example loads the model and performs object detection. More accurately, we have performed object localization, only drawing bounding boxes around detected objects.
In this case, we can see that the model has correctly located the single object in the photo, the elephant, and drawn a red box around it.
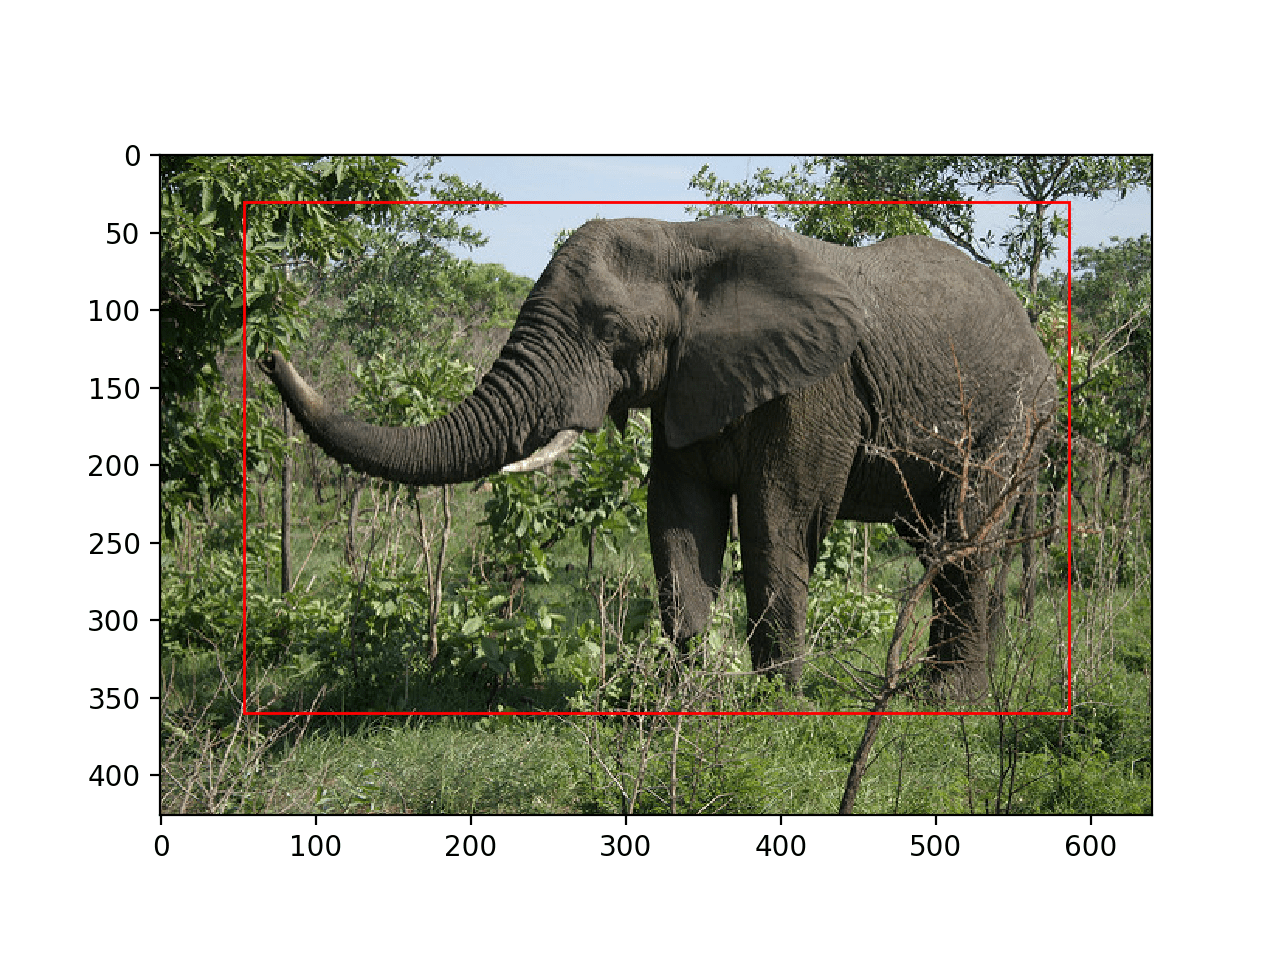
Photograph of an Elephant With All Objects Localized With a Bounding Box
Example of Object Detection
Now that we know how to load the model and use it to make a prediction, let’s update the example to perform real object detection.
That is, in addition to localizing objects, we want to know what they are.
The Mask_RCNN API provides a function called display_instances() that will take the array of pixel values for the loaded image and the aspects of the prediction dictionary, such as the bounding boxes, scores, and class labels, and will plot the photo with all of these annotations.
One of the arguments is the list of predicted class identifiers available in the ‘class_ids‘ key of the dictionary. The function also needs a mapping of ids to class labels. The pre-trained model was fit with a dataset that had 80 (81 including background) class labels, helpfully provided as a list in the Mask R-CNN Demo, Notebook Tutorial, listed below.
|
1 2 3 4 5 6 7 8 9 10 11 12 13 14 15 16 |
# define 81 classes that the coco model knowns about class_names = ['BG', 'person', 'bicycle', 'car', 'motorcycle', 'airplane', 'bus', 'train', 'truck', 'boat', 'traffic light', 'fire hydrant', 'stop sign', 'parking meter', 'bench', 'bird', 'cat', 'dog', 'horse', 'sheep', 'cow', 'elephant', 'bear', 'zebra', 'giraffe', 'backpack', 'umbrella', 'handbag', 'tie', 'suitcase', 'frisbee', 'skis', 'snowboard', 'sports ball', 'kite', 'baseball bat', 'baseball glove', 'skateboard', 'surfboard', 'tennis racket', 'bottle', 'wine glass', 'cup', 'fork', 'knife', 'spoon', 'bowl', 'banana', 'apple', 'sandwich', 'orange', 'broccoli', 'carrot', 'hot dog', 'pizza', 'donut', 'cake', 'chair', 'couch', 'potted plant', 'bed', 'dining table', 'toilet', 'tv', 'laptop', 'mouse', 'remote', 'keyboard', 'cell phone', 'microwave', 'oven', 'toaster', 'sink', 'refrigerator', 'book', 'clock', 'vase', 'scissors', 'teddy bear', 'hair drier', 'toothbrush'] |
We can then provide the details of the prediction for the elephant photo to the display_instances() function; for example:
|
1 2 3 4 |
# get dictionary for first prediction r = results[0] # show photo with bounding boxes, masks, class labels and scores display_instances(img, r['rois'], r['masks'], r['class_ids'], class_names, r['scores']) |
The display_instances() function is flexible, allowing you to only draw the mask or only the bounding boxes. You can learn more about this function in the visualize.py source file.
The complete example with this change using the display_instances() function is listed below.
|
1 2 3 4 5 6 7 8 9 10 11 12 13 14 15 16 17 18 19 20 21 22 23 24 25 26 27 28 29 30 31 32 33 34 35 36 37 38 39 40 41 42 43 44 |
# example of inference with a pre-trained coco model from keras.preprocessing.image import load_img from keras.preprocessing.image import img_to_array from mrcnn.visualize import display_instances from mrcnn.config import Config from mrcnn.model import MaskRCNN # define 81 classes that the coco model knowns about class_names = ['BG', 'person', 'bicycle', 'car', 'motorcycle', 'airplane', 'bus', 'train', 'truck', 'boat', 'traffic light', 'fire hydrant', 'stop sign', 'parking meter', 'bench', 'bird', 'cat', 'dog', 'horse', 'sheep', 'cow', 'elephant', 'bear', 'zebra', 'giraffe', 'backpack', 'umbrella', 'handbag', 'tie', 'suitcase', 'frisbee', 'skis', 'snowboard', 'sports ball', 'kite', 'baseball bat', 'baseball glove', 'skateboard', 'surfboard', 'tennis racket', 'bottle', 'wine glass', 'cup', 'fork', 'knife', 'spoon', 'bowl', 'banana', 'apple', 'sandwich', 'orange', 'broccoli', 'carrot', 'hot dog', 'pizza', 'donut', 'cake', 'chair', 'couch', 'potted plant', 'bed', 'dining table', 'toilet', 'tv', 'laptop', 'mouse', 'remote', 'keyboard', 'cell phone', 'microwave', 'oven', 'toaster', 'sink', 'refrigerator', 'book', 'clock', 'vase', 'scissors', 'teddy bear', 'hair drier', 'toothbrush'] # define the test configuration class TestConfig(Config): NAME = "test" GPU_COUNT = 1 IMAGES_PER_GPU = 1 NUM_CLASSES = 1 + 80 # define the model rcnn = MaskRCNN(mode='inference', model_dir='./', config=TestConfig()) # load coco model weights rcnn.load_weights('mask_rcnn_coco.h5', by_name=True) # load photograph img = load_img('elephant.jpg') img = img_to_array(img) # make prediction results = rcnn.detect([img], verbose=0) # get dictionary for first prediction r = results[0] # show photo with bounding boxes, masks, class labels and scores display_instances(img, r['rois'], r['masks'], r['class_ids'], class_names, r['scores']) |
Running the example shows the photograph of the elephant with the annotations predicted by the Mask R-CNN model, specifically:
- Bounding Box. Dotted bounding box around each detected object.
- Class Label. Class label assigned each detected object written in the top left corner of the bounding box.
- Prediction Confidence. Confidence of class label prediction for each detected object written in the top left corner of the bounding box.
- Object Mask Outline. Polygon outline for the mask of each detected object.
- Object Mask. Polygon fill for the mask of each detected object.
The result is very impressive and sparks many ideas for how such a powerful pre-trained model could be used in practice.
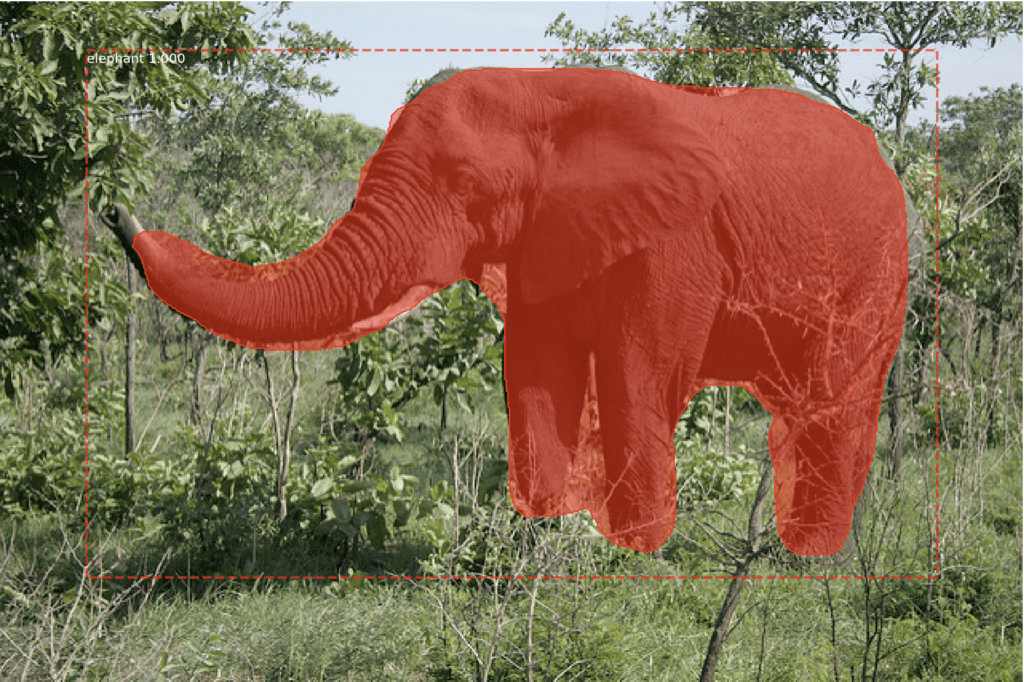
Photograph of an Elephant With All Objects Detected With a Bounding Box and Mask
Further Reading
This section provides more resources on the topic if you are looking to go deeper.
Papers
- Rich feature hierarchies for accurate object detection and semantic segmentation, 2013.
- Spatial Pyramid Pooling in Deep Convolutional Networks for Visual Recognition, 2014.
- Fast R-CNN, 2015.
- Faster R-CNN: Towards Real-Time Object Detection with Region Proposal Networks, 2016.
- Mask R-CNN, 2017.
API
Resources
R-CNN Code Repositories
- R-CNN: Regions with Convolutional Neural Network Features, GitHub.
- Fast R-CNN, GitHub.
- Faster R-CNN Python Code, GitHub.
- Detectron, Facebook AI, GitHub.
Summary
In this tutorial, you discovered how to use the Mask R-CNN model to detect objects in new photographs.
Specifically, you learned:
- The region-based Convolutional Neural Network family of models for object detection and the most recent variation called Mask R-CNN.
- The best-of-breed open source library implementation of the Mask R-CNN for the Keras deep learning library.
- How to use a pre-trained Mask R-CNN to perform object localization and detection on new photographs.
Do you have any questions?
Ask your questions in the comments below and I will do my best to answer.
Develop Deep Learning Models for Vision Today!

Develop Your Own Vision Models in Minutes
...with just a few lines of python code
Discover how in my new Ebook:
Deep Learning for Computer Vision
It provides self-study tutorials on topics like:
classification, object detection (yolo and rcnn), face recognition (vggface and facenet), data preparation and much more...
Finally Bring Deep Learning to your Vision Projects
Skip the Academics. Just Results.


Good job! Wonderful article on subject. I would like to thank you first of all to your efforts. But wondering how text recognition can be implemented ( ie. for road side ads)?. How custom training dataset should be prepared?(images and labeling of them) Any source and help welcomed.
Thanks.
Good question, you can first perform object recognition to find the text, then use a model such as a CNN-LSTM to read off the text. Perhaps even segment each letter in the text and read them off one by one.
I was wondering the same and I came across the coco-text. https://bgshih.github.io/cocotext/
So this post could be re-implemented but with a different pre-trained model.
Thanks for sharing.
Any prerequisites?
Not really, this might help if you need to setup your Python environment:
https://machinelearningmastery.com/setup-python-environment-machine-learning-deep-learning-anaconda/
here are three errors i got re: missing prereqs, and their respective fixes (i’m not using anaconda)
1. ModuleNotFoundError: No module named ‘skimage’
2. ModuleNotFoundError: No module named ‘IPython’
3. AttributeError: module ‘tensorflow’ has no attribute ‘placeholder’
1. pip3 install scikit-image
2. pip3 install ipython
3. pip3 install tensorflow==1.7
(To downgrade from version 2. https://stackoverflow.com/questions/56226284/why-do-i-get-attributeerror-module-tensorflow-has-no-attribute-placeholder
)
and now it’s working perfectly for me on a mac 10.13.4
Amazing resource, thank you Jason Brownlee!!
Thanks for sharing.
Note, the code works with TensorFlow 1.13.
Thank you so much:) it works easily.
But I want to use it for videos also. How can i do it? Just modify some codes or make another codes?
Perhaps, you could apply it frame by frame, for some subset of frames per second.
I’m facing problem 3 but I can’t downgrade TensorFlow to 1.7 or 1.13. I get the following error message:
ERROR: Could not find a version that satisfies the requirement tensorflow==1.13.1 (from versions: 2.2.0rc1, 2.2.0rc2, 2.2.0rc3, 2.2.0rc4, 2.2.0, 2.2.1, 2.3.0rc0, 2.3.0rc1, 2.3.0rc2, 2.3.0, 2.3.1)
ERROR: No matching distribution found for tensorflow==1.13.1
Any help with this? (I’m not using conda)
Try this:
Thank You Very Much May God Bless you for your great efforts in computer vision field one more thing if you can explain for us how to use concatenate and deconvolution in separate article
Thanks!
Yes, I have tutorials scheduled on these topics.
Dear Jason.
I’m trying to apply mask in my project.
I have this type of structure folder:
── train
├── class_1
├── class_2
├── class_3
Where are the objects coordinates ?
And what is the format? [ 1, 1, 1, 1] (1,1,1,1)
Sounds like a great project!
Dear Jason, it was very well explained. Thank you.
I want to write the code for mask RCNN from the scratch using tensorflow-keras, can you suggest me how to proceed? Is there any resource or article that can help me in this.
Perhaps start with the paper and try to understand each step well.
Dear Jason:
I’ve got an err while running the code below:
rcnn = MaskRCNN(mode=’inference’, model_dir=’./’, config=TestConfig())
The error is : ValueError: Tried to convert ‘shape’ to a tensor and failed. Error: None values not supported.
I‘m running whith Tensorflow 1.13 and Keras 2.2.4 . And mask-rcnn 2.1 seems installed correctly.
I’m confused because you said it worked with tf 1.13
Sorry to hear that, I can confirm it works with TF 1.13.
Are you using Python 3.6?
Are you running from the command line?
Did you copy all of the code from the example?
I have some more suggestions here that may help:
https://machinelearningmastery.com/faq/single-faq/why-does-the-code-in-the-tutorial-not-work-for-me
I’m using Python 3.7 but i don’t think it matters. I’ve copy all of the code and run them in PyCharm .
I’ll reset my environment and try this tutorial again , because i used TF2.0-gpu and then changed to TF1.13-gpu and then to TF 1.13 .
Thank you for your help. Your tutorials really help me a lot. They works with TF 2.0-gpu beta well, most time I only need to change “import keras.XX” to “import tensorflow.keras.XX”. That’s great!
I recommend running from the command line not from a notebook or IDE, more here:
https://machinelearningmastery.com/faq/single-faq/why-dont-use-or-recommend-notebooks
Thanks much for the article. I’ve an object detection code working on TF 1.xx, and I’m trying to port that to TF 2.beta. Followed the tf.upgrade_v2 commands…; but stuck finally with “keras.engine as KE” in the maskrcnn.model.py file. Any help on what all changes to be made for the code to run would really be appreciated.
Sorry, I don’t have tutorials on TF, let alone converting from one API to another.
Perhaps try the TF user group or stackoverflow?
para solucionar o problema “keras.engine as KE” no arquivo maskrcnn.model.py basta substituir onde tem KE por KL.
Thanks for sharing.
Hi ,thank you so much for this tutorial,I have. h5 file to classify blood cells, is it possible to load that weight to rcnn.load_weights(‘blood.h5) and detect mask?
If the saved model is a Mask RCNN model, then perhaps yes.
Hi Jason, how to apply this for own dataset.thanks
Here is an example:
https://machinelearningmastery.com/how-to-train-an-object-detection-model-with-keras/
Hi Mr. Jason, I’ve found that there are so many different algorithms were published in 2019 for Instance Segmentation like HTC and last year we have PANET..etc. So, how efficient is it we use MaskRCNN still to develop for different outputs. What is your opinion on MRCNN. Give me an advise. Thank you.
I think Mask R-CNN is great.
If you want to try other methods, go for it – but it can be very time and resource consuming.
thank you very match for sharing your knowledge ,my question is i want to change the training data and the classes name because i have different problem and i need to implement this method to detect the objects
my problem that i need to detect objects which is really similar to the background it is like very small circular,and the model have failed to detect them so i think i need adaptation on this method.
See this tutorial for fitting a model on your own data:
https://machinelearningmastery.com/how-to-train-an-object-detection-model-with-keras/
thanks for your response.
Kindly, i want your clarification what is the loss function of this model ??
how this model is trained and do the backpropagation >>
i think that the loss function here is MAP ???
can you clarify these points please
Good questions.
The model uses a multi-task loss that combines loss on the classification, bounding box and the mask.
You can learn more about the details of the model in this paper:
https://arxiv.org/pdf/1703.06870.pdf
Excellent tutorial.
I’m getting this error
rcnn.load_weights(‘mask_rcnn_coco.h5’, by_name=True
>>> rcnn.load_weights(‘mask_rcnn_coco.h5′, by_name=True)
Traceback (most recent call last):
File “”, line 1, in
File “C:\Users\srtangel\Documents\OpenCV\Code\Mask_RCNN\mrcnn\model.py”, line 2115, in load_weights
f = h5py.File(filepath, mode=’r’)
File “C:\Users\srtangel\Anaconda\envs\facecourse-py3\lib\site-packages\h5py\_hl\files.py”, line 394, in __init__
swmr=swmr)
File “C:\Users\srtangel\Anaconda\envs\facecourse-py3\lib\site-packages\h5py\_hl\files.py”, line 170, in make_fid
fid = h5f.open(name, flags, fapl=fapl)
File “h5py\_objects.pyx”, line 54, in h5py._objects.with_phil.wrapper
File “h5py\_objects.pyx”, line 55, in h5py._objects.with_phil.wrapper
File “h5py\h5f.pyx”, line 85, in h5py.h5f.open
OSError: Unable to open file (file signature not found)
>>>
It suggests that the weights file is not in the same directory as your Python file.
Perhaps try running the example from the command line instead? See this:
https://machinelearningmastery.com/faq/single-faq/how-do-i-run-a-script-from-the-command-line
Thank you. I like so much.
You’re welcome.
Thanks for nice tutorial.
Am I always restricted to the ‘resnet’ or other pre-built architecture within the FPN? Is there are a way to incorporate an arbitrary Conv. network into mrcnn-FPN structure? It looks that people use mrcnn in different projects. So far, however, I noticed only different types of resnet and vgg (not fully sure).
I don’t see why not. You might have to dig into the mask rcnn code a bit to swap out the feature extractor model.
Dear Jason, Thanks! I really learned a lot.
How do I apply Mask R-CNN on Binary class, that is, people or nothing on images.
I have tried to implement it by setting NUM_CLASSES = 1 + 1 (background and people), however I got error as below,
ValueError: Layer #389 (named “mrcnn_bbox_fc”), weight has shape (1024, 8), but the saved weight has shape (1024, 324).
Here is an example that you can use as a starting point:
https://machinelearningmastery.com/how-to-train-an-object-detection-model-with-keras/
Hello,
I am a developer and I want to discover the world of deeplearning.
I learned to build my own new model with transfert learning from the matterport mask RCNN project. Thanks to that : https://machinelearningmastery.com/how-to-train-an-object-detection-model-with-keras/
I would want to create a new Model from Scratch, but I can’t find a tuto to know how to do it. Would you have something to help ?
Is it really harder to train from scratch ?
Thank you
Sorry, I don’t have an example of developing the model from scratch.
Hi,
Thank you for this wonderful article. I have implemented this and it is working. I tried to run from the command prompt and that too is working. Now I saved the weights in the directory called
The directory path is /kangaroo/logs/kangaroo20191128T1406/mask_rcnn_kangaroo_0015.h5
how to resume training the model on the data from this checkpoint like –0016.h5, –0017,h5 etc from anaconda command prompt
python kangaroo.py train –dataset=kangaroo –weights=logs/kangaroo20191128T1406/mask_rcnn_kangaroo_0015.h5 gives error unrecognized arguments
Thank you
Nice work.
Perhaps try loading the weights programmatically?
I am able to do it. But it starts from another event logs. During predictions the model the old weights .h5 and not the latest.
Further how to get the Polygon fill area for the mask of each detected object.
Thanks.
You call the detect() function that returns the results object. The polygons are in that object.
Hey Jason and fellow readers. Any update on use with TF 2.0? Is this going to be possible? If not, what is still needs to be converted to 2.0 code?
The authors of mask rcnn have not yet updated the code base from what I can see.
How is confidence score calculated at test time?
Good question. Perhaps you can use the predicted probability for class membership as an uncertainty score?
is it possible to use data generators with model.train() ?
I’m not sure, perhaps try it and see?
Can you please share some resources to do this on custom dataset along with creating masks. I searched a lot, got something but faced a lot of hurdles for masking the images and creating the model.
Yes, here is an example:
https://machinelearningmastery.com/how-to-train-an-object-detection-model-with-keras/
How to disable classifier branch in MASK_RCNN?
Sorry, I don’t understand.
I am working on a project, the objective is to improve the speed of detection without reducing the precision of the mask. in the rcnn mask, there are three branches (classifier, bounding box and mask). I need the bounding box and the mask. how to delete classifier branch in model.py
It is a graph, you can formate a new graph with/without the elements you choose.
Sorry, I don’t have an example for tensorflow.
Thank you.
you can send me the links but if it is not for tensorflow.
I am getting random predictions for the same image that i had run an inference on earlier.
Mask RCNN had successfully detected a person in my image and applied a mask. Later, when I tried to create a bounding box for the same image, it detected a bunch of random stuff instead.
never mind. I figured out the problem.Anyway, excellent article as always.
I’m happy to hear that you solved your problem.
There is no error while running the code in jupyter notebook but I am not getting any output. Any help at the earliest would be appreciated.
Perhaps try running the code from the command line instead:
https://machinelearningmastery.com/faq/single-faq/how-do-i-run-a-script-from-the-command-line
Hi. There! I want to use Matterport Mask RCNN -model/Github repo for commercial use. It is open source project, or there is some limitation about this solution?
Yes, I believe you can use it directly. Here is the license:
https://github.com/matterport/Mask_RCNN/blob/master/LICENSE
Trying to do a custom training using Maskrcnn. training is happening but currently run int an error:
‘Cannot stop profiling. No profiler is running.’)
ProfilerNotRunningError: Cannot stop profiling. No profiler is running.
I guess its something related path defined like forward \ backward slashes but not sure how to fix it.
I am using anaconda,tensorflow 2.0 cpu and OS:Windows 10.
I tried to change the file which is
log_dir=’logs’ to log_dir=’.\\logs’, in callbacks.py…but definetly not the right way. Looking for a solution . Please help me out
Mask RCNN does not support tensorflow 2 at this stage. Perhaps downgrade to tensorflow 1.15.
Hello Jason,
Thanks for the most helpful and top notch. Your efforts means a lot to me
Just had a question, how can i get the prediction or classification rate n display it?
Also how can i plot mrcnn losses n validation losses?
You’re welcome.
You can evaluate your model on a test dataset, e.g. make predictions for each example in the test set, then calculate classification accuracy. Recall, that maskrcnn does not simply do image classification, it does object detection, so you instead use a measure that captures whether it localized the object in each photo.
Yes already evalulated my model on test dataset
Got r[‘scores’]>0.9
Is this the prediction rate???
How do u calculate classification accuracy?
Thank you.
The scores printed near the mask of the detected object along the object name i.e gun in my case
That means similar to the value that is printed (1.000) in the top left corner of bounding box along with ‘elephant’ in your tutorial
Accuracy is inappropriate for object detection, use mean average precision mAP.
Awesome tutorial Jason.
I’m getting the following error even after setting up and installing all the requirements as instructed by you in step 1.
ModuleNotFoundError: No module named ‘mrcnn’
Any help would be greatly appreciated.
The error suggests the library was not installed, or was installed but it is not accessible from wherever you are running code.
I recommend running examples from the command line:
https://machinelearningmastery.com/faq/single-faq/how-do-i-run-a-script-from-the-command-line
Hi Jason,
I have run a object detection model with images like this –
https://drive.google.com/open?id=1QGAmIv8maV_tY0ynoII8VI-fWlQA6Cz8
https://drive.google.com/open?id=1806mj4c5jftsY98qiUIeqQ04HCb_askY
https://drive.google.com/open?id=1uvNb5eGzQSIKfQExLVgkmuNyA92nRz4Z
https://drive.google.com/open?id=1wbs-HGGAS22G_ys9vinLes3Sc_FW5sU2
– to detect brick kiln from aerial images (saved from Google earth). I used Faster rcnn resnet 101. My model was not able to detect anything from similar image. Also, I used only 50 images which is why I am thinking that could be because of less images.
Do you think it is okay to use these images? Also – what could be the best models, and parameters setting for the task?
I am so thankful for your resources – has always helped researcher like us.
Also – how manu images – at least – would you suggest if yes? Training and testing?
As many as possible, thousands. If you cannot get thousands, use data augmentation to get the most out of what you have.
Again – last question – however, are the images okay? do you think we can detect brick kilns with these images?
Thanks
Perhaps. You will have to run experiments to answer that question.
That looks like a great problem.
I recommend training and testing a number of different models and discover through results what works best for your images.
hi, in which format were your images ?
if tif i’s not going to work
if jpeg, jpg ,png its ok however it should not exced certain size 2048 i guess
Hi Dr. Jason,
I can not run the example for rcnn at page 398 for detecting an elephant because of this error: on module named mrcnn. when I wrote this commend pip show mask-rcnn, the result is this:
Name: mask-rcnn Version: 2.1 Summary: Mask R-CNN for object detection and instance segmentation Home-page: https://github.com/matterport/Mask_RCNN Author: Matterport Author-email: waleed.abdulla@gmail.com License: MIT Location: … Requires: Required-by:
Please, tell me why?
Sorry to hear that.
Perhaps ensure that you are using TensorFlow 1.15 and Keras 2.2 (not Tensorflow 2)
I’m happy to discuss further, you can email me here:
https://machinelearningmastery.com/contact/
I run mrcnn directly on the prompt and it is sloved:pip install mrcnn.
Well done!
Hi dr.Jason,
I tried to run the example on page 419 lisiting 26.36 but this error appeared:
IndexError: index 0 is out of bounds for axis 2 with size 0
Please, do you know why?
I’m sorry to hear that.
I have some ideas for you to check:
– Are you able to confirm that Python is up to date (e.g. Python 3.6+, etc.)?
– Are you able to confirm that your libraries are up to date (e.g. latest versions of each)?
– Are you able to try running the code file provided with the book (instead of copy-pasting from the PDF)?
– Are you able to try executing the code from the command line directly (e.g. not in an IDE or notebook)?
Let me know how you go.
Hi,dr. Jason,
I tried to run the example on page 428 lisiting 26.47 but this error appeared:
AttributeError: ‘Model’ object has no attribute ‘metrics_tensors’
Please, do you know what I should do?
Sorry, I have not seen this error.
Perhaps this will help:
https://machinelearningmastery.com/faq/single-faq/why-does-the-code-in-the-tutorial-not-work-for-me
Hi, dr. Jason
Deep Learning AMI (Amazon Linux) Version 22.0 – ami-0283132d7b60d70b9.
I used this instance since Deep Learning AMI (Amazon Linux) Version 21.1 is not available.
Is it ok?
Yes.
Hi Jason
chmod 600 keras-aws-keypair.pem on page 534 is not recognized by command prompt
(administrator) window.Can you tell me how to solve this problem.Please,?
Sorry, I have not used windows.
Hi Jason,
Thank you for your explanation.
Is the object position known after the classification?
Or for example, the distance of each classified object to the camera?
Thank you!
The model will give you the position of the object by localizing it with a bounding box.
Hi, dr. Jason
Since amazon has not incease the the limit of my instances for more ten days and they need about four days more. Furthermore, I could run my instances for only short time due to interrupt. I would like to ro run the listing26.66 on google colab. which sitting is suitable for keras and tensorflow ,please?
Sorry, I don’t know about colab, I’ve never used it.
hi and thanks, can I get the rectangle position(X_start, Y_start), thanks
The model outputs the rectangle.
hi Jason,
thanks for the example. I would like to know what is the avg inference time? do you have any measurements performed with CPU?
I am trying tu tune my setup .
thanks
Not off hand.
Perhaps try measuring it yourself on your hardware?
this is already done, I would like to know what is the performance of this algorithm. Therefore looking for references.
Currently it is taking 5s/frame for me. I am using only CPU and no GPU. Next steps from my side are to run it also with GPU and on target device.(small GPU)
if you remember any value and could share it with me will be really helpful.
Thanks!
Hi Jason,
i run the listing 26.47 in my lab top for ten days continuously while I run it in google colab for hours. I got
the same result: Epoch 1/5
Please, do you have any idea how to fix this issue?
Perhaps try running it on a fast ec2 instance, like a p3.
Hi Jason,
May I get the mask_rcnn_kangaroo_cfg_0005.h5 weights since I couldnot run listing 26.47
in amazon cloud or google colab or in my labtop either. Please, Thanks alot
Sorry, I don’t share fit models.
Hi, Dr.Jason,
I want to measure the actual distance between two detected objects, such as the distance between two cars in the image. Is there any way to do it? Do you have any suggestions?
I’m not sure off hand, sorry. Perhaps check the literature.
Hi Dr. Jason,
I am unable to open the file of mask_rcnn_coco.h5 by my laptop or by google colab, Please,
send me a copy of this file which I can open on my email:hamedmmsuliman@gmail.com
Thanks alot
The link for the file is provided in the tutorial. You an download it directly.
Hello Jason,
Thanks for the most helpful and top notch. Your efforts means a lot to me
Just had a question, how can i get the prediction or classification rate n display it?
Also how can i plot mrcnn losses n validation losses?
I recommend using mean average precision, or mAP. See this:
https://machinelearningmastery.com/how-to-train-an-object-detection-model-with-keras/
Hello Jason,
Can I use MRCNN to detect objects in motion like a video for moving objects? and how?
Thanks a lot
I don’t see why not.
You could pass each frame or video or a subset of frames to the model.
Hello Jason,
How can I save the segmented part of the image into a separate image ? The canvas size should be equivalent to the segmented part’s height x weight, And I don’t want any white spaces. I was trying to do this bit stuck. Can you kindly help me?
Best regards,
Nivethan
You can use the masks returned from the prediction to slice up your original image and save those elements.
Sorry, I don’t have the capacity to prepare a custom example for you. If you are new to working with images, perhaps start here:
https://machinelearningmastery.com/start-here/#dlfcv
Hi Jason,
I’ve modified this code to be able to detect multiple classes, but I was wondering how one would go about doing this on a live stream video from a webcam? I know using opencv is involved, but I got stuck when it came to figuring out if display_instances needed to be modified or something else for being able to superimpose the masks on the classes the video stream sees.
Sorry, I don’t have an example of this, perhaps in the future.
Sounds very interesting and a challenge I’ve been attempting to solve. How did you do this Rachel? Please is it possible to share your code?
How to use this model for training on COCO dataset.
Thanks in advance.Hopeto hear from you
The model is already trained on the dataset, you can download it and use it directly.
Hey Jason,
Two questions, if I may….
1) Is it possible to extract the x,y position of the Object Mask Outline? e.g each x,y pixel that forms the perimeter of the Object Mask? I am interested in using this data in a geometric morphometric shape analysis so it would be ideal to be able to extract this, rather than have to select the perimeter by hand.
2) Have you any thoughts on using Google’s ShapeMask instead of MaskRCNN?
Thanks for your time
Yes, the model returns polygons in image space I believe.
I’m not familiar with the google models.
Hello,
Thanks for the nice tutorial. So far, everything is working fine. But in Tensorboard as well as in a CSVCallback I added, only ‘loss’ and ‘val_loss’ are being locked. To better evaluate the training process, I would like to know and log the other losses like mask and box loss. Any idea how to enable those logs?
Thanks again for this easy to understand tutorial!
Sorry to hear that the callbacks are not working.
Perhaps you can write a very simple custom callback that prints loss to stdout and then pipe it to a log file.
How can we get prediction on only 4 clases instead of 1+81 class ?? what kind of change we do ?
You can train your own model with your dataset on the classes you are interested in, here is an example:
https://machinelearningmastery.com/how-to-train-an-object-detection-model-with-keras/
I ran MRCNN in jetson tx2 but it is very slow. Please, how to improve the performance?
What about YOLO cab be trained in custom data. Thanks a lot.
Perhaps some of these suggestions will help:
https://machinelearningmastery.com/faq/single-faq/how-do-i-speed-up-the-training-of-my-model
please help me how to solve the problem:
model = MaskRCNN(mode=”inference”, model_dir=MODEL_DIR, config=MaskRCNNConfig())
AttributeError Traceback (most recent call last)
in
1 # Create a Mask-RCNN model in inference mode
—-> 2 model = MaskRCNN(mode=”inference”, model_dir=MODEL_DIR, config=MaskRCNNConfig())
~\anaconda3\lib\site-packages\mrcnn\model.py in __init__(self, mode, config, model_dir)
1830 self.model_dir = model_dir
1831 self.set_log_dir()
-> 1832 self.keras_model = self.build(mode=mode, config=config)
1833
1834 def build(self, mode, config):
~\anaconda3\lib\site-packages\mrcnn\model.py in build(self, mode, config)
2028 # Proposal classifier and BBox regressor heads
2029 mrcnn_class_logits, mrcnn_class, mrcnn_bbox =\
-> 2030 fpn_classifier_graph(rpn_rois, mrcnn_feature_maps, input_image_meta,
2031 config.POOL_SIZE, config.NUM_CLASSES,
2032 train_bn=config.TRAIN_BN,
~\anaconda3\lib\site-packages\mrcnn\model.py in fpn_classifier_graph(rois, feature_maps, image_meta, pool_size, num_classes, train_bn, fc_layers_size)
925 # ROI Pooling
926 # Shape: [batch, num_boxes, pool_height, pool_width, channels]
–> 927 x = PyramidROIAlign([pool_size, pool_size],
928 name=”roi_align_classifier”)([rois, image_meta] + feature_maps)
929 # Two 1024 FC layers (implemented with Conv2D for consistency)
~\anaconda3\lib\site-packages\tensorflow\python\keras\engine\base_layer.py in __call__(self, *args, **kwargs)
923 # >> model = tf.keras.Model(inputs, outputs)
924 if _in_functional_construction_mode(self, inputs, args, kwargs, input_list):
–> 925 return self._functional_construction_call(inputs, args, kwargs,
926 input_list)
927
~\anaconda3\lib\site-packages\tensorflow\python\keras\engine\base_layer.py in _functional_construction_call(self, inputs, args, kwargs, input_list)
1115 try:
1116 with ops.enable_auto_cast_variables(self._compute_dtype_object):
-> 1117 outputs = call_fn(cast_inputs, *args, **kwargs)
1118
1119 except errors.OperatorNotAllowedInGraphError as e:
~\anaconda3\lib\site-packages\tensorflow\python\autograph\impl\api.py in wrapper(*args, **kwargs)
256 except Exception as e: # pylint:disable=broad-except
257 if hasattr(e, ‘ag_error_metadata’):
–> 258 raise e.ag_error_metadata.to_exception(e)
259 else:
260 raise
AttributeError: in user code:
C:\Users\Office1\anaconda3\lib\site-packages\mrcnn\model.py:390 call *
roi_level = log2_graph(tf.sqrt(h * w) / (224.0 / tf.sqrt(image_area)))
C:\Users\Office1\anaconda3\lib\site-packages\mrcnn\model.py:341 log2_graph *
return tf.log(x) / tf.log(2.0)
AttributeError: module ‘tensorflow’ has no attribute ‘log’
It looks like you are using tensorflow 2, try downgrading to tensorflow 1, instructions are in the above tutorial.
Dear jason Brownlee,
I’m so thankful to you. This is the great tutorial helped alot in my pg project.
You’re welcome, I’m happy to hear that.
How can use display_instances() function to only draw the mask WITHOUT only the bounding boxes and the reverse?
I believe so, perhaps check the code or documentation for the function, or try experimenting with the function directly.
I am a beginner in Machine Learning. I am confused where to write the code for Step 3 which is under the heading “Example of Object Localization”.
I am using Anaconda virtual environment and its command prompt
I am confused where to put this code.
# define the test configuration
class TestConfig(Config):
NAME = “test”
GPU_COUNT = 1
IMAGES_PER_GPU = 1
NUM_CLASSES = 1 + 80
I update the config.py file as per the above shown code.
Now when I execute
rcnn = MaskRCNN(mode=’inference’, model_dir=’./’, config=TestConfig())
Traceback (most recent call last):
File “”, line 1, in
NameError: name ‘MaskRCNN’ is not defined
How to solve this?
These tips will help:
https://machinelearningmastery.com/faq/single-faq/why-does-the-code-in-the-tutorial-not-work-for-me
Hi Shankhanil Borthakur, pleae have you find a solution of the problem. Unfortunaltely I get the same problem. Thanks
Tomas
I recommend copying the code from the complete example at the end of that section.
Hi, Its Interesting job that u guys did,
can you recommend using Mask R-CNN to detect objects in a dim image/ enironment. or any other better recent algorithms specifically used to detect objects with in dim/low resolution images.
Thanks.
Perhaps you can pre-process your images?
Perhaps you can re-train the model for your dataset?
Hi Jason, I have a python 3.6 virtual environment set up with all the libraries. The code runs. However, when the elephant is displayed at the end, the bounding boxes are completely incorrect. This also happens when I run the demo notebook from the original repository. I’ve tried re-creating my virtual environment multiple times, and the bounding boxes are wildly incorrect every time. Do you have ideas on how to debug this?
Sorry to hear that, perhaps some of these tips will help:
https://machinelearningmastery.com/faq/single-faq/why-does-the-code-in-the-tutorial-not-work-for-me
thank u vary much
I implementation this step for pycharm but show error :ModuleNotFoundError: No module named ‘mrcnn’ , please how can correct that
These tips will help:
https://machinelearningmastery.com/faq/single-faq/why-does-the-code-in-the-tutorial-not-work-for-me
thank u
You’re welcome.
Hi Jason, first of all I really appreciate your work and I love your tutorials. I went through your other tutorial as-well which was for the Instance Segmentation using MASK-RCNN for the Kangaroo Dataset so, I have a question that is there a way to use the same Dataset for the Image Segmentation using any other pre-trained model such as VGG or ResNet?
Thanks.
Thanks.
Perhaps try it and see if it makes sense for your project/dataset.
Mr. Jason thanks for providing such knowledge. I want to ask a question regarding mask r-cnn, Is it possible to use this method to detect keypoint of dog ( as like dog pose estimation).
Any comment will be helpful.
Thanks.
Hi Mukul…The following may be of interest to you:
https://machinelearningmastery.com/deep-learning-for-computer-vision/
whz this error, NameError: name ‘MaskRCNN’ is not defined
Running this command.
# define the model
rcnn = MaskRCNN(mode=’inference’, model_dir=’./’, config=TestConfig())
running on colab, TF_version, python_version all seems correct
Thank you for your feedback Mak!
hi james can u please figure out how to plot the train accuracy and validation accuracy, moreover with the final accuracy as my advisor is interested in knowing these graphs and metrics
Hi Philmonna…The following resource may be very helpful to you:
https://machinelearningmastery.com/display-deep-learning-model-training-history-in-keras/
Ya but that thing wont works out for mask rcnn because its trained using model.train not model.fit. I found outThe mask rcnn model defers from other models. refer matterport mask rcnn
@James Carmichael So i want support to visualize the accuracy and loss graph from the mask rcnn out put arguments.
Thanks in advance!!!
Nice work done here. I have very simple question, is it possible to use this model to detect multiple classes?
I need to develop a model which can detect building defects like Cracks, Efflorescence, Rust Stains, etc.
Thank you in advance for your response.
Hi Sushant…The following resource may help add clarity:
https://discuss.pytorch.org/t/multi-class-implementation-mask-rcnn/70476/11