
This tutorial is part two of a four part series, which aims to take you from scratch to deploying a fully functional full stack application.
- Part 1: How to build blazing fast REST APIs with Node.js, MongoDB, Fastify and Swagger
- Part 2: How to build a blazing fast GraphQL API with Node.js, MongoDB, Fastify and GraphQL! (You are here.)
- Part 3: Coupling Vue.js with a GraphQL API.
- Part 4: Deploying a GraphQL API and Vue.js frontend application.
The first part of the series is available here and the source code for the application can be found here.
In this part we will revisit the models, controllers and routes from part one and then integrate GraphQL into the application. As a bonus we will also use Faker.js to create some fake data and seed the database.
Introduction:
GraphQL is a query language for APIs and a runtime for fulfilling those queries with your existing data.
Every GraphQL query goes through three phases: the queries are parsed, validated and executed.
GraphQL provides a complete and understandable description of the data in your API, gives clients the power to ask for exactly what they need, makes it easier to evolve APIs over time, and enables powerful developer tools. Learn More.
Prerequisites…
If you have completed the first part of this series, you should be up to speed with beginner/intermediate JavaScript knowledge, Node.js, Fastify.JS and MongoDB (Mongoose).
To follow along, you will need to complete part one of this series or grab the code from Git, although I would highly recommend at least skimming through part one.
Let’s get started!
Clone the repo for part one (skip this step if you followed part one and you are continuing with your own code) by opening your terminal, navigating to your project directory and executing each of the following lines of code:
git clone https://github.com/siegfriedgrimbeek/fastify-api.git
cd fastify-api
So now that we have a copy of the codebase we will update our packages and package.json file by running the following code:
sudo npm i -g npm-check-updates
ncu -u
npm install
First we globally install the npm package “npm-check-updates” and then we use this package to automatically update our package.json file with the latest package versions and then we install/update all our npm modules by running npm install.
This is done to ensure that everyone completing the tutorial is working with the same package versions.
Refactor our server and start the app!

As with all software solutions, as the solution grows, developers often need to revisit and refactor the code.
In the src directory we will create a new file called server.js:
cd src
touch server.js
Add the following code code to the server.js file:
// Require the fastify framework and instantiate it
const fastify = require('fastify')({
	logger: true
})

// Require external modules
const mongoose = require('mongoose')

// Connect to DB
mongoose
	.connect('mongodb://localhost/mycargarage')
	.then(() => console.log('MongoDB connected...'))
	.catch(err => console.log(err))

module.exports = fastifyWe have now extracted the logic that starts the server to the server.js file, allowing us to reuse this code throughout the project.
Next we need to update our index.js file in the src directory:
// Import Server
const fastify = require('./server.js')

// Import Routes
const routes = require('./routes')

// Import Swagger Options
const swagger = require('./config/swagger')

// Register Swagger
fastify.register(require('fastify-swagger'), swagger.options)

// Loop over each route
routes.forEach((route, index) => {
	fastify.route(route)
})

// Run the server!
const start = async () => {
	try {
		await fastify.listen(3000, '0.0.0.0')
		fastify.swagger()
		fastify.log.info(`server listening on ${fastify.server.address().port}`)
	} catch (err) {
		fastify.log.error(err)
		process.exit(1)
	}
}
start()We will revisit the index.js file, once we setup and configure GraphQL.
Start the Fastify server by running the following code in your terminal:
npm startNote that there is no default route setup so for now, navigating to http://localhost:3000/ will result in the server returning a 404 error which is correct.
Start MongoDB and update the models

Let’s extend the existing model to also include Services and Owners. The below diagram below demonstrates the relationships between the collections:
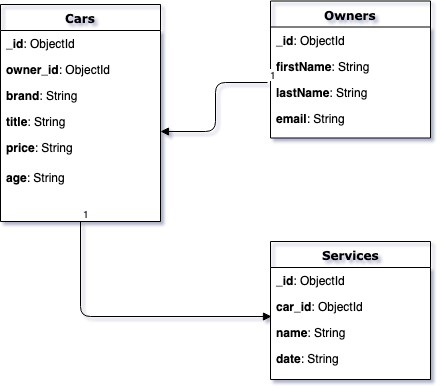
- One car can have one owner.
- One owner can have many cars.
- One car can have many services.
Revisit the Car.js file in the models directory and update it as follows:
// External Dependancies
const mongoose = require("mongoose")
const ObjectId = mongoose.Schema.Types.ObjectId

const carSchema = new mongoose.Schema({
  title: String,
  brand: String,
  price: String,
  age: Number,
  owner_id: ObjectId
})

module.exports = mongoose.model("Car", carSchema)Create two new files in the models directory, Owner.js and Service.js and add the following code to the files respectively:
Owner.js
// External Dependancies
const mongoose = require('mongoose')

const ownerSchema = new mongoose.Schema({
	firstName: String,
	lastName: String,
	email: String
})

module.exports = mongoose.model('Owner', ownerSchema)Service.js
// External Dependancies
const mongoose = require("mongoose")
const ObjectId = mongoose.Schema.Types.ObjectId

const serviceSchema = new mongoose.Schema({
  car_id: ObjectId,
  name: String,
  date: String
})

module.exports = mongoose.model("Service", serviceSchema)
view rawService.js hosted with ❤ by GitHub
There are no new concepts used in the above code. We have just created standard Mongoose Schemas, as with the Car.js model.
Revisit the Car Controller and create the additional controllers
There are some slight changes to the carController.js so navigate to the controllers directory and update your file as per below:
// External Dependancies
const boom = require('boom')

// Get Data Models
const Car = require('../models/Car')

// Get all cars
exports.getCars = async () => {
	try {
		const cars = await Car.find()
		return cars
	} catch (err) {
		throw boom.boomify(err)
	}
}

// Get single car by ID
exports.getSingleCar = async req => {
	try {
		const id = req.params === undefined ? req.id : req.params.id
		const car = await Car.findById(id)
		return car
	} catch (err) {
		throw boom.boomify(err)
	}
}

// Add a new car
exports.addCar = async req => {
	try {
		const car = new Car(req)
		const newCar = await car.save()
		return newCar
	} catch (err) {
		throw boom.boomify(err)
	}
}

// Update an existing car
exports.updateCar = async req => {
	try {
		const id = req.params === undefined ? req.id : req.params.id
		const updateData = req.params === undefined ? req : req.params
		const update = await Car.findByIdAndUpdate(id, updateData, { new: true })
		return update
	} catch (err) {
		throw boom.boomify(err)
	}
}

// Delete a car
exports.deleteCar = async req => {
	try {
		const id = req.params === undefined ? req.id : req.params.id
		const car = await Car.findByIdAndRemove(id)
		return car
	} catch (err) {
		throw boom.boomify(err)
	}
}Create two new files in the controllers directory, serviceController.js and ownerController.js, and add the following code to the files respectively:
serviceController.js
// External Dependancies
const boom = require('boom')

// Get Data Models
const Service = require('../models/Service')

// Get single service ID
exports.getSingleService = async req => {
	try {
		const id = req.params === undefined ? req.id : req.params.id
		const service = await Service.findById(id)
		return service
	} catch (err) {
		throw boom.boomify(err)
	}
}

// Get single car's services
exports.getCarsServices = async req => {
	try {
		const id = req.params === undefined ? req.id : req.params.id
		const services = await Service.find({ car_id: id })
		return services
	} catch (err) {
		throw boom.boomify(err)
	}
}ownerController.js
// External Dependancies
const boom = require('boom')

// Get Data Models
const Owner = require('../models/Owner')
const Car = require('../models/Car')

// Get all owners
exports.getOwner = async () => {
	try {
		const owners = await Owner.find()
		return owners
	} catch (err) {
		throw boom.boomify(err)
	}
}

// Get single owner by ID
exports.getSingleOwner = async req => {
	try {
		const id = req.params === undefined ? req.id : req.params.id
		const owner = await Owner.findById(id)
		return owner
	} catch (err) {
		throw boom.boomify(err)
	}
}

// Get single owner's cars
exports.getOwnersCars = async req => {
	try {
		const id = req.params === undefined ? req.id : req.params.id
		const cars = await Car.find({ owner_id: id })
		return cars
	} catch (err) {
		throw boom.boomify(err)
	}
}The biggest change to the controllers is how we get the parameters:
const id = req.params === undefined ? req.id : req.params.id
const updateData = req.params === undefined ? req : req.params
The above code is called a “conditional (ternary) operator” and is used as shorthand for the following if statement:
let id

if (req.params === undefined) {

id = req.id

} else {

id = req.params.id

}
We are using the ternary operator to accommodate requests from both the REST API and the GraphQL API, as they have a slightly different implementation.
Time to seed the database with some fake data!

In the src directory let’s create a new directory and file by running the following code:
mkdir helpers
touch seed.js
Add the following code to the seed.js file:
// Import external dependancies
const faker = require('faker')
const boom = require('boom')

// Import internal dependancies
const fastify = require('../server.js')

// Fake data
const cars = [
	{
		name: 'Tesla',
		models: ['S', 'E', 'X', 'Y']
	},
	{
		name: 'Mercedes',
		models: ['GLA', 'GLC', 'GLE', 'GLS']
	},
	{
		name: 'BMW',
		models: ['X4', 'Z3', 'M2', '7']
	},
	{
		name: 'Audi',
		models: ['A1', 'A3', 'A4', 'A5']
	},
	{
		name: 'Ford',
		models: ['Fiesta', 'Focus', 'Fusion', 'Mustang']
	}
]
const serviceGarages = ['A++ Auto Services', "Gary's Garage", 'Super Service', 'iGarage', 'Best Service']

// Get Data Models
const Car = require('../models/Car')
const Owner = require('../models/Owner')
const Service = require('../models/Service')

// Fake data generation functions
const generateOwnerData = () => {
	let ownerData = []
	let i = 0

	while (i < 50) {
		const firstName = faker.fake('{{name.firstName}}')
		const lastName = faker.fake('{{name.lastName}}')
		const email = faker.fake(`${firstName.toLowerCase()}.${lastName.toLowerCase()}@gmail.com`)

		const owner = {
			firstName,
			lastName,
			email
		}

		ownerData.push(owner)
		i++
	}

	return ownerData
}

const generateCarData = ownersIds => {
	let carData = []
	let i = 0

	while (i < 1000) {
		const owner_id = faker.random.arrayElement(ownersIds)
		const carObject = faker.random.arrayElement(cars)
		const title = faker.random.arrayElement(carObject.models)
		const price = faker.random.number({ min: 5000, max: 30000 })
		const age = faker.random.number({ min: 2, max: 10 })

		const car = {
			owner_id,
			brand: carObject.name,
			title,
			price,
			age
		}

		carData.push(car)
		i++
	}

	return carData
}

const generateServiceData = carsIds => {
	let serviceData = []
	let i = 0

	while (i < 5000) {
		const car_id = faker.random.arrayElement(carsIds)
		const name = faker.random.arrayElement(serviceGarages)
		const date = faker.fake('{{date.past}}')

		const service = {
			car_id,
			name,
			date
		}

		serviceData.push(service)
		i++
	}

	return serviceData
}

fastify.ready().then(
	async () => {
		try {
			const owners = await Owner.insertMany(generateOwnerData())
			const ownersIds = owners.map(x => x._id)

			const cars = await Car.insertMany(generateCarData(ownersIds))
			const carsIds = cars.map(x => x._id)

			const services = await Service.insertMany(generateServiceData(carsIds))

			console.log(`
      Data successfully added:
        - ${owners.length} owners added.
        - ${cars.length} cars added.
        - ${services.length} services added.
      `)
		} catch (err) {
			throw boom.boomify(err)
		}
		process.exit()
	},
	err => {
		console.log('An error occured: ', err)
		process.exit()
	}
)Let’s break down this mountain of code:
First we import two external libraries, Faker.js which is used to generate fake data and Boom, which is used to throw http friendly error objects.
Then we import the server.js file which will spin up an instance of our server allowing us to interact with the models.
We then declare two arrays with fake data, cars and serviceGarages.
Then we import the models and declare three functions (generateOwnerData, generateCarData, generateServiceData) which each return an array of objects with the owner, car and service data respectively.
Once the Fastify.js instance is ready we use the Mongoose insertMany() function to insert the generated arrays into the database. The function then returns an array of objects containing the original object data and ids of the each record.
We use the JavaScript Map function to create an array of ids owners and cars arrays. We use the ownersIDs array for when generating car data and we use the carsIds array when generating service data, they are passed into the respective functions and then values are randomly selected from them.
Lastly we need to install the Faker.js package and add the seed task to our package.json file.
We can add the Faker.js package by navigating to the root directory and running the following code:
npm i faker -DWe then add the following to the package.json file:
...

"scripts": {

...

"seed": "node ./src/helpers/seed.js"

},

...
That’s it! We can now run our seeding script from the project root directory with the following code:
npm run seedIf you are using MongoDB Compass (you should), you will see the data in your database:

GraphQL installation, setup and testing

Let’s get started by navigating to the root directory and running the following code:
npm i fastify-gql graphqlThe above installs GraphQL and the Fastify barebone GraphQL adapter.
Navigate to the src directory and run the following code:
mkdir schema
cd shema
touch index.js
Navigate to the src directory update the index.js file with the following:
// Import Server
const fastify = require('./server.js')

// Import external dependancies
const gql = require('fastify-gql')

// Import GraphQL Schema
const schema = require('./schema')

// Register Fastify GraphQL
fastify.register(gql, {
   schema,
   graphiql: true
})

... end here

// Import Routes
const routes = require('./routes')
With the above code we require the Fastify GraphQL Adapter, import the schema and register the GraphQl Adapter with Fastify.
We register the schema and enable GraphiQL, an in-browser IDE for exploring GraphQL.
Navigate to the schema directory and open the index.js file and add the following boilerplate code:
// Import External Dependancies
const graphql = require('graphql')

// Destructure GraphQL functions
const {
	GraphQLSchema,
	GraphQLObjectType,
	GraphQLString,
	GraphQLInt,
	GraphQLID,
	GraphQLList,
	GraphQLNonNull
} = graphql

// Import Controllers
const carController = require('../controllers/carController')
const ownerController = require('../controllers/ownerController')
const serviceController = require('../controllers/serviceController')

// Define Object Types
const carType = new GraphQLObjectType({
	name: 'Car',
	fields: () => ({})
})

const ownerType = new GraphQLObjectType({
	name: 'Owner',
	fields: () => ({})
})

const serviceType = new GraphQLObjectType({
	name: 'Service',
	fields: () => ({})
})

// Define Root Query
const RootQuery = new GraphQLObjectType({
	name: 'RootQueryType',
	fields: {
		car: {},
		cars: {},
		owner: {},
		service: {}
	}
})

// Define Mutations
const Mutations = new GraphQLObjectType({
	name: 'Mutations',
	fields: {
		addCar: {
			type: carType,
			args: {},
			async resolve(args) {
				return ''
			}
		},
		editCar: {
			type: carType,
			args: {},
			async resolve(args) {
				return ''
			}
		},
		deleteCar: {
			type: carType,
			args: {},
			async resolve(args) {
				return ''
			}
		}
	}
})

// Export the schema
module.exports = new GraphQLSchema({
	query: RootQuery,
	mutation: Mutations
})Let’s run through the above code:
We require the main GraphQL package and use JavaScript Destructuring to get the necessary GraphQL functions(GraphQLSchema, GraphQLObjectType, GraphQLString, GraphQLInt, GraphQLID, GraphQLList and GraphQLNonNull).
We import our three controllers (carController, ownerController and serviceController).
We declare the carType, ownerType and serviceType GraphQL Object Types, which are functions that accept an object as a parameter, with a name and a fields key.
These functions are used to define our GraphQL schema, similar to the Mongoose models defined earlier.
The fields can return a particular type, and methods that take arguments. Learn More about Object Types.
Then we declare the RootQuery which is also a GraphQL Object Type and is found at the top level of every GraphQL server. It represents all of the possible entry points into the GraphQL API. Learn More about root fields and resolvers.
We then declare our Mutations, which are used to change data. Although any query could be implemented to change data, operations that cause changes should be sent explicitly via a mutation. Learn More about Mutations.
Lastly we export the GraphQLSchema.
Now that we have our template setup we can start populating the Object Types, Root Query and Mutations.
Note that there are Mongoose to GraphQL schema generators available, but for the tutorial purposes we will manually create the schema.
Let’s update the carType Object Type as follows:
const carType = new GraphQLObjectType({
	name: 'Car',
	fields: () => ({
		_id: { type: GraphQLID },
		title: { type: GraphQLString },
		brand: { type: GraphQLString },
		price: { type: GraphQLString },
		age: { type: GraphQLInt },
		owner_id: { type: GraphQLID },
		owner: {
			type: ownerType,
			async resolve(parent, args) {
				return await ownerController.getSingleOwner({ id: parent.owner_id })
			}
		},
		services: {
			type: new GraphQLList(serviceType),
			async resolve(parent, args) {
				return await serviceController.getCarsServices({ id: parent._id })
			}
		}
	})
})Let’s dive deeper into the GraphQL functions, starting with the Scalars types in GraphQL:
GraphQL comes with a set of default scalar types out of the box:
Int: A signed 32‐bit integer.GraphQLIntFloat: A signed double-precision floating-point value.GraphQLFloatString: A UTF‐8 character sequence.GraphQLStringBoolean:trueorfalse.GraphQLBooleanID: The ID scalar type represents a unique identifier, often used to refetch an object or as the key for a cache. The ID type is serialised in the same way as a String; however, defining it as anIDsignifies that it is not intended to be human‐readable.GraphQLID
The owner and service fields are where it gets interesting. These fields are not defined as Scalar types like the rest — instead, their type is referencing the ownerType and serviceType that we have created and are yet to populate.
The second argument that we pass into the owner and service fields are resolver functions.
Resolver functions or methods are functions that resolves a value for a type or field in a schema
Resolvers can be asynchronous too! They can resolve values from another REST API, database, cache, constant, etc.
You can think of each field in a GraphQL query as a function or method of the previous type which returns the next type. In fact, this is exactly how GraphQL works. Each field on each type is backed by a function called the resolver which is provided by the GraphQL server developer. When a field is executed, the corresponding resolver is called to produce the next value.
If a field produces a scalar value like a string or number, then the execution completes. However if a field produces an object value then the query will contain another selection of fields which apply to that object. This continues until scalar values are reached. GraphQL queries always end at scalar values.
In order to create the relationship between the different types we pass the _id and the owner_id values into the respective controller functions.
So essentially we are requesting the owner details along with the car details:
return await userController.getSingleOwner({ id: parent.owner_id })and the details of all the services related to the car:
return await serviceController.getCarsServices({ id: parent._id })To return a list or array from with GraphQL, we use the GraphQLList. Here is a great in depth tutorial about using arrays in GraphQL Schema, but it is really simple: whenever we need an array we will use the GraphQLList function.
Let’s update the ownerType and serviceType with the following code:
ownerType
const ownerType = new GraphQLObjectType({
	name: 'Owner',
	fields: () => ({
		_id: { type: GraphQLID },
		firstName: { type: GraphQLString },
		lastName: { type: GraphQLString },
		email: { type: GraphQLString },
		cars: {
			type: new GraphQLList(carType),
			async resolve(parent, args) {
				return await ownerController.getOwnersCars({ id: parent._id })
			}
		}
	})
})serviceType
const serviceType = new GraphQLObjectType({
	name: 'Service',
	fields: () => ({
		_id: { type: GraphQLID },
		car_id: { type: GraphQLID },
		name: { type: GraphQLString },
		date: { type: GraphQLString },
		car: {
			type: carType,
			async resolve(parent, args) {
				return await carController.getSingleCar({ id: parent.car_id })
			}
		}
	})
})The above two Object Types are very similar to the carType. You can notice a pattern between the different Object Types and their relationships.
We can now populate the RootQuery root with the following code:
const RootQuery = new GraphQLObjectType({
	name: 'RootQueryType',
	fields: {
		car: {
			type: carType,
			args: { id: { type: GraphQLID } },
			async resolve(parent, args) {
				return await carController.getSingleCar(args)
			}
		},
		cars: {
			type: new GraphQLList(carType),
			async resolve(parent, args) {
				return await carController.getCars()
			}
		},
		owner: {
			type: ownerType,
			args: { id: { type: GraphQLID } },
			async resolve(parent, args) {
				return await ownerController.getSingleOwner(args)
			}
		},
		service: {
			type: serviceType,
			args: { id: { type: GraphQLID } },
			async resolve(parent, args) {
				return await serviceController.getSingleService(args)
			}
		}
	}
})There are no new concepts in the above code, but keep in mind that the RootQuery query is the entry point to all queries on the GraphQL API. So from the above we can see that we can run the following queries directly:
- Get all the Cars
- Get a single Car
- Get a single Owner
- Get a single Service
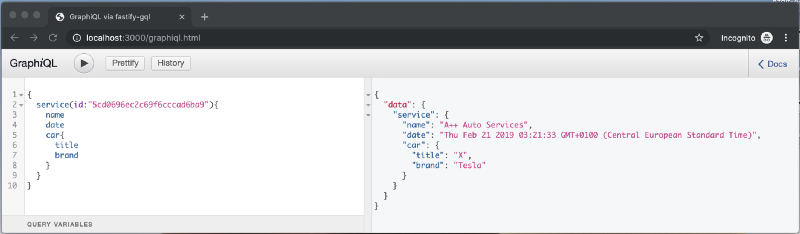
Let’s open the GraphiQL user interface and build some queries: http://localhost:3000/graphiql.html
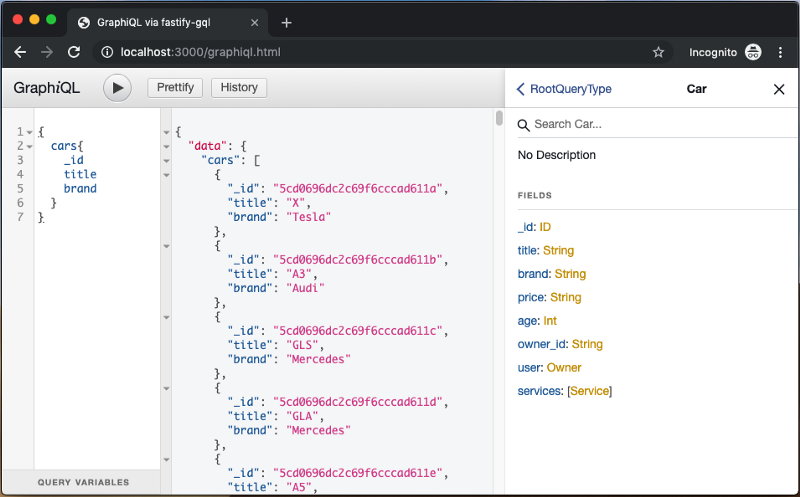
Queries are entered on the left, results are in the middle, and the documentation explorer is on the right.
The documentation explorer can be used to explore the entire graph down to Scalar level. This is very helpful when building queries.
The language used to build the queries resembles JSON. This cheat sheet is a great a reference.
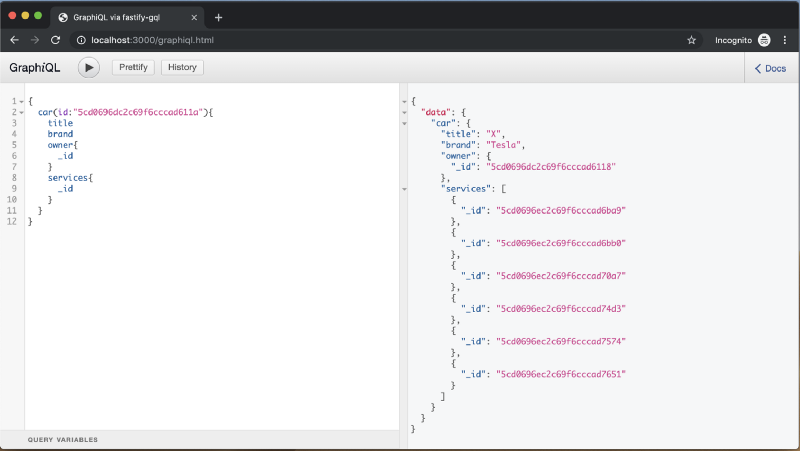
Below demonstrates why GraphQL is so awesome:
In the above example, we are using the cars root query to display a list of all the cars, their owners, and their services.

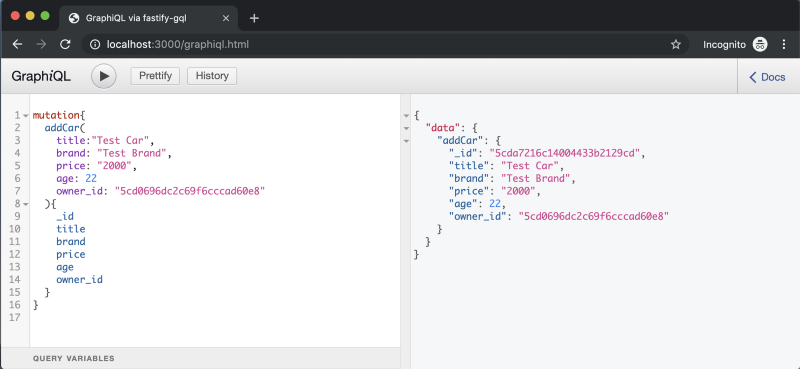
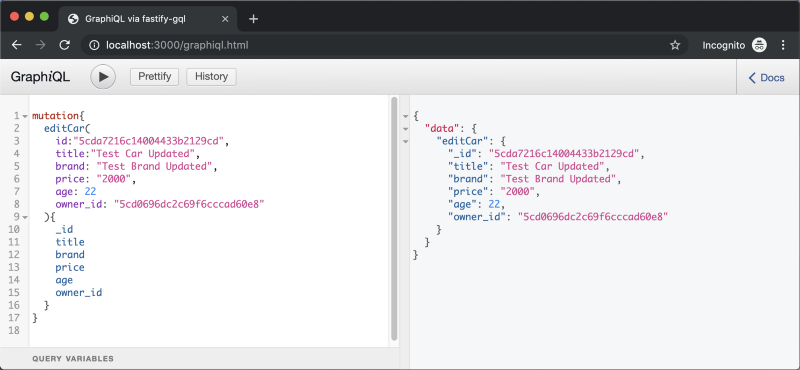
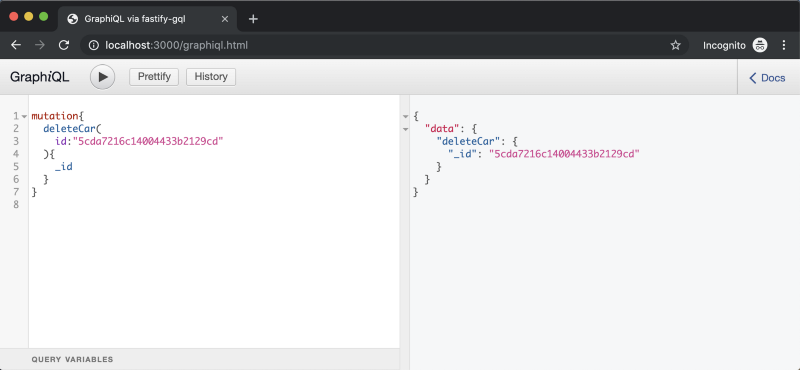
We have one final topic to address, and that is mutations. Let’s update the mutations with the following code:
const Mutations = new GraphQLObjectType({
	name: 'Mutations',
	fields: {
		addCar: {
			type: carType,
			args: {
				title: { type: new GraphQLNonNull(GraphQLString) },
				brand: { type: new GraphQLNonNull(GraphQLString) },
				price: { type: GraphQLString },
				age: { type: GraphQLInt },
				owner_id: { type: GraphQLID }
			},
			async resolve(parent, args) {
				const data = await carController.addCar(args)
				return data
			}
		},
		editCar: {
			type: carType,
			args: {
				id: { type: new GraphQLNonNull(GraphQLID) },
				title: { type: new GraphQLNonNull(GraphQLString) },
				brand: { type: new GraphQLNonNull(GraphQLString) },
				price: { type: new GraphQLNonNull(GraphQLString) },
				age: { type: new GraphQLNonNull(GraphQLInt) },
				owner_id: { type: GraphQLID }
			},
			async resolve(parent, args) {
				const data = await carController.updateCar(args)
				return data
			}
		},
		deleteCar: {
			type: carType,
			args: {
				id: { type: new GraphQLNonNull(GraphQLID) }
			},
			async resolve(parent, args) {
				const data = await carController.deleteCar(args)
				return data
			}
		}
	}
})As before, we declare our Object Type, specify the name and the fields.
A mutation consists of the the type, args and the async resolve function. The resolve function passes the args to the controller, which returns the result of the mutation.
You have now coded a fully functional REST API and a fully functional GraphQL API.
There are no rules stating that one should use exclusively REST or exclusively GraphQL. In some projects, the best solution may be a mix of both. This is really determined on a project-to-project basis.
You can download the source code form Git here.
What is Next?
In the next tutorial, we will consume our GraphQL API with a Vue.js frontend as a single page application!