Originally posted on my Coda profile (coda.io/@atc).
May 2020 update: Published two scripts to sync from Coda to Google Sheets or from Google Sheets to Coda. See this post for details.
Feb 2020 update: If you are using the V8 runtime in Google Apps Script, delete the word each from line 40 and line 88 of the script.
You have a master spreadsheet with some sensitive data, but want to share some of that data with a client, employee, or vendor. You obviously can’t share the entire spreadsheet because then the other party can see your sensitive data. I’ve seen this scenario over and over again in various workflows, and there are some solutions that solve this problem…but they’re not perfect. So what do you do?

If there is software that exists specifically for your industry, then you’re in luck. Chances are that specialized software has built in data sync features that allow you to see the data that is important to you, but then you can share a filtered view of that data with your client or patient. The other party most likely has to set up a login on the software you use, or download an app to see their data.
Then there’s the rest of us.
We spend our lives in Excel spreadsheets and Google Sheets, and needs simple ways to share data between the files. In this article, I’m going to discuss:
- How to share data from one table in a Coda doc to another Coda doc using Google Apps Script (GAS)
- How to share data from one Google Sheet to another Google Sheet (also using GAS)
- A non-GAS way to share data from one Google Sheet to another Google Sheet using formulas
If you want to skip right to the solution, here is the script for syncing Coda tables, and the script for syncing Google Sheets lists. Or just watch the video below.
First off, what is Coda?
Coda is a real-time collaborative doc (similar to a Google Doc) that includes the power of spreadsheets and databases in one tool. With Coda, you’re able to build applications (without code) that solve workflows related to project management to organizing Game of Thrones death poolsfor your friends. See the video below if you’re more of a visual learner:
At the heart of Coda are tables of data. Tables in Coda look and feel like a grid of cells in a spreadsheet, but they have names and act more like databases. Here is a table of team tasks with typical columns you would need for managing tasks for a project:

Filtering data that’s relevant for you
If you are the project manager, this list could get pretty long so what most project managers would do is create a view of the tasks filtered to just tasks that have a Stage of “Not Started” or the “Industrial Design” team would create a view of the tasks just filtered to their team.
Many users in the Coda community want to sync the data from a master task list above to a separate Coda doc. Why? To create an even cleaner view of the tasks that doesn’t include the other sections of the “source” doc. Some common workflows outside of project management I’ve seen:
- A digital agency manages their clients’ data in a doc, but wants to selectively share data from their doc with their clients
- A teacher tracks their students’ attendance and grade in one Coda doc, but only wants to share data specific to one student with that student’s parents
- A small business manages their business data in a doc and places purchase orders with vendors, and only wants to share specific data from their doc with one vendor
Enter Google Apps Script
You can integrate all the various apps you use from Google (e.g. Gmail, Google Sheets, Google Docs) using Google Apps Script. Coda has a library you can use in Google Apps Script, which means you can integrate data from Coda with other Google apps (and vice versa).
I find that using the Coda API is easiest with GAS, but you can also use Python or a Unix shell. What I like about using GAS for syncing tables in Coda docs together is that you can easily set up a time-driven trigger so that your script runs every minute, hour, day, etc. If you are using Google Sheets, however, you can use simple triggers that fire your script when there is a change to one of your Google Sheets.
Setting up your Google Apps Script
If you follow along with the Getting Started Guide: Coda API, you’ll pretty much get the one-way sync working so that data from your master Coda doc (which I’ll call the source from now on) is one-way synced to another Coda doc you create (the target doc). See the full script below:
The main function you need to run is oneWaySync() and the table from your source doc will get synced to a table you define in your target doc. After playing around with this script, I noticed there are a few things we can do to make the script more robust to solve more complicated workflows and data sync scenarios.
#1 Sync multiple tables in the source to multiple tables in the target
If you look at the way the script is structured, it assume two things:
- You have multiple tables in your source doc you want to sync
- There is only one table in your target doc that all the multiple tables sync to
This is the part of the script where you define your source and target tables and the syncSpecificTable() function syncs each of the source tables with your target table:
SOURCE_TABLES = [
  {
    doc: 'TO UPDATE',
    table: 'Source Table',
  },
];

TARGET_TABLE = {
  doc: 'TO UPDATE',
  table: 'Target Table',
};

TARGET_TABLE_SOURCE_ROW_COLUMN = 'Source Row URL';
function oneWaySync() {
  for each (var source in SOURCE_TABLES) {
    syncSpecificTable(source, TARGET_TABLE);
  }
}
If we look back at our project tasks table, you most likely have one “master” list of tasks, one “master” list of team members, and want to sync those to individual tables in the target doc. The script assumes you have multiple project tasks table that you want to combine into one table in your target doc:

I argue that this is not the most common pattern in the Coda docs you’re looking to sync. Something I see with a lot of our users is this pattern:
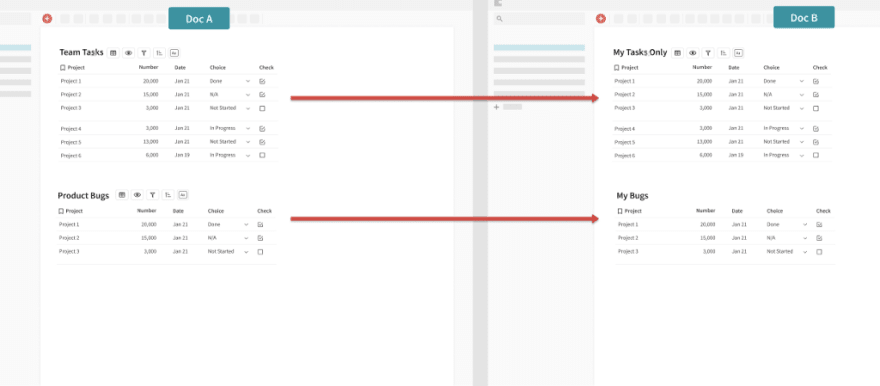
In order to do this, we have to edit the script slightly to account for multiple source tables and multiple target tables. I didn’t want to change the data structure needed for the syncSpecificTable() function, so instead created an array of arrays of doc and table key-value pairs so that the oneWaySync() function can loop through each element in the array and reference the source doc and table via the 1st element and the target doc and table via the 2nd element. In the script below, table[0] and table[1] represent these elements:
SOURCE_DOC_ID = 'TO UPDATE'
TARGET_DOC_ID = 'TO UPDATE'

var TABLES = [

  //1st table to sync
  [
    {
      doc: SOURCE_DOC_ID,
      table: 'TO UPDATE', //1st table from source doc
    },
    {
      doc: TARGET_DOC_ID,
      table: 'TO UPDATE', //1st table from target doc
    }
  ],

  //2nd table to sync
  [
    {
      doc: SOURCE_DOC_ID,
      table: 'TO UPDATE', //2nd table from source doc
    },
    {
      doc: TARGET_DOC_ID,
      table: 'TO UPDATE', //2nd table from target doc
    }
  ]
];

function oneWaySync() {
  for each (var table in TABLES) {
    syncSpecificTable(table[0], table[1]);
  }
}
This may not be the most efficient or prettiest way of setting up multiple tables to sync, but it works :).
#2 Deleting rows in the source table should delete rows in the target table
If you delete rows of data in the source table, wouldn’t you want the rows to also get deleted in the target table? One way I’ve seen this being done in current data syncs between Coda docs is setting up a filter in the target doc so that any rows from the source that are supposed to be “deleted” will just get filtered out from the target doc.
For instance, here are a bunch of tasks from the source table that are completed and should be “deleted” from the source table. You can apply a filter to the source table so that these rows get filtered out:

Then, in your target table, you can filter out those same rows that have been marked as “Complete.” You’ll notice that in this target table, I’m only interested in the tasks that are owned by “Adam Davis” (he has 4 tasks in various stages):

This pattern only works if there is value you know you can filter on in the table that would remove rows from your table. In many cases related to project management, the project manager might just delete the row entirely since it’s an irrelevant task, they made a mistake with the data entry, or they just want to reduce the number of rows in the main table. The script currently would not allow for deleting rows. If you have 10 rows in the source table, those same 10 rows would show up in the target table once the sync happens. If you delete 3 rows from the source table, there would still be 10 rows in the target table (but only 7 rows in the source table).
In order to delete rows from the target table, we need to utilize two resources available to us in the Coda API:
-
deleteRowmethod in the GAS library -
browserLinkparameter which gives us a unique identifier for every row in the source table
The browserLink is a super useful identifier for doing the one-way sync because it also gives us the ability update rows if there has been a change in the source table. We call this an UPSERT when you want to either insert or update a row. In the main syncSpecificTable() function of our GAS script, I add the following code to:
- Retrieve all the rows from the target table
- Iterate over all these rows
- Delete rows from the target table if the
browserLink(or in this case, theTARGET_TABLE_SOURCE_ROW_COLUMN) in the target row does not exist in the rows from the source table
var targetRows = CodaAPI.listRows(target.doc, target.table, {limit: 500, useColumnNames: true}).items;

targetRows.map(function(row) {
  if (sourceSourceRowURLs.indexOf(row.values[TARGET_TABLE_SOURCE_ROW_COLUMN]) == -1) {
      CodaAPI.deleteRow(TARGET_DOC_ID, target.table, row['id']);
  }
});
The sourceSourceRowURLs variable is an array of all the browserLinks from the source table.
Putting it all together
A few notes about the final GAS script to sync your tables together:
- The first time you do the sync, you need to create a table in the target doc that contains all the columns you want to sync from the source doc (spelling of the column names must be the same)
- The target table must contain a “source row column.” You’ll see the
TARGET_TABLE_SOURCE_ROW_COLUMNvariable which tells you what to call this (“Source Row URL” is used in the script) - Once you have created the “Source Row URL” in your target table, feel free to hide that column and don’t worry about it ever again
- This syncs tables from one source doc to your target doc. You can easily set up tables from other source docs by changing the variable names in the
TABLESvariable - To sync more tables from your source doc to your target doc, just copy lines 11–21 in the script below and paste it below the “2nd table to sync” to create a 3rd table, 4th table, etc.
Instructions to run script
- Create a new Google Apps Script project and paste the above script into the editor
- Go to your Coda Account Settings, scroll down to “API Settings,” click “Generate API token,” and copy/paste that token into the line 2 of the script.
- Get the doc IDs from your source doc and target doc and paste them into lines 3 and 4 (the doc ID is the random string of characters after the _d in the URL of your doc

- Get the table ID from the source doc and paste it into line 15, and get the table ID from the target doc and paste it into line 17. If you have more than one table to sync, you’ll see lines 27 and 31 to sync that table.
Getting the table ID of a doc
Getting the table IDs is super annoying right now (I plan on building a tool to make this easier). In the meantime, you can use the printDocTables() helper function in line 100 and replace the TARGET_DOC_ID in line 101 with SOURCE_DOC_ID depending on which doc you’re looking at. Run that function, and check view the Logs in GAS to get the table IDs (the all start with grid-):
Advantages of syncing your Coda tables with GAS
- You can change the ordering of columns in the source table or target table
- You can move the table in the source doc to a different section without affecting the sync
- You can add new columns to the source or target table and create your own formulas that are not affected by the sync
- Every table, row, and column in the source doc has a unique ID, which means you can pinpoint the sync down to a “cell”
Disadvantages of syncing with GAS
- The sync is not real-time and generally takes a few seconds to finish
- As mentioned earlier, you cannot use the
onEditSimple Trigger in GAS like you could in Google Sheets. This means all triggers are time-driven. - If you accidentally change a column name in the target table, the sync won’t work (you can edit the script to account for column name changes since every column has a unique ID, but the current script doesn’t account for this)
Syncing data between Google Sheets using Google Apps Script
The script for syncing data between your Google Sheets is much shorter (but also comes with a few drawbacks):
Instructions to run the script
- Get the spreadsheet ID of your source spreadsheet and target spreadsheet and paste them into the
sourceSpreadsheetIDandtargetSpreadsheetIDvariables, respectively. This is the ID after the /d/ in any Google Sheets file

Get the sheet name from the source spreadsheet and target spreadsheet and paste them into the
sourceWorksheetNameandtargetWorksheetNamevariables, respectively.(Optional) If your data in your source spreadsheet is a named range, comment out line 9 and un-comment line 11 and replace
teamBugswith the name of your named range.
Advantages of syncing your Google Sheets with GAS
- Can you event-driven triggers (like an edit to the source spreadsheet ) that will trigger a sync to the target spreadsheet
- If you used named ranges, can insert new columns in the source spreadsheet and they will show up in the target spreadsheet
- Data syncs between Google Sheets are generally quicker than syncs between Coda docs
Disadvantages of syncing your Google Sheets with GAS
- You can’t rename the sheet where your data lives in the source spreadsheet or target spreadsheet ; you also cannot move your table of data to another sheet
- If you delete rows of data in the source spreadsheet , those rows don’t get deleted in the target spreadsheet unless you have assigned a named range to your data in the source spreadsheet
- Your data has to be in cell A1 and there can’t be any “gaps” in the data given the way the
getDataRange()function pulls in data - If you insert new columns of data in the source spreadsheet , any columns you created in the target spreadsheet will be overwritten (e.g. custom formulas you’ve written in columns to the right of the main table that was synced)
GAS copies data from the source and pastes in the target

Unlike Coda’s API, there is no native row identifier in Google Sheets. Some people have built custom scripts to generate random IDs. Without the Source Row URL like we have in Coda, the GAS script essentially copies the values from your source spreadsheet and pastes them into your target spreadsheet. It’s a clean wipe of your target spreadsheet which is not the best solution if you have added columns with custom formulas in your target spreadsheet (see bullet point # from the Disadvantages of syncing your Google Sheets with GAS above).
While the sync is a bit snappier than the sync using Coda’s API, syncing Google Sheets with GAS is not as precise given the lack of unique identifiers for columns and rows in the source and target spreadsheet. You could, of course, write a custom formula that creates a unique identifier, but then you have to “store” that identifier in a hidden column or row in the spreadsheet, or perhaps store it in the GAS script itself.
In most businesses, the data set is usually growing in the number of rows and columns. If the schema in your source data set in the source spreadsheet is staying fixed (e.g. no new columns will be showing up), then the GAS script for syncing your Google Sheets should be sufficient for your needs. You could get fancy and add the named range to account for new columns showing up in your source spreadsheet. With this solution, however, you can’t add any columns to the target spreadsheet (on the sheet where the data is syncing). Otherwise, your custom columns will be overwritten.
For example, my “Team Project Tracker” source spreadsheet has a bunch of bugs my team is tracking:

The first time I sync the data to another spreadsheet called “My Stuff,” everything copies over correctly. I decided to create a column called Bug ID Number in column J where I just take the number from the ID column using the mid() function:

Now back in my “Team Project Tracker” spreadsheet, I realized I needed to add a Due Date column and I insert it after column A, shifting all my columns over by 1:

What happens when I run the GAS script again? You guessed it. The original formula I had written in column J in my target spreadsheet (“My Stuff”) gets overwritten by the source spreadsheet:

If you are syncing data to a target spreadsheet in Google Sheets, the best practice is to leave that target sheet alone and create new sheets where you are doing Vlookups on that target sheet. This way, you can account for new columns being added to the source spreadsheet that gets synced to your target spreadsheet.
Syncing data between Google Sheets using formulas
Instead of going through GAS, you can use one of Google Sheets’ built-in formulas for syncing data: IMPORTRANGE(). This is the preferred method for most Google Sheets users who don’t want to get into scripting and is decent solution to do a very basic data sync. The basic syntax is this:
IMPORTRANGE("Source Spreadsheet URL", "Range")
If I want to pull in all the tasks from my “Project Team Tasks” spreadsheet into my own Google Sheet, I can write a formula like this:

Now whenever new tasks get added to the “All Team Tasks” sheet, they will show up in the “My Stuff” spreadsheet. Notice how the range is A:J? This is to account for new data being add to the spreadsheet whether it’s more rows or columns. This is a common pattern instead of specifying the exact row number like A1:J100.
Aside from the formula being easy to write, you can easily filter data by introducing the QUERY() function, but this requires a bit of SQL knowledge. For the syncing between Coda docs and Google Sheets using GAS, we have to filter in the target table itself versus filtering the data in the GAS script. You could provide a query parameter to the Coda API to filter the rows returned, but it’s still limited right now in terms of the number of parameters you provide to the API.
For instance, here is how you could get a filtered set of rows returned from the “Project Team Tasks” spreadsheet where the “Stage” is “Not Started”:

The annoying thing about using QUERY() with IMPORTRANGE() is that you have to know the exact column number from your source spreadsheet that you want to filter on. In the example above, Col4 represents the “Stage” column from my source spreadsheet that I want to filter on. Just like I did with syncing with GAS, here are some advantages and disadvantages of syncing with IMPORTRANGE():
Advantages of using IMPORTRANGE() for syncing data between Google Sheets
- No scripting or coding, can use a built-in formula in Google Sheets
- Can use familiar row and column references (e.g. “A1:B5”) to pinpoint the data you want to sync from your source to target spreadsheet
- Syncs are quicker compared to GAS
Disadvantages of using IMPORTRANGE() for syncing data between Google Sheets
- If you accidentally enter some data in the target spreadsheet where the
IMPORTRANGE()is supposed to sync data, it will break the sync - Similar to syncing Google Sheets with GAS, you cannot move the table in the source spreadsheet to another sheet or shift the table to the right or left without breaking the sync to the target spreadsheet (unless you use a Named Range)
- Deleting rows in the source spreadsheet won’t delete rows in the target spreadsheet (unless you use a Named Range)
- If you are using a named range and insert new columns of data in the source spreadsheet , and columns you added in your target spreadsheet to the right of the main data will be overwritten
Conclusion

You’re probably left wondering which of the 3 methods is best for syncing data between your tables. Short answer is that it depends on your use case. The long answer is that it depends on a few factors:
- How precise does you one-way sync need to be?
- Do you want to prevent the end user of the target spreadsheet from creating errors in the sync?
- Will the structure of your data in your source spreadsheet change every day, week, month?
- Do you feel comfortable editing scripts in Google Apps Script?
At a high-level, here’s how I would frame the value propositions of each method:
- Coda with Google Apps Script — The most precise one-way sync but requires more upfront setup
- Google Sheets with Google Apps Script — More prone to overwriting data, but is a faster sync and easier to setup
- Google Sheets with IMPORTRANGE() — More prone to overwriting data and least precise, but easiest to set up for simple use cases


Top comments (0)