How to Install PowerDNS and Poweradmin on CentOS 7
PowerDNS (pdns) is an open source DNS server written in C++ and released under GPL License. It has become a good alternative for the traditional DNS server Bind, designed with better performance and low memory requirements. PowerDNS provides two products, the Authoritative server, and the Recursor. The PowerDNS Authoritative server can be configured through the different backend, including the plain Bind zone files, RDBMS such as MySQL, PostgreSQL, SQLite3 or LDAP.
In this tutorial, I will show you how to install and configure a PowerDNS Authoritative server with MariaDB database server as a Backend and using Poweradmin for easy DNS management.
Prerequisites
- CentOS 7 server
- Root privileges
What we will do:
- Install EPEL and Remi Repositories
- Install and Configure MariaDB
- Install PowerDNS
- Install Poweradmin
- Poweradmin Post-Installation
- Create Sample Zone
Step 1 - Install EPEL and Remi Repositories
First of all, we need to install dependencies for the PowerDNS installation. We're going to install the EPEL repository and the REMI for PHP 7.2 installation.
Install EPEL and PHP Remi repository using the following commands.
yum -y install epel-release
 yum -y install http://rpms.remirepo.net/enterprise/remi-release-7.rpm
Once these repositories are added to the system, install the 'yum-utils' package.
yum -y install yum-utils
And enable the PHP 7.2 Remi repository using the following command.
yum-config-manager --enable remi-php72
Step 2 - Install and Configure MariaDB
The PowerDNS Authoritative server has support for a different backend, including the MySQL/MariaDB database server. The terms of 'backend' is a datastore that the server will consult that contains DNS records (and some meta-data). And for this guide, we will be using the MariaDB as a backend.
Install MariaDB using the following yum command.
yum -y install mariadb mariadb-server
Once the installation is complete, start the MariaDB service and add it to the startup boot time.
systemctl start mariadb
 systemctl enable mariadb
Next, we're going to configure the root password for the MariaDB using the interactive tool called 'mysql_secure_installation'.
Run the command below.
mysql_secure_installation
And you will be prompted for configuring the root password of the database server. Type 'Y' to set up the root password and type a strong password.
Set root password? [Y/n] Y
New password:
Re-enter new password:
For the others, just type 'Y' to yes.
Remove anonymous users? [Y/n] Y
Disallow root login remotely? [Y/n] Y
Remove test database and access to it? [Y/n] Y
Reload privilege tables now? [Y/n] Y
As a result, you've been installed the MariaDB database server and set up the root password for authentication.
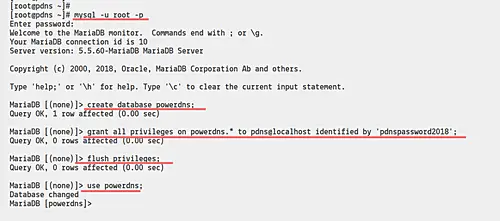
Next, we will create a new database and user for the PowerDNS installation. Login to the MySQL shell with the user root and your password.
Run MySQL command below.
mysql -u root -p
 PASSWORD
Now create a new database called 'powerdns' and grant all the database privileges to a new user named 'pdns' with password 'pdnspassword2018'.
create database powerdns;
 grant all privileges on powerdns.* to pdns@localhost identified by 'pdnspassword2018';
 flush privileges;
After that, create the tables structures for the PowerDNS database by running following MySQL queries below.
use powerdns;

 CREATE TABLE domains (
   id                    INT AUTO_INCREMENT,
   name                  VARCHAR(255) NOT NULL,
   master                VARCHAR(128) DEFAULT NULL,
   last_check            INT DEFAULT NULL,
   type                  VARCHAR(6) NOT NULL,
   notified_serial       INT DEFAULT NULL,
   account               VARCHAR(40) DEFAULT NULL,
   PRIMARY KEY (id)
 ) Engine=InnoDB;

 CREATE UNIQUE INDEX name_index ON domains(name);


 CREATE TABLE records (
   id                    BIGINT AUTO_INCREMENT,
   domain_id             INT DEFAULT NULL,
   name                  VARCHAR(255) DEFAULT NULL,
   type                  VARCHAR(10) DEFAULT NULL,
   content               VARCHAR(64000) DEFAULT NULL,
   ttl                   INT DEFAULT NULL,
   prio                  INT DEFAULT NULL,
   change_date           INT DEFAULT NULL,
   disabled              TINYINT(1) DEFAULT 0,
   ordername             VARCHAR(255) BINARY DEFAULT NULL,
   auth                  TINYINT(1) DEFAULT 1,
   PRIMARY KEY (id)
 ) Engine=InnoDB;

 CREATE INDEX nametype_index ON records(name,type);
 CREATE INDEX domain_id ON records(domain_id);
 CREATE INDEX recordorder ON records (domain_id, ordername);


 CREATE TABLE supermasters (
   ip                    VARCHAR(64) NOT NULL,
   nameserver            VARCHAR(255) NOT NULL,
   account               VARCHAR(40) NOT NULL,
   PRIMARY KEY (ip, nameserver)
 ) Engine=InnoDB;


 CREATE TABLE comments (
   id                    INT AUTO_INCREMENT,
   domain_id             INT NOT NULL,
   name                  VARCHAR(255) NOT NULL,
   type                  VARCHAR(10) NOT NULL,
   modified_at           INT NOT NULL,
   account               VARCHAR(40) NOT NULL,
   comment               VARCHAR(64000) NOT NULL,
   PRIMARY KEY (id)
 ) Engine=InnoDB;

 CREATE INDEX comments_domain_id_idx ON comments (domain_id);
 CREATE INDEX comments_name_type_idx ON comments (name, type);
 CREATE INDEX comments_order_idx ON comments (domain_id, modified_at);


 CREATE TABLE domainmetadata (
   id                    INT AUTO_INCREMENT,
   domain_id             INT NOT NULL,
   kind                  VARCHAR(32),
   content               TEXT,
   PRIMARY KEY (id)
 ) Engine=InnoDB;

 CREATE INDEX domainmetadata_idx ON domainmetadata (domain_id, kind);


 CREATE TABLE cryptokeys (
   id                    INT AUTO_INCREMENT,
   domain_id             INT NOT NULL,
   flags                 INT NOT NULL,
   active                BOOL,
   content               TEXT,
   PRIMARY KEY(id)
 ) Engine=InnoDB;

 CREATE INDEX domainidindex ON cryptokeys(domain_id);


 CREATE TABLE tsigkeys (
   id                    INT AUTO_INCREMENT,
   name                  VARCHAR(255),
   algorithm             VARCHAR(50),
   secret                VARCHAR(255),
   PRIMARY KEY (id)
 ) Engine=InnoDB;

 CREATE UNIQUE INDEX namealgoindex ON tsigkeys(name, algorithm);

 quit;
As a result, the MySQL/MariaDB database and a user for PowerDNS installation has been created.
Step 3 - Install PowerDNS
Install PowerDNS and all packages needed using the following command.
yum -y install pdns pdns-backend-mysql bind-utils
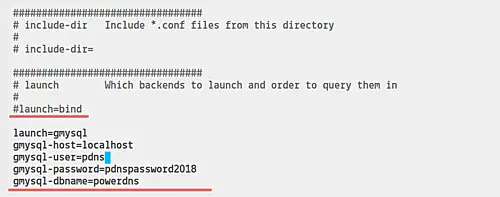
After installing PowerDNS packages, go to the '/etc/pdns/' directory and edit the configuration file 'pdns.conf' using vim editor.
cd /etc/pdns/
 vim pdns.conf
By default, PowerDNS is using 'bind' as the backend. So, type comment '#' in the front of 'launch=bind' configuration and paste the MySQL backend configuration as below.
#launch=bind

launch=gmysql
gmysql-host=localhost
gmysql-user=pdns
gmysql-password=pdnspassword2018
gmysql-dbname=powerdns
Save and close.
Now start the pdns service and add it to the startup boot time.
systemctl start pdns
 systemctl enable pdns
After that, add the DNS service to the firewall.
firewall-cmd --add-service=dns --permanent
 firewall-cmd --reload

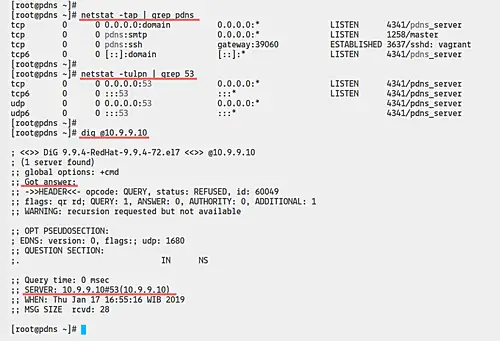
And the PowerDNS service is up and running, check using the following command.
netstat -tap | grep pdns
 netstat -tulpn | grep 53
 dig @10.9.9.10
As a result, you will get the pdns service is up and running on port 53 and get the response from the PowerDNS server.
Step 4 - Install Poweradmin
In this step, we're going to install the DNS management for PowerDNS called 'Poweradmin'. It's a web application based on PHP, so we need to install PHP and web server in order to run the application.
Install an httpd web server and PHP packages using the following command.
yum -y install httpd php php-devel php-gd php-imap php-ldap php-mysql php-odbc php-pear php-xml php-xmlrpc php-mbstring php-mcrypt php-mhash gettext
After the installation, we need to install additional PHP Pear packages. Run the following command.
yum -y install php-pear-DB php-pear-MDB2-Driver-mysqli
Once the httpd and PHP installation is complete, start the httpd service and add it to the startup boot time.
systemctl start httpd
 systemctl enable httpd
Next, go to the '/var/www/html' directory and download the poweradmin source code.
cd /var/www/html/
 wget http://downloads.sourceforge.net/project/poweradmin/poweradmin-2.1.7.tgz
Extract the poweradmin compressed file and rename it.
tar xvf poweradmin-2.1.7.tgz
 mv poweradmin-2.1.7/ poweradmin/
After that, add the HTTP and HTTPS protocols to the firewall.
firewall-cmd --add-service={http,https} --permanent
 firewall-cmd --reload
And we're ready for the poweradmin post-installation.
Step 5 - Poweradmin Post-Installation
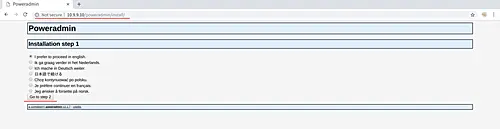
Open your web browser and type the server IP address plus the /poweradmin/install/ path URL for the installation. Mine is:
http://10.9.9.10/poweradmin/install/
Choose your preferred language and click the 'Go to Step 2' button.
Now just click the 'Go to Step 3' button.

And you will be displayed for the database configuration. Type the PowerDNS database details that we've created and the admin password for PowerDNS.
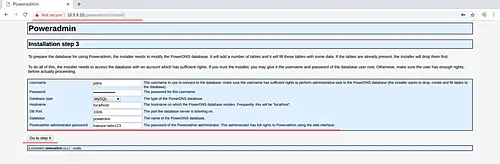
Click the 'Go to Step 4' button.
After that, you will need to create a new user will limited right privileges. Type the details as the following and change the user, password, etc with your own.
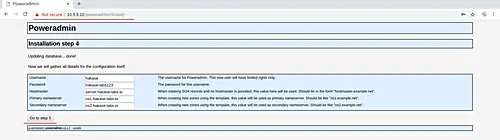
Now click 'Go to Step 5' button.
And you will be shown the page as below.
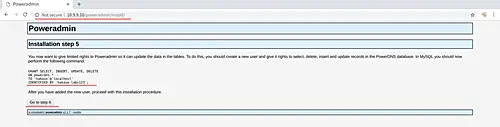
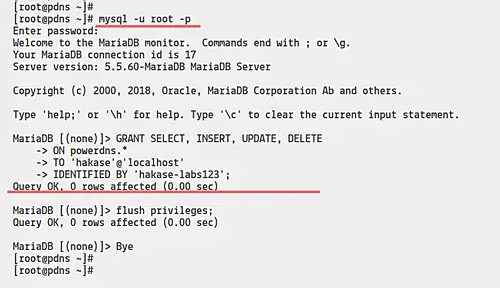
Open again your terminal server, log in with the root user and password. Then run the MySQL queries as on the page.
mysql -u root -p
 PASSWORD

 GRANT SELECT, INSERT, UPDATE, DELETE
 ON powerdns.*
 TO 'hakase'@'localhost'
 IDENTIFIED BY 'hakase-labs123';
Now back to the web browser and click the 'Go to Step 6' button.
And you will be shown the page as below.
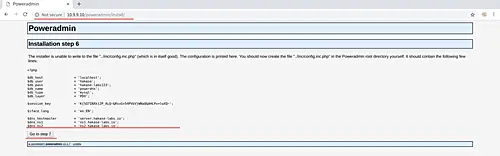
The installer was unable to create a new configuration '../inc/config.inc.php'. So, we need to create it manually.
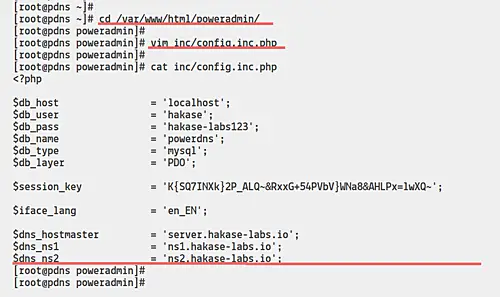
Back to the terminal server, go to the '/var/www/html/poweradmin' directory and create a new configuration file 'inc/config.inc.php'.
cd /var/www/html/poweradmin
 vim inc/config.inc.php
Now paste the PHP script on the page into it.
<?php

$db_host                = 'localhost';
$db_user                = 'hakase';
$db_pass                = 'hakase-labs123';
$db_name                = 'powerdns';
$db_type                = 'mysql';
$db_layer               = 'PDO';

$session_key            = 'xTNxUiXIu320Z@N=uetwJeD2#uApgO)2Ekj+S#oN1Khhoj';

$iface_lang             = 'en_EN';

$dns_hostmaster         = 'server.hakase-labs.io';
$dns_ns1                = 'ns1.hakase-labs.io';
$dns_ns2                = 'ns2.hakase-labs.io';
Save and close, then back to the browser and click the button.
And the installation is complete.
Optionally:
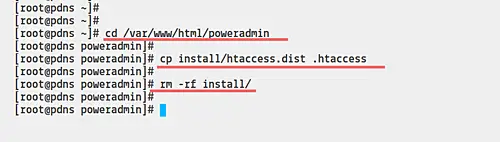
If you want to support for the URLs used by other Dynamic providers, copy the htaccess file.
cd /var/www/html/poweradmin
 cp install/htaccess.dist .htaccess
After that, you MUST remove the 'install' directory.
rm -rf /var/www/html/poweradmin/install
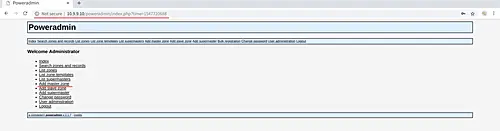
Back again to your web browser and log in to the Poweradmin dashboard using the URL as below.
http://10.9.9.10/poweradmin/
Log in with the default user 'admin' and the password, click the 'Go' button.

And as a result, you will be shown the Poweradmin dashboard and the installation is finished.

Step 6 - Create Sample Zone and DNS Records
At this stage, we're going test the PowerDNS and Poweradmin installation by creating a new DNS zone for a domain called 'emma.io'.
On the Poweradmin dashboard, click the 'Add master zone' menu.
Set the zone name with the domain name 'emaa.io' and click 'Add zone' button.

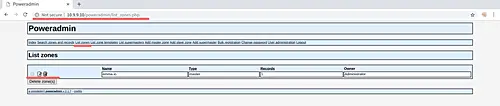
Click the 'List zones' menu to get all available zone. And click the 'edit' button for the zone 'emma.io'.
Click the 'List zones' menu to get all available zone. And click the 'edit' button for the zone 'emma.io'.

Now click the 'Add record' button and we successfully add the DNS zone and DNS record for the domain named 'emma.io'.
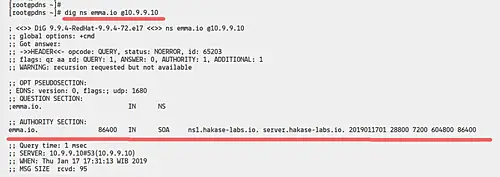
Next, we're going to test the domain 'emma.io' using a 'dig' DNS utility command.
Check the name server or ns record of the domain 'emma.io'.
dig NS emma.io @10.9.9.10
Check the A DNS record of the domain 'emma.io'.
dig A emma.io @10.9.9.10
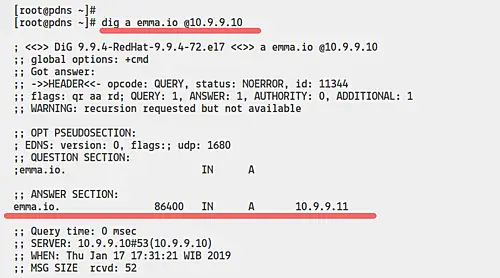
And you will be displayed the domain 'emma.io' has a nameserver from our DNS server 'ns1.hakase-labs.io', and the 'A' of that domain name is match with our configuration on the top with server IP address '10.9.9.11'.
Finally, the installation and configuration of PowerDNS and Poweradmin on CentOS 7 have been completed successfully.

