Many applications today have similarities when it comes to separating the front- and back-ends. It means that the back-end can be hosted anywhere: in the cloud or on a dedicated server. There can be many serverless functions. It can be created in any programming language, using any stack tools of your choice. The same can happen to the front-end: you can go from a Single Page Application (SPA) loading everything through Ajax or use any framework to render your data from the server synchronously.
For SPAs, Angular has always appeared as an excellent choice because of its asynchronous nature, modularization via components, and the templating system which allows easy reuse of pieces of screens and logic. For the back-end, ASP.NET services have proven their value and effectiveness when it comes to speed, security, and even asynchronicity of the endpoints.
In this article, you’ll learn how to match both worlds in a concise and fully working application for the management of notes built on top of Angular in the front and an ASP.NET API in the back.
Setting Up
First, you’ll need to have Visual Studio Community Edition properly installed. Also, make sure to have installed the latest versions of .NET Core and ASP.NET Core frameworks as well. Then, select the option File –> New Project, then ASP.NET Core Web Application. Fill in the blank spaces as shown in Figure 1.
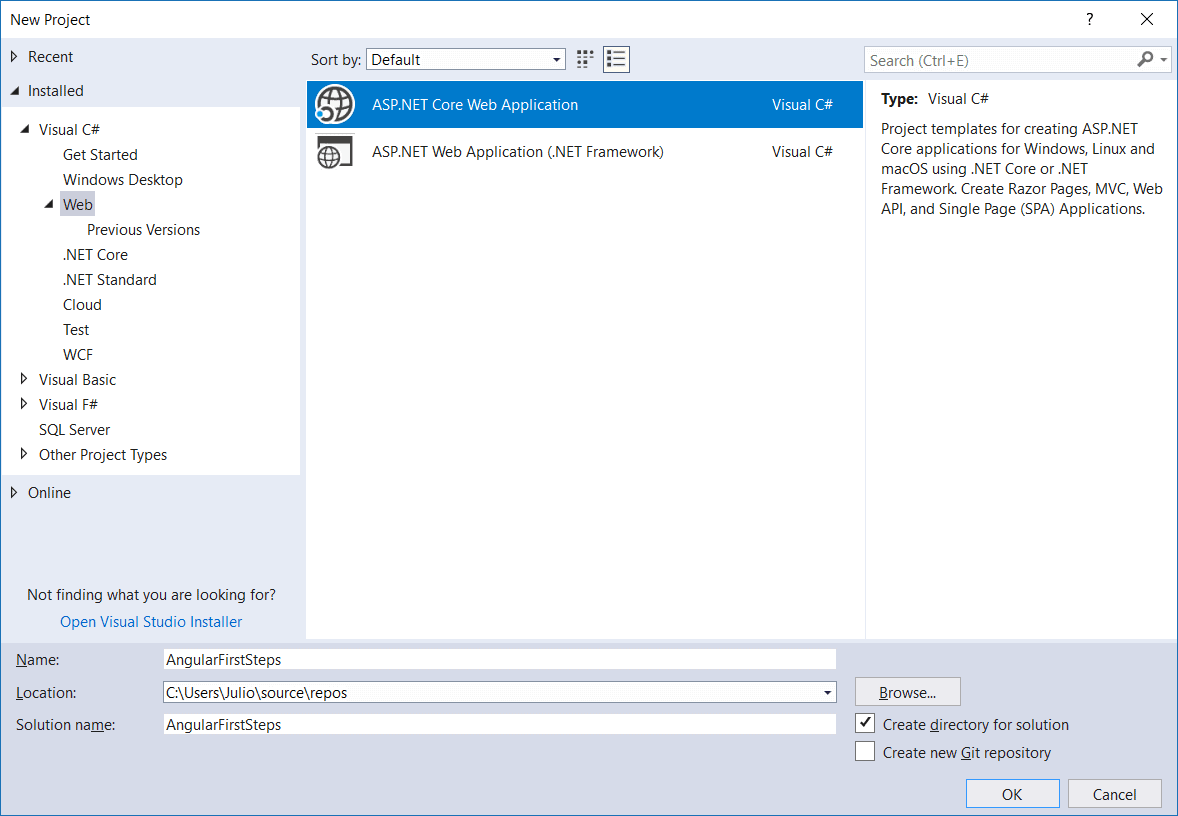
Figure 1. Creating a new ASP.NET Core application project.
Once you’ve finished, click OK. You’ll be requested to select the project template. Note here that you also have an option for an Angular template which you won’t select since the focus is on learning how Angular works separately from the .NET project itself. It’ll help you to understand both worlds working independently and see how a front-end application usually communicates with the back-end, specifically with Angular projects.
Select the API option (Figure 2), which will create several files, including a ready-to-use API with the four main HTTP methods for CRUD operations: GET, POST, PUT and DELETE. That’ll be useful for testing purposes.
Remember not to select anything else: you won’t use any authentication mechanism nor Docker support to keep this example simple.
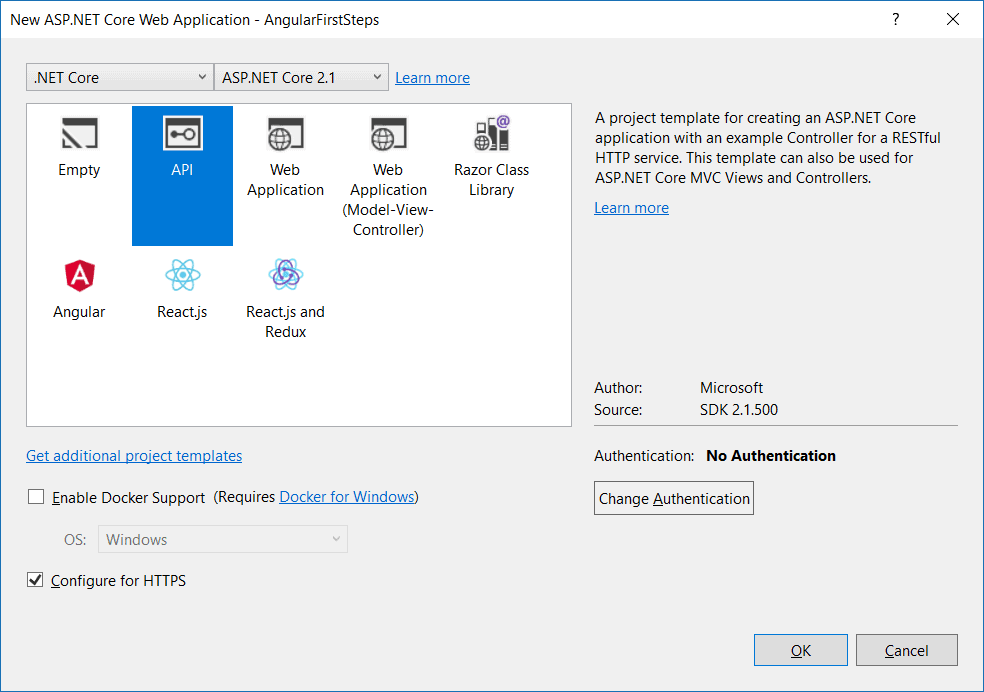
Figure 2. Selecting the project template for ASP.NET Core application.
Now, set up the configurations for the Angular side. Since you did not install the Angular template in the wizard process, you’ll have to do that manually via command line. Before that, you need to install the latest version of Node.js and npm (Node package manager). It will be helpful to install and configure the proper packages directly from the official CDN sources.
Navigate to the Node.js website and download the proper installer for your OS. Pay attention to the version of your OS, whether it is 32-bit or 64-bit. Conclude the installation just like shown on the Node website instructions. Once you’re done, check the version in your command line:
|
1 2 |
node -v npm -v |
Great. Now, install Angular CLI. Angular CLI is a command line interface to scaffold apps for Angular based on its official packages, making the whole process of building an Angular app more productive and concise. For that, run the following command:
|
1 |
npm install -g @angular/cli |
The -g flag will make sure to install it globally, that is, for everyone in your machine. Wait until it’s finished and, then, run the second following command:
|
1 |
ng new angular-simpletalk --skip-install |
Note: If you don’t have Git installed, a warning message could appear at the end of the command, but don’t worry, it won’t prevent the project from being created.
Notice that the command ng will only be available once you’ve installed the Angular CLI tool. It is the official command for Angular operations in the command line. The command new, in turn, is responsible for creating the whole structure of the project, initializing it and creating the necessary files (HTML, CSS, and JavaScript) with preset configs that’ll be important during development. Figure 3 shows the questions the installer will ask you, such as if you’d like to enable Angular routing to the application (which you’ll say yes, since you’ll need this to navigate through pages in the app), and which stylesheet format you’d like to use (plain CSS, in case).
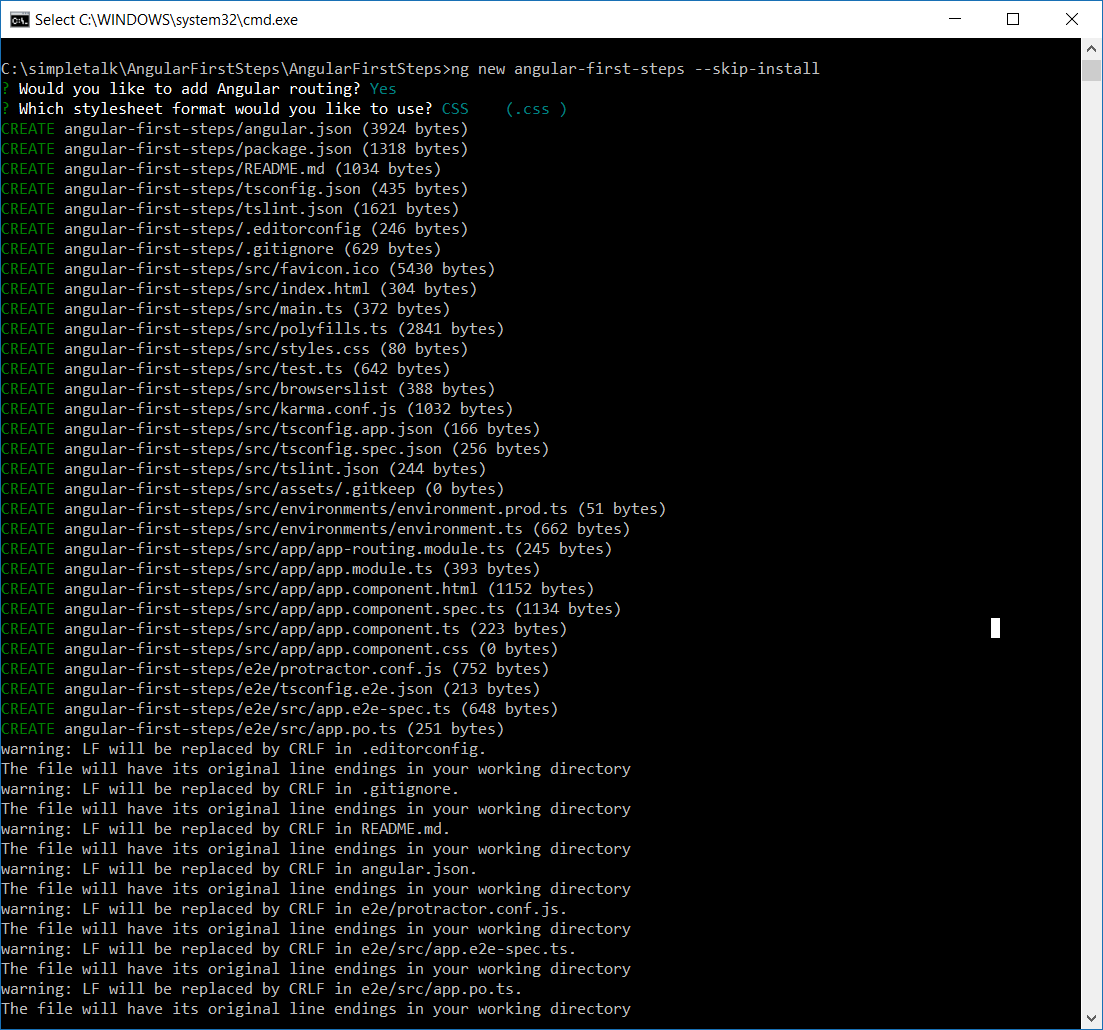
Figure 3. Creating a new Angular project via Angular CLI.
This will generate a bunch of folders and files inside the /angular-simpletalk directory. After it’s finished, go to the Visual Studio project, spot these assets and move them to the root directory, the same as the ASP.NET Core files. This is because the files need to be placed at the same level as the ASP.NET project.
Run these last commands to have the Angular HTTP dependency added as a dependency to the project:
|
1 2 3 |
npm install @angular/core@latest npm install @angular/http@latest npm install |
You’ll need the HTTP package of Angular to make requests to the API.
Making the First Call to the API
To make HTTP requests in Angular, you first need to import the proper modules from the dependency packages imported earlier. Navigate to the /src/app/app.module.ts file and modify it as follows:
|
1 2 3 4 5 6 7 8 9 10 11 12 13 14 15 16 17 18 19 20 |
import { BrowserModule } from '@angular/platform-browser'; import { NgModule } from '@angular/core'; import { AppRoutingModule } from './app-routing.module'; import { AppComponent } from './app.component'; import { FormsModule } from '@angular/forms'; import { HttpModule } from '@angular/http'; @NgModule({ declarations: [ AppComponent ], imports: [ BrowserModule, AppRoutingModule, FormsModule, HttpModule ], providers: [], bootstrap: [AppComponent] }) export class AppModule { } |
Notice that you’ve added two new imports: the HTTP and Forms modules. These are required because the application will not only send requests but also send them from web forms in later examples. The rest of the file remains the default.
Next, comes the component (specifically the file app.component.ts) that is responsible for making the request call itself. Change its content to the following:
|
1 2 3 4 5 6 7 8 9 10 11 12 13 14 15 16 17 |
import { Component, OnInit } from '@angular/core'; import { Http } from '@angular/http' @Component({ selector: 'app-root', templateUrl: './app.component.html', styleUrls: ['./app.component.css'] }) export class AppComponent implements OnInit { constructor(private _httpService: Http) { } accessPointUrl: string = 'https://localhost:44324/api/values'; apiValues: string[] = []; ngOnInit() { this._httpService.get(this.accessPointUrl).subscribe(values => { this.apiValues = values.json() as string[]; }); } } |
Apart from the component imports Angular usually makes use of when it comes to this type of file, you also include the import of HTTP previously set. The constructor of this component receives the httpService as an injected parameter and calls the API inside the ngOnInit method, through the get()method. Note that the URL of the API is stored in a variable and passed to this method. The subscribe method, in turn, guarantees that the result will be stored asynchronously into the variable apiValues, once everything’s done.
Finally, adapt the app.component.html to read the retrieved data. Open it and change its contents to the following:
|
1 2 3 4 5 6 7 8 |
<!--The content below is only a placeholder and can be replaced.--> <div> <h1>Application says what?</h1> <ul> <li *ngFor="let value of apiValues">{{value}}</li> </ul> </div> <router-outlet></router-outlet> |
An Angular directive inside of the <li> element iterates over the list of values the API returned and was stored into apiValues public variable. For now, you’ll keep using the autogenerated API endpoints, that is, those which return hardcoded values just as a matter of testing.
It happens that the application still won`t work because of a CORS problem. You must enable it to allow the Angular application to call an API hosted in a different address. For this, you`ll have to add the following content to the ConfigureServices method in Startup class:
|
1 2 3 4 5 6 7 8 |
services.AddCors(options => { options.AddPolicy("CorsPolicy", builder => builder.AllowAnyOrigin() .AllowAnyMethod() .AllowAnyHeader() .AllowCredentials()); }); |
As well as this one to the Configure method:
|
1 |
app.UseCors("CorsPolicy"); |
To run the application, make sure to first run the API application in the back-end. Then, in the command line, run the following command:
|
1 |
ng serve |
It’ll both start your Angular application and watch for file changes. Access the address http://localhost:4200/ with your browser and you’ll see something like:
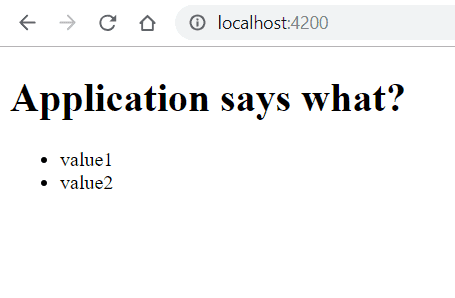
Figure 4. Showing values from the API with Angular.
Creating a Notes App CRUD
Now, you’ll create a complete application that manages notes from scratch. It’s helpful for you to understand how CRUD operations work in Angular-based apps. Figure 5 shows how the app will look when it’s complete:
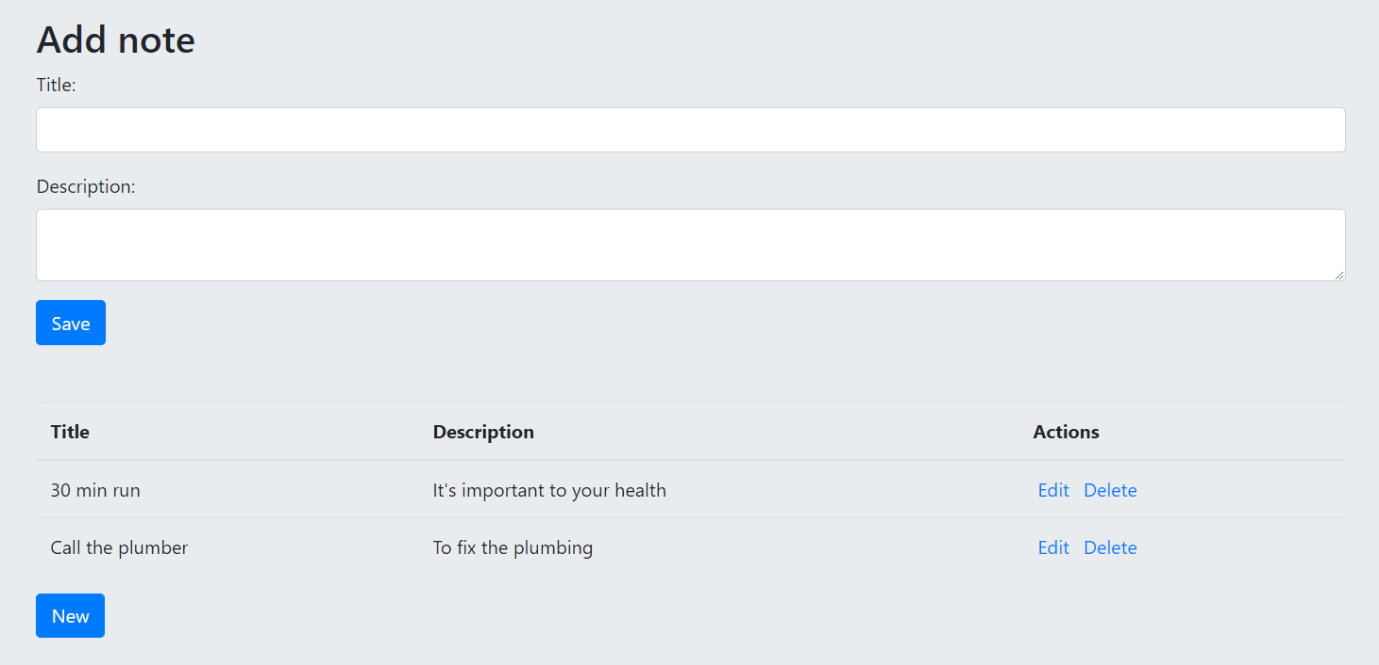
Figure 5. The final screen of the Angular app.
Within the same application, create a new folder called Models. It’ll host the POCOs (Plain Old C# Objects). Then create a new class naming it Note.cs. Add the following content to it:
|
1 2 3 4 5 6 7 8 9 10 11 12 |
using System.ComponentModel.DataAnnotations; namespace AngularFirstSteps.Models { public class Note { public int Id { get; set; } [Required] public string Title { get; set; } [Required] public string Description { get; set; } } } |
It is made of simple attributes and getters and setters. Next, create a new controller class that will store the REST operations for each of the CRUD ones. Give it the name of NotesController.cs and add the following content:
|
1 2 3 4 5 6 7 8 9 10 11 12 13 14 15 16 17 18 19 20 21 22 23 24 25 26 27 28 29 30 31 32 33 34 35 36 37 38 39 40 41 42 43 44 45 46 47 48 49 50 51 52 53 54 55 56 57 58 59 60 61 62 63 64 65 66 67 68 69 70 |
using System; using System.Collections.Generic; using System.Linq; using System.Threading.Tasks; using AngularFirstSteps.Models; using Microsoft.AspNetCore.Mvc; namespace AngularFirstSteps.Controllers { [Produces("application/json")] [Route("api/[controller]")] [ApiController] public class NotesController : ControllerBase { private static List<Note> notes = new List<Note>(); private static int count = 0; static NotesController() { Note note1 = new Note { Id = count++, Title = "30 min run", Description = "It's important to your health" }; Note note2 = new Note { Id = count++, Title = "Call the plumber", Description = "To fix the plumbing" }; notes.Add(note1); notes.Add(note2); } // GET api/notes [HttpGet] public IEnumerable<Note> Get() { return notes; } // GET api/notes/5 [HttpGet("{id}")] public async Task<IActionResult> Get(int id) { return Ok(notes.Where(note => note.Id == id).FirstOrDefault()); } // POST api/notes [HttpPost] public async Task<IActionResult> Post([FromBody] Note note) { note.Id = count++; notes.Add(note); return CreatedAtAction("Get", new { id = note.Id }, note); } // PUT api/notes/5 [HttpPut("{id}")] public async Task<IActionResult> Put(int id, [FromBody] Note note) { Note found = notes.Where(n => n.Id == id).FirstOrDefault(); found.Title = note.Title; found.Description = note.Description; return NoContent(); } // DELETE api/notes/5 [HttpDelete("{id}")] public async Task<IActionResult> Delete(int id) { notes.RemoveAll(n => n.Id == id); return NoContent(); } } } |
It’s basically the same thing as the previous Controller class, with the slight difference that each of our endpoints are now async, i.e., the client (Angular application) can make calls to the back-end REST endpoints and wait for them to respond asynchronously via callback functions.
The connection to a database, or anything like that, will not be covered as not to lose the focus of the article. Here, the operations will be stored in a static list, which will simulate a database, at least while the ASP.NET application is up in the server.
Now it’s time to set up our new components. There are three components to this app:
- app.component: it was already created within the application setup. It will call the next two templates;
- notes-listing.component: it will handle the operations of listing in a table the notes were added;
- add-update-notes.component: it will store the form and the other CRUD operation links.
For that, run the following commands at the command line (inside the “\AngularFirstSteps\angular-first-steps\src\app” folder):
|
1 2 |
ng generate component NotesListing ng generate component AddUpdateNotes |
Run, in sequence, another command for the creation of an Angular service; this one is responsible for the REST service orchestration:
|
1 |
ng generate service NotesService |
This will generate the following new folder structures:
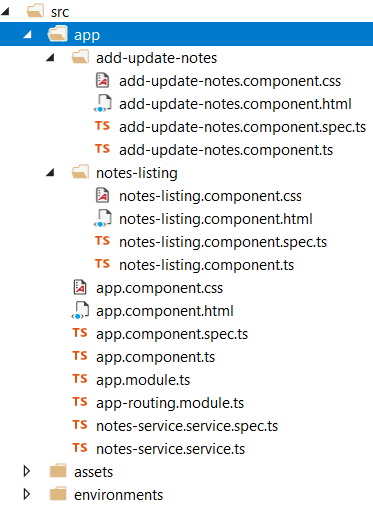
Figure 6. New components folders.
The new components must be included in the app.module.ts file, which registers all the components, modules and new services of an Angular app. The final content of the file must be exactly as
|
1 2 3 4 5 6 7 8 9 10 11 12 13 14 15 16 17 18 19 20 21 22 23 24 25 26 27 28 29 30 31 32 |
import { BrowserModule } from '@angular/platform-browser'; import { NgModule } from '@angular/core'; import { AppRoutingModule } from './app-routing.module'; import { AppComponent } from './app.component'; import { RouterModule, Routes } from '@angular/router'; import { FormsModule } from '@angular/forms'; import { HttpModule } from '@angular/http'; import { HttpClientModule } from '@angular/common/http'; import { NotesListingComponent } from './notes-listing/notes-listing.component'; import { AddUpdateNotesComponent } from './add-update-notes/add-update-notes.component'; import { NotesService } from './notes-service.service'; const appRoutes: Routes = [ { path: '', component: AppComponent } ]; @NgModule({ declarations: [ AppComponent, NotesListingComponent, AddUpdateNotesComponent ], imports: [ BrowserModule, RouterModule.forRoot(appRoutes), AppRoutingModule, FormsModule, HttpModule, HttpClientModule ], providers: [NotesService], bootstrap: [AppComponent] }) export class AppModule { } |
Some basic actions:
- Add the proper imports of the needed modules, components and services at the beginning of the file. Here, the modules will be:
- Routers: enables navigation from one view to the next as users perform application tasks. We’ll only use to state that the root address of the application will always redirect to our home view;
- Forms: implements a set of directives and providers to communicate with native DOM elements when building forms to capture user input;
- Http: offers a simplified client HTTP API for Angular applications that rests on the XMLHttpRequest interface exposed by browsers. We’ll need to communicate with our REST endpoints;
- HttpClient: implements an HTTP client API for Angular apps that relies on the XMLHttpRequest interface exposed by browsers;
- Add the name of the components to each respective NgModule declarations tag; each of the imported modules to the imports tag, and the service to the providers one.
All set to be used. Start by coding notes-service.service.ts, which will be responsible for calling the back-end API. That’s its code:
|
1 2 3 4 5 6 7 8 9 10 11 12 13 14 15 16 17 18 19 20 21 22 |
import { Injectable } from '@angular/core'; import { HttpClient, HttpHeaders } from '@angular/common/http'; @Injectable() export class NotesService { private headers: HttpHeaders; private url: string = 'https://localhost:44324/api/notes'; constructor(private http: HttpClient) { this.headers = new HttpHeaders({ 'Content-Type': 'application/json' }); } public get() { return this.http.get(this.url, { headers: this.headers }); } public add(payload) { return this.http.post(this.url, payload, { headers: this.headers }); } public remove(payload) { return this.http.delete(this.url + '/' + payload.id, { headers: this.headers }); } public update(payload) { return this.http.put(this.url + '/' + payload.id, payload, { headers: this.headers }); } } |
Please, don’t forget to pay attention to the right port your ASP.NET application was started with. Change it properly in the accessPoint variable. Nothing too exceptional here, just a function for each of the corresponding endpoints of the API receiving a payload and returning the same result our API returns. The pure logic will be spread out over the other components.
Take a look at the add-update-notes.component.ts file:
|
1 2 3 4 5 6 7 8 9 10 11 12 13 14 15 16 17 18 19 20 21 22 23 24 25 26 27 |
import { Component, EventEmitter, Input, Output, OnInit } from '@angular/core'; @Component({ selector: 'app-add-update-notes', templateUrl: './add-update-notes.component.html', styleUrls: ['./add-update-notes.component.css'] }) export class AddUpdateNotesComponent implements OnInit { @Output() noteCreated = new EventEmitter<any>(); @Input() note: any; constructor() { this.clearNotes(); } ngOnInit() { } // Create an empty note object private clearNotes = function () { this.note = { id: undefined, title: '', description: '' }; }; public addUpdateNote = function(event) { this.noteCreated.emit(this.note); this.clearNotes(); }; } |
In Angular, a component can emit an event using @Output that’ll be, in turn, attached to an EventEmitter. The same will happen to @Input for an Angular model object that has its attribute bindings mapped in the HTML page. Both must be imported from the @angular/core default module.
There are two functions: one for handling the cleanup stuff, that is, recreating the note object with default values, and another one for dealing with the event emitting when a note is created. Since the same button will be used for both operations of saving and updating, its function will be responsible for emitting the respective note object.
The following is the HTML code for the respective add-update-notes.component.html:
|
1 2 3 4 5 6 7 8 9 10 11 12 13 14 15 |
<div> <h2 *ngIf="!note || note.id === undefined">Add note</h2> <h2 *ngIf="note && note.id !== undefined">Update note</h2> <form> <div class="form-group"> <label for="title-input">Title:</label> <input name="title" type="text" id="title" [(ngModel)]="note.title" class="form-control" /> </div> <div class="form-group"> <label for="desc-input">Description:</label> <textarea name="description" type="text" id="desc-input" [(ngModel)]="note.description" class="form-control" ></textarea> </div> <button type="button" class="btn btn-primary" (click)="addUpdateNote($event);">Save</button> </form> </div> |
Here, it’s just mapping the right <h2> title based on which type of operation you’re doing. In other words, both register and update of a note will be handled by this page. The ngModel attribute maps each of the note object property that will receive the input value. The (click) attribute will map the corresponding function in the component js for receiving the event and pass it on.
The next component covered is the notes-listing.component.ts:
|
1 2 3 4 5 6 7 8 9 10 11 12 13 14 15 16 17 18 19 20 21 22 23 |
import { Component, EventEmitter, Input, Output, OnInit } from '@angular/core'; @Component({ selector: 'app-notes-listing', templateUrl: './notes-listing.component.html', styleUrls: ['./notes-listing.component.css'] }) export class NotesListingComponent implements OnInit { @Input() notes: Array<any>; @Output() recordDeleted = new EventEmitter<any>(); @Output() newClicked = new EventEmitter<any>(); @Output() editClicked = new EventEmitter<any>(); public delete(data) { this.recordDeleted.emit(data); } public edit(data) { this.editClicked.emit(Object.assign({}, data)); } public new() { this.newClicked.emit(); } ngOnInit() { } } |
For the notes listing, you’ll need an input that is also an array. It’ll receive its values from the service that, in turn, will catch them from the server endpoint. Each output event emitter will be attached to the corresponding function for editing, removing or creating a new (blank) note. Note that for the edit operation, you’re passing a copy of the data, instead of the original, in order to evict it to be modified.
That’s the content of the notes-listing.component.html:
|
1 2 3 4 5 6 7 8 9 10 11 12 13 14 15 16 17 18 19 20 21 |
<table class="table mt-5"> <thead> <tr> <th scope="col">Title</th> <th scope="col">Description</th> <th scope="col">Actions</th> </tr> </thead> <tbody> <tr *ngIf="notes?.length == 0"><td>No data</td></tr> <tr *ngFor="let note of notes"> <td>{{ note.title }}</td> <td>{{ note.description }}</td> <td> <a href="#" class="m-1" (click)="edit(note)">Edit</a> <a href="#" class="m-2" (click)="delete(note)">Delete</a> </td> </tr> </tbody> </table> <button type="button" class="btn btn-primary mb-2" (click)="new()">New</button> |
This HTML basically exposes the table that will store the list of notes. Note that it’s using a ngIf directive to check if the list of notes is empty in order to show a proper message instead of the listing. Otherwise, the table will be iterated over the notes object as well as set each corresponding value to the columns. The rest of the code deals with the three links that’ll call the edit, delete and new functions.
Finally, analyze the code for the app.component.ts:
|
1 2 3 4 5 6 7 8 9 10 11 12 13 14 15 16 17 18 19 20 21 22 23 24 25 26 27 28 29 30 31 32 33 34 35 36 37 38 39 40 41 42 43 44 45 46 47 48 49 50 51 52 53 54 |
import { Component, OnInit } from '@angular/core'; import { NotesService } from './notes-service.service'; import * as _ from 'lodash'; @Component({ selector: 'app-root', templateUrl: './app.component.html', styleUrls: ['./app.component.css'] }) export class AppComponent implements OnInit { public notes: Array<any>; public currentNote: any; constructor(private notesService: NotesService) { notesService.get().subscribe((data: any) => this.notes = data); this.currentNote = this.getDefaultNote(); } private getDefaultNote() { return { id: undefined, title: '', description: '' } } public createUpdateNote = function (note: any) { let noteWithId = _.find(this.notes, (el => el.id === note.id)); if (noteWithId) { const updateIndex = _.findIndex(this.notes, { id: noteWithId.id }); this.notesService.update(note).subscribe( this.notes.splice(updateIndex, 1, note) ); } else { this.notesService.add(note).subscribe( noteRecord => { note.id = noteRecord.id; this.notes.push(note) } ); } this.currentNote = this.getDefaultNote(); }; public editNote = function(record: any) { this.currentNote = record; }; public newNote = function () { this.currentNote = this.getDefaultNote(); }; public deleteNote(record) { const deleteIndex = _.findIndex(this.notes, { id: record.id }); this.notesService.remove(record).subscribe( result => this.notes.splice(deleteIndex, 1) ); } ngOnInit() { } } |
The first important thing about this code is that it’s injecting the NotesService in the constructor of the component since it is when the component is initiated that it will retrieve all the notes from the API and store them in the notes array. The function createUpdateNote() is the engine to decide whether to call the POST or PUT in the API. It’ll be called from the HTML page, specifically from the subcomponent tags. If the note id is passed in as an argument is into the current list of notes, it means it is an update. Otherwise, register a new one.
Note that it’s using an underscore _ operator to perform the search in the array. This is because you’ve imported Lodash at the beginning of the file. Lodash makes JavaScript easier by taking the hassle out of working with arrays, numbers, objects, strings, etc.
The rest of the functions will take care of placing the current note object to the currentNote variable or removing it from the notes array. Here is the content of the app.component.html file:
|
1 2 3 4 5 6 7 8 9 10 11 12 13 14 |
<section class="jumbotron"> <div class="container"> <div class="row"> <div class="col-md-12"> <app-add-update-notes (noteCreated)="createUpdateNote($event)" [note]="currentNote"></app-add-update-notes> </div> </div> <div class="row"> <div class="col-md-12"> <app-notes-listing [notes]="notes" (editClicked)="editNote($event)" (newClicked)="newNote()" (recordDeleted)="deleteNote($event)"></app-notes-listing> </div> </div> </div> </section> |
Here, the code is invoking the two components created for add/update and listing of the notes. Note that they must have the exact same name as the ones put into the selector attribute of the @Component annotation. Pay attention, as well, to the bindings made from each subcomponent’s functions to this component’s functions.
The reader may have noticed that a lot of CSS classes common to Bootstrap are used. This is because you’re composing the views using it, and now you need to install its npm package via the following command:
|
1 |
npm install bootstrap –save |
Then, go to the styles.css file and add the following content:
|
1 |
@import '~bootstrap/dist/css/bootstrap.min.css'; |
This will provide the style of Bootstrap to the HTML. That’s it.
In order to run the application, start your ASP.NET application and go to the command line and run:
|
1 |
ng serve |
Then, access the URL http://localhost:4200 and test your application.
Conclusion
You can access the source code for this project here. There’s a lot more to explore on Angular, and the official docs can help you. No matter what subject, ASP.NET will follow the path and give excellent solutions for API calls and more.
Take your time to explore it and make your own changes. Add more fields, validations, and interactions to the screen. Have fun!

Load comments