Being able to verify that a piece of data originates from a trusted source (authenticity) and that it has not been altered in transit (integrity) is a common requirement in many use cases. It is needed for instance when distributing software packages and installers and when delivering firmware to an embedded device. Digital signatures allow the recipient to verify both authenticity and integrity of the received document. This blog post describes how to use digital signatures with OpenSSL in practice. First part describes what is a digital signature and then the second part shows how to use OpenSSL sign and verify functions to work with signatures.
What is a digital signature?
To understand what makes a digital signature, the two requirements, integrity and authenticity, should be first examined separately. Common method to verify integrity is to use a hash function. A hash function takes an arbitrary length data and produce a fixed sized digest for it. For instance, SHA256 hash function always produces 256-bit output. Hash functions are also designed so that even a minute change in the input produces very different digest output. Also, it is very hard to find two inputs that produce the same digest (collision resistance).
To verify integrity in practice using a hash function, the sender first calculates the digest for the message or document. The digest is then sent alongside the message to the recipient. When the message is received, the recipient calculates the digest from the received data and verifies that it matches with the one calculated by the sender. If the digests differ, the data has changed in transit. It is quite common to find hash values for download files on websites (e.g. Linux distributions or software installers) which allow the user to verify the file before installing. For instance, SHA256 hashes for recent Ubuntu images are shown below:
ubuntu-18.04.2-desktop-amd64.iso
22580b9f3b186cc66818e60f44c46f795d708a1ad86b9225c458413b638459c4

ubuntu-18.04.2-live-server-amd64.iso
ea6ccb5b57813908c006f42f7ac8eaa4fc603883a2d07876cf9ed74610ba2f53
However, if the digest is sent with the data, it is possible that a malicious actor intercepts the message and modifies it (man-in-the middle). Since calculating the digest does not require any secret, it is possible to alter the data and update the digest before sending it to the recipient. Anyone who has the data is able to calculate a valid hash for it which means that a hash function alone cannot be used to verify the authenticity of the data.
To authenticate the source of the data, a secret that is only known by the sender needs to be used. Often this secret information is a private key. When a hash function and asymmetric cryptography (public-private key) are combined, digital signatures can be created.
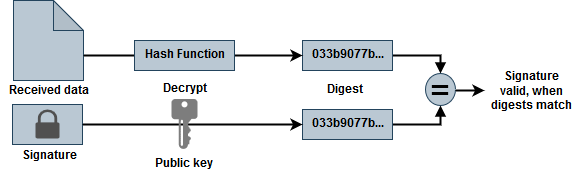
Simply put, a digital signature is a hash value (digest) from the original data that is encrypted using a private key. To verify a signature, the recipient first decrypts the signature using a public key that matches with the senders private key. This produces a digest. Then the recipient calculates a digest from the received data and verifies that it matches with the one in the signature. If the digest match, the signature is valid.
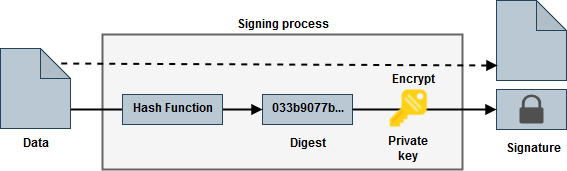
Any change in the data will invalidate the signature. Also, it is computationally infeasible to produce a valid signature for the modified data without knowing the private key when sufficiently large key size and proper hash functions are used. Therefore, when the signature is valid, the recipient can be sure that the message originated from a trusted source and it is unchanged.
It is important to note that digital signature does not encrypt the original data. It just provides a scheme to verify it. Another important thing to note is that encryption alone does not provide authentication. Encryption hides the plain data, but it may still be possible to change the encrypted message to control the output that is produced when the recipient decrypts it.
Implementation
To work with digital signatures, private and public key are needed. 4096-bit RSA key can be generated with OpenSSL using the following commands.
# Generate 4096-bit RSA private key and extract public key
openssl genrsa -out key.pem 4096
openssl rsa -in key.pem -pubout > key.pub
The private key is in key.pem file and public key in key.pub file. The sender uses the private key to digitally sign documents, and the public key is distributed to recipients.
Sign and verify from command line
To sign a data file (data.zip in the example), OpenSSL digest (dgst) command is used. More information about the command can be found from its man page.
openssl dgst -sign key.pem -keyform PEM -sha256 -out data.zip.sign -binary data.zipThe -sign argument tells OpeSSL to sign the calculated digest using the provided private key. The hash function is selected with -sha256 argument. Other hash functions can be used in its place (e.g. sha1 or sha512). The output is written to data.zip.sign file in binary format.
The digital signature can also be verified using the same openssl dgst command. Obviously this step is performed on the receivers end.
openssl dgst -verify key.pub -keyform PEM -sha256 -signature data.zip.sign -binary data.zipThe -verify argument tells OpenSSL to verify signature using the provided public key. The signature file is provided using -signature argument.
When the signature is valid, OpenSSL prints “Verified OK”.
It is also possible to calculate the digest and signature separately. This can be useful if the signature is calculated on a different machine where the data file is generated (e.g. to manage private keys securely). This way the whole data file does not need to be moved to the signing machine.
# Calculate digest and write to 'hash' file
openssl dgst -binary -sha256 data.zip > hash

# Calculate signature from hash
openssl pkeyutl -sign -in hash -inkey key.pem -pkeyopt digest:sha256 -keyform PEM -out data.zip.sign
The pkeyutl command does not know which hashing algorithm was used because it only gets the generated digest as input. Therefore -pkeyopt argument is used to tell which algorithm was used, so it can be properly marked in the signature for verify operation. Otherwise the arguments should be fairly self-explanatory. More information from the man page.
Verify with C
If the OpenSSL command line utilities are not available for instance in an embedded environment, the signature can also be verified quite easily using C and libssl library. First, the OpenSSL headers should be installed:
sudo apt install libssl-devThe following listing shows an implementation for a command line application that takes data file, signature file and public key as arguments, and verifies the signature. Note that all error handling has been omitted (e.g. files not available) to simplify the example.
#include <stdio.h>
#include <stdlib.h>
#include <openssl/pem.h>
#include <openssl/rsa.h>
#include <openssl/sha.h>

// Buffer for file read operations. The buffer must be able to accomodate
// the RSA signature in whole (e.g. 4096-bit RSA key produces 512 byte signature)
#define BUFFER_SIZE 512
static unsigned char buffer[BUFFER_SIZE];

int main(int argc, char *argv[])
{
    if(argc != 4)
    {
        fprintf(stderr, "Usage: %s datafile signature_file public_key\n", argv[0]);
        return -1;
    }
    const char* filename = argv[1];
    const char* sigfile = argv[2];
    const char* pubkeyfile = argv[3];

    unsigned bytes = 0;

    // Calculate SHA256 digest for datafile
    FILE* datafile = fopen(filename , "rb");

    // Buffer to hold the calculated digest
    unsigned char digest[SHA256_DIGEST_LENGTH];
    SHA256_CTX ctx;
    SHA256_Init(&ctx);

    // Read data in chunks and feed it to OpenSSL SHA256
    while((bytes = fread(buffer, 1, BUFFER_SIZE, datafile)))
    {
        SHA256_Update(&ctx, buffer, bytes);
    }

    SHA256_Final(digest, &ctx);
    fclose(datafile);

    // Read signature from file
    FILE* sign = fopen (sigfile , "r");

    bytes = fread(buffer, 1, BUFFER_SIZE, sign);
    fclose(sign);

    // Verify that calculated digest and signature match
    FILE* pubkey = fopen(pubkeyfile, "r");

    // Read public key from file
    RSA* rsa_pubkey = PEM_read_RSA_PUBKEY(pubkey, NULL, NULL, NULL);

    // Decrypt signature (in buffer) and verify it matches
    // with the digest calculated from data file.
    int result = RSA_verify(NID_sha256, digest, SHA256_DIGEST_LENGTH,
                            buffer, bytes, rsa_pubkey);
    RSA_free(rsa_pubkey);
    fclose(pubkey);

    if(result == 1)
    {
        printf("Signature is valid\n");
        return 0;
    }
    else
    {
        printf("Signature is invalid\n");
        return 1;
    }
}
The application needs to be linked with crypto library which provides the necessary interfaces.
gcc main.c -lcryptoThe application first calculates SHA256 digest from the data file. Then, both the signature and public key are read from files. Finally RSA_verify function is used to decrypt the signature and compare it with the SHA256 digest calculated earlier.
Conclusions
Digital signatures provide a strong cryptographic scheme to validate integrity and authenticity of data and are therefore useful in various use cases. OpenSSL provides easy command line utilities to both sign and verify documents. Additionally the libcrypto can be used to perform these operations from a C application. Special care should be taken when handling the private keys especially in a production environment because the whole scheme relies on the senders private key being kept secret.
