
A comprehensive step by step tutorial on creating offline Android/iOS Mobile App using React Native and SQLite. Sometimes we need to build or create Mobile Apps that work without an internet connection or offline. In this tutorial, we will play with data without accessing an API or Web Services. For that, we choose SQLite as a local Database.
Shortcut to the steps:
- Install React App Creator and Create App
- Add Navigation Header and required Screen
- Install and Configure React Native SQLite Storage
- Show List of Product
- Show Product Details and Delete Product
- Add Product
- Edit Product
- Run and Test React Native and SQLite Offline Mobile App
Just like the standard SQL, SQLite contains the schema of tables with their fields. All data that save to the SQLite Database tables save as Application data that take space of internal memory. It will grow as many as data or record saved to the SQLite Database.
The following tools, frameworks, and modules are required for this tutorial:
- React Native
- Node.js (NPM or Yarn)
- React Native SQLite Storage Module
- Android Studio or SDK for Android
- XCode for iOS
- Terminal (OSX/Linux) or Command Line (Windows)
- Text Editor or IDE (We are using Atom)
Before start to the main steps, make sure that you have installed Node.js and can run `npm` in the terminal or command line. To check the existing or installed Node.js environment open the terminal/command line then type this command.
node -v
v10.15.1
npm -v
6.8.0
yarn -v
1.10.1
Install React App Creator and Create App
The Create React Native App is a tool for creating a React Native App. Right now, we will install the react-native-cli first. To install it, type this command in your App projects folder.
sudo npm install -g react-native-cliThen create a React Native App using this command.
react-native init reactOfflineThat command will create a React Native app then install all required modules. The app or project folder will contain these folders and files.

Next, go to the newly created React App folder.
cd reactSqliteTo run on iOS device or simulator run this command.
react-native run-iosThe simulator will open along with the new terminal window. Go to the project folder from the new terminal window then run this command.
react-native startRight after iOS build success and React Native started, you will see this view in the iOS Simulator.

To run on Android device or simulator, make sure ADB detected the device.
adb devices
List of devices attached
J8AXGF0194047T6    device
Next, type this command to run on the Android device or simulator.
react-native run-androidIt will open the new terminal windows. Just go to the project folder then type this command.
react-native startYou will see this app in your Android device.

Sometimes, if running React Native app faster than starting React-Native Javascript bundler you see this red-screen of error.
No bundle URL present.Make sure you're running a packager server or have included a .jsbundle file in your application bundle.
RCTFatal
__28-[RCTCxxBridge handleError:]_block_invoke
_dispatch_call_block_and_release
_dispatch_client_callout
_dispatch_main_queue_callback_4CF
__CFRUNLOOP_IS_SERVICING_THE_MAIN_DISPATCH_QUEUE__
__CFRunLoopRun
CFRunLoopRunSpecific
GSEventRunModal
UIApplicationMain
main
start
0x0
Don't worry, just starts the Metro Bundler in the newly opened terminal window after you go to the project folder. After Metro Bundler started completely, refresh the React Native app on your device or simulator. In iOS Simulator you will see this error after the refresh.
Attempting to reload bridge before it's valid: <RCTCxxBridge: 0x7ff34bc00510>. Try restarting the development server if connected.

-[RCTCxxBridge reload]
    RCTCxxBridge.mm:986
-[RCTRedBox reloadFromRedBoxWindow:]
-[RCTRedBoxWindow reload]
-[UIApplication sendAction:to:from:forEvent:]
-[UIControl sendAction:to:forEvent:]
-[UIControl _sendActionsForEvents:withEvent:]
-[UIControl touchesEnded:withEvent:]
-[UIWindow _sendTouchesForEvent:]
-[UIWindow sendEvent:]
-[UIApplication sendEvent:]
__dispatchPreprocessedEventFromEventQueue
__handleEventQueueInternal
__handleEventQueueInternal
__CFRUNLOOP_IS_CALLING_OUT_TO_A_SOURCE0_PERFORM_FUNCTION__
__CFRunLoopDoSources0
__CFRunLoopRun
CFRunLoopRunSpecific
GSEventRunModal
UIApplicationMain
main
start
0x0
Just reload again the React Native app, you will get your React Native app running.
Add Navigation Header and required Screen
Above generated React Native App just show blank app with plain text. Now, we will show you how to add the Navigation Header (react-navigation and react-native-gesture-handler) and Home Screen for your app. So, it will look like the Native App. In the terminal or command line, type this command to install React Navigation module and don't forget to stop the running Metro Bundler before installing the modules.
yarn add react-navigation --save
yarn add react-native-gesture-handler --save
react-native link react-native-gesture-handler
Next, create a folder for components and components files in the root of the app folder.
mkdir components
touch components/ProductScreen.js
touch components/ProductDetailsScreen.js
touch components/ProductAddScreen.js
touch components/ProductEditScreen.js
Open and edit `components/ProductScreen.js` then add this React codes.
import React, { Component } from 'react';
import { Button, View, Text } from 'react-native';

export default class ProductScreen extends Component {
  static navigationOptions = {
    title: 'Product List',
  };
  render() {
    return (
      <View style={{ flex: 1, alignItems: 'center', justifyContent: 'center' }}>
        <Text>Product List</Text>
        <Button
          title="Go to Details"
          onPress={() => this.props.navigation.navigate('ProductDetails')}
        />
        <Button
          title="Go to Add Product"
          onPress={() => this.props.navigation.navigate('AddProduct')}
        />
        <Button
          title="Go to Edit Product"
          onPress={() => this.props.navigation.navigate('EditProduct')}
        />
      </View>
    );
  }
}
Open and edit `components/ProductDetailsScreen.js` then add this React codes.
import React, { Component } from 'react';
import { Button, View, Text } from 'react-native';

export default class ProductDetailsScreen extends Component {
  static navigationOptions = {
    title: 'Product Details',
  };
  render() {
    return (
      <View style={{ flex: 1, alignItems: 'center', justifyContent: 'center' }}>
        <Text>Product Details</Text>
        <Button
          title="Go to Details... again"
          onPress={() => this.props.navigation.push('ProductDetails')}
        />
        <Button
          title="Go to Home"
          onPress={() => this.props.navigation.navigate('Product')}
        />
        <Button
          title="Go back"
          onPress={() => this.props.navigation.goBack()}
        />
      </View>
    );
  }
}
Open and edit `components/ProductAddScreen.js` then add this React codes.
import React, { Component } from 'react';
import { Button, View, Text } from 'react-native';

export default class ProductAddScreen extends Component {
  static navigationOptions = {
    title: 'Add Product',
  };
  render() {
    return (
      <View style={{ flex: 1, alignItems: 'center', justifyContent: 'center' }}>
        <Text>Add Product</Text>
        <Button
          title="Go to Add Product... again"
          onPress={() => this.props.navigation.push('AddProduct')}
        />
        <Button
          title="Go to Home"
          onPress={() => this.props.navigation.navigate('Product')}
        />
        <Button
          title="Go back"
          onPress={() => this.props.navigation.goBack()}
        />
      </View>
    );
  }
}
Open and edit `components/ProductEditScreen.js` then add this React codes.
import React, { Component } from 'react';
import { Button, View, Text } from 'react-native';

export default class ProductEditScreen extends Component {
  static navigationOptions = {
    title: 'Edit Product',
  };
  render() {
    return (
      <View style={{ flex: 1, alignItems: 'center', justifyContent: 'center' }}>
        <Text>Add Product</Text>
        <Button
          title="Go to Edit Product... again"
          onPress={() => this.props.navigation.push('EditProduct')}
        />
        <Button
          title="Go to Home"
          onPress={() => this.props.navigation.navigate('Product')}
        />
        <Button
          title="Go back"
          onPress={() => this.props.navigation.goBack()}
        />
      </View>
    );
  }
}
Next, open and edit `App.js` then add replace all codes with this.
import React from 'react';
import { StyleSheet, Text, View } from 'react-native';
import { createAppContainer, createStackNavigator } from 'react-navigation';
import ProductScreen from './components/ProductScreen';
import ProductDetailsScreen from './components/ProductDetailsScreen';
import ProductAddScreen from './components/ProductAddScreen';
import ProductEditScreen from './components/ProductEditScreen';
const RootStack = createStackNavigator(
{
Product: ProductScreen,
ProductDetails: ProductDetailsScreen,
AddProduct: ProductAddScreen,
EditProduct: ProductEditScreen,
},
{
initialRouteName: 'Product',
navigationOptions: {
headerStyle: {
backgroundColor: '#777777',
},
headerTintColor: '#fff',
headerTitleStyle: {
fontWeight: 'bold',
},
},
},
);
const RootContainer = createAppContainer(RootStack);
export default class App extends React.Component {
render() {
return <RootContainer />;
}
}
const styles = StyleSheet.create({
container: {
flex: 1,
backgroundColor: '#fff',
alignItems: 'center',
justifyContent: 'center',
},
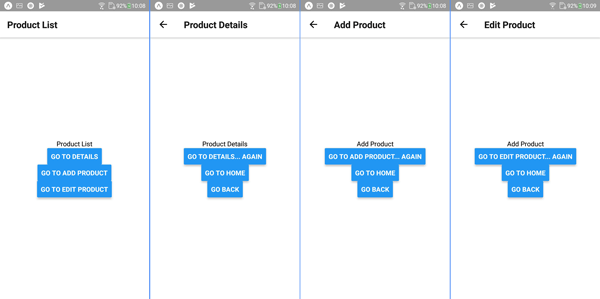
});After Re-run the React Native app on the iOS/Android Device/Simulator you will see this updated views.
Install and Configure React Native SQLite Storage
Before creating an offline CRUD application using local data, we have to install the `react-native-sqlite-storage` and required UI/UX module.
yarn add react-native-sqlite-storage --save
yarn add react-native-elements --save
react-native link
We will use separate Class for accessing SQLite and do some CRUD (create, read, update, delete) operations. For that, create a new Javascript file on the root of the project folder.
touch Database.jsOpen and edit `Database.js` then add this SQLite import with the configuration.
import SQLite from "react-native-sqlite-storage";
SQLite.DEBUG(true);
SQLite.enablePromise(true);
Add the constant variables after that.
const database_name = "Reactoffline.db";
const database_version = "1.0";
const database_displayname = "SQLite React Offline Database";
const database_size = 200000;
Give this file a class name.
export default class Database {

}
Inside the class bracket, add a function for Database initialization that creates Database, tables, etc.
initDB() {
  let db;
  return new Promise((resolve) => {
    console.log("Plugin integrity check ...");
    SQLite.echoTest()
      .then(() => {
        console.log("Integrity check passed ...");
        console.log("Opening database ...");
        SQLite.openDatabase(
          database_name,
          database_version,
          database_displayname,
          database_size
        )
          .then(DB => {
            db = DB;
            console.log("Database OPEN");
            db.executeSql('SELECT 1 FROM Product LIMIT 1').then(() => {
                console.log("Database is ready ... executing query ...");
            }).catch((error) =>{
                console.log("Received error: ", error);
                console.log("Database not yet ready ... populating data");
                db.transaction((tx) => {
                    tx.executeSql('CREATE TABLE IF NOT EXISTS Product (prodId, prodName, prodDesc, prodImage, prodPrice)');
                }).then(() => {
                    console.log("Table created successfully");
                }).catch(error => {
                    console.log(error);
                });
            });
            resolve(db);
          })
          .catch(error => {
            console.log(error);
          });
      })
      .catch(error => {
        console.log("echoTest failed - plugin not functional");
      });
    });
};
Add a function for the close Database connection.
closeDatabase(db) {
  if (db) {
    console.log("Closing DB");
    db.close()
      .then(status => {
        console.log("Database CLOSED");
      })
      .catch(error => {
        this.errorCB(error);
      });
  } else {
    console.log("Database was not OPENED");
  }
};
Add a function to get the list of products.
listProduct() {
  return new Promise((resolve) => {
    const products = [];
    this.initDB().then((db) => {
      db.transaction((tx) => {
        tx.executeSql('SELECT p.prodId, p.prodName, p.prodImage FROM Product p', []).then(([tx,results]) => {
          console.log("Query completed");
          var len = results.rows.length;
          for (let i = 0; i < len; i++) {
            let row = results.rows.item(i);
            console.log(`Prod ID: ${row.prodId}, Prod Name: ${row.prodName}`)
            const { prodId, prodName, prodImage } = row;
            products.push({
              prodId,
              prodName,
              prodImage
            });
          }
          console.log(products);
          resolve(products);
        });
      }).then((result) => {
        this.closeDatabase(db);
      }).catch((err) => {
        console.log(err);
      });
    }).catch((err) => {
      console.log(err);
    });
  });
}
Add a function to get Product by ID.
productById(id) {
  console.log(id);
  return new Promise((resolve) => {
    this.initDB().then((db) => {
      db.transaction((tx) => {
        tx.executeSql('SELECT * FROM Product WHERE prodId = ?', [id]).then(([tx,results]) => {
          console.log(results);
          if(results.rows.length > 0) {
            let row = results.rows.item(0);
            resolve(row);
          }
        });
      }).then((result) => {
        this.closeDatabase(db);
      }).catch((err) => {
        console.log(err);
      });
    }).catch((err) => {
      console.log(err);
    });
  });
}
Add a function to save a new product to the SQLite database.
addProduct(prod) {
  return new Promise((resolve) => {
    this.initDB().then((db) => {
      db.transaction((tx) => {
        tx.executeSql('INSERT INTO Product VALUES (?, ?, ?, ?, ?)', [prod.prodId, prod.prodName, prod.prodDesc, prod.prodImage, prod.prodPrice]).then(([tx, results]) => {
          resolve(results);
        });
      }).then((result) => {
        this.closeDatabase(db);
      }).catch((err) => {
        console.log(err);
      });
    }).catch((err) => {
      console.log(err);
    });
  });
}
Add a function to update a product.
updateProduct(id, prod) {
  return new Promise((resolve) => {
    this.initDB().then((db) => {
      db.transaction((tx) => {
        tx.executeSql('UPDATE Product SET prodName = ?, prodDesc = ?, prodImage = ?, prodPrice = ? WHERE prodId = ?', [prod.prodName, prod.prodDesc, prod.prodImage, prod.prodPrice, id]).then(([tx, results]) => {
          resolve(results);
        });
      }).then((result) => {
        this.closeDatabase(db);
      }).catch((err) => {
        console.log(err);
      });
    }).catch((err) => {
      console.log(err);
    });
  });
}
Add a function to delete a product.
deleteProduct(id) {
  return new Promise((resolve) => {
    this.initDB().then((db) => {
      db.transaction((tx) => {
        tx.executeSql('DELETE FROM Product WHERE prodId = ?', [id]).then(([tx, results]) => {
          console.log(results);
          resolve(results);
        });
      }).then((result) => {
        this.closeDatabase(db);
      }).catch((err) => {
        console.log(err);
      });
    }).catch((err) => {
      console.log(err);
    });
  });
}
Show List of Product
To show or display the list of product, open and edit `components/ProductScreen.js` then replace all imports with these imports of StyleSheet, FlatList, ActivityIndicator, View, Text (react-native), ListItem, Button (react-native-elements), and Database (SQLite).
import React, { Component } from 'react';
import { StyleSheet, FlatList, ActivityIndicator, View, Text } from 'react-native';
import { ListItem, Button } from 'react-native-elements';
import Database from '../Database';
Instantiate the Database as a constant variable before the class name.
const db = new Database();Next, replace `navigationOptions` with these.
static navigationOptions = ({ navigation }) => {
  return {
    title: 'Product List',
    headerRight: (
      <Button
        buttonStyle={{ padding: 0, backgroundColor: 'transparent' }}
        icon={{ name: 'add-circle', style: { marginRight: 0, fontSize: 28 } }}
        onPress={() => {
          navigation.navigate('AddProduct', {
            onNavigateBack: this.handleOnNavigateBack
          });
        }}
      />
    ),
  };
};
Add a constructor function.
constructor() {
  super();
  this.state = {
    isLoading: true,
    products: [],
    notFound: 'Products not found.\nPlease click (+) button to add it.'
  };
}
Add a function to initialize the screen.
componentDidMount() {
  this._subscribe = this.props.navigation.addListener('didFocus', () => {
    this.getProducts();
  });
}
Add a function to get the product list from Database class.
getProducts() {
  let products = [];
  db.listProduct().then((data) => {
    products = data;
    this.setState({
      products,
      isLoading: false,
    });
  }).catch((err) => {
    console.log(err);
    this.setState = {
      isLoading: false
    }
  })
}
Add a variable to iterate the listed product in the view.
keyExtractor = (item, index) => index.toString()Add a function to render the List Item.
renderItem = ({ item }) => (
  <ListItem
    title={item.prodName}
    leftAvatar={{
      source: item.prodImage && { uri: item.prodImage },
      title: item.prodName[0]
    }}
    onPress={() => {
      this.props.navigation.navigate('ProductDetails', {
        prodId: `${item.prodId}`,
      });
    }}
    chevron
    bottomDivider
  />
)
Add a function to render the rest of List view.
render() {
  if(this.state.isLoading){
    return(
      <View style={styles.activity}>
        <ActivityIndicator size="large" color="#0000ff"/>
      </View>
    )
  }
  if(this.state.products.length === 0){
    return(
      <View>
        <Text style={styles.message}>{this.state.notFound}</Text>
      </View>
    )
  }
  return (
    <FlatList
      keyExtractor={this.keyExtractor}
      data={this.state.products}
      renderItem={this.renderItem}
    />
  );
}
Finally, add a stylesheet for the whole screen after the class bracket.
const styles = StyleSheet.create({
  container: {
   flex: 1,
   paddingBottom: 22
  },
  item: {
    padding: 10,
    fontSize: 18,
    height: 44,
  },
  activity: {
    position: 'absolute',
    left: 0,
    right: 0,
    top: 0,
    bottom: 0,
    alignItems: 'center',
    justifyContent: 'center'
  },
  message: {
    padding: 16,
    fontSize: 18,
    color: 'red'
  }
});
Show Product Details and Delete Product
From the list of product view, you will see that list item has an action button to show the product details. Next, open and edit `components/ProductDetailsScreen.js` then replace the imports with these imports of ScrollView, StyleSheet, Image, ActivityIndicator, View, Text (react-native), Card, Button (react-native-elements), and Database (SQLite).
import React, { Component } from 'react';
import { ScrollView, StyleSheet, Image, ActivityIndicator, View, Text } from 'react-native';
import { Card, Button } from 'react-native-elements';
import Database from '../Database';
Instantiate the Database as a constant variable.
const db = new Database();Add a function as the constructor.
constructor() {
  super();
  this.state = {
    isLoading: true,
    product: {},
    id: '',
  };
}
Add a function to initialize the screen.
componentDidMount() {
  this._subscribe = this.props.navigation.addListener('didFocus', () => {
    const { navigation } = this.props;
    db.productById(navigation.getParam('prodId')).then((data) => {
      console.log(data);
      product = data;
      this.setState({
        product,
        isLoading: false,
        id: product.prodId
      });
    }).catch((err) => {
      console.log(err);
      this.setState = {
        isLoading: false
      }
    })
  });
}
Add a function to delete a product data.
deleteProduct(id) {
  const { navigation } = this.props;
  this.setState({
    isLoading: true
  });
  db.deleteProduct(id).then((result) => {
    console.log(result);
    this.props.navigation.goBack();
  }).catch((err) => {
    console.log(err);
    this.setState = {
      isLoading: false
    }
  })
}
Add a function to render the whole Product Details view.
render() {
  if(this.state.isLoading){
    return(
      <View style={styles.activity}>
        <ActivityIndicator size="large" color="#0000ff" />
      </View>
    )
  }
  return (
    <ScrollView>
      <Card style={styles.container}>
        <View style={styles.subContainer}>
          <View>
            <Image
              style={{width: 150, height: 150}}
              source={{uri: this.state.product.prodImage}}
            />
          </View>
          <View>
            <Text style={{fontSize: 16}}>Product ID: {this.state.product.prodId}</Text>
          </View>
          <View>
            <Text style={{fontSize: 16}}>Product Name: {this.state.product.prodName}</Text>
          </View>
          <View>
            <Text style={{fontSize: 16}}>Product Desc: {this.state.product.prodDesc}</Text>
          </View>
          <View>
            <Text style={{fontSize: 16}}>Product Price: {this.state.product.prodPrice}</Text>
          </View>
        </View>
        <View style={styles.detailButton}>
          <Button
            large
            backgroundColor={'#CCCCCC'}
            leftIcon={{name: 'edit'}}
            title='Edit'
            onPress={() => {
              this.props.navigation.navigate('EditProduct', {
                prodId: `${this.state.id}`,
              });
            }} />
        </View>
        <View style={styles.detailButton}>
          <Button
            large
            backgroundColor={'#999999'}
            color={'#FFFFFF'}
            leftIcon={{name: 'delete'}}
            title='Delete'
            onPress={() => this.deleteProduct(this.state.id)} />
        </View>
      </Card>
    </ScrollView>
  );
}
Finally, add the stylesheet for this screen after the class bracket.
const styles = StyleSheet.create({
  container: {
    flex: 1,
    padding: 20
  },
  subContainer: {
    flex: 1,
    paddingBottom: 20,
    borderBottomWidth: 2,
    borderBottomColor: '#CCCCCC',
  },
  activity: {
    position: 'absolute',
    left: 0,
    right: 0,
    top: 0,
    bottom: 0,
    alignItems: 'center',
    justifyContent: 'center'
  },
  detailButton: {
    marginTop: 10
  }
})
Add Product
To add or save a new Product, open and edit the `components/ProductAddScreen.js` then replace all imports with these imports of StyleSheet, ScrollView, ActivityIndicator, View, TextInput (react-native), Button (react-native-elements), and Database (SQLite).
import React, { Component } from 'react';
import { StyleSheet, ScrollView, ActivityIndicator, View, TextInput } from 'react-native';
import { Button } from 'react-native-elements';
import Database from '../Database';
Instantiate the Database as a constant variable.
const db = new Database();Add a constructor inside the class bracket after the `navigationOptions`.
constructor() {
  super();
  this.state = {
    prodId: '',
    prodName: '',
    prodDesc: '',
    prodImage: '',
    prodPrice: '0',
    isLoading: false,
  };
}
Add a function to update the input text values.
updateTextInput = (text, field) => {
  const state = this.state
  state[field] = text;
  this.setState(state);
}
Add a function to save a product to the SQLite table.
saveProduct() {
  this.setState({
    isLoading: true,
  });
  let data = {
    prodId: this.state.prodId,
    prodName: this.state.prodName,
    prodDesc: this.state.prodDesc,
    prodImage: this.state.prodImage,
    prodPrice: this.state.prodPrice
  }
  db.addProduct(data).then((result) => {
    console.log(result);
    this.setState({
      isLoading: false,
    });
    this.props.navigation.state.params.onNavigateBack;
    this.props.navigation.goBack();
  }).catch((err) => {
    console.log(err);
    this.setState({
      isLoading: false,
    });
  })
}
Add a function to render the whole add product view.
render() {
  if(this.state.isLoading){
    return(
      <View style={styles.activity}>
        <ActivityIndicator size="large" color="#0000ff"/>
      </View>
    )
  }
  return (
    <ScrollView style={styles.container}>
      <View style={styles.subContainer}>
        <TextInput
            placeholder={'Product ID'}
            value={this.state.prodId}
            onChangeText={(text) => this.updateTextInput(text, 'prodId')}
        />
      </View>
      <View style={styles.subContainer}>
        <TextInput
            placeholder={'Product Name'}
            value={this.state.prodName}
            onChangeText={(text) => this.updateTextInput(text, 'prodName')}
        />
      </View>
      <View style={styles.subContainer}>
        <TextInput
            multiline={true}
            numberOfLines={4}
            placeholder={'Product Description'}
            value={this.state.prodDesc}
            onChangeText={(text) => this.updateTextInput(text, 'prodDesc')}
        />
      </View>
      <View style={styles.subContainer}>
        <TextInput
            placeholder={'Product Image'}
            value={this.state.prodImage}
            onChangeText={(text) => this.updateTextInput(text, 'prodImage')}
        />
      </View>
      <View style={styles.subContainer}>
        <TextInput
            placeholder={'Product Price'}
            value={this.state.prodPrice}
            keyboardType='numeric'
            onChangeText={(text) => this.updateTextInput(text, 'prodPrice')}
        />
      </View>
      <View style={styles.button}>
        <Button
          large
          leftIcon={{name: 'save'}}
          title='Save'
          onPress={() => this.saveProduct()} />
      </View>
    </ScrollView>
  );
}
Finally, add the style for the whole screen.
const styles = StyleSheet.create({
  container: {
    flex: 1,
    padding: 20
  },
  subContainer: {
    flex: 1,
    marginBottom: 20,
    padding: 5,
    borderBottomWidth: 2,
    borderBottomColor: '#CCCCCC',
  },
  activity: {
    position: 'absolute',
    left: 0,
    right: 0,
    top: 0,
    bottom: 0,
    alignItems: 'center',
    justifyContent: 'center'
  }
})
Edit Product
To edit a product, open and edit `components/ProductEditScreen.js` then replace all imports with these imports of StyleSheet, ScrollView, ActivityIndicator, View, TextInput (react-native), Button (react-native-elements), and Database (SQLite).
import React, { Component } from 'react';
import { StyleSheet, ScrollView, ActivityIndicator, View, TextInput } from 'react-native';
import { Button } from 'react-native-elements';
import Database from '../Database';
Instantiate the Database as a constant variable.
const db = new Database();Add the constructor after the `navigationOptions` function.
constructor() {
  super();
  this.state = {
    prodId: '',
    prodName: '',
    prodDesc: '',
    prodImage: '',
    prodPrice: '0',
    isLoading: true,
  };
}
Add a function to initialize the screen that will get product data.
componentDidMount() {
  const { navigation } = this.props;
  db.productById(navigation.getParam('prodId')).then((data) => {
    console.log(data);
    const product = data;
    this.setState({
      prodId: product.prodId,
      prodName: product.prodName,
      prodDesc: product.prodDesc,
      prodImage: product.prodImage,
      prodPrice: product.prodPrice,
      isLoading: false,
    });
  }).catch((err) => {
    console.log(err);
    this.setState = {
      isLoading: false
    }
  })
}
Add a function to update the input text value.
updateTextInput = (text, field) => {
  const state = this.state
  state[field] = text;
  this.setState(state);
}
Add a function to update the product data.
updateProduct() {
  this.setState({
    isLoading: true,
  });
  const { navigation } = this.props;
  let data = {
    prodId: this.state.prodId,
    prodName: this.state.prodName,
    prodDesc: this.state.prodDesc,
    prodImage: this.state.prodImage,
    prodPrice: this.state.prodPrice
  }
  db.updateProduct(data.prodId, data).then((result) => {
    console.log(result);
    this.setState({
      isLoading: false,
    });
    this.props.navigation.state.params.onNavigateBack;
    this.props.navigation.goBack();
  }).catch((err) => {
    console.log(err);
    this.setState({
      isLoading: false,
    });
  })
}
Add a function to render the whole Edit Product screen.
render() {
  if(this.state.isLoading){
    return(
      <View style={styles.activity}>
        <ActivityIndicator size="large" color="#0000ff"/>
      </View>
    )
  }
  return (
    <ScrollView style={styles.container}>
      <View style={styles.subContainer}>
        <TextInput
            placeholder={'Product ID'}
            value={this.state.prodId}
            onChangeText={(text) => this.updateTextInput(text, 'prodId')}
        />
      </View>
      <View style={styles.subContainer}>
        <TextInput
            placeholder={'Product Name'}
            value={this.state.prodName}
            onChangeText={(text) => this.updateTextInput(text, 'prodName')}
        />
      </View>
      <View style={styles.subContainer}>
        <TextInput
            multiline={true}
            numberOfLines={4}
            placeholder={'Product Description'}
            value={this.state.prodDesc}
            onChangeText={(text) => this.updateTextInput(text, 'prodDesc')}
        />
      </View>
      <View style={styles.subContainer}>
        <TextInput
            placeholder={'Product Image'}
            value={this.state.prodImage}
            onChangeText={(text) => this.updateTextInput(text, 'prodImage')}
        />
      </View>
      <View style={styles.subContainer}>
        <TextInput
            placeholder={'Product Price'}
            value={this.state.prodPrice}
            keyboardType='numeric'
            onChangeText={(text) => this.updateTextInput(text, 'prodPrice')}
        />
      </View>
      <View style={styles.button}>
        <Button
          large
          leftIcon={{name: 'save'}}
          title='Save'
          onPress={() => this.updateProduct()} />
      </View>
    </ScrollView>
  );
}
Finally, add the stylesheet after the class bracket.
const styles = StyleSheet.create({
  container: {
    flex: 1,
    padding: 20
  },
  subContainer: {
    flex: 1,
    marginBottom: 20,
    padding: 5,
    borderBottomWidth: 2,
    borderBottomColor: '#CCCCCC',
  },
  activity: {
    position: 'absolute',
    left: 0,
    right: 0,
    top: 0,
    bottom: 0,
    alignItems: 'center',
    justifyContent: 'center'
  }
})
Run and Test React Native and SQLite Offline Mobile App
As we show you at the first step, run the React Native and SQLite app using this command.
react-native run-android
react-native run-ios
After the new terminal window open, just go to the project folder then run this command.
react-native startNow, you will see the whole application in the Android/iOS Device.


That it's, the React Native and SQLite Offline Mobile App. You can get the full source code from our GitHub.
That just the basic. If you need more deep learning about React.js, React Native or related you can take the following cheap course:
- Master React Native Animations
- Advanced React Native Topics
- React Native
- Learning React Native Development
- React: React Native Mobile Development: 3-in-1
Thanks!