Installing Ubuntu Cloud as RDP-enabled Remote Desktop in an offline Openstack environment
In this tutorial, we’ll be deploying an RDP-enabled Linux host serving as a Remote Desktop on a limited access (no internet connectivity) environment. An additional requirement is that multiple users can share the same credentials to this host.
For that purpose, we’ll be using two mirrored instances of Ubuntu Cloud servers, one online and the other offline, so that the correct packages can be deployed on the offline server. Also, the Xfce4 desktop has been chosen due to its capability of opening multiple sessions for a single user. To the moment the tutorial was written Gnome didn’t count on this feature.
Offline installation
To allow installation in an offline system we’ll be deploying an identical system in an online VirtualBox, using the following command sequence for every package:
On the online system:
sudo apt-get install --download-only <package list>
Copy packages from online /var/cache/apt/archives to PC (using either an sftp client or VirtualBox shared folder) and from PC to offline system. Then, on both systems:
dpkg -i /var/cache/apt/archives/*.deb
Finally, clean apt archives:
apt-get clean
Download Ubuntu cloud image
Use this link. For OpenStack, we’ll use the img extension, equivalent to qcow2. For VirtualBox, we need the ova, which contains already a vmdk disk file.
Create the two Virtual Machines
In OpenStack:
Upload image to glance:
glance image-create --name "Ubuntu Cloud image" --file ubuntu-18.04-server-cloudimg-amd64.img --is-public False --container-format bare --disk-format qcow2
Create a hot template, here is an example with one fixed IP and additional disk space:
heat_template_version: 2018-04-30

description: Remote Desktop deployment

resources:

 port_vm:
    type: OS::Neutron::Port
    properties:
      network: <network name>
      fixed_ips:
         - subnet: <subnet name>
           ip_address: <ip address>

 server:
    type: OS::Nova::Server
    properties:
      name: <instance name>
      flavor: <flavor name>
      availability_zone: <zone name>
      networks:
        - port: { get_resource: port_vm }

   new_volume:
      type: OS::Cinder::Volume
      properties:
        size: <disk space in MB>

   volume_attachment:
      type: OS::Cinder::VolumeAttachment
      properties:
        volume_id: { get_resource: new_volume }
        instance_uuid: { get_resource: server }
Create the stack, the instance is automatically launched:
heat stack-create -f <FILE> -e <FILE> <STACK_NAME>
Connect to console, make sure the VM booted successfully. Restart with Ctrl-Alt Del and press Left-Shift to access the recovery mode and change root password.
In VirtualBox:
Import ova file as a new appliance. Be sure to activate a serial port, it may stay disconnected, it’s used to bypass one of the steps during cloud initialization. Also, make sure to select network bridged adapter and associate to the host network interface that has internet access.
Boot with Left-Shift pressed and gain access to GRUB recovery mode. There you can change the root password to whatever you prefer. Boot and login normally this time.
Run parted to correct the partition data:

Accept to fix GPT, then use “resizepart” to make use of the whole existing space in the disk:
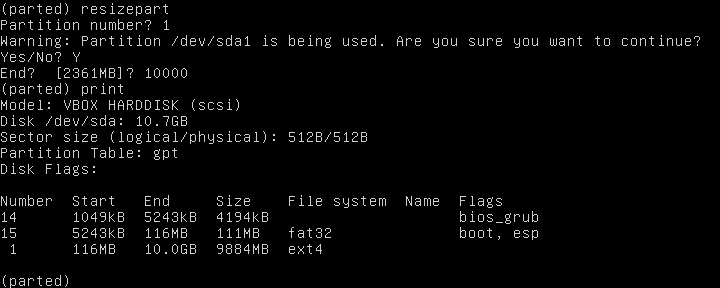
Quit parted and use resize2fs to adjust the file system:

Now df -h should display 10G available.
Check IP connectivity
Even though Openstack may provide the correct IP address via DHCP, we’ll be configuring a static one I both environments. Create a file with yaml extension in /etc/netplan, set IP address and gateway accordingly:
network:
       version: 2
       renderer: networkd
       ethernets:
               enp0s3:
                       dhcp4: no
                       addresses: [192.168.1.100/24]
                       gateway4: 192.168.1.1
                       nameservers:
                               addresses: [192.168.1.1]
Apply the new configuration:
netplan apply
Now connectivity should work from VM to the gateway and your PC to both VMs.
As soon as internet connectivity is provided in VirtualBox VM, be sure to update apt:
apt-get update
Notice that, if opting to install Gnome instead of Xfce4 desktop, you’ll need to replace networkd for NetworkManager as soon as you finish this installation.
Configure SSH
We’ll be enabling root ssh access. Edit the default /etc/ssh/sshd_config:
- Enable all 3 HostKeys
- Set PermitRootLogin to yes
- Disable HostBasedAuthentication
- Enable clear-text password (PasswordAuthentication yes, PermitEmptyPasswords no)
Also check /etc/ssh for the presence of hostkey files, in VirtualBox they are usually missing. Generate new ones using ssh-keygen:
ssh-keygen -f /etc/ssh/ssh_host_rsa_key -t rsa -N ""
ssh-keygen -f /etc/ssh/ssh_host_ecdsa_key -t ecdsa -N ""
ssh-keygen -f /etc/ssh/ssh_host_ed25519_key -t ed25519 -N ""
Restart the service:
service sshd restart
Now you must be able to ssh to new VMs. If preferred, you may generate a private/public keypair to replace the clear-text password.
Install Xfce4
These are the steps to install xfce4 desktop in Ubuntu.
In VirtualBox:
apt-get update
apt-get install --download-only xfce4 xfce4-terminal gnome-icon-theme-full tango-icon-theme
dpkg -i /var/cache/apt/archives/*.deb
Then copy deb packages from /var/cache/apt/archives to Openstack VM. Don’t forget to clean /var/cache/apt/archives.
In Openstack:
dpkg -i /var/cache/apt/archives/*.deb
apt-get clean
Following that, for the two VMs add new user ubuntu and add it to sudo group:
adduser ubuntu
usermod -aG sudo ubuntu
Just click ENTER for all questions and that’s it. The home directory is automatically added.
Install XRDP
Change user to ubuntu so that XRDP performs the required configuration in /home/ubuntu.
In VirtualBox:
sudo apt-get install --download-only xrdp
sudo dpkg -i /var/cache/apt/archives/*.deb
Copy deb packages from /var/cache/apt/archives to Openstack VM. Clean /var/cache/apt/archives.
In Openstack:
sudo dpkg -i /var/cache/apt/archives/*.deb
sudo apt-get clean
Configure XRDP on both:
Edit /etc/xrdp/sesman.ini and set Policy=UBDC. This enables multiple sessions with same username.
Edit /etc/xrdp/startwm.sh, adding startxfce4 to the end:
#!/bin/sh

if [ -r /etc/default/locale ]; then
. /etc/default/locale
export LANG LANGUAGE
fi

unset SESSION_MANAGER
unset DBUS_SESSION_BUS_ADDRESS
startxfce4
Restart XRDP service:
sudo service xrdp restart
Install web browsers
Web browsers need to be added to Xfce4. Search for Google Chrome deb on the internet and install it using dpkg.
You can get Firefox directly from Ubuntu repositories.
In VirtualBox:
sudo apt-get install --download-only firefox
sudo dpkg -i /var/cache/apt/archives/*.deb
Copy deb packages from /var/cache/apt/archives to Openstack VM. Clean /var/cache/apt/archives.
In Openstack:
sudo dpkg -i /var/cache/apt/archives/*.deb
sudo apt-get clean
Add shortcuts for each browser in task bar and/or desktop.
And that’s it. Open multiple RDP sessions to the server and check that everything is working.
Cheers!

